background image

Internal


LEDs,


connectors,


and


jumpers


The


following


illustrations


show


the


connectors,


LEDs,


and


jumpers


on


the


internal


boards.


The


illustrations


might


differ


slightly


from


your


hardware.


I/O


board


internal


connectors


and


jumpers


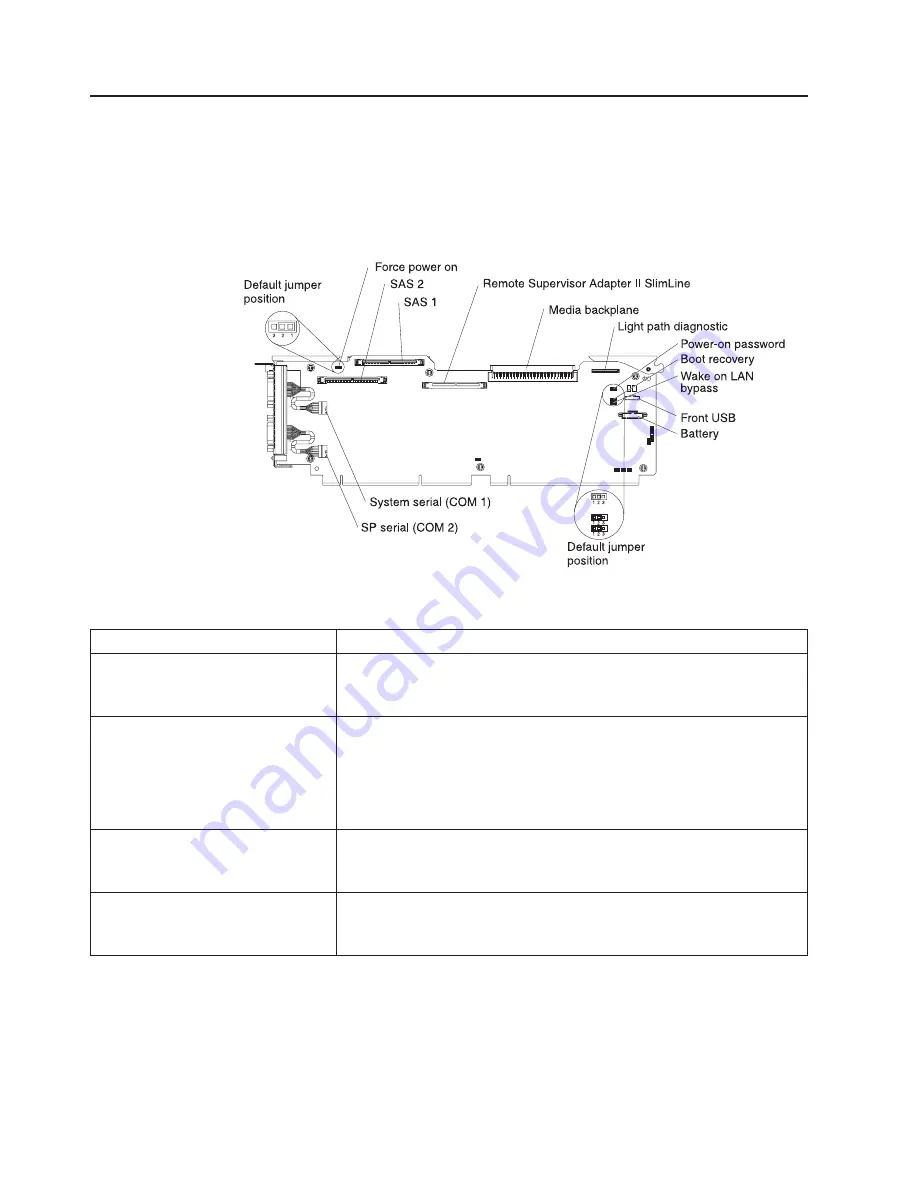
The


following


illustration


shows


the


internal


connectors


and


jumpers


on


the


I/O


board.


The


following


table


describes


the


function


of


each


three-pin


jumper


block.


Table


2.


I/O


board


jumper


blocks


Jumper


name


Description


Force


power


on


(J2)


The


default


position


is


pins


1


and


2.


Change


the


position


of


this


jumper


to


pins


2


and


3


to


force


the


server


to


start


up


when


you


connect


the


server


to


ac


power.


Power-on


password


(J9)


The


default


position


is


pins


1


and


2.


Change


the


position


of


this


jumper


to


pins


2


and


3


to


bypass


the


power-on


password


check.


Changing


the


position


of


this


jumper


does


not


affect


the


administrator


password


check


if


an


administrator


password


is


set.


If


the


administrator


password


is


lost,


the


I/O


board


must


be


replaced.


Boot


recovery


(J14)


The


default


position


is


pins


1


and


2


(use


the


primary


page


during


startup).


Move


the


jumper


to


pins


2


and


3


to


use


the


secondary


page


during


startup.


Wake


on


LAN

®


bypass


(J15)


The


default


position


is


pins


1


and


2.


Move


the


jumper


to


pins


2


and


3


to


prevent


a


Wake


on


LAN


packet


from


waking


the


system


when


the


system


is


in


the


powered-off


state.


8


IBM


System


x3800


Type


8865:


Problem


Determination


and


Service


Guide

Summary of Contents for x3800 - System - 8865

Page 1: ...IBM System x3800 Type 8865 Problem Determination and Service Guide...

Page 2: ......

Page 3: ...IBM System x3800 Type 8865 Problem Determination and Service Guide...

Page 4: ...al information in Appendix B Notices on page 169 Ninth Edition October 2006 Copyright International Business Machines Corporation 2006 All rights reserved US Government Users Restricted Rights Use dup...

Page 5: ...s 13 Diagnostic tools 13 POST 13 POST beep codes 14 Error logs 18 POST error codes 20 POST and SMI error messages 34 Checkout procedure 46 About the checkout procedure 46 Performing the checkout proce...

Page 6: ...ing the top cover bezel and front cover 121 Removing the adapter 121 Replacing the adapter 122 Removing the hot swap fan 123 Replacing the hot swap fan 124 Removing the hot swap hard disk drive 124 Re...

Page 7: ...Setup Utility program 158 Installing and using the baseboard management controller utility programs 163 Using the SAS SATA Configuration Utility program 164 Configuring the Ethernet controller 164 Usi...

Page 8: ...vi IBM System x3800 Type 8865 Problem Determination and Service Guide...

Page 9: ...tuotteen lue turvaohjeet kohdasta Safety Information Avant d installer ce produit lisez les consignes de s curit Vor der Installation dieses Produkts die Sicherheitshinweise lesen Prima di installare...

Page 10: ...exterior cover is not damaged loose or broken and observe any sharp edges 3 Check the power cord v Make sure that the third wire ground connector is in good condition Use a meter to measure third wire...

Page 11: ...n the off position v Never assume that power has been disconnected from a circuit Check it to make sure that it has been disconnected v If you have to work on equipment that has exposed electrical cir...

Page 12: ...formation document For example if a caution statement begins with a number 1 translations for that caution statement appear in the Safety Information document under statement 1 Be sure to read all cau...

Page 13: ...quipment when there is evidence of fire water or structural damage v Disconnect the attached power cords telecommunications systems networks and modems before you open the device covers unless instruc...

Page 14: ...CAUTION When laser products such as CD ROMs DVD drives fiber optic devices or transmitters are installed note the following v Do not remove the covers Removing the covers of the laser product could re...

Page 15: ...ower control button on the device and the power switch on the power supply do not turn off the electrical current supplied to the device The device also might have more than one power cord To remove a...

Page 16: ...levels are present inside any component that has this label attached There are no serviceable parts inside these components If you suspect a problem with one of these parts contact a service technicia...

Page 17: ...options v User s Guide This document is in Portable Document Format PDF on the IBM Documentation CD It provides general information about the server including information about features and how to con...

Page 18: ...ety Information document The following notices and statements are used in this document v Note These notices provide important tips guidance or advice v Important These notices provide information or...

Page 19: ...ons v Baseboard management controller v IBM EXA 32 Chipset with integrated memory and I O controller v Service processor support for Remote Supervisor Adapter II SlimLine v Light path diagnostics v Th...

Page 20: ...the operator information panel Power control button Power on LED USB connector Hard disk drive activity LED Information LED System error LED Locator LED Release latch The following controls connectors...

Page 21: ...s LED is flashing it indicates that a SAS hard disk drive is in use v Power on LED When this LED is lit and not flashing it indicates that the server is turned on When this LED is flashing it indicate...

Page 22: ...r supply connector Connect the power cord to this connector Video connector Connect a monitor to this connector USB 1 connector Connect a USB device to this connector SP Ethernet 10 100 connector Use...

Page 23: ...flashes it indicates that there is activity between the server and the network Gigabit Ethernet 2 connector Use this connector to connect the server to a network Gigabit Ethernet 2 link LED This LED i...

Page 24: ...nnect the server to ac power Power on password J9 The default position is pins 1 and 2 Change the position of this jumper to pins 2 and 3 to bypass the power on password check Changing the position of...

Page 25: ...d LEDs The following illustration shows the LEDs on the memory card DIMM 1 error LED DIMM 2 error LED DIMM 3 error LED DIMM 4 error LED Light path diagnostics button Light path diagnostics button powe...

Page 26: ...cessor 1 socket Microprocessor 2 socket Fan 4 Fan 8 Fan 3 Fan 7 Fan 6 Fan 2 Fan 5 Fan 1 Memory card 1 Memory card 2 Memory card 3 Memory card 4 Light path diagnostics button 1 1 2 2 4 4 3 3 PCI X boar...

Page 27: ...rd PCI attention LEDs PCI power LEDs Power good LED SAS backplane connectors The following illustration shows the connectors on the SAS backplane Front of SAS backplane Back of SAS backplane SAS hard...

Page 28: ...12 IBM System x3800 Type 8865 Problem Determination and Service Guide...

Page 29: ...gnostic programs messages and error messages The diagnostic programs are the primary method of testing the major components of the server The diagnostic programs are in read only memory on the server...

Page 30: ...h they are listed in the Action column until the problem is solved v See Chapter 3 Parts listing System x3800 Type 8865 on page 107 to determine which components are customer replaceable units CRU and...

Page 31: ...he server each time 2 1 1 Secondary DMA register failed 1 Reseat the I O board 2 Replace the I O board 2 1 2 Primary DMA register failed 1 Reseat the I O board 2 Replace the I O board 2 1 3 Primary in...

Page 32: ...Trained service technician only Microprocessor tray d I O board 3 3 3 No operational memory in system 1 Make sure that all memory cards contain the correct number of DIMMs install or reseat DIMMS then...

Page 33: ...service technician only Microprocessor b Trained service technician only Optional microprocessor c Trained service technician only Microprocessor tray Repeating short beeps Keyboard error 1 Reseat th...

Page 34: ...nts are customer replaceable units CRU and which components are field replaceable units FRU v If an action step is preceded by Trained service technician only that step must be performed only by a tra...

Page 35: ...keys or the Page Up and Page Down keys To move from one entry to the next select Get Next Entry or Get Previous Entry The log indicates an assertion event when an event has occurred It indicates a dea...

Page 36: ...ed devices then turn on the server 3 When the prompt F2 for Diagnostics appears press F2 If you have set both a power on password and an administrator password you must type the administrator password...

Page 37: ...y b I O board 2 Replace the components listed in step 1 one at a time in the order shown restarting the server each time 161 Real time clock battery error 1 Reseat the following components a Battery b...

Page 38: ...Setup Utility program select Load Default Settings and save the settings 2 Reseat the following components a Battery b I O board 3 Remove the battery for 60 minutes then reinstall the battery and res...

Page 39: ...e DIMM 4 Replace the DIMM 301 Keyboard or keyboard controller error 1 If you have installed a USB keyboard run the Configuration Setup Utility program and enable keyboardless operation to prevent the...

Page 40: ...tray b I O board c Adapter 5 Trained service technician only Replace the microprocessor tray 1602 Systems management adapter communication error 1 Make sure that the Remote Supervisor Adapter II Slim...

Page 41: ...gram and adjust the adapter settings 2 Remove each adapter one at a time restarting the server each time until the problem is isolated 1962 A drive does not contain a valid boot sector 1 Make sure tha...

Page 42: ...ollowing components one at a time in the order shown restarting the server each time a Trained service technician only Microprocessor b Trained service technician only Microprocessor tray 00019501 Pro...

Page 43: ...n restarting the server each time a VRM 3 b Trained service technician only Microprocessor 3 c Trained service technician only Microprocessor tray 00019504 Processor 4 is not functioning check VRM and...

Page 44: ...me a Trained service technician only Microprocessor 2 b Trained service technician only Microprocessor tray 00019703 Processor 3 failed BIST 1 Reseat the following components a Trained service technic...

Page 45: ...comes with the adapter 00180200 No more I O space is available for a PCI adapter 1 If the error code indicates a particular PCI or PCI X slot or device remove that device 2 If the error continues rese...

Page 46: ...the order shown above restarting the server each time 00180700 00180800 General PCI error 1 Make sure that no devices have been disabled in the Configuration Setup Utility program 2 Reseat the follow...

Page 47: ...pdate data for processor 1 1 Make sure that all microprocessors have the same cache size see Configuration Setup Utility menu choices on page 159 2 Update the BIOS code again see Updating the firmware...

Page 48: ...sure that all microprocessors have the same cache size see Configuration Setup Utility menu choices on page 159 2 Update the BIOS code again see Updating the firmware on page 157 3 Trained service tec...

Page 49: ...cache size see Configuration Setup Utility menu choices on page 159 I9990301 Fixed disk sector error 1 Reseat the following components a Hard disk drive b SAS hard disk drive backplane cables c I O bo...

Page 50: ...Make sure that all microprocessors have the same part number 3 Trained service technician only Replace the microprocessor POST reporting Processor Event Unable to apply microcode patch update Chassis...

Page 51: ...is Number X Memory Card Y Memory DIMM Z 1 Reseat the DIMM 2 If the DIMM was disabled by the user run the Configuration Setup Utility program and enable the DIMM 3 Replace the DIMM 4 If the DIMM was di...

Page 52: ...than 0 complete the following steps a Reseat the adapter b Replace the adapter 2 If the slot number is 0 replace the PCI board Signaled target abort on PCI primary Chassis X Slot Y Bus Z Dev ID 0xSSSS...

Page 53: ...atus 0xUUUU DevFun 0xVV 1 If the slot number is greater than 0 complete the following steps a Reseat the adapter b Replace the adapter 2 If the slot number is 0 replace the PCI board Uncorrectable ECC...

Page 54: ...han 0 complete the following steps a Reseat the adapter b Replace the adapter 2 If the slot number is 0 replace the PCI board PCI PCI bridge secondary Slave signaled parity error Chassis X Slot Y Bus...

Page 55: ...y if the message remains 1 If the slot number is greater than 0 complete the following steps a Reseat the adapter b Replace the adapter 2 If the slot number is 0 replace the PCI board PCI PCI bridge s...

Page 56: ...the PCI board PERR Received by PCI Bridge on a PCIX split completion Chassis X Slot Y Bus Z Dev ID 0xSSSS Vend ID 0xTTTT Status 0xUUUU DevFun 0xVV 1 If the slot number is greater than 0 complete the...

Page 57: ...slot number is 0 replace the PCI board Internal error on PCIX split completion Chassis X Slot Y Bus Z Dev ID 0xSSSS Vend ID 0xTTTT Status 0xUUUU DevFun 0xVV 1 If the slot number is greater than 0 comp...

Page 58: ...mber is 0 replace the PCI board PCI Bus timeout Chassis X Slot Y Bus Z Dev ID 0xSSSS Vend ID 0xTTTT Status 0xUUUU DevFun 0xVV 1 If the slot number is greater than 0 complete the following steps a Rese...

Page 59: ...If the slot number is 0 replace the PCI board Unexpected PCIX split completion received Chassis X Slot Y Bus Z Dev ID 0xSSSS Vend ID 0xTTTT Status 0xUUUU DevFun 0xVV 1 If the slot number is greater th...

Page 60: ...the PCI board PCIX Discontiguous byte enable error Chassis X Slot Y Bus Z Dev ID 0xSSSS Vend ID 0xTTTT Status 0xUUUU DevFun 0xVV 1 If the slot number is greater than 0 complete the following steps a R...

Page 61: ...r is 0 replace the PCI board PCI Secondary Status Register Dump Chassis X Slot Y Bus Z Dev ID 0xSSSS Vend ID 0xTTTT Status 0xUUUU DevFun 0xVV 1 If the slot number is greater than 0 complete the follow...

Page 62: ...hether the failing server is part of a shared hard disk drive cluster two or more servers sharing external storage devices If it is part of a cluster you can run all diagnostic programs except the one...

Page 63: ...determined problems on page 104 v Yes Run the diagnostic programs see Running the diagnostic programs on page 71 If you receive an error see Diagnostic error codes on page 72 If the diagnostic program...

Page 64: ...nents are field replaceable units FRU v If an action step is preceded by Trained service technician only that step must be performed only by a trained service technician Symptom Action The CD or DVD d...

Page 65: ...If an action step is preceded by Trained service technician only that step must be performed only by a trained service technician Symptom Action Not all drives are recognized by the hard disk drive di...

Page 66: ...problems v Follow the suggested actions in the order in which they are listed in the Action column until the problem is solved v See Chapter 3 Parts listing System x3800 Type 8865 on page 107 to deter...

Page 67: ...ting device b I O board 4 Replace the components listed in step 3 one at a time in the order shown restarting the server each time USB keyboard mouse or pointing device problems v Follow the suggested...

Page 68: ...work 1 Make sure that v The mouse or pointing device USB cable is securely connected to the server the keyboard and mouse or pointing device cables are not reversed and the device drivers are install...

Page 69: ...e memory configuration in the Configuration Setup Utility program v All banks of memory are enabled The server might have automatically disabled a memory bank when it detected a problem or a memory ba...

Page 70: ...croprocessor 1 b Microprocessor VRM 3 or 4 c Microprocessor tray 5 Trained service technicians only If there is no indication of which microprocessor has failed isolate the error by testing with one m...

Page 71: ...the server each time The screen is blank 1 If the server is attached to a KVM switch bypass the KVM switch to eliminate it as a possible cause of the problem connect the monitor cable directly to the...

Page 72: ...monitor self tests show the monitor is working correctly consider the location of the monitor Magnetic fields around other devices such as transformers appliances fluorescent lights and other monitors...

Page 73: ...tion in the Configuration Setup Utility program Whenever memory or any other device is changed you must update the configuration 2 Reseat the device that you just installed 3 Replace the device that y...

Page 74: ...or PCI X card remove it and restart the server If the server now turns on you might have installed more devices than the power supply supports or installed a faulty device 4 Make sure that the operato...

Page 75: ...on page 104 Serial port problems v Follow the suggested actions in the order in which they are listed in the Action column until the problem is solved v See Chapter 3 Parts listing System x3800 Type...

Page 76: ...d Installation CD label for a list of supported operating system versions The operating system cannot be installed the option is not available Make sure that the server supports the operating system I...

Page 77: ...stics Light path diagnostics is a system of LEDs on various external and internal components of the server When an error occurs LEDs are lit throughout the server By viewing the LEDs in a particular o...

Page 78: ...step 2 The following illustration shows the operator information panel Power control button Power on LED USB connector Hard disk drive activity LED Information LED System error LED Locator LED Releas...

Page 79: ...croprocessor 3 VRM connector Microprocessor card error LED Microprocessor 4 socket Microprocessor 3 socket Microprocessor 3 error LED VRM 3 error LED VRM 4 error LED Microprocessor 4 error LED Micropr...

Page 80: ...chnician Lit light path diagnostics LED with the system error or system information LED also lit Description Action All LEDs off the power LED is lit No action necessary OVERSPEC There is insufficient...

Page 81: ...only Failing microprocessor b Microprocessor tray 4 Replace the following components one at a time in the order shown restarting the server each time a Trained service technician only Failing micropro...

Page 82: ...ime a DIMM b Memory card c Trained service technician only Microprocessor tray NMI A hardware error has been reported to the operating system Note The PCI or MEM LED might also be lit 1 See the BMC lo...

Page 83: ...oard RAID The RAID adapter ServeRAID 8i has indicated a fault 1 See the BMC log or the system error log see Error logs on page 18 2 Reseat the following components a RAID adapter b Hard disk drives c...

Page 84: ...s been removed Note A failing fan can also cause the TEMP LED to be lit 1 Reinstall the removed fan 2 If an individual fan LED is lit replace the fan 3 Reseat the microprocessor tray 4 Trained service...

Page 85: ...dle open 2nd power supply PS2 Fan filler Fan filler Release latch 3rd power supply PS3 DC power LED green AC power LED green 1st power supply PS1 AC DC Fan error LED The following table describes the...

Page 86: ...y Replace the power backplane 4 View the system error log see Error logs on page 18 Lit Lit Off Standby power problem 1 View the system error log see Error logs on page 18 2 Trained service technician...

Page 87: ...message or error code see the table in Diagnostic error codes on page 72 If the diagnostic programs do not detect any hardware errors but the problem remains during normal server operations a software...

Page 88: ...then select View Test Log The test log data is maintained only while you are running the diagnostic programs When you exit from the diagnostic programs the test log is cleared To save the test log to...

Page 89: ...ake the indicated action 3 Reinstall and if necessary update the BIOS code on the server then rerun the test see Updating the firmware on page 157 001 250 00x Test failed where v x of 0 ECC logic on I...

Page 90: ...tep 1 one at a time in the order shown restarting the server each time 020 xxx 001 Failed hot swap slot 1 PCI latch test 1 Trained service technician only Reseat the PCI X switch card assembly 2 Train...

Page 91: ...on page 157 3 Reseat the I O board 4 Replace the I O board 030 267 001 Central Management Seq error 1 Update the microcode for the Serial Attached SCSI SAS controller see Updating the firmware on page...

Page 92: ...SAS controller see Updating the firmware on page 157 2 Update the BIOS code see Updating the firmware on page 157 3 Reseat the I O board 4 Replace the I O board 030 273 001 FLASH access error 1 Update...

Page 93: ...he ServeRAID Hardware Maintenance Manual for more information 2 Reseat the following components a SAS hard disk drive backplane cables b ServeRAID controller 3 Replace the components listed in step 2...

Page 94: ...st error 1 Update the RAID controller firmware see Updating the firmware on page 157 2 Reseat the RAID controller 3 Replace the RAID controller 035 271 0nn Adapter XOR engine test error 1 Update the R...

Page 95: ...e attached drive 035 281 001 Adapter Drive error Replace the attached drive 035 282 001 Adapter Parameters set error 1 Update the RAID controller firmware see Updating the firmware on page 157 2 Resea...

Page 96: ...It may be busy Run the test again 1 Update the firmware BIOS service processor and diagnostics see Updating the firmware on page 157 2 Run the diagnostic test again 3 Correct other error conditions i...

Page 97: ...Adapter II SlimLine 6 Replace the Remote Supervisor Adapter II SlimLine 166 198 000 BIOS cannot detect ASM Reseat ASM adapter in correct slot ASM restart failure Unplug and cold boot server to reset A...

Page 98: ...service technician only Microprocessor tray b I O board 166 201 004 ISMP indicates I2C errors on bus M 1 Reseat the following components a I O board b Memory card c Microprocessor tray 2 Replace the f...

Page 99: ...b I O board c Microprocessor tray 2 Replace the following components one at a time in the order shown restarting the server each time a Memory card b I O board c Trained service technician only Microp...

Page 100: ...r if one is installed and run the test again 2 Reseat the following components a SAS hard disk drive backplane cables b I O board c Microprocessor tray 3 Replace the following components one at a time...

Page 101: ...y Microprocessor tray 180 xxx 005 Failed SCSI backplane LED test 1 Reseat the following components a SAS hard disk drive backplane cable b I O board c Microprocessor tray 2 Replace the following compo...

Page 102: ...n page 157 4 Trained service technician only Replace the microprocessor tray 201 198 00n Memory Test Aborted Could not run the test Note n 1 9 programming error 1 Restart the server 2 Run the diagnost...

Page 103: ...ponents one at a time in the order shown restarting the server each time a CD or DVD drive b Operator information panel assembly 217 xxx 000 Failed BIOS fixed disk test Note If RAID is configured the...

Page 104: ...e If RAID is configured the fixed disk number refers to the RAID logical array 1 Reseat hard disk drive 12 2 Replace hard disk drive 12 217 198 xxx Could not establish drive parameters 1 Check the dri...

Page 105: ...code in the server has become damaged such as from a power failure during an update The flash memory of the server consists of a primary page and a backup page If the BIOS code in the primary page is...

Page 106: ...he server System error log messages A system error log is generated only if a Remote Supervisor Adapter II SlimLine is installed The system error log can contain messages of three types Information In...

Page 107: ...ard 2 Reseat the microprocessor tray 3 Trained service technician only Replace the PCI X board 1 8V 2 HSSIB Power Good Fault 1 Reseat the I O board 2 Reseat the microprocessor tray 3 Trained service t...

Page 108: ...service technician only Replace the PCI X board 3 Trained service technician only Replace the power backplane 12V B Bus Fault 1 Reseat the following components a Disk drives b SAS hard disk drive back...

Page 109: ...ckplane 4 Trained service technician only Replace the microprocessor tray Application Posted Alert to ASM Information only Backplane Power Good Fault 1 Reseat the microprocessor tray 2 Reseat the memo...

Page 110: ...ver Temperature 1 Check all fans and remove any obstacles from the path of the airflow 2 Make sure that the room temperature is within the recommended range 3 Make sure that the microprocessor heat si...

Page 111: ...plug cable or adapter SMI 1 2V Power Good Fault 1 Reseat the memory cards 2 Reseat the microprocessor tray 3 Trained service technician only Replace the microprocessor tray Vtt MR 1 5V Power Good Fau...

Page 112: ...m with the applicable device drivers Machine check asserted 1 Reseat the memory card 2 Replace the memory card Machine check asserted SPINT North Bridge Information only Just an indication of who repo...

Page 113: ...x inserted Information only if the message remains 1 Make sure that the memory card lever is securely latched 2 Reseat the memory card Memory Card x removed Information only if the message remains 1 M...

Page 114: ...e technician only Replace the power backplane 5 Trained service technician only Replace the microprocessor tray Power Supply d Temperature Warning 1 Make sure the room temperature is within the recomm...

Page 115: ...plane 2 Replace the following components one at a time in the order shown restarting the server each time a Power supply b Trained service technician only Power backplane Power Supply X DC Good Fault...

Page 116: ...essors 3 Reseat the microprocessor VRMs if any are present 4 Trained service technician only Replace the microprocessor tray Remote Login Successful Login ID Information only Resetting system due to a...

Page 117: ...card and DIMMs 2 Replace the DIMMs 3 Replace the memory card System Running Nonredundant Power 1 Install another power supply if possible and make sure that the ac power cords are connected to properl...

Page 118: ...Usually a short circuit will cause the power subsystem to shut down because of an overcurrent condition To diagnose a power problem use the following general procedure 1 Turn off the server and discon...

Page 119: ...ctor cable or hub The Ethernet link status LED is lit when the Ethernet controller receives a link pulse from the hub If the LED is off there might be a defective connector or cable or a problem with...

Page 120: ...ged pins and ensure that the card is completely latched into place Check the LEDs on all the power supplies see Power supply LEDs on page 69 If the LEDs indicate that the power supplies are working co...

Page 121: ...codes What occurs When Where Is the failure repeatable Has the current server configuration ever worked What changes if any were made before it failed Is this the original reported failure or has this...

Page 122: ...106 IBM System x3800 Type 8865 Problem Determination and Service Guide...

Page 123: ...n updated parts listing on the Web complete the following steps 1 Go to http www ibm com support 2 Under Search technical support type 8865 and click Search 3 Under Document type select Parts informat...

Page 124: ...ssembly all models 41Y3155 5 PCI X switch card assembly all models 39M2699 9 Power backplane all models 41Y3159 9 Power backplane tower all models 42D8316 6 Power supply filler with fan 39Y9989 7 Powe...

Page 125: ...HZ models 21x 22x 2Rx 2Tx 13M7879 23 Heat sink all models 26K8805 24 Air baffle all models 01R1479 25 Heat sink filler all models 26K9020 26 Hard disk drive filler all models 39M4375 27 SAS hard disk...

Page 126: ...nagement 1 v Screw M3 5x8mm 8 v Nut M6 caged 16 v Bracket CMA 1 v Latch bracket 2 v Bracket latch 2 v Latch cover 2 v Slide assembly 2 26R0790 Retention module all models 26K8836 ServeRAID 8i card opt...

Page 127: ...its intended to be operated at 115 volts Use a UL listed and CSA certified cord set consisting of a minimum 18 AWG Type SVT or SJT three conductor cord a maximum of 15 feet in length and a parallel bl...

Page 128: ...zbekistan Vanuatu Vietnam Wallis and Futuna Yugoslavia Federal Republic of Zaire 13F9997 Denmark 14F0015 Bangladesh Lesotho Macao Maldives Namibia Nepal Pakistan Samoa South Africa Sri Lanka Swaziland...

Page 129: ...os Islands Canada Cayman Islands Colombia Costa Rica Cuba Dominican Republic Ecuador El Salvador Guam Guatemala Haiti Honduras Jamaica Mexico Micronesia Federal States of Netherlands Antilles Nicaragu...

Page 130: ...114 IBM System x3800 Type 8865 Problem Determination and Service Guide...

Page 131: ...ne is near the server and that no other objects have been left inside the server v Do not attempt to lift an object that you think is too heavy for you If you have to lift a heavy object observe the f...

Page 132: ...perate the server without the air baffle installed Operating the server without the air baffle might cause the microprocessor or microprocessors to overheat v The air baffle lies flat and within the g...

Page 133: ...joints pins or exposed circuitry v Do not leave the device where others can handle and damage it v While the device is still in its static protective package touch it to an unpainted metal part on the...

Page 134: ...e input and output connectors see Server controls LEDs and connectors on page 4 The following illustrations show the locations of the input and output connectors on the server Detailed cabling instruc...

Page 135: ...amage server components To remove the top cover bezel and front cover complete the following steps 1 Read the safety information that begins on page vii and Installation guidelines on page 115 2 If yo...

Page 136: ...oth sides of the bezel and pull the top of the bezel slightly away from the server 7 Lift up the bezel to release the tabs at the bottom edge of the bezel 8 If you are instructed to return the top cov...

Page 137: ...in the server chassis and push the top of the bezel toward the server until the retention tabs snap into place 6 Tower model only To install the front cover tilt the front cover and insert the bottom...

Page 138: ...replacement PCI or PCI X adapter complete the following steps 1 See the documentation that comes with the adapter for instructions for setting jumpers or switches and for cabling Note Route adapter c...

Page 139: ...Hot swap fan 1 Hot swap fan 2 Hot swap fan 3 Hot swap fan 4 Hot swap fan 6 Hot swap fan 7 Hot swap fan 8 Fan error LED 1 Read the safety information that begins on page vii and Installation guideline...

Page 140: ...el remove the front cover see Removing the top cover bezel and front cover on page 119 3 Open the drive handle and pull the hard disk drive out of the server Replacing the hot swap hard disk drive To...

Page 141: ...upply complete the following steps Handle open 2nd power supply PS2 Fan filler Fan filler Release latch 3rd power supply PS3 DC power LED green AC power LED green 1st power supply PS1 AC DC Fan error...

Page 142: ...a properly grounded electrical outlet 4 Make sure that both the ac and dc power LEDs on the rear of the power supply are lit indicating that the power supply is operating correctly To install the repl...

Page 143: ...shipping that are supplied to you To install the replacement memory card complete the following steps 1 Open the retention levers on the memory card then while holding the memory card by the retentio...

Page 144: ...erate the server for more than 2 minutes with the top cover removed 4 Remove the memory card see Removing and replacing a memory card on page 126 5 Place the memory card on a flat surface with the DIM...

Page 145: ...nds of the DIMM simultaneously The retaining clips snap into the locked position when the DIMM is seated in the connector If there is a gap between the DIMM and the retaining clips the DIMM has not be...

Page 146: ...on page 115 2 Turn off the server and peripheral devices and disconnect the power cords and all external cables necessary to replace the device 3 Remove the front cover tower model only bezel and top...

Page 147: ...the rear of the operator information panel assembly to indicate the position of the assembly 7 Press on the retention tab and pull the operator information panel assembly through the chassis then pull...

Page 148: ...mation panel assembly in the tower position the tabs must be inserted into the middle and rear guide slots To install the operator information panel assembly in the rack position the tabs must inserte...

Page 149: ...cables from the I O board 5 Remove the I O board see Removing the I O board on page 139 and place the board on a static protective surface with the battery facing up 6 Release the retention latch on...

Page 150: ...ry cards see Removing and replacing a memory card on page 126 5 Disconnect the cables from the I O board that pass through the support structure then open the cable retention clip and place the cable...

Page 151: ...ver see Replacing the top cover bezel and front cover on page 121 6 Connect the cables and power cords see Connecting the cables on page 118 for cabling instructions 7 Turn on all attached devices and...

Page 152: ...gins on page vii and Installation guidelines on page 115 2 Turn off the server and peripheral devices and disconnect the power cords and all external cables necessary to replace the device 3 Unlock th...

Page 153: ...r to an electrical outlet before the power control button becomes active 6 Start the Configuration Setup Utility program and reset the configuration v Set the system date and time v Set the power on p...

Page 154: ...remove a diskette drive complete the following steps 1 Read the safety information that begins on page vii and Installation guidelines on page 115 2 Turn off the server and peripheral devices and dis...

Page 155: ...s and jumpers on page 8 for the location and description of each jumper block To remove the I O board complete the following steps 1 Read the safety information that begins on page vii and Installatio...

Page 156: ...er on page 121 6 Connect all the external cables and power cords see Connecting the cables on page 118 for cabling instructions 7 Turn on all attached devices and the server Removing the PCI X adapter...

Page 157: ...oles in the bottom of the metal section of the guide and the tabs on the top of the dividers engage the plastic retainer section of the guide 5 Lower the retaining bar 6 Install the top cover and lock...

Page 158: ...e into the card guides on the rear of the SAS hard disk drive cage and press the backplane into place 3 Connect one end of the new SAS signal cable to the SAS backplane then following the existing SAS...

Page 159: ...while pulling the structure out of the server 9 If you are instructed to return the SAS hard disk drive cage follow all packaging instructions and use any packaging materials for shipping that are sup...

Page 160: ...all packaging instructions and use any packaging materials for shipping that are supplied to you Replacing the ServeRAID 8i adapter To install the replacement ServeRAID 8i adapter complete the followi...

Page 161: ...ot 1 Read the safety information that begins on page vii and Installation guidelines on page 115 2 Turn off the server and peripheral devices and disconnect the power cords and all external cables nec...

Page 162: ...ons and must be installed on the microprocessor board v When installing additional microprocessors populate the microprocessor connectors in numeric order starting with connector 2 v When installing t...

Page 163: ...hat begins on page vii and Installation guidelines on page 115 2 Turn off the server and peripheral devices and disconnect the power cords and all external cables necessary to replace the device 3 Rem...

Page 164: ...ocessor from the microprocessor socket 13 If you are instructed to return the microprocessor tray and microprocessor follow all packaging instructions and use any packaging materials for shipping that...

Page 165: ...Firmly press the VRM straight down into the connector by applying pressure on both ends of the VRM simultaneously The retaining clips snap into the locked position when the VRM is seated in the connec...

Page 166: ...ake sure that all of the thermal grease is removed 4 Use a clean area of the cleaning pad to wipe the thermal grease from the microprocessor then dispose of the cleaning pad after all of the thermal g...

Page 167: ...ove all adapters and adapter dividers and place the adapters on a static protective surface Note You might find it helpful to note where each adapter is installed before removing the adapters 6 Remove...

Page 168: ...on the PCI X board assembly and place the assembly in the chassis Slide the assembly toward the rear of the chassis and align it with the blue retainer screws 2 Tighten the retainer screws to secure...

Page 169: ...ture to pivot at the chassis front 7 Lift the structure out of the server and make sure that the alignment tabs clear the chassis Note While lifting the structure out of the server guide the signal ca...

Page 170: ...top cover and bezel see Removing the top cover bezel and front cover on page 119 4 Remove the power supplies see Removing the hot swap power supply and power supply filler on page 125 5 Remove all fa...

Page 171: ...ing the microprocessor tray the rest of the way in Then close the microprocessor tray levers and close the microprocessor tray release latch 5 Install the power supplies 6 Install the memory cards 7 I...

Page 172: ...g the power backplane To install the replacement power backplane complete the following steps 1 Align the power backplane with the guides on the rear of the power supply sleeve 2 Install the power sup...

Page 173: ...ct to update the VPD code during the BIOS code update procedure Configuring the server The ServerGuide Setup and Installation CD provides software setup tools and installation tools that are specifica...

Page 174: ...ervers eserver xseries systems_management ibm_director extensions xpress html Using the Configuration Setup Utility program Use the Configuration Setup Utility program to v View configuration informat...

Page 175: ...is choice to view VPD for some server components v Devices and I O Ports Select this choice to view or change assignments for devices and input output I O ports Select this choice to enable or disable...

Page 176: ...re and software and the operating system supports Wake on LAN functions you can specify a startup sequence for the Wake on LAN functions If you enable the boot fail count the BIOS default settings wil...

Page 177: ...og timeout value 5 minutes is the default setting System BMC Serial Port Sharing Enable or disable the system BMC serial port sharing Enable is the default setting BMC Serial Port Access Mode Share or...

Page 178: ...tility menu If you set only an administrator password you do not have to type a password to complete the system startup but you must type the administrator password to access the Configuration Setup U...

Page 179: ...f move the power on password jumper from pins 1 and 2 to pins 2 and 3 You can then start the Configuration Setup Utility program and reset the power on password After you reset the password turn off t...

Page 180: ...rl A If an administrator password has been set you are prompted to type the password 3 Follow the instructions on the screen to configure the controller settings Go to http www ibm com support to chec...

Page 181: ...nge the settings of the selected items follow the instructions on the screen Using the ServeRAID configuration programs A ServeRAID controller enables you to configure multiple physical hard disk driv...

Page 182: ...166 IBM System x3800 Type 8865 Problem Determination and Service Guide...

Page 183: ...to submit a request for information You can solve many problems without outside assistance by following the troubleshooting procedures that IBM provides in the online help or in the documentation that...

Page 184: ...es For information about which products are supported by Support Line in your country or region see http www ibm com services sl products For more information about Support Line and other IBM services...

Page 185: ...TY OF ANY KIND EITHER EXPRESS OR IMPLIED INCLUDING BUT NOT LIMITED TO THE IMPLIED WARRANTIES OF NON INFRINGEMENT MERCHANTABILITY OR FITNESS FOR A PARTICULAR PURPOSE Some states do not allow disclaimer...

Page 186: ...s and logos are trademarks of Sun Microsystems Inc in the United States other countries or both Adaptec and HostRAID are trademarks of Adaptec Inc in the United States other countries or both Linux is...

Page 187: ...differ from its retail version if available and may not include user manuals or all program functionality Product recycling and disposal This unit must be recycled or discarded according to applicable...

Page 188: ...f EEE on the environment and human health due to the potential presence of hazardous substances in EEE For proper collection and treatment contact your local IBM representative Battery return program...

Page 189: ...t cause harmful interference and 2 this device must accept any interference received including interference that may cause undesired operation Industry Canada Class A emission compliance statement Thi...

Page 190: ...ment Attention This is a Class A product In a domestic environment this product may cause radio interference in which case the user may be required to take adequate measures Taiwanese Class A warning...

Page 191: ...lity program 157 158 configuring hardware 157 configuring your server 157 connectors 6 cover removing 119 CPU BRD LED 68 CPU LED 65 CRUs replacing adapters 121 CRUs replacing continued CD drive 137 DI...

Page 192: ...microprocessor board assembly 146 PCI X board assembly 151 PCI X switch card assembly 153 power backplane 155 power supply structure 154 G Gigabit Ethernet connector 7 grease thermal 150 H hard disk...

Page 193: ...RD LED 68 PCI LED 66 PCI X adapter guide replacing 140 PCI X board assembly replacing 151 PCI X switch card assembly replacing 153 pointing device problems 52 POST error codes 20 error log 19 power ba...

Page 194: ...rt problems 59 server replaceable units 108 ServeRAID configuration programs 165 ServeRAID 8i removing 144 replacing 144 ServerGuide 157 problems 60 Setup and Installation CD 157 service processor mes...

Page 195: ......

Page 196: ...Part Number 31R1860 Printed in USA 1P P N 31R1860...

Reviews: