background image

Chapter 3. Installation and Configuration

3-21

DNS setting

 — Select 

Use DNS

 to use a domain name server. The DNS server, 

if entered, allows the encryption, date and time, and notifications IP addresses 
to be specified using hostnames instead of numerical IP addresses.

DNS IP address 

— Sets the IP address of the DNS server.

4.

Click 

Submit

 to enable the settings.

Configuring Date and Time Settings

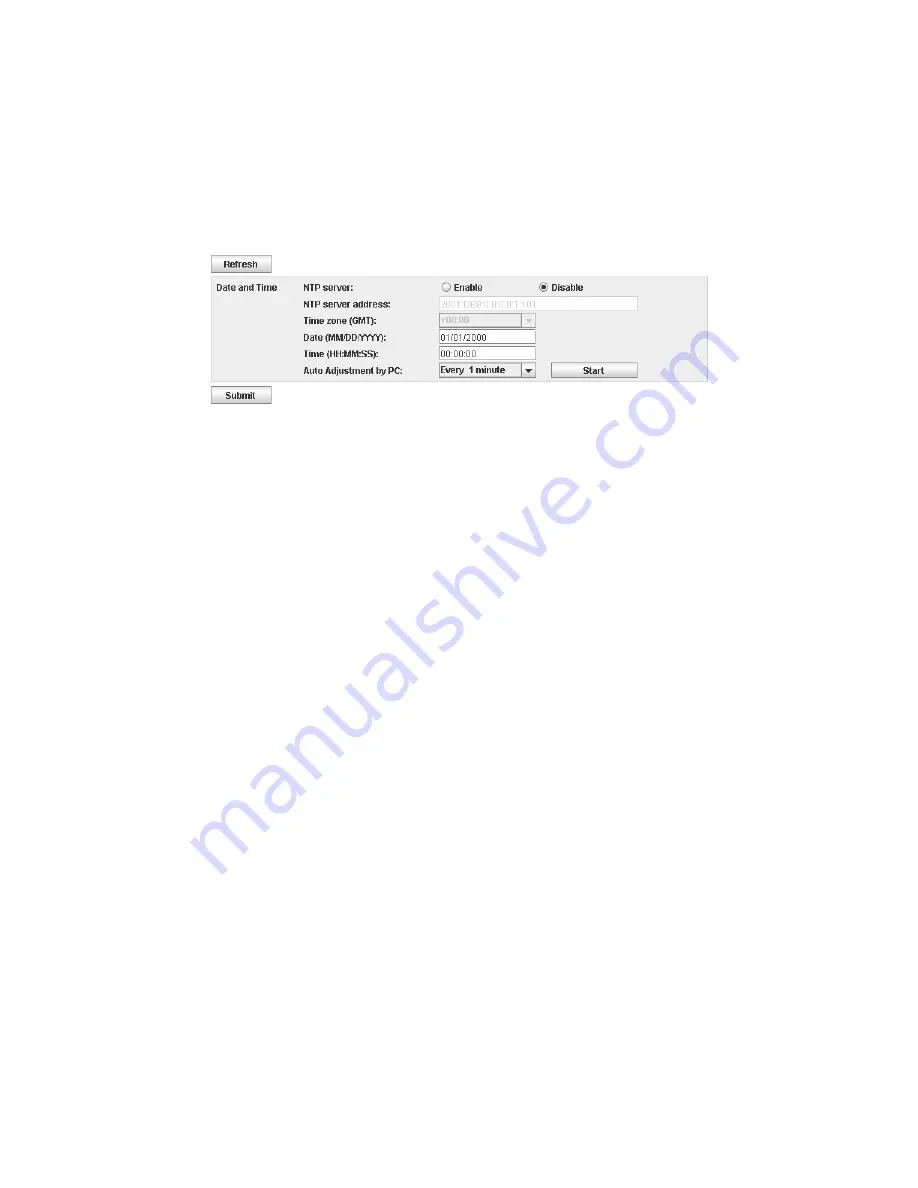
Figure 3-22. Date and Time settings

Configure the date and time settings using one of three methods: automatically using 
a remote NTP time server on the network, automatically using your the clock on your 
host computer, or manually.

Note:

This is an optional procedure. If you choose to manually set your date and 
time, you will need to reset the date and time after power cycling the library.

Note:

When power cycling the library, wait 10 seconds after the power is OFF before 
powering ON again.

Once the network settings have been entered on the Operator Panel, the current date 
and time can be modified using the Web User Interface.

The TS2900 Tape Autoloader communicates with an NTP server with the following 
conditions:
• client-server basis operation
• UDP (User Datagram Protocol) to access the NTP server
• does not use authentication keys
• library polling is every 12 hours

To modify the date and time settings, complete the following procedure:

1.

Expand 

Configure Library

, if necessary, and click on 

Date and Time

 in the left 

navigation pane of the Web User Interface.

2.

Select the 

Date and Time

 settings.

NTP Server

 — Enables time and date control using a time server on the 

network.

NTP server address

 — Enter the IP address of the time server. IPv4 and 

IPv6 addresses are supported, depending on the TCP/IP settings. 
Hostnames can be entered instead of numerical IP addresses if 

Use DNS

 is 

selected in the Network settings.

Time zone

 — Enter the time zone relative to Greenwich Mean Time (GMT).

• If the time server is disabled, enter the local time and date manually.

Date

 — Enter the date using the MM/DD/YYYY format.

Time

 — Enter the time using the HH:MM:SS format.

a29z0170

Summary of Contents for System Storage TS2900

Page 1: ...IBM System Storage TS2900 Tape Autoloader Setup Operator and Service Guide Machine Type 3572 GC27 2212 00...

Page 2: ......

Page 3: ...IBM System Storage TS2900 Tape Autoloader Setup Operator and Service Guide Machine Type 3572 GC27 2212 00...

Page 4: ...ibm com storage lto This edition applies to the IBM System Storage TS2900 Tape Autoloader Setup Operator and Service Guide GC27 2212 00 and to the subsequent releases and modifications until otherwise...

Page 5: ...ments or suggestions for improving this publication send your comments by E mailing IBM Internet or IBMLink from US starpubs us ibm com IBMLink from Canada STARPUBS at TORIBM Include the following inf...

Page 6: ...rator and Service Guide In all countries regions Visit http www ibm com and complete all the steps in Contacting IBM Technical Support on page 7 1 To open a Service Request online Under Support downlo...

Page 7: ...Header Elements 2 6 Menus Available from the Web User Interface 2 7 User Privileges 2 8 Chapter 3 Installation and Configuration 3 1 Verifying the Shipment 3 1 Choosing a Location 3 2 Installing the...

Page 8: ...ools 8 1 Replacing a Defective Cartridge Magazine 8 1 Unlocking the Cartridge Magazine Manually 8 1 Moving the Library from a Rack to a Desktop 8 2 Removing Library from a Rack 8 2 Installing the Libr...

Page 9: ...ctronic Emission Notices H 2 Federal Communications Commission FCC Class A Statement H 2 European Union EU Electromagnetic Compatibility Directive H 3 People s Republic of China Class A Electronic Emi...

Page 10: ...viii TS2900 Tape Autoloader Setup Operator and Service Guide...

Page 11: ...settings 3 26 3 29 User access settings 3 27 3 30 Add User dialog 3 27 3 31 Save configuration 3 28 3 32 Cartridge release gate 3 31 3 33 Cartridge orientation 3 32 4 1 Operator Panel top level menus...

Page 12: ...from the rear of the library 8 8 8 14 Removing the cover from the library chassis 8 8 8 15 Removing the feet 8 8 8 16 Removing side rails from the library chassis 8 9 8 17 Attaching the front brackets...

Page 13: ...ive 5 3 5 4 Bar code label requirements for the Ultrium tape drive and library 5 5 5 5 Cartridges and VOLSERs compatible with the Ultrium 3 and Ultrium 4 Tape Drive 5 6 5 6 Environment for operating s...

Page 14: ...xii TS2900 Tape Autoloader Setup Operator and Service Guide...

Page 15: ...hat is potentially hazardous to people because of some existing condition A caution notice can be accompanied by one of several symbols A danger notice calls attention to a situation that is potential...

Page 16: ...he following safety inspection procedure 1 Stop all activity between the host and the library s tape drive 2 Turn off the power to the library by switching the Power button on the rear of the tape lib...

Page 17: ...t be moved for servicing unless specified by the manufacturer Attempting to move the drawer partially or completely out of the rack may cause the rack to become unstable or cause the drawer to fall ou...

Page 18: ...es shelves drawers doors and cables are secure Ensure that the four leveling pads are raised to their highest position Ensure that there is no stabilizer bracket installed on the rack cabinet during m...

Page 19: ...s propietarios de equipos a reciclar sus productos de TI Se puede encontrar informaci n sobre las ofertas de reciclado de productos de IBM en el sitio web de IBM http www ibm com ibm environment produ...

Page 20: ...facilities may not be available in your area For information on disposal of batteries outside the United States go to http www ibm com ibm environment products index shtml or contact your local waste...

Page 21: ...s and accumulators must not dispose of batteries and accumulators as unsorted municipal waste but use the collection framework available to customers for the return recycling and treatment of batterie...

Page 22: ...xx TS2900 Tape Autoloader Setup Operator and Service Guide...

Page 23: ...supplies information to application owners who want to integrate their open systems applications with IBM supported Ultrium hardware The reference contains information about the application programmi...

Page 24: ...xxii TS2900 Tape Autoloader Setup Operator and Service Guide...

Page 25: ...e providing a maximum of 9 data cartridge positions or a maximum of 8 data cartridge positions with a configurable 1 slot I O Station One position is reserved as the tape drive exchange position and c...

Page 26: ...ic display located on the front of the library Library operations and service functions are performed from this screen The Web User Interface offers some of the same functionality as the Operator Pane...

Page 27: ...number of the library are located on the front bezel of the library The serial number is the number that links the library to IBM entitlement for service Air vents These vents draw cooler air into the...

Page 28: ...ply Power switch The library is powered ON when the power supply switch on the rear panel is ON the library has no independent power switch on the front panel SAS host interface connector Serial attac...

Page 29: ...0 Tape Autoloader can be hot plugged SAS drives will auto negotiate speed Encryption The LTO Ultrium 4 Tape Drive supports host Application Managed Encryption AME Library Managed Encryption LME and Sy...

Page 30: ...me description manufacturer model number firmware level and the URL that the trap is designated for Product Status such as the severity of the trap status current and previous and the time the trap oc...

Page 31: ...Figure 1 6 Ultrium Half High Tape Drive Speed Matching To improve system performance the Ultrium 3 and Ultrium 4 Tape Drives use a technique called speed matching to dynamically adjust its native unco...

Page 32: ...only see the tape drive Important Some HBAs such as RAID controllers do not support LUN scanning Location Coordinates and Element Addresses The TS2900 Tape Autoloader incorporates IBM s patented high...

Page 33: ...er 1 Column 3 Tier 1 Column 2 Tier 1 Column 1 Tier 1 Drive Front Rear Accessor Reserved slot Table 1 5 Physical specifications Parameter Measurement Front panel width chassis bezel 445 mm 17 52 in 483...

Page 34: ...s 0 to 2 500 0 to 2 500 0 to 2 500 Note The operating environment of the library must not conflict with the media storage requirements The library may be capable of operating at elevated temperatures...

Page 35: ...If you do not have Internet access and you need information about device drivers contact your Marketing Representative Using a browser type one of the following http www ibm com storage lto ftp ftp s...

Page 36: ...1 12 TS2900 Tape Autoloader Setup Operator and Service Guide...

Page 37: ...erator Panel is located on the front bezel of the library The Operator Panel displays library information and menu commands used to execute library management functions in response to the control keys...

Page 38: ...cartridge from an empty cartridge position Loading a cartridge from any source to a full drive Unloading a cartridge from an empty drive Any error detected by the library or drive controller and not r...

Page 39: ...rable drive or library failure An error message is displayed on the screen and the LED remains ON until the error state is resolved For more information see Interpreting Front Panel LEDs on page 6 8 I...

Page 40: ...next digit The default password is 0000 Once you have logged in you can change the password using the Change Login Password command See Configuring Operator Panel Settings on page 4 11 Screen Elements...

Page 41: ...ve firmware and to download error logs drive dumps and other library data from the library Before the TS2900 Tape Autoloader can be managed over a network using the Web User Interface you must set up...

Page 42: ...ount name and password are case sensitive After entering your account name and password use your mouse to click Login or press the Enter key For information on account privileges see User Privileges o...

Page 43: ...face Figure 2 8 shows the Web User Interface window for a User account Figure 2 9 shows the window for a Superuser account and Figure 2 10 shows the window for an Administrator account Figure 2 8 User...

Page 44: ...ser privileges in the library Users are allowed to monitor the library but not perform actions that affect the physical library Superusers are allowed to operate the physical and logical library but n...

Page 45: ...ack on page 3 5 Removing the Accessor Locking Screw on page 3 12 Attaching the Library to a Server on page 3 13 Configuring Your Library using the Web User Interface on page 3 16 Logging in to the Web...

Page 46: ...hillips head screwdriver preferably with a magnetic head will be needed to assemble the deskside kit Table 3 1 Location criteria Criteria Definition Room temperature 16 to 32 C 60 to 90 F Voltage 100...

Page 47: ...library chassis 45E3798 1 Deskside cover 45E3799 1 Bracket 1U library right rail 45E3749 2 Screw cross recessed binding head M4x4 for securing the rear of the cover to the library 45E3801 1 Bracket 1U...

Page 48: ...rary Figure 3 2 Return the library to the upright position Figure 3 2 Attaching the feet 4 Position the deskside cover in the correct orientation over the library chassis and attach the cover to the l...

Page 49: ...system A standard 19 inch rack system contains multiple mounting locations called EIA units as defined by the Electronics Industries Association Each EIA unit contains three square or round holes use...

Page 50: ...1 Right front rail 45E3747 2 Rear rail 45E5909 4 Screw cross recessed flat head M3x4 45E3748 8 Screw flat head self locking M6x10 45E3749 6 Screw cross recessed binding head Table 3 3 Rack mount asse...

Page 51: ...it 1U of vertical rack space is equal to 4 45 cm 1 75 in and contains three holes with equidistant centers of 1 59 cm 0 625 in The boundary between each 1U rack space is identified by two holes separa...

Page 52: ...ations for front vertical rails Figure 3 6 Rack mount screw locations for rear vertical rails 3 Attach the left and right Figure 3 7 front brackets to the front of the library chassis using two flat h...

Page 53: ...de Figure 3 8 Note Run the hook and loop fastener strap through the slot on the right rear bracket and attach it back upon itself Figure 3 8 Attaching the rear brackets to the rails Important Do NOT t...

Page 54: ...front of the unit align with the 1U space marked on the vertical rails in Step 2 Secure the rails to the rack using four flat head screws on each side of the rack Use both of the two screw locations o...

Page 55: ...the rack 8 Secure the rear of the library to the rack using a round head screw on each rear bracket Figure 3 12 Tighten the other rear bracket screws to secure the library to the rack Figure 3 12 Sec...

Page 56: ...page 8 1 Removing the Accessor Locking Screw Important The Accessor locking screw prevents the library Accessor from moving during shipment and must be removed before the library is powered ON To rem...

Page 57: ...result in damage to the library 1 Attach an Ethernet cable to the Ethernet port in Figure 3 15 Note On rack mount installations run the cable through the hook and loop fastener strap on the right rear...

Page 58: ...hten the strap The rack PDU line cord is a special power cord that plugs into a rack power strip 2 Plug the other end of the power cord into the nearest properly grounded power outlet On rack mount in...

Page 59: ...ubnet mask 255 255 255 0 Gateway 0 0 0 0 IPv6 settings Disabled DHCP Dynamic Host Configuration Protocol Enabled Stateless auto configuration Enabled Static IP address Disabled IPv6 address 0 0 0 0 0...

Page 60: ...lowing procedures 1 Install Java 1 5 0 or higher on your host computer Download the latest version of the Java Runtime Environment JRE for your platform from http www java com 2 Logging in to the Web...

Page 61: ...rnet Explorer on your server or PC to access the Web User Interface 3 In the browser address field enter your library s IP Address URL to launch the Web User Interface applet in the browser window For...

Page 62: ...e 4 34 Configuring Library Settings Logical Library Settings Figure 3 19 Logical library mode settings To configure the library access mode settings for the logical library complete the following proc...

Page 63: ...r 9 The second digit configures Column 5 Tier 1 of the magazine as an I O Station 0 when disabled and 1 when enabled The Auto Cleaning function can be enabled only if there is at least 1 inactive posi...

Page 64: ...rowser and the tape library IPv4 setting Select Use IPv4 to enable the IPv4 Internet Protocol Select the corresponding radio button to obtain an IP address automatically DHCP or use static IP address...

Page 65: ...ed on the Operator Panel the current date and time can be modified using the Web User Interface The TS2900 Tape Autoloader communicates with an NTP server with the following conditions client server b...

Page 66: ...tings Configuring Encryption Settings Figure 3 23 Encryption settings Note This is an optional procedure if you have purchased the Encryption Activation Key Feature Code 5901 Only the Ultrium 4 Tape D...

Page 67: ...ed Encryption For encryption in operating environments where no application is capable of key management runs and encryption is set up implicitly through each instance of the IBM device driver Library...

Page 68: ...yption only Encrypt All All tape cartridges loaded into the tape drive are encrypted Internal Label Selective Encryption This option is used only for Symantec s Veritas NetBackup Internal Label Encryp...

Page 69: ...ge to the enabled addresses 7 Click Submit to enable the settings Configuring Trap Notifications Figure 3 26 Trap notifications Note This is an optional procedure The traps supported by the TS2900 Tap...

Page 70: ...P community name User name v3 only SNMPv3 unique user name Authentication v3 only Authentication algorithm MD5 or SHA When an algorithm is specified an authentication password and confirmation of the...

Page 71: ...igure 3 29 User access settings Note This is an optional procedure To add users able to access the library using the Web User Interface complete the following procedure 1 Expand Configure Library if n...

Page 72: ...on complete the following procedure 1 Expand Configure Library if necessary and click on Save Restore in the left navigation pane of the Web User Interface 2 Click Save to create a configuration file...

Page 73: ...IPv6 and press Enter to enable or press Down and select Disable DHCP IPv6 to disable c Press Enter again to apply the setting or Cancel to reject the setting d Press Cancel to backtrack through the m...

Page 74: ...ly the setting or Cancel to reject the setting 5 Library Mode Default Random a Select Configure Library Configure Library Mode b Select Set Random Mode or Configure Sequential Mode and press Enter Ran...

Page 75: ...us key to select Unlock Magazine and press Enter 2 Insert cartridges in the magazine Note A blue release gate in Figure 3 32 in the top left corner of each column in the cartridge magazine prevents ea...

Page 76: ...2 Press the Minus key to select Diagnostics and press Enter 3 Select Run Library Verify and press Enter Follow the on screen instructions The library performs a Power ON Self Test POST the normal tes...

Page 77: ...lick on Save Restore in the left navigation pane of the Web User Interface b Click Save and then enter a file name and select a location to save the configuration file 2 Verify the library state a Cli...

Page 78: ...3 34 TS2900 Tape Autoloader Setup Operator and Service Guide...

Page 79: ...the Library on page 4 6 Preparing to Ship the Library on page 4 6 Rebooting the Drive on page 4 7 Rebooting the Library on page 4 7 Logging Out of the Library on page 4 7 Configuring the Library Confi...

Page 80: ...ings on page 4 23 Configuring Date and Time Settings on page 4 25 Configuring E mail Notifications on page 4 26 Configuring SNMP Trap Notifications on page 4 27 Saving and Restoring Configuration Sett...

Page 81: ...ress subnet mask address gateway address DHCP IPv6 settings IP address gateway address prefix length DHCP Drive settings Model number Viewing Current Information Figure 4 3 Current information Use Vie...

Page 82: ...e prevents each cartridge from falling out of the front of the magazine When manually releasing the gate with one hand position your other hand in front of the column opening to prevent cartridges bei...

Page 83: ...moved to the Accessor using this command but can be moved from the Accessor using this command if for example the library was powered OFF with a tape still held in the Picker Unloading the Drive Figur...

Page 84: ...brary Once these operations have finished it is necessary to bring the library back online Note The tape drive is always online even when the library is offline Powering Down the Library Before poweri...

Page 85: ...ify whether the library should come online offline after it finishes rebooting Select Execute to reboot the drive Rebooting the Library Figure 4 15 Reboot Library command Use Commands Reboot Library t...

Page 86: ...the number of active slots using the following setting Active Slots The maximum number of active slots that can be set is dependent upon the I O Station configuration and Auto Cleaning setting The ac...

Page 87: ...idge in the highest Column Tier cartridge position has been filled and sent back to its home position This allows endless backup operations without user interaction Autoload Sequential mode with autol...

Page 88: ...namic Host Configuration Protocol Enable DHCP to have the library server or router negotiate the connection with the library IPv4 Select to enable DHCP using the IPv4 protocol IPv6 Select to enable DH...

Page 89: ...ttings Back light Select to enable the LCD back light when using the Operator Panel Input Count If the auto back light is enabled specify the time duration before the back light turns OFF The setting...

Page 90: ...be executed after all maintenance procedures to ensure correct library performance Note Running the Library Verify diagnostic test will unload tape cartridges in the drives if the host application ha...

Page 91: ...ite test using all servo positions and exercise all of the tape motion functions of the drive Takes approximately 18 minutes Perform Read Write Test Performance R W Test Runs a shortened version of th...

Page 92: ...User Interface Figure 4 1 shows all the menu options available from the Web User Interface for the Administrator User account For information on the menu user access privileges for User Superuser and...

Page 93: ...led I O Station status Open Closed when I O Station is enabled Operator Panel LED indicators Number of cartridges and slot configuration Cartridge in the drive 0 or 1 Slots value is always N A Number...

Page 94: ...tation The information displayed varies according to the type of device selected Library information Accessor status OK Degraded or Failed Drive status OK Degraded or Failed I O Station Enabled or Dis...

Page 95: ...ID Product ID Firmware version Serial number World wide node name Encryption capability Model S4H only Accessor information Status OK Degraded or Failed Accessor event Managing the Library Moving Car...

Page 96: ...cannot be moved directly from Tier 1 in one column to Tier 2 in another column in a single move operation intermediate move operations are required Note Cartridges cannot be moved to the Accessor usin...

Page 97: ...online Note The tape drive is always online even when the library is offline Conducting a Library Inventory Figure 4 36 Inventory screen Use Manage Library Inventory to force the library to execute a...

Page 98: ...he physical library Superusers are allowed to operate the physical and logical library but not perform actions that affect the library configuration Administrator users are allowed access to the entir...

Page 99: ...to read the current settings from the library Configuring Logical Library Settings Figure 4 40 Logical library settings screen Use Configure Library Logical to configure the library access mode for t...

Page 100: ...ctive position in the magazine If Auto Cleaning is enabled the inactive positions become cleaning cartridge positions Click Submit to transfer the settings to the library A dialog message is displayed...

Page 101: ...following parameter if using static IP address settings IPv6 address Sets the TCP IPv6 address of the library on the network Prefix Length Decimal value between 0 and 128 indicating the number of cont...

Page 102: ...ts layer SSL Enable SSL for EKM Select to enable secure communications between the tape library and the EKM server Primary and Secondary EKM Server Settings library managed encryption IP address The I...

Page 103: ...by the customer without the guidance of IBM Support To determine whether a cartridge is encrypted use Configure Library Library Map and select the cartridge The screen displays whether the cartridge i...

Page 104: ...th the clock on your host computer at regular intervals The Web User Interface Java Applet must be running continuously to use this function Click Submit to transfer the settings to the library A dial...

Page 105: ...l occurs and to register users who are permitted to access the tape library using SNMP Version 3 The traps supported by the TS2900 Tape Autoloader are listed in Trap Definitions Types on page B 12 Dow...

Page 106: ...word are required Privacy Privacy service encryption and decryption algorithm DES or AES When an algorithm is specified a privacy password and confirmation of the password are required Click Test to s...

Page 107: ...that you need to switch between on a regular basis Note When saving the library configuration manually the library must be offline to save to files and to restore from files Click Save to save the cu...

Page 108: ...test ensures that the LDI is functioning properly Ethernet Test In this test the library pings each EKM server IP address EKM Path Test In this test the library performs an EKM communication test on...

Page 109: ...r intervention event comprises Index number of the event Date the event occurred Time the event occurred Unit in the library where the event occurred Event level Description of the event Viewing Libra...

Page 110: ...ntry 010 a 0222 error states that the library cannot eject medium because drive is in state of Prevent Media Removal Information on errors and action to resolve the problem are listed in Appendix B Er...

Page 111: ...nloading Library Logs Figure 4 54 Download Library Logs screen Use Service Library Download Library Logs to download a tape library dump to file for use by support personnel to help troubleshoot a pro...

Page 112: ...aded from the IBM web site then click Update The Web User Interface will indicate that the operation has completed This means that the firmware file has been successfully moved from the host computer...

Page 113: ...nt for all movements accessor movements picker movements and X axis movements Retry counts Lists the accumulated number of retries re attempts to load cartridges in the drive and the cartridges positi...

Page 114: ...4 36 TS2900 Tape Autoloader Setup Operator and Service Guide...

Page 115: ...ducts Figure 5 1 shows the IBM LTO Ultrium 800 GB Data Cartridge and its components Figure 5 1 IBM LTO Ultrium 800 GB Data Cartridge Data Cartridges on page 5 2 WORM Write Once Read Many on page 5 3 C...

Page 116: ...ape is attached to a leader pin behind the door When the cartridge is inserted into the drive a threading mechanism pulls the pin and tape out of the cartridge across the drive head and onto a non rem...

Page 117: ...a security applications require a Write Once Read Many WORM method for storing data on tape The LTO Ultrium generation 4 drive enables WORM support when a WORM tape cartridge is loaded into the drive...

Page 118: ...lay SCD An error will also be displayed on the Operator Panel Inserting a WORM tape cartridge into a drive that is not WORM capable causes the cartridge to be treated as an unsupported medium The driv...

Page 119: ...e how many times it has been loaded and how many errors it has accumulated Whenever a tape cartridge is unloaded the tape drive writes any pertinent information to the cartridge memory The storage cap...

Page 120: ...at http www ibm com storage lto select LTO Support or contact your IBM Sales Representative When attaching a bar code label to a tape cartridge place the label only in the recessed label area in Figur...

Page 121: ...label area in Figure 5 1 on page 5 1 With light finger pressure smooth the label so that no wrinkles or bubbles exist on its surface Verify that the label is smooth and parallel and has no roll up or...

Page 122: ...es that describe proper media handling in places where people gather Ensure that anyone who handles tape has been properly trained in handling and shipping procedures This includes operators users pro...

Page 123: ...sturdy material ensure the following Place the cartridge in polyethylene plastic wrap or bags to protect it from dust moisture and other contaminants Pack the cartridge snugly do not allow it to move...

Page 124: ...orm a Thorough Inspection After purchasing a cartridge and before using it perform the following steps Inspect the cartridge s packaging to determine potential rough handling When inspecting a cartrid...

Page 125: ...itioning or Reattaching a Leader Pin on page 5 11 Then immediately use data recovery procedures to minimize chances of data loss 3 Review media handling procedures Example Improper Placement of Leader...

Page 126: ...Reattachment Kit part number 08L9129 Figure 5 8 Leader pin in the incorrect and correct positions The cartridge door is open and the leader pin is visible inside the cartridge To reposition the leader...

Page 127: ...idge 6 Remove the rewind tool by pulling it away from the cartridge 7 If you suspect that the cartridge has been mishandled but it appears usable copy any data onto a good cartridge immediately for po...

Page 128: ...when the leader pin detaches from the magnetic tape and you must copy the cartridge s data onto another cartridge Destroy the damaged cartridge after you copy the data This procedure may affect the pe...

Page 129: ...eth between the teeth of the hub Turn the tool clockwise until you see the end of the tape inside the cartridge Then slowly turn the rewind tool counterclockwise to bring the tape edge toward the cart...

Page 130: ...ur fingers to push the C clip from the leader pin 7 Position the tape in the alignment groove of the leader pin attach tool in Figure 5 15 8 Place a new C clip into the retention groove in Figure 5 15...

Page 131: ...open and trim the excess tape so that it is flush with the reattached leader pin 13 Use your fingers to remove the leader pin from the cavity in the leader pin attach tool 14 Use the cartridge manual...

Page 132: ...s normal office trash These regulations are amended from time to time and you should review them at the time of disposal If your local state country non U S A or regional regulations are more restrict...

Page 133: ...95P4447 through an IBM authorized distributor 5 PACK IBM LTO Ultrium 800 GB Data Cartridge Order as part number 95P4278 through an IBM authorized distributor 20 PACK IBM Ultrium 4 800 GB WORM Tape Car...

Page 134: ...d labels IBM TotalStorage 3589 Model 029 Feature Code 2920 is a 20 pack of WORM cartridges packed in individual jewel cases with unattached blank labels This media can be used with LTO 3 drives read w...

Page 135: ...17th Avenue Broomfield CO 80020 U S A Telephone 888 438 8362 http www tri optic com EDP Europe Ltd 43 Redhills Road South Woodham Ferrers Chelmsford Essex CM3 5UL U K Telephone 44 0 1245 322380 http w...

Page 136: ...5 22 TS2900 Tape Autoloader Setup Operator and Service Guide...

Page 137: ...m detection reporting and notification technology to alert customers of problems as soon as they occur It performs numerous self tests to monitor the library s temperature voltage and currents and sta...

Page 138: ...ions The summary can be filtered to display the operator intervention log for a specific hardware component and specific event levels The log is stored in memory on the Library Control Board When the...

Page 139: ...e does unlock resume normal library operations The magazine can only be partially removed from the library The magazine seems stuck on something inside the library 1 Verify that you have requested the...

Page 140: ...s error logs device driver logs tape library error logs and tape drive error logs for entries that are related to encryption Connection problem with the Encryption Key Manager EKM If you are using li...

Page 141: ...oes not complete the boot up process and appears hung Failure of the login screen to appear on the Operator Panel in 15 minutes indicates that the boot up process is not completing 1 Power OFF the lib...

Page 142: ...ive firmware is at the latest level visit http www ibm com storage 2 Cycle library power 3 If the drive is experiencing permanent or temporary errors or if the Clean LED is lit on the front panel of t...

Page 143: ...is required Note On newer PCs either straight through or crossover Ethernet cables may be used since the crossover requirement is provided internally 8 Check the Ethernet cable carefully or try anoth...

Page 144: ...e that there are no bent pins on cables and that all connections are securely fastened SAS cables and interposers Ensure that SAS cables and interposers if any are properly attached See Connecting the...

Page 145: ...ing updated Blinks 2 times per second OFF OFF OFF LOADER FIRMWARE UPDATING Drive firmware is being updated Blinks 2 times per second OFF OFF OFF DRIVE FIRMWARE UPDATING Drive dump is being uploaded to...

Page 146: ...ation settings and information provided in Operator Interventions Download current logs of the library and drive when requested by your service representative To e mail current logs 1 Ensure that no a...

Page 147: ...ains the required syntax as well as a brief explanation of each particular function A Readme text file will be posted with the exe file for a thorough explanation of initial tool download information...

Page 148: ...c Note any error messages displayed on your PC monitor or file server Write down the exact error message d If at all possible call while at your computer with the library installed and turned on e If...

Page 149: ...moving the defective magazine from the library remove all cartridges from the defective magazine and insert them into the replacement magazine 3 Insert the new magazine with cartridges into the librar...

Page 150: ...using the rack mount kit to a desktop using the deskside kit Removing Library from a Rack 1 Take the library offline Note If the library is processing queued requests wait for the library to finish th...

Page 151: ...Disconnect the SAS host interface cable 8 Insert and tighten the Accessor locking screw Figure 8 2 Insert Accessor locking screw 9 Remove the SAS cable power cable and Ethernet cable from the hook and...

Page 152: ...e library 12 Remove the flat head screws to remove the left and right front brackets from the front of the library chassis Figure 8 6 Figure 8 6 Removing the front brackets from the library chassis In...

Page 153: ...tom of the library Figure 8 8 Return the library to the upright position Figure 8 8 Attaching the feet 3 Position the deskside cover in the correct orientation over the library chassis and attach the...

Page 154: ...hernet cable c Connect the power cable from the library power supply Route all cables through the hook and loop fastener strap d Power ON the library by toggling the power supply switch to the ON posi...

Page 155: ...e If the cartridge magazine fails to unlock in response to the Unlock Magazine command from the Operator Panel you can unlock the magazine manually See Unlocking the Cartridge Magazine Manually on pag...

Page 156: ...0 Remove the flat head screws on each side securing the deskside cover to the library and remove the deskside cover Figure 8 14 Figure 8 14 Removing the cover from the library chassis 11 Turn the libr...

Page 157: ...details on rack mount locations see Installing in a Rack on page 3 5 2 Attach the left and right front brackets to the front of the library chassis using two flat head screws on each side Figure 8 17...

Page 158: ...twards Figure 8 19 Figure 8 19 Creating the rail assemblies 5 Install the rail assemblies into the rack Figure 8 20 Ensure the three holes in the front of the unit align with the 1U space marked on th...

Page 159: ...ry to the rack using the large black screws in the bottom holes on each front bracket Figure 8 21 Figure 8 21 Securing the front of the library in the rack 7 Secure the rear of the library to the rack...

Page 160: ...or locking screw Figure 8 24 Removing Accessor locking screw 10 On the rear panel of the library a Connect the SAS host interface cable b Connect the Ethernet cable c Connect the power cable or rack P...

Page 161: ...e cookie the Web User Interface checks the serial number of the new library against the serial number saved in the cookie If the new serial number is different from the saved serial number the saved d...

Page 162: ...on page 4 10 Be sure to disable DHCP b Log in to the Web User Interface as admin The following screen appears Figure 8 26 Auto saved data confirmation c Answer Yes to restore the saved configuration...

Page 163: ...rify all configuration settings Change any settings as required Update the Library Configuration Form if necessary Save your new configuration using the Web User Interface Configure Library Save Resto...

Page 164: ...errupted The tag is important for customer inventory accuracy Follow the instructions on the RID tag precisely Figure 8 29 RID tag 1 Copy the machine type MT and serial number SN from the old library...

Page 165: ...ber 2m SAS Mini SAS 1x Cable from HBA with SFF 8470 to drive with SFF 8088 5402 95P4711 5 5m SAS Mini SAS 1x Cable from HBA with SFF 8470 to drive with SFF 8088 5406 95P4712 2m Mini SAS 1x Cable from...

Page 166: ...Receptacles Figure 9 1 shows the receptacles that are used by the power cords in Table 9 3 Match the index number that is beside each plug to the index number in the table Figure 9 1 Types of power c...

Page 167: ...abia South Korea Suriname Taiwan Trinidad Tobago Venezuela US 1 Chicago 1 8 m 125 V FC 9986 AAS PN 39M5080 HVEC SAP PN 23R7143 NEMA 5 15P Chicago U S A 1 US Canada 2 8 m 250 V FC 9833 AAS PN 39M5095 H...

Page 168: ...land Portugal Romania Russia Saudi Arabia Senegal Spain Sweden Sudan Syria Togo Tunisia Turkey Yugoslavia Zaire Zimbabwe Vietnam 4 Denmark 2 8 m 250V FC 9821 AAS PN 39M5130 HVEC SAP PN 23R7147 DK2 5A...

Page 169: ...raguay Trinidad Tobago Uruguay 11 China 2 8 m 250V FC 9840 AAS PN 39M5206 HVEC SAP PN 23R7155 CCEE People s Republic of China 12 Taiwan LV 2 8 m 125V FC 9835 AAS PN 39M5247 HVEC SAP PN 23R7158 CNS 109...

Page 170: ...HVEC SAP PN 23R6985 IS 6538 India 18 Brazil LV 2 8 m 125V FC 9846 AAS PN 39M5233 HVEC SAP PN 23R6986 InMetro NBR 6147 Brazil 19 Brazil HV 2 8 m 250V FC 9847 AAS PN 39M5240 HVEC SAP PN 23R6987 InMetro...

Page 171: ...r library data from the library Before the TS2900 Tape Autoloader can be managed over a network using the Web User Interface you must set up the initial network configuration of the library using the...

Page 172: ...re A 1 Java security warning message You can click the Always trust content from this publisher checkbox to avoid the warning message in subsequent browser sessions Click Run to launch the Web User In...

Page 173: ...e Web User Interface Figure A 3 shows the window for a Service account Figure A 3 Service account window For a complete description of all Web User Interface menu options see Chapter 4 Operations on p...

Page 174: ...e users can be logged in at one time on the Web User Interface Any user can be logged in to only one interface at a time Table A 1 Menu commands and access privileges Menu Command User Superuser Admin...

Page 175: ...rained IBM service provider SSRs should claim their time against service code 33 ECA 013 when performing this procedure Inform the customer the following procedure has high risk of damaging the drive...

Page 176: ...re A 5 Figure A 5 Removing the deskside cover c Remove the flat head screws on each side to remove the left and right rails from the chassis Figure A 6 Figure A 6 Removing side rails from the library...

Page 177: ...ry b Remove the large black screws from each front bracket securing the front of the library to the rack and slide the library chassis out of the rack Figure A 8 Figure A 8 Removing screws at the fron...

Page 178: ...e Autoloader Setup Operator and Service Guide Figure A 9 Library chassis cover screw locations 6 Lift the library chassis cover off vertically Figure A 10 Figure A 10 Library chassis cover removal a29...

Page 179: ...g with Column 4 a minimum of one column can be reserved for cleaning cartridges Cleaning cartridges are used to clean the tape drive heads For configuration details see Physical Library Settings on pa...

Page 180: ...ary Chassis Cover on page A 5 4 Disconnect the internal SAS cable in Figure A 12 Figure A 12 Rear panel of the SAS Half high drive 5 If connected disconnect the internal LDI RS 422 cable from the LDI...

Page 181: ...ot leave the site inform the customer that certain failure conditions diagnostics will be performed to test the drive for continued use The following removal procedures can destroy customer data Use e...

Page 182: ...to a hang condition in the application 3 If you have not already done so attempt to remove the cartridge by power cycling the drive Look for the drive to attempt a midtape recovery Note It can take up...

Page 183: ...fter the procedure is completed Tape tangled along tape path Tape appears to be tangled and damaged but intact Return the drive after the procedure is completed No damage to tape or no apparent failur...

Page 184: ...the flanges of the tape guiding rollers Turn the supply reel in Figure A 16 10 additional turns Ensure that you do not stretch the tape 7 Reassemble the drive reversing the steps in Beginning Procedur...

Page 185: ...reader mechanism gear in Figure A 17 clockwise This draws the tape leader block assembly LBA into the cartridge 5 As the leader pin is secured in the cartridge you should hear the leader pin retention...

Page 186: ...y 5 cm 2 in of tape on the takeup reel go to Tape Pulled from or Broken near Leader Pin on page A 15 2 From the supply reel inside the cartridge pull approximately 0 3 m 1 ft of tape 3 Make sure the t...

Page 187: ...Tape Tangled along Tape Path 1 Carefully pull out excess tape and untangle If you find the tape to be broken go to one of the following appropriate procedures Tape Spooled off Supply Reel on page A 1...

Page 188: ...ooling into the cartridge until the tape is taut and remains within the flanges of the tape guiding rollers turn the supply reel in Figure A 20 10 turns Ensure that you do not stretch the tape 5 Reass...

Page 189: ...d remains within the flanges of the tape guiding rollers Ensure that you do not stretch the tape Continue spooling until all tape is removed from the takeup reel in Figure A 21 4 Locate the threader i...

Page 190: ...nsion on the tape as the LBA is drawn into the cartridge 6 Rotate the loader intermediate gear in Figure A 22 and in Figure A 23 clockwise as viewed from the front of the drive until it stops This rel...

Page 191: ...s Cover on page A 5 3 Return the failed library to IBM Removing a Stuck Cartridge Magazine Complete the following steps to remove a stuck cartridge magazine from the library 1 Turn OFF the power to th...

Page 192: ...A 22 TS2900 Tape Autoloader Setup Operator and Service Guide...

Page 193: ...de information 0001 At power on initialization a firmware error was detected All 4 LEDs ON 1 Upgrade reinstall firmware and try again 2 Cycle the power supply and try again If the problem is corrected...

Page 194: ...Cycle the power supply and try again If the problem is corrected run Library Verify before resuming normal library operations If the problem persists see Contacting IBM Technical Support on page 7 1 0...

Page 195: ...supply and try again If the problem is corrected run Library Verify before resuming normal library operations If the problem persists see Contacting IBM Technical Support on page 7 1 0053 Response ac...

Page 196: ...on page 7 1 0071 Calibration failed due to an empty magazine Suspect the magazine set sensor CHK 0071 Cycle the power supply and try again If the problem is corrected run Library Verify before resumi...

Page 197: ...t the X origin sensor or X motor CHK 0080 Cycle the power supply and try again If the problem is corrected run Library Verify before resuming normal library operations If the problem persists see Cont...

Page 198: ...nical Support on page 7 1 00B1 No media is contained in the specified cell Cell Empty Suspect the centering sensor X motor or P motor CHK 00B1 Cycle the power supply and try again If the problem is co...

Page 199: ...or operation Suspect the centering sensor P origin sensor FWD sensor or P motor CHK 00BF 00C0 Accessor operation disabled because a cartridge magazine was removed Suspect the magazine set sensor CHK 0...

Page 200: ...or damage If not damaged return it to the library and run Library Verify before resuming normal library operations If damaged replace the magazine 00DA I O Station failed to unlock Suspect the magazin...

Page 201: ...or CHK 00F9 00FA Sensor error 7 Accessor forward sensor error detected during blink check Suspect the Accessor forward sensor CHK 00FA 00FB Sensor error 8 Accessor origin sensor error detected during...

Page 202: ...er error User Access User name parameter error User Access Not enough role User Access An user name unmatched User Access An user is already existed User Access Users full User Access Flush ROM write...

Page 203: ...lure All Library logs download failure Please retry download Download Library Logs E mail submit failure Notifications SNMP trap submit failure Notifications Log data access failure Traces View Librar...

Page 204: ...r ON 21 Error Drive error ON 22 Library error ON 51 Drive 52 Library Warning Drive error Library error Endurance frequency attainment ON 53 Drive Cleaning demand reception from drive ON 54 Library Cle...

Page 205: ...if devices add additional TapeAlerts that are not supported today However should this occur the MIB is written to minimize impact to the SNMP monitoring station At the time of this writing the TapeAl...

Page 206: ...r damage If not damaged return the cartridge to the library Run Library Verify before resuming normal library operations If the cartridge did not unload from the drive cycle the power supply and try a...

Page 207: ...Set for any unrecoverable read write or positioning error that is due to a faulty tape cartridge Replace the tape cartridge 5 Read failure Set for any unrecoverable read error where the isolation is...

Page 208: ...rectory in the cartridge memory has been corrupted Re read all data from the tape to rebuild the tape directory 19 Nearing media life Set when the tape cartridge is nearing its specified end of life I...

Page 209: ...at was previously unloaded is corrupted The file search performance is degraded Use your backup software to rebuild the tape directory by reading all the data 52 Tape system area write failure Set whe...

Page 210: ...g the Operator Panel or the Web User Interface 4 If the cartridge will still not unload from the drive see Contacting IBM Technical Support on page 7 1 59 WORM Media integrity check failed Set when th...

Page 211: ...by IBM for example AIX Linux Sun Solaris HP UX Windows 2003 and Windows 2000 the IBM Ultrium Device Drivers Installation and User s Guide contains information about how to obtain sense data after an...

Page 212: ...l intervention required 3A 02 Media not present tray open 80 05 During reprogramming mode Hardware Error 04 15 01 Mechanical position error 40 nn Diagnostic failure on component nn 80h ffh 44 00 Inter...

Page 213: ...te the reason for the command failure 00 01 Filemark detected A Read or Space command terminated early due to an FM The FM flag is set 00 02 EOM A Write or Write File Marks command failed because the...

Page 214: ...he one issuing the command 30 00 Incompatible Media Installed A write type operation could not be executed because it is not supported on the cartridge type that is loaded 30 01 Unknown Format An oper...

Page 215: ...the cartridge 53 00 Media Load Eject Failed Sense Key 04 An attempt to load or eject the cartridge failed due to a problem with the drive 53 02 Media Removal Prevented An Unload command has failed to...

Page 216: ...ncryption Key Unknown EE 32 Encryption Keystore Related Problem EE 42 Encryption EKM Challenge Pending EE E2 Encryption Key Translation Disallowed EE FF Encryption Security Prohibited Function EF 01 E...

Page 217: ...t Wrap 30 33 Relative LPOS 34 SCSI Address 35 Frame number Drive number 36 39 Port Identifier Relative Target Port Address Reporting Sense This is the hashed SAS address of the drive port for example...

Page 218: ...Bytes 3 5 are only valid if the Valid flag is set This occurs only for current errors and not for deferred errors 7 The Field Replaceable Unit field Byte 14 is set to either zero or to a non zero ven...

Page 219: ...e SCSI Bus Address for the drive Values returned range from 00h to 0Fh 14 This field Byte 35 contains the frame and drive number passed across the RS 422 serial interface For additional information re...

Page 220: ...D 10 TS2900 Tape Autoloader Setup Operator and Service Guide...

Page 221: ...In most cases you will use the summary report to find the date and time of any errors related to library devices then use the detail report to obtain the sense data needed to identify the cause of the...

Page 222: ...a would be listed SCSI Sense Data Library Error The following example of SCSI Sense Data was received from a System p Open System host and shows a Tape Drive Failure and what the sense data would look...

Page 223: ...sent by the host In this case 0C bytes bb SCSI target address In this example SCSI address 00 xx Unused or reserved cc Start of CDB cc is the operation code byte 0 In this case A5 which was an Move M...

Page 224: ...the IBM TotalStorage LTO Ultrium Tape Drive SCSI Reference LABEL TAPE_ERR2 IDENTIFIER 476B351D Date Time Wed May 09 07 51 42 DFT Sequence Number 1669 Machine Id 0046083B4C00 Node Id risc4 Class H Typ...

Page 225: ...gon and its security password QSRV After signing on the proper access authorizations will be granted and the System i MAIN MENU displays 1 Type STRSST Start System Service Tools command on the command...

Page 226: ...as a resource type of 3572 and press Enter 8 On the Display Detail Report for Resource screen press F4 Additional Information Pressing F4 will display the machine type and serial number of the device...

Page 227: ...on this form will be helpful if a call to IBM Service is necessary Store this form in a secure location Physical Library Logical Library Tape Drive Network Settings Machine type 3572 TL Serial Number...

Page 228: ...ress Sender Address Subject Mail to 01 Mail to 02 Mail to 03 Mail to 04 Mail Event Level SNMP Server Community Name Location Contact Trap to 01 Trap to 02 Trap to 03 Trap to 04 User 1 User 2 User 3 Us...

Page 229: ...d in the table below Modify and add additional Administrator Superuser and User names and passwords that are created My Notification Secondary EKM SSL Port Address Advanced Encryption Settings Type of...

Page 230: ...F 4 TS2900 Tape Autoloader Setup Operator and Service Guide...

Page 231: ...ouse Navigating by keyboard You can use keys or key combinations to perform operations and initiate many menu actions that can also be done through mouse actions You can navigate the HTML version of t...

Page 232: ...G 2 TS2900 Tape Autoloader Setup Operator and Service Guide...

Page 233: ...ANTY OF ANY KIND EITHER EXPRESS OR IMPLIED INCLUDING BUT NOT LIMITED TO THE IMPLIED WARRANTIES OF NON INFRINGEMENT MERCHANTABILITY OR FITNESS FOR A PARTICULAR PURPOSE Some states or regions do not all...

Page 234: ...or other countries or regions or both Other company product or service names may be the trademarks or service marks of others Electronic Emission Notices Federal Communications Commission FCC Class A...

Page 235: ...on requirements resulting from a non recommended modification of the product including the fitting of non IBM option cards This product has been tested and found to comply with the limits for Class A...

Page 236: ...lt die Grenzwerte der EN 550022 Klasse A ein Um dieses sicherzustellen sind die Ger te wie in den Handb chern beschrieben zu installieren und zu betreiben Des Weiteren d rfen auch nur von der IBM empf...

Page 237: ...e der Klasse A Dieses Ger t ist berechtigt in bereinstimmung mit dem Deutschen EMVG das EG Konformit tszeichen CE zu f hren Verantwortlich f r die Konformit tserkl rung des EMVG ist die IBM Deutschlan...

Page 238: ...H 6 TS2900 Tape Autoloader Setup Operator and Service Guide...

Page 239: ...particularly the area surrounding equipment AME Application Managed Encryption ampere A A unit of measure for electric current that is equivalent to a flow of one coulomb per second or to the current...

Page 240: ...al harm to people Contrast with attention and danger CE Customer engineer field engineer service representative centimeter cm One one hundredth of a meter 0 01 m Approximately 0 39 inch channel comman...

Page 241: ...concept These libraries usually have the file extension dll ocs for libraries containing activeX controls or drv for legacy system drivers DNS Directory Name System This allows the library to recogniz...

Page 242: ...ls file A named set of records stored or processed as a unit Also referred to as a dataset file protection The processes and procedures established in an information system that are designed to inhibi...

Page 243: ...issue since it takes the library a while to configure initial microprogram load IML The action of loading a microprogram from an external storage to writable control storage initiator The component th...

Page 244: ...ryption LTO See Linear Tape Open LVD SCSI Bus Low Voltage Differential M MAC address The Media Access Control address of a computer networking device magnetic tape A tape with a magnetic surface layer...

Page 245: ...y wound solenoid that is excited with a linear current density in its winding of one abampere per 4 centimeters of axial length offline Pertaining to the operation of a functional unit without the con...

Page 246: ...place to repair the hardware SAS See Serial Attached SCSI scratch cartridge A data cartridge that contains no useful data but can be written to with new data SCSI Small computer system interface SE Si...

Page 247: ...the fundamental product START Start maintenance subsystem A secondary or subordinate system usually capable of operating independently of or asynchronously with a controlling system SUPP Support sync...

Page 248: ...unctional areas of the drive and information required for manufacturing RAS and engineering W word A character string that is convenient for some purpose to consider as an entity World Wide Node Name...

Page 249: ...v6 address 3 20 library access mode 3 18 library configuration form F 1 library managed encryption 3 23 library settings 3 30 link speed ethernet 3 20 network settings 3 20 3 29 notification settings...

Page 250: ...on form F 1 connecting host interface cable 3 13 connecting network cable 3 13 connecting power cord 3 14 diagnosing problems 6 3 downloading drive logs 4 33 downloading library logs 4 33 error codes...

Page 251: ...ails 3 9 8 10 location in rack 3 7 rack brackets 3 8 8 4 8 9 random access mode configuration 3 18 3 30 Operator Panel 4 8 Ready Activity LED 2 1 rear panel Accessor locking screw 1 4 ethernet port 1...

Page 252: ...on 4 24 auto cleaning 4 21 cleaning drives 4 18 configuring library 3 16 display elements 2 6 A 3 downloading drive logs 4 33 downloading library logs 4 33 e mail notifications 4 26 Encryption Key Man...

Page 253: ...nformation about products and prices please contact your IBM branch office your IBM business partner or your authorized remarketer When you send comments to IBM you grant IBM a nonexclusive right to u...

Page 254: ...opment Department 61C 9032 South Rita Road Tucson Arizona USA 85775 4401 _ _ _ _ _ _ _ _ _ _ _ _ _ _ _ _ _ _ _ _ _ _ _ _ _ _ _ _ _ _ _ _ _ _ _ _ _ _ _ _ _ _ _ _ _ _ _ _ _ _ _ _ _ _ _ _ _ _ _ _ _ _ _ _...

Page 255: ......

Page 256: ...Part Number 45E3877 Printed in USA GC27 2212 00 1P P N 45E3877...

Page 257: ...Spine information IBM System Storage TS2900 Tape Autoloader Setup Operator and Service Guide Machine Type 3572...

Reviews: