


What to do next
Prepare the system for operation. For instructions, see “Preparing the 8335-GTB system for operation after
you remove and replace internal parts” on page 198.
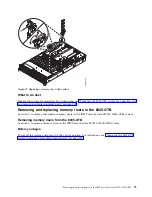
Removing and replacing a graphics processing unit in the 8335-GTB
Learn how to remove and replace a graphics processing unit (GPU) in the IBM Power System S822LC
(8335-GTB) system.
Removing the graphics processing unit from an air-cooled 8335-GTB
system
Learn how to remove and replace a graphics processing unit (GPU) in the air-cooled IBM Power System
S822LC (8335-GTB) system.
Before you begin
Power off the system and place it in the service position. For instructions, see “Preparing the 8335-GTB
system to remove and replace internal parts” on page 195.
About this task
Attention:
For safety and airflow purposes, if you remove parts from the system, you must ensure that:
v
PCIe tailstock fillers are present
v
Graphic processor unit (GPU) airflow tunnels are present.
Procedure
1.
Attach the electrostatic discharge (ESD) wrist strap.
Attention:
v
Attach an electrostatic discharge (ESD) wrist strap to the front ESD jack, to the rear ESD jack, or to
an unpainted metal surface of your hardware to prevent the electrostatic discharge from damaging
your hardware.
v
When you use an ESD wrist strap, follow all electrical safety procedures. An ESD wrist strap is
used for static control. It does not increase or decrease your risk of receiving electric shock when
using or working on electrical equipment.
v
If you do not have an ESD wrist strap, just prior to removing the product from ESD packaging and
installing or replacing hardware, touch an unpainted metal surface of the system for a minimum of
5 seconds.
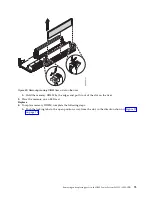
2.
Remove the two GPU airflow tunnels that cover the GPUs.
3.
If you are removing multiple GPUs, label the GPUs, noting their positions and orientations.
4.
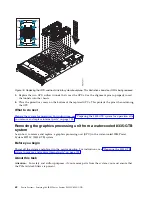
For the GPU you are removing, remove the eight screws shown in Figure 75 on page 61.
Attention:
Do not unscrew the four spring-loaded screws that attach the heat sink to the GPU.
60
Power Systems: Servicing the IBM Power System S822LC (8335-GTB)
Summary of Contents for S822LC
Page 1: ...Power Systems Servicing the IBM Power System S822LC 8335 GTB IBM ...
Page 2: ......
Page 3: ...Power Systems Servicing the IBM Power System S822LC 8335 GTB IBM ...
Page 16: ...xiv Power Systems Servicing the IBM Power System S822LC 8335 GTB ...
Page 204: ...188 Power Systems Servicing the IBM Power System S822LC 8335 GTB ...
Page 242: ...226 Power Systems Servicing the IBM Power System S822LC 8335 GTB ...
Page 243: ......
Page 244: ...IBM ...


