background image

2.

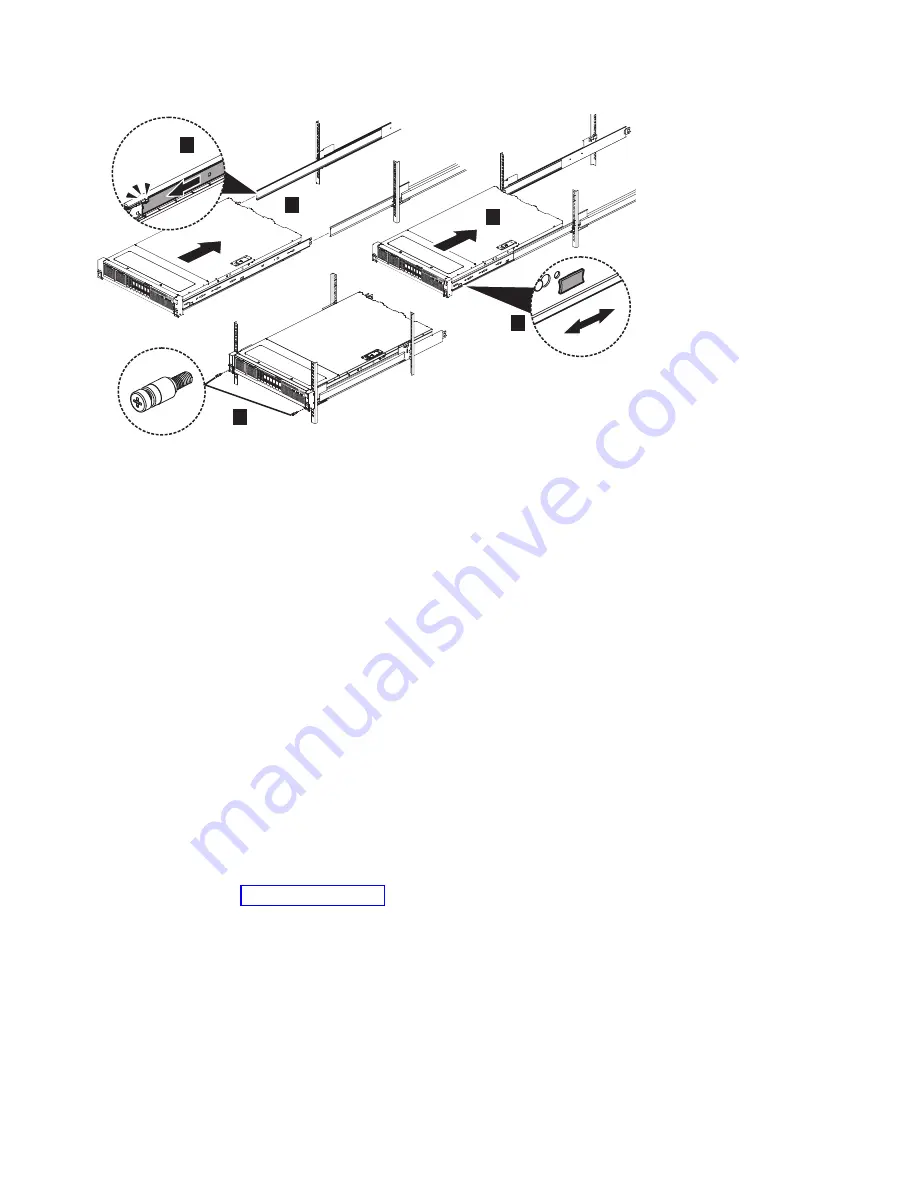
Make sure that the ball bearing retainer is located at the front of the middle
section of the rail.

3.

With the help of multiple persons, lift the chassis until the inner section of the
rail (attached to the chassis) is aligned with the middle section (

▌1▐

).

4.

Insert the chassis and inner member into the middle section of the rail until it
stops (

▌2▐

▌3▐

).

5.

Pull or push the release tab to unlock (

▌4▐

), and then retract the chassis into the

rack.

6.

If you ship the rack with the chassis attached, tighten the shipping screws in
the front of the chassis before you ship the rack (

▌5▐

).

Installing the cable management arm assembly for the SAN
Volume Controller 2145-SV1

The SAN Volume Controller 2145-SV1 uses a cable management arm (CMA)
assembly to route and secure power and data cables.

About this task

v

The CMA assembly can be installed on either side of the node.

v

The inner rail of the CMA assembly must be on top to work correctly.

Figure 23 on page 23 shows the parts that are used to install the CMA assembly.

1

2

3

5

sv100028

2

3

4

5

6

1

2

1

SAN V

olume Controller

7

8

2

3

4

5

6

1

2

1

SAN V

olume Controller

7

8

2

3

4

5

6

1

2

1

SAN V

olume Controller

7

8

4

Figure 22. Insert the chassis into the rack

22

SAN Volume Controller: Model 2145-SV1 Hardware Installation Guide

Summary of Contents for MTM 2145-12F

Page 1: ...IBM SAN Volume Controller MTM 2145 SV1 2147 SV1 2145 12F 2147 12F 2145 24F 2147 24F 2145 92F and 2147 92F Hardware Installation Guide GI13 4547 02 IBM...

Page 2: ...The information in the Safety and environmental notices on page ix v The information in the IBM Environmental Notices and User Guide provided on a DVD This edition replaces GI13 4547 01 Copyright IBM...

Page 3: ...r 2145 SV1 hardware 15 Preparing for the SAN Volume Controller 2145 SV1 hardware installation 15 Installing the SAN Volume Controller 2145 SV1 18 Installation guidelines 18 Installing the support rail...

Page 4: ...d password for system initialization 153 Initializing the SAN Volume Controller 2145 SV1 system by using the technician port 154 Adding nodes to an existing system 155 Appendix A Accessibility feature...

Page 5: ...t fascia of the 2145 92F expansion enclosure 51 43 Features on the rear of the 2145 92F expansion enclosure 51 44 2145 92F support rails 52 45 2145 92F CMA assemblies 53 46 Tray containing expansion e...

Page 6: ...pander module removed from the enclosure 121 115 Expansion canister 122 116 Removing the expansion canister 123 117 Fan module LED 124 118 Fan module release tab 124 119 Remove fan module 125 120 Fan...

Page 7: ...3 Weight of an enclosure with 92 SAS drives 48 14 Enclosure weight as FRUs are installed 48 15 LEDs on the secondary expander modules 119 16 Examples of supported SAS chain combinations 139 17 Display...

Page 8: ...viii SAN Volume Controller Model 2145 SV1 Hardware Installation Guide...

Page 9: ...e IBM System Storage SAN Volume Controller Safety Notices with the user publications that were provided with the SAN Volume Controller hardware 3 Find the matching identification number in the IBM Sys...

Page 10: ...n number You can use this identification number to check the safety notice in each language To find the translated text for a caution or danger notice 1 In the product documentation look for the ident...

Page 11: ...to safely lift this part or unit C011 CAUTION To avoid personal injury before lifting this unit remove all appropriate subassemblies per instructions to reduce the system weight C012 CAUTION The door...

Page 12: ...on before each use Do not over force moving or rolling the LIFT TOOL with stabilizer brake engaged v Do not raise lower or slide platform load shelf unless stabilizer brake pedal jack is fully engaged...

Page 13: ...ch is locked in position before releasing handle Read instruction page before operating this winch Never allow winch to unwind freely Freewheeling will cause uneven cable wrapping around winch drum da...

Page 14: ...comes with your rack cabinet for the weight of a loaded rack cabinet v Verify that all door openings are at least 760 x 230 mm 30 x 80 in v Ensure that all devices shelves drawers doors and cables are...

Page 15: ...nd only to connect or disconnect signal cables v Never turn on any equipment when there is evidence of fire water or structural damage v Disconnect the attached power cords telecommunications systems...

Page 16: ...ate and properly secure the load on the lift tool before moving or using the lift tool to lift or move an object D010 DANGER Multiple power cords The product might be equipped with multiple power cord...

Page 17: ...cabinet when directed to disconnect power during servicing v Connect all devices installed in a rack cabinet to power devices installed in the same rack cabinet Do not plug a power cord from a device...

Page 18: ...vy object 1 Ensure that you can stand safely without slipping 2 Distribute the weight of the object equally between your feet 3 Use a slow lifting force Never move suddenly or twist when you attempt t...

Page 19: ...stall all safety shields guards labels and ground wires Replace any safety device that is worn or defective v Reinstall all covers correctly after you have finished servicing the unit Safety and envir...

Page 20: ...on any equipment when there is evidence of fire water or structural damage v Disconnect the attached power cords telecommunications systems networks and modems before you open the device covers unles...

Page 21: ...circuit to cause electrical shock By observing the previous rule you might prevent a current from passing through your body When using testers set the controls correctly and use the approved probe lea...

Page 22: ...guide If any unsafe conditions are present you must determine how serious the apparent hazard might be and whether you can continue without first correcting the problem For example consider the follow...

Page 23: ...tall or service SAN Volume Controller Procedure To conduct an external device check complete the following steps 1 Verify that all external covers are present and are not damaged 2 Ensure that all lat...

Page 24: ...from the site power distribution units 5 Test the grounding continuity between a conductive area on the SAN Volume Controller frame and the ground pin on the plug of each input power cable 6 Initiate...

Page 25: ...ut putting it down If it is necessary to put the device down place it onto its static protective bag If your device is an adapter place it component side up Do not place the device onto the cover of t...

Page 26: ...xxvi SAN Volume Controller Model 2145 SV1 Hardware Installation Guide...

Page 27: ...rk v Verify the completeness of a SAN Volume Controller installation The topics within this book provide conceptual planning and installation information for the SAN Volume Controller hardware model t...

Page 28: ...are available in Adobe portable document format PDF from a website ibm com shop publications order Click Search for publications to find the online publications you are interested in and then view or...

Page 29: ...related websites Table 3 lists websites that provide publications and other information about the SAN Volume Controller or related products or technologies The IBM Redbooks publications provide positi...

Page 30: ...ing on v A detailed description of any information that should be changed How to get information help and technical assistance If you need help service technical assistance or just want more informati...

Page 31: ...ustomer number is a 7 digit number 0000000 9999999 assigned by IBM when the product is purchased Your customer number should be on the customer information worksheet or on the invoice from your storag...

Page 32: ...ss these pages go to www ibm com support and follow the instructions Also some documents are available through the IBM Publications Center Sign up for the Support Line Offering If you have questions a...

Page 33: ...or have them completed by an IBM service representative or IBM Business Partner 1 Verify that all the system installation requirements have been met Ensure that space and power requirements are met b...

Page 34: ...uct To receive product support notifications from IBM you must register your product To register your product click Register at this website www ibm com support 2 Create a system Use the System Initia...

Page 35: ...an individual server in a SAN Volume Controller clustered system on which the SAN Volume Controller software runs The nodes are always installed in pairs a minimum of one pair and a maximum of four pa...

Page 36: ...er 2145 SV1 contains v At least one Fibre Channel adapter or one 10 Gbps Ethernet adapter v Optional second third and fourth Fibre Channel adapters v 64 256 GB memory v Two eight core processors v Dua...

Page 37: ...status LED 9 Operator information panel 10 Front USB ports 1 3 11 Right side latch releases chassis to slide out on rails 12 Drive slot fillers no empty slots permitted 13 Boot drives 14 Battery fault...

Page 38: ...and indicators such as the power control button and LEDs that provide node information Figure 2 shows the operator information panel for the SAN Volume Controller 2145 SV1 1 Power control button and...

Page 39: ...nitialized and initial setup is completed you can use the Management GUI to identify a node by making the Identify LED on the node blink Node status LED The green Node status LED has the following sta...

Page 40: ...e the status of the Fibre Channel ports Ethernet connection and activity power and electrical current Figure 3 shows the rear panel indicators on the SAN Volume Controller 2145 SV1 back panel assembly...

Page 41: ...itch On Off The link is up and running at the expected port speed This display does not necessarily imply logical connectivity that is completion of FLOGI or FIP On On The link is up but running at a...

Page 42: ...d v 1 2 or 3 lanes are connected but not all 4 v Not all 4 lanes are running at the same speed v Not all 4 all lanes are connected to the same remote port v An unsupported device is connected to the p...

Page 43: ...inguish a particular node when you move from the rear of the rack to the front You can also trigger flashing from the management GUI by selecting Monitoring System Right click the node and select Iden...

Page 44: ...rts on a 10 Gbps Ethernet adapter If the SAN Volume Controller 2145 SV1 is equipped with a 10 Gbps Ethernet adapter the port activity is not reflected on the activity LEDs of the operator information...

Page 45: ...Serial port not used 5 Rear USB port 1 6 Rear USB port 2 7 Unused Ethernet port 8 10 Gbps Ethernet port 1 9 10 Gbps Ethernet port 2 10 10 Gbps Ethernet port 3 11 Technician port Ethernet Figure 12 on...

Page 46: ...ian port can be used during normal operation Connect a device to the Technician port only when you are directed to do so by a service procedure or by your IBM service representative SAN Volume Control...

Page 47: ...e expansion slot number Adapter 1 Not used 2 12 Gbps SAS adapter 3 16 Gbps Fibre Channel adapter or 10 Gbps Ethernet adapter 4 16 Gbps Fibre Channel adapter or 10 Gbps Ethernet adapter 5 Compression A...

Page 48: ...mmunications 1 3 10 Gbps Ethernet ports 1 3 4 7 10 Gbps optical Ethernet ports 4 7 sv100014 1 2 4 5 3 7 8 6 12 1 2 3 4 5 6 7 8 10 9 11 12 14 13 15 16 Figure 15 Fibre Channel port numbers in a typical...

Page 49: ...you require 2 Install the support rails for the nodes 3 Install the cable management arms for the nodes 4 Install the nodes 5 Optionally install the expansion enclosures 6 Connect the Fibre Channel a...

Page 50: ...e been received and that all the optional features are fitted Verify that you know the quantity of nodes and optional features that were ordered A label on the main shipping box indicates the features...

Page 51: ...hat the correct part set has been shipped for the feature codes Unless otherwise stated the feature code contents are in the main box v Feature codes 3001 and 3002 ship the same parts Verify that you...

Page 52: ...llation guidelines Before you install the support rails for the 2145 SV1 node review the following guidelines v Do not install a unit in a rack where the internal rack ambient temperature exceeds the...

Page 53: ...the 2U area in the rack 1 Front 2 Rear 3 Upper U for 2U system 4 Lower U 5 Location of optional screws for securing enclosure to rack 6 Location of rail mounting pins 3 Detach the inner section of on...

Page 54: ...the appliance to lock as shown in Figure 20 5 Repeat steps 3 on page 19 4 for the opposite rail 6 Install the outer section of the rail to the front frame as shown in the following figure sv100026 2 3...

Page 55: ...r the opposite rail Installing the SAN Volume Controller 2145 SV1 in a rack After you install the support rails you can install the SAN Volume Controller 2145 SV1 node in the rack Before you begin CAU...

Page 56: ...hassis before you ship the rack 5 Installing the cable management arm assembly for the SAN Volume Controller 2145 SV1 The SAN Volume Controller 2145 SV1 uses a cable management arm CMA assembly to rou...

Page 57: ...at its final destination Procedure To install the CMA assembly complete the following steps 1 Optional You might need to reverse the left right orientation of the CMA to accommodate the routing of ca...

Page 58: ...Install the CMA outer connector 3 onto the CMA connector base on the outer member 4 as shown in the following figure sv100017 1 2 Figure 24 Reversing the orientation of the assembly 1 2 sv100019 Figu...

Page 59: ...and Fibre Channel cables Before you begin Refer to the cable connection table to find out where to connect the Ethernet and Fibre Channel cables Up to three RJ45 Ethernet cables can be connected to th...

Page 60: ...6 Attention When routing the Fibre Channel cables do not tighten the cable straps or bend the cables to a radius smaller than 76 mm 3 in 4 Connect the other ends of the Fibre Channel cables to the pro...

Page 61: ...AN Volume Controller 2145 SV1 runs an extended series of power on self tests The node might appear to be idle for up to five minutes after it powers on Figure 30 shows the controls and indicators on t...

Page 62: ...battery charge is low the battery status LED flashes When the batteries are fully charged the battery status LED is on The battery fault LEDs should be off Results The installation of the SAN Volume C...

Page 63: ...l SAS expansion enclosures to the 2145 SV1 Installing support rails for 2U SAS expansion enclosures Before you install 2U SAS expansion enclosures you must first install support rails Before you begin...

Page 64: ...igure 33 Note Some models of rail have the studs on the outside of the rail c Stretch the spring slightly and push the other looped end of the spring onto the other stud on the inside of the rail 4 Wo...

Page 65: ...ing holes in your rack see Table 9 Table 9 Selecting bracket pins for your rack Mounting holes Bracket pins Round unthreaded Use the preinstalled medium pins Round threaded Unscrew the medium pins and...

Page 66: ...the two bracket pins into the holes in the rack flanges 11 Close the front hinge bracket to secure the rail to the rack cabinet flange See Figure 36 12 Secure the rear of the rail to the rear rack fl...

Page 67: ...ensure rack stability Empty the rack from the top down Procedure To install an optional SAS expansion enclosure complete the following steps 1 On either side of the drive assemblies remove the enclos...

Page 68: ...vious steps to complete the installation Connecting the optional 2U SAS expansion enclosures to the 2145 SV1 After you install the SAS expansion enclosures into the rack you must connect them to each...

Page 69: ...to provide access to the following components Ethernet ports including the technician port The technician port is used for initial setup of the system by directly attaching to a personal computer It...

Page 70: ...enclosure 6 2145 24F or 2145 12F SAS expansion enclosure 2 If more I O groups are configured repeat the cabling procedure for the other I O groups The system supports up to four I O groups with a tot...

Page 71: ...aximum SAS chain weight that can be attached to a node SAS port is 10 v 2145 92F enclosures have a chain weight of 2 5 v 2145 24F and 2145 12F enclosures have a chain weight of 1 Example Table 10 Exam...

Page 72: ...38 SAN Volume Controller Model 2145 SV1 Hardware Installation Guide...

Page 73: ...n these steps see Unpacking and installing the enclosure 2145 92F on page 53 Safety notices and considerations 2145 92F Before you install service or move the 2145 92F expansion enclosure you must rev...

Page 74: ...es present constitute a shock hazard which can cause severe injury or death L004 DANGER 240VA Hazardous energy present Voltages with hazardous energy might cause heating when shorted with metal which...

Page 75: ...prevent an electrical shock R001 part 1 of 2 CAUTION v Do not install a unit in a rack where the internal rack ambient temperatures will exceed the manufacturer s recommended ambient temperature for a...

Page 76: ...fer to the documentation that comes with your rack cabinet for the weight of a loaded rack cabinet v Verify that all door openings are at least 760 x 230 mm 30 x 80 in v Ensure that all devices shelve...

Page 77: ...e bolt or stud goes into where the terminal conductor and the lock washer contact should be free of any non conductive material to allow for metal to metal contact All PROTECTIVE EARTHING CONDUCTORS s...

Page 78: ...ion before each use Do not over force moving or rolling the LIFT TOOL with stabilizer brake engaged v Do not raise lower or slide platform load shelf unless stabilizer brake pedal jack is fully engage...

Page 79: ...d instruction page before operating this winch Never allow winch to unwind freely Freewheeling will cause uneven cable wrapping around winch drum damage cable and may cause serious injury C048 part 2...

Page 80: ...sion enclosure above position 22U in the rack Weight of expansion enclosure parts Table 11 summarizes the weight and quantity of the parts FRUs that are shipped with the 2145 92F expansion enclosure T...

Page 81: ...304 0 670 1 8 TB 10 K 2 5 inch hard disk drive 01LJ063 AH74 0 304 0 670 6 TB 7 2 K 3 5 inch Near Line SAS hard disk drive 01LJ064 AH77 0 876 1 931 8 TB 7 2 K 3 5 inch Near Line SAS hard disk drive 01...

Page 82: ...lled Table 14 Enclosure weight as FRUs are installed Enclosure assembly Approximate weight FRUs installed FRUs not installed kg lb v Enclosure 01LJ112 v Secondary expansion modules v Fascia 1U and 4U...

Page 83: ...ure 01LJ112 v Secondary expansion modules v Fascia 1U and 4U v PSUs v Expansion canisters v Fan modules v Fan interface boards v 92 2 5 inch tier 1 flash drives v Cover 78 6 173 3 v Enclosure 01LJ112...

Page 84: ...n the front of the enclosure Figure 41 shows the front of the 2145 92F expansion enclosure In the figure all parts are installed in the enclosure 1 Display panel indicators 2 Rack retention thumb scre...

Page 85: ...enclosures are accessible from the back of the enclosure 1 Power cable connector for PSU 2 2 Power cable retention clamps x4 svc01042 Figure 42 Front fascia of the 2145 92F expansion enclosure svc0101...

Page 86: ...enclosure The support rails are packaged separately from the expansion enclosure Cable management arm The cable management arm CMA which consists of an upper and lower assembly are packaged separately...

Page 87: ...ft this part or unit C011 CAUTION To avoid personal injury before lifting this unit remove all appropriate subassemblies per instructions to reduce the system weight C012 Important Before you unpack m...

Page 88: ...stalled in the enclosure However due to weight considerations you must remove some parts and then reinstall them as part of the initial installation process Note Drives are not included in installatio...

Page 89: ...upport rails 2145 92F on page 58 8 Attach the remaining sections of the support rails to the rack as described in step 6 on page 60 in Installing or replacing the support rails 2145 92F on page 58 9 M...

Page 90: ...enclosure securely into the rack as described in steps 6 on page 68 through 8 on page 68 in Installing or replacing an expansion enclosure in a rack 2145 92F on page 61 17 Remove the cable management...

Page 91: ...overheating Procedure 1 Use the slide rails to pull the enclosure out from the rack See Removing an expansion enclosure from a rack 2145 92F on page 104 for details 2 Slide the release latch 1 in the...

Page 92: ...5xL13 screws Set the hardware which is shown in Figure 51 aside for use later in the installation process 2 Select an available 5U space in your rack to install the expansion enclosure Important When...

Page 93: ...e inner section of the rail onto each side of the expansion enclosure as shown in Figure 54 on page 60 Pull tab forward a Push x2 svc01080 Figure 52 Detaching the inner rail section svc00965 1 Figure...

Page 94: ...e front of the rail that is attached to the frame click 1 2 M4x6L locking svc01081 Figure 54 Attaching the inner rail section to the enclosure 1 2 Click M5x13L Rear Bracket 3 1 Click 1 2 PUSH Front Br...

Page 95: ...2145 92F Installing or replacing an expansion enclosure in a rack 2145 92F Use the following procedure to place the 2145 92F expansion controller in a rack during the installation process To complete...

Page 96: ...t Always install servers and optional devices starting from the bottom of the rack cabinet v Rack mounted devices are not to be used as shelves or work spaces Do not place objects on top of rack mount...

Page 97: ...orrect power connection to a rack refer to the rating labels located on the equipment in the rack to determine the total power requirement of the supply circuit v For sliding drawers Do not pull out o...

Page 98: ...ack cabinet Refer to the documentation that comes with your rack cabinet for the weight of a loaded rack cabinet v Verify that all door openings are at least 760 x 230 mm 30 x 80 in v Ensure that all...

Page 99: ...ed storage sleeve area Latest revision manual available on vendor s website v Test verify stabilizer brake function before each use Do not over force moving or rolling the LIFT TOOL with stabilizer br...

Page 100: ...sure winch is locked in position before releasing handle Read instruction page before operating this winch Never allow winch to unwind freely Freewheeling will cause uneven cable wrapping around winch...

Page 101: ...e rack If you are reinstalling the expansion enclosure in the rack after you performed a service task for example replacing the enclosure you must also perform the following tasks v Reinstall all of t...

Page 102: ...n the following topics You can reinstall the parts in any order v Installing or replacing a power supply 2145 92F on page 91 and Installing or replacing the fascia 2145 92F on page 89 v Installing or...

Page 103: ...Figure 59 shows an example of an expansion canister If either of the two expansion canisters has a failure the other expansion canister assumes the full I O load 1 Canister fault indicator 2 Canister...

Page 104: ...ght need to move the cable management arm CMA aside to complete service tasks If needed you can also remove the CMA from the 2145 92F expansion enclosure About this task The cable management arm CMA c...

Page 105: ...73 However you might need to remove a CMA assembly from the 2145 92F expansion enclosures To do so complete step 1 on page 72 through step 8 on page 73 in following procedure Procedure Remove the upp...

Page 106: ...ector from the inner member of the left support rail 4 in Figure 62 5 Remove the inner connector of the upper CMA assembly 1 from the inner member of the left support rail 2 as shown in Figure 62 Remo...

Page 107: ...ly 9 To reinstall the CMA or replace it with one from FRU stock follow the procedure in Installing or replacing the cable management arm 2145 92F on page 75 Moving the cable management arms About this...

Page 108: ...cessible Procedure 1 To release the upper CMA push the latch on the support rail connector 5 to release it from the connector base 6 on the right rail svc01024 Figure 64 Upper and lower CMA assemblies...

Page 109: ...se procedures to install the cable management arm CMA for the 2145 92F expansion enclosure You can also use these procedure to replace a faulty CMA assembly About this task As part of the initial inst...

Page 110: ...ps from the upper and lower CMA assemblies The straps are used only for shipping Installing the upper CMA assembly Figure 70 on page 77 shows the connectors on the upper CMA assembly svc01017 Figure 6...

Page 111: ...nner member of the left support rail 2 as shown in Figure 71 from the outer and inner support rails 3 Install the inner connector of the upper CMA assembly 3 to the inner member of the left support ra...

Page 112: ...er the connector locations are reversed For comparison Figure 74 on page 79 shows the upper and lower CMA assemblies as they are aligned to the support rails The support rail connector of the upper CM...

Page 113: ...lower CMA assembly 11 to the connector on the left support rail 12 as shown in Figure 74 Ensure the lower CMA assembly is securely attached to the hooks on the end of the support rails 8 Route the ca...

Page 114: ...nclosure might cause the enclosure or its components to shut down to protect from overheating About this task To install or replace the top cover on the 2145 92F expansion enclosure complete the follo...

Page 115: ...powering off the expansion enclosure However to maintain operating temperature do not keep the cover off an operational enclosure for more than 15 minutes The reduction in airflow through the enclosu...

Page 116: ...a rack 2145 92F on page 104 3 Remove the cover as described in Removing the top cover 2145 92F on page 56 4 Locate the empty drive slot to receive the new drive or that contains the faulty drive that...

Page 117: ...drives are installed correctly Drives are installed in slots 1 14 of row A and the installation continues in slot 15 in row B In Figure 81 on page 84 the drives are not installed correctly Slot 1 A1 d...

Page 118: ...drive assembly is in the open unlocked position 7 Align the drive carrier into the appropriate drive slot 8 Gently push the drive down until it stops and the bottom of the latch is aligned with the t...

Page 119: ...9 Rotate the handle down to lock the drive assembly into the chassis 3 in Figure 82 1 2 3 4 svc00982 Figure 82 Replace the drive Chapter 4 Installing an optional 5U SAS expansion enclosure 85...

Page 120: ...nder modules after you perform other service tasks Before you begin DANGER Hazardous voltage present Voltages present constitute a shock hazard which can cause severe injury or death L004 DANGER 240VA...

Page 121: ...dule 2 is missing or is faulty the expansion canisters can communicate only with SAS port 1 on each drive Similarly if secondary expander module 1 is missing or is faulty the expansion canisters can c...

Page 122: ...Figure 85 4 Carefully align the edges of the secondary expander module in the guide slot in the enclosure as shown in Figure 86 on page 89 svc01068 1 2 Figure 84 LEDs on a secondary expansion module s...

Page 123: ...eiving power SAN Volume Controller 2145 92F expansion enclosure LEDs and indicators on page 144 describes the status indicated by the LEDs Installing or replacing the fascia 2145 92F During the initia...

Page 124: ...he front flange of the enclosure 3 Replace the four screws to reattach the 4U fascia Secure the screws from the back of the flange and into the rear of the fascia Each side of the 4U fascia contains t...

Page 125: ...ls Before you begin Important You can replace a PSU without powering off the expansion enclosure However to maintain operating temperature replace the PSU within 10 minutes of its removal When a PSU i...

Page 126: ...re as described in Removing the fascia 2145 92F on page 94 v You are aware of the procedures for handling static sensitive devices Procedure 1 Read all safety information 2 Rotate the handles on the P...

Page 127: ...lock clicks in to place 5 Verify that the AC input and the DC power indicators are lit on the front of the PSU as shown in Figure 91 on page 94 svc01033 Figure 90 Install the power supply Chapter 4 I...

Page 128: ...rom the front of a 2145 92F expansion enclosure About this task The expansion enclosure has a 4U front fascia that covers the display panel and a 1U fascia that covers the power supply units PSUs As F...

Page 129: ...nical lift is available to support the weight of the enclosure Remove the front 4U fascia 2 Remove the front fascia by removing the two screws that attach the fascia to the flange on each side of the...

Page 130: ...from the slot and pin that connect it to each side of the chassis You must remove the bottom fascia to access and service either PSU However as Figure 94 on page 97 shows you do not have to remove the...

Page 131: ...ove any cables that you are not instructed to remove If you replace more than one cable record which two ports canisters and enclosures each cable connects so you can match the connections with the re...

Page 132: ...rt until you hear or feel a click When the cable is successfully inserted you cannot disconnect the cable without pulling on the blue tag Connecting to a SAN Volume Controller node 7 Connect the SAS c...

Page 133: ...97 on page 100 shows the LEDs of expansion canister 1 on a 2145 92F expansion enclosure The SAS cable is successfully inserted in to port 1 input port 2 output does not contain a SAS cable svc01082 Fi...

Page 134: ...tect from overheating About this task The expansion enclosure might or might not be powered on depending on the number of fan modules that need to be replaced For example the expansion enclosure must...

Page 135: ...board FIB in a 2145 92F expansion enclosure Before you begin This task assumes that the following conditions are met v You have removed the fan interface board following the process described in Remov...

Page 136: ...If the fault LED on each fan module is lit it is possible that the FIB that controls those modules needs to be replaced You can also issue the lsenclosurefanmodule command to display the status of the...

Page 137: ...taining screws that secure the FIB to the drive board as shown in Figure 102 svc01031 Figure 101 Insert the new FIB in the chassis svc01029 Figure 102 Secure the FIB to the drive board Chapter 4 Insta...

Page 138: ...0 8 Replace the drives secondary expander modules and other heavy FRUs that were removed before the enclosure was removed from the rack 9 Replace the top cover as described in Installing or replacing...

Page 139: ...net Always install servers and optional devices starting from the bottom of the rack cabinet v Rack mounted devices are not to be used as shelves or work spaces Do not place objects on top of rack mou...

Page 140: ...ect power connection to a rack refer to the rating labels located on the equipment in the rack to determine the total power requirement of the supply circuit v For sliding drawers Do not pull out or i...

Page 141: ...Refer to the documentation that comes with your rack cabinet for the weight of a loaded rack cabinet v Verify that all door openings are at least 760 x 230 mm 30 x 80 in v Ensure that all devices shel...

Page 142: ...to metal contact All PROTECTIVE EARTHING CONDUCTORS should terminate at this main protective earthing terminal or at points marked with R010 DANGER DANGER Serious injury or death can occur if loaded...

Page 143: ...ction before each use Do not over force moving or rolling the LIFT TOOL with stabilizer brake engaged v Do not raise lower or slide platform load shelf unless stabilizer brake pedal jack is fully enga...

Page 144: ...serious injury Not for moving humans Make certain clicking sound is heard as the equipment is being raised Be sure winch is locked in position before releasing handle Read instruction page before ope...

Page 145: ...lable to support the weight of the enclosure Removing the expansion enclosure from the rack Note Continue the procedure step 5 through step 7 on page 112 only if you must completely remove the expansi...

Page 146: ...to be installed v Do not remove a PSU from an operational enclosure for more than approximately 10 minutes The reduction in airflow through the enclosure might cause the enclosure or its components to...

Page 147: ...out of the expansion enclosure chassis and place it in a safe location as shown in Figure 106 on page 114 svc01033 Figure 105 Releasing the power supply handles Chapter 4 Installing an optional 5U SAS...

Page 148: ...drive from a 2145 92F expansion enclosure to replace it with a new one received from FRU stock Before you begin Ensure that the drive is not a spare or a member of an array The drive status is shown...

Page 149: ...lable safety information 2 Use the slide rails to pull the enclosure out from the rack as described in Removing an expansion enclosure from a rack 2145 92F on page 104 3 Remove the top cover as descri...

Page 150: ...olumns 1 14 are marked on the front edge of the enclosure The row and column marks are visible when the top cover is removed 5 Slide the release latch forward 1 as shown in Figure 109 on page 117 svc0...

Page 151: ...or each drive you need to remove Replace the drive 9 To reinstall a drive or replace it with one from FRU stock follow the procedure in Installing or replacing a drive 2145 92F on page 81 Removing a s...

Page 152: ...ondary expander module until its replacement is ready to be installed v Do not keep the cover off an operational enclosure for more than 15 minutes The reduction in airflow through the enclosure might...

Page 153: ...s identify the operational status of the secondary expander modules Table 15 describes the function and status values of each LED indicator Table 15 LEDs on the secondary expander modules LED Color St...

Page 154: ...op cover 2145 92F on page 56 Procedure 1 Identify the secondary expander module to be replaced refer to Table 15 on page 119 2 Press the release buttons on top of the secondary expander module to rele...

Page 155: ...dary expansion module 7 To reinstall the secondary expansion module or replace it with one from FRU stock follow the procedure in Installing or replacing a secondary expander module 2145 92F on page 8...

Page 156: ...d SAN Volume Controller system If either of the two expansion canisters has a failure the other expansion canister assumes the full I O load Figure 115 shows the features of an expansion enclosure 1 C...

Page 157: ...t remove more than one fan module at a time v Remove a faulty fan module only when its replacement is ready to be installed v Do not remove a fan module from an operational enclosure for more than app...

Page 158: ...ase tab on the fan module as Figure 118 shows 3 Use the handle to pull the fan module out of the expansion enclosure chassis as shown in Figure 119 on page 125 svc01003 1 Figure 117 Fan module LED svc...

Page 159: ...ing an expansion enclosure from a rack 2145 92F on page 104 Ensure that you use a lift to support the weight of the enclosure About this task The 2145 92F expansion enclosure contains two fan interfac...

Page 160: ...each side of the chassis Place the cover and cover screws in a safe location 2 Use a cross head screwdriver to loosen the retaining screws on the FIB as shown in Figure 122 on page 127 svc01003 1 Figu...

Page 161: ...he FIB out of the expansion enclosure chassis as shown in Figure 123 svc01029 Figure 122 Loosen the FIB screws svc01031 Figure 123 Remove the FIB from the chassis Chapter 4 Installing an optional 5U S...

Page 162: ...an interface board 2145 92F on page 101 Replacing an enclosure 2145 92F You can replace a faulty enclosure FRU 01LJ112 of a 2145 92F expansion enclosure with a new one from FRU stock Before you begin...

Page 163: ...scia 2145 92F on page 94 Power supply units Removing a power supply 2145 92F on page 112 Secondary expander modules Removing a secondary expander module 2145 92F on page 117 Expansion canisters Removi...

Page 164: ...arts in any order Important Ensure that a mechanical lift is available and in place to support the additional weight as the FRUs are reinstalled in the enclosure v Installing or replacing a power supp...

Page 165: ...ully pull the display panel assembly shown in Figure 126 on page 132 out of the chassis svc01008 Figure 125 Removing the display panel assembly Chapter 4 Installing an optional 5U SAS expansion enclos...

Page 166: ...e procedure in Installing or replacing the display panel assembly 2145 92F Installing or replacing the display panel assembly 2145 92F You can replace the display panel assembly in a 2145 92F expansio...

Page 167: ...a rack 2145 92F on page 104 v The top cover was removed as described in Removing the top cover 2145 92F on page 56 v The display panel assembly was removed as described in Removing the display panel a...

Page 168: ...the expansion enclosure as shown in Figure 128 on page 135 Ensure the display panel assembly which is shown in Figure 127 faces toward the outside of the chassis svc01012 Figure 127 Display panel asse...

Page 169: ...described in Removing or moving the cable management arm 2145 92F on page 70 v The expansion enclosure has been removed from the rack as described in Removing an expansion enclosure from a rack 2145...

Page 170: ...re if software version 7 8 0 is not installed on the system About this task This task applies if you are installing a 2145 92F expansion enclosure When you insert the SAS cables ensure that the connec...

Page 171: ...be used to complete service actions for the system USB ports USB ports can be used to initialize the system or to perform service related tasks by using a USB flash drive that contains executable file...

Page 172: ...edure for the other I O groups Each system can have a maximum of four I O groups with two svc01050 1 2 4 5 3 7 8 6 12 1 2 4 5 3 7 8 6 12 2 1 2 1 2 1 2 1 Figure 132 Connecting the SAS cables 138 SAN Vo...

Page 173: ...enclosures have a chain weight of 2 5 v 2145 24F and 2145 12F enclosures have a chain weight of 1 Example Table 16 shows examples of different combinations of SAS weights Table 16 Examples of support...

Page 174: ...nclosure v Before you connect the power cables to the rear of the enclosure always check that the expansion enclosure is secured in the rack If needed tighten the thumbscrews on the front of the enclo...

Page 175: ...enclosure The enclosure automatically powers on and begins its Power On Self Tests POST 2 Secure the power cables in the cable retainer at each power connector on the rear of the enclosure Also ensur...

Page 176: ...xpansion enclosure all four fans and the expansion canister indicators 3 and 8 in Figure 136 on page 143 become active when the power is connected 1 2 svc01083 Figure 135 Power cable connections on th...

Page 177: ...UI view information about the system status and the expansion enclosure v If a new expansion enclosure was installed make sure that the enclosure was discovered by the system A newly recognized expans...

Page 178: ...drives 4 Unplug both of the power cords from the rear of the expansion enclosure to remove all power from the enclosure SAN Volume Controller 2145 92F expansion enclosure LEDs and indicators The 2145...

Page 179: ...y panel LEDs Function Color Status Description Power Green On The expansion enclosure power is on this LED is controlled by the expansion enclosure Off The expansion enclosure power is off Identify Bl...

Page 180: ...nclosure 1 as shown in Figure 141 on page 149 Table 18 Power supply unit LEDs Function Color Status Description 1 Input power Green On The input voltage is within specification Off No power input dete...

Page 181: ...and I O is occurring Off The drive is not installed or an installed drive is not ready to be used 3 Fault Amber On A fault occurred on the drive The LED is turned off when the drive is removed and rep...

Page 182: ...s not receiving power 2 Fault Amber On Not used Flash The secondary expansion module is being identified Off The secondary expansion module is operating normally LEDs on the rear of the expansion encl...

Page 183: ...LEDs as shown in Figure 142 The LEDs provide status information about the expansion canister itself and the SAS connections 1 Canister fault 2 Canister status 3 Canister power 4 and 6 SAS link fault...

Page 184: ...ceiving power 4 and 6 SAS link fault Amber Off No faults are detected All four lanes have a link connection On Several error conditions are possible v Only 1 2 or 3 lanes are connected but not all 4 v...

Page 185: ...defect related service requests If the support center cannot re create the issue support might request the client to re create the problem on a certified browser version Defects are not accepted for...

Page 186: ...ction select Allow all sites to run JavaScript e Click OK f Refresh your browser 2 Enable cookies in your web browser For Microsoft Internet Explorer IE 11 and Microsoft Edge running on Microsoft Wind...

Page 187: ...ontent c Click Advanced by the Enable JavaScript setting d Select Disable or replace context menus e Click OK to close the Advanced window f Click OK to close the Options window g Refresh your browser...

Page 188: ...f a switch is detected the technician port connection might shut down causing a 746 node error Procedure To initialize the system complete the following steps 1 Ensure that the nodes and switches of t...

Page 189: ...rted web browser and pointing it to http management_IP_address Use the management GUI to add each candidate node to the system Then it is best to use the management GUI to set the service IP address f...

Page 190: ...Zone the SAN Volume Controller node ports in the existing SAN Volume Controller zone The SAN Volume Controller zone exists in each fabric with only node ports 6 Zone the SAN Volume Controller node por...

Page 191: ...r specific instructions about adding a new node or adding a replacement node to a clustered system see the information about adding nodes to a system Chapter 5 Initializing the SAN Volume Controller 2...

Page 192: ...158 SAN Volume Controller Model 2145 SV1 Hardware Installation Guide...

Page 193: ...evices ports and connectors v You can attach alternative input and output devices The SAN Volume Controller online documentation and its related publications are accessibility enabled The accessibilit...

Page 194: ...160 SAN Volume Controller Model 2145 SV1 Hardware Installation Guide...

Page 195: ...anty is available in both hardcopy format and in the SAN Volume Controller IBM Knowledge Center The Statement of Limited Warranty is included in hardcopy form with your product It can also be ordered...

Page 196: ...162 SAN Volume Controller Model 2145 SV1 Hardware Installation Guide...

Page 197: ...r each node Ensure that your environment meets the power requirements as shown in Table 25 The maximum power that is required depends on the node type and the optional features that are installed Tabl...

Page 198: ...at are shown in Table 27 to ensure that space is available in a rack capable of supporting the node Table 27 Dimensions and weight Height Width Depth Maximum weight 87 mm 3 4 in 447 mm 17 6 in 746 mm...

Page 199: ...r 2145 SV1 node Model Heat output per node SAN Volume Controller 2145 SV1 v Minimum configuration 419 68 Btu per hour AC 123 watts v Maximum configuration 3480 24 Btu per hour AC 1020 watts Appendix C...

Page 200: ...166 SAN Volume Controller Model 2145 SV1 Hardware Installation Guide...

Page 201: ...of Licensing IBM Corporation North Castle Drive Armonk NY 10504 1785 U S A For license inquiries regarding double byte character set DBCS information contact the IBM Intellectual Property Department...

Page 202: ...other publicly available sources IBM has not tested those products and cannot confirm the accuracy of performance compatibility or any other claims related to non IBM products Questions on the capabi...

Page 203: ...nt This product may not be certified in your country for connection by any means whatsoever to interfaces of public telecommunications networks Further certification may be required by law prior to ma...

Page 204: ...on This is an EN 55022 Class A product In a domestic environment this product might cause radio interference in which case the user might be required to take adequate measures European community conta...

Page 205: ...etische Vertr glichkeit von Ger ten EMVG bzw der EMC EG Richtlinie 2004 108 EG f r Ger te der Klasse A Dieses Ger t ist berechtigt in bereinstimmung mit dem Deutschen EMVG das EG Konformit tszeichen C...

Page 206: ...ence Class A statement This explains the Japan Voluntary Control Council for Interference VCCI statement Japan Electronics and Information Technology Industries Association Statement This statement ex...

Page 207: ...oducts greater than 20 A per phase three phase Korean Electromagnetic Interference EMI Statement This explains the Korean Electromagnetic Interference EMI statement Russia Electromagnetic Interference...

Page 208: ...174 SAN Volume Controller Model 2145 SV1 Hardware Installation Guide...

Page 209: ...environmental notices ix xxv EPO emergency power off event xxiv Ethernet activity LED 9 connecting to 25 link LED 9 SAN Volume Controller 2145 SV1 25 European Union EU EMC Directive conformance statem...

Page 210: ...ure 29 reader feedback xxx rear panel indicators SAN Volume Controller 2145 SV1 6 related information xxviii removing 2145 92F2147 92F power supply 112 support rails 57 cable management arm 70 replaci...

Page 211: ...pace requirements SAN Volume Controller 2145 SV1 164 Statement of Limited Warranty 161 static sensitive devices xxiv superuser 153 support rails 2145 92F2147 92F 58 SAN Volume Controller 2145 SV1 18 s...

Page 212: ...178 SAN Volume Controller Model 2145 SV1 Hardware Installation Guide...

Page 213: ......

Page 214: ...IBM Printed in USA GI13 4547 02...

Reviews: