


v
6
-
0
: exit
6.
Press and hold the Unload button for 3 or more seconds, then release it to
select one of the above functions. The drive automatically starts the test. If you
cycle past the desired code, press the Unload button once per second until the
code reappears.
7.
The SCD will display a flashing
6
during the test.
v
If no error is detected, the diagnostic will loop and begin again. To stop the
loop, press the Unload button for 1 second and release. When the loop ends,
0
temporarily appears in the SCD.
v
If an error is detected, the status light flashes amber and the drive posts an
error code to the SCD. To determine the error, locate the code in Appendix C,
“Error codes and messages,” on page 59. To clear the error, either turn the
power off and then on again, or restart the drive by pressing and holding the
Unload button for 10 seconds.
Function code 7: Run RS-422 wrap test
Approximate Run Time = 10 seconds per loop
Number of Loops = This test runs until stopped by pressing the Unload button.
Note:
This function is described here only for informational purposes. It is not
supported on the tape drive.
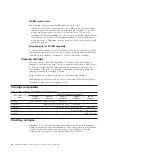
This test causes the drive to perform a check of the circuitry and connector for the
RS-422 interface. This connector supports the Library Drive Interface (LDI) and the
Automation Drive Interface (ADI).
Before selecting this function, attach an LDI or RS-422 wrap plug to the drive LDI
or RS-422 connector (in place of the LDI or RS-422 cable).
1.
Make sure that no cartridge is in the drive, and the correct wrap plug is
attached to the RS-422 connector.
2.
Put the drive in Maintenance mode. For instructions, see “Entering
Maintenance mode” on page 25.
3.
Press the Unload button once per second until
7
appears in the SCD. If you
cycle past
7
, continue to press the Unload button until it displays again.
4.
To select the function, press and hold the Unload button for 3 seconds. After
you select the function,
7
flashes and the drive automatically starts the test.
v
If no error is detected, the diagnostic will loop and begin again. To stop the
loop, press the Unload button for 1 second and release. When the loop ends,
0
temporarily appears in the SCD.
v
If an error is detected, the status light flashes amber and the drive posts an
error code to the SCD. To determine the error, locate the code in Appendix C,
“Error codes and messages,” on page 59. To clear the error, either turn the
power off and then on again, or restart the drive by pressing and holding the
Unload button for 10 seconds.
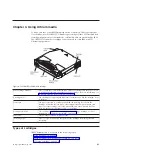
Chapter 3. Operating
31
Summary of Contents for L5X
Page 2: ......
Page 10: ...viii Half High LTO Gen 5 SAS Tape Drive Installation and User s Guide...
Page 14: ...xii Half High LTO Gen 5 SAS Tape Drive Installation and User s Guide...
Page 16: ...xiv Half High LTO Gen 5 SAS Tape Drive Installation and User s Guide...
Page 58: ...40 Half High LTO Gen 5 SAS Tape Drive Installation and User s Guide...
Page 71: ...Figure 14 RID tag on rear panel Chapter 5 Resolving problems 53...
Page 72: ...54 Half High LTO Gen 5 SAS Tape Drive Installation and User s Guide...
Page 76: ...58 Half High LTO Gen 5 SAS Tape Drive Installation and User s Guide...
Page 90: ...72 Half High LTO Gen 5 SAS Tape Drive Installation and User s Guide...
Page 102: ...84 Half High LTO Gen 5 SAS Tape Drive Installation and User s Guide...
Page 119: ......
Page 120: ...Part Number 60Y1487 Printed in USA 1P P N 60Y1487...


