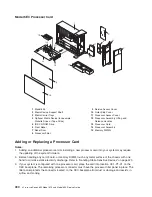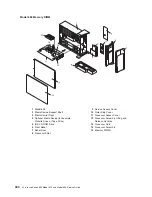
Memory DIMMs
Before performing the following procedures, read “Safety Notices” on page xi.
Memory DIMM Removal
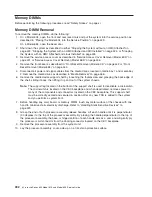
To remove the memory DIMMs, do the following:
1. On a Model 6C4, open the front and rear rack doors and put the system into the service position as
described in “Placing the Model 6C4 into the Service Position” on page 429.
On a Model 6E4, open the bezel door.
2. Shut down the system as described in either “Stopping the System without an HMC Attached” on
page 424, “Stopping the System with an HMC Attached and AIX Installed” on page 424, or “Stopping
the System with an HMC Attached and Linux Installed” on page 425.
3. Remove the service access cover as described in “Service Access Cover Removal (Model 6C4)” on
page 431 or “Service Access Cover Removal (Model 6E4)” on page 436.
4. Remove the front bezel as described in “Front Bezel Removal (Model 6C4)” on page 442 or “Front
Bezel Removal (Model 6E4)” on page 443.
5. Disconnect all power and signal cables from the media drives, located in media bay 1 and media bay
2. Remove the media drives as described in “Media Removal” on page 466.
6. Remove the media device support shelf by loosening the thumbscrew and grasping the back edge of
the shelf, sliding it back, then lifting it up and out of the system chassis.
Note:
The support leg located on the bottom of the support shelf is used to deactivate a microswitch.
The microswitch is located on the CEC backplane and when deactivated, removes power to
many of the components and connectors located on the CEC backplane. This support shelf
must be correctly seated and secured in position after any new FRU is added to the system
and you perform a system boot.
7. Before handling any card, board, or memory DIMM, touch any metal surface of the chassis with one
hand to minimize static electricity discharge. Refer to “Handling Static-Sensitive Devices” on
page 423.
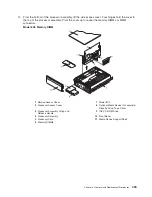
8. Grasp the end of both processor assembly release handles. Lift each handle until it is perpendicular
(90 degrees) to the top of the processor assembly. By placing the handle perpendicular to the top of
the processor assembly, the base or hinged portion of each handle acts as a cam and will gently pry
the processor card connector from the docking connector located on the CEC backplane.
9. Remove the processor assembly from the system unit.
10. Lay the processor assembly, cover-side up, on a flat, static-protective surface.
492
Eserver
pSeries 630 Model 6C4 and Model 6E4 Service Guide
Summary of Contents for @Server pSeries 630 6C4
Page 1: ...pSeries 630 Model 6C4 and Model 6E4 Service Guide SA38 0604 03 ERserver...
Page 2: ......
Page 3: ...pSeries 630 Model 6C4 and Model 6E4 Service Guide SA38 0604 03 ERserver...
Page 16: ...xiv Eserver pSeries 630 Model 6C4 and Model 6E4 Service Guide...
Page 18: ...xvi Eserver pSeries 630 Model 6C4 and Model 6E4 Service Guide...
Page 382: ...362 Eserver pSeries 630 Model 6C4 and Model 6E4 Service Guide...
Page 440: ...420 Eserver pSeries 630 Model 6C4 and Model 6E4 Service Guide...
Page 538: ...System Parts continued 518 Eserver pSeries 630 Model 6C4 and Model 6E4 Service Guide...
Page 541: ...Chapter 10 Parts Information 521...
Page 562: ...542 Eserver pSeries 630 Model 6C4 and Model 6E4 Service Guide...
Page 568: ...548 Eserver pSeries 630 Model 6C4 and Model 6E4 Service Guide...
Page 576: ...556 Eserver pSeries 630 Model 6C4 and Model 6E4 Service Guide...
Page 580: ...560 Eserver pSeries 630 Model 6C4 and Model 6E4 Service Guide...
Page 616: ...596 Eserver pSeries 630 Model 6C4 and Model 6E4 Service Guide...
Page 646: ...626 Eserver pSeries 630 Model 6C4 and Model 6E4 Service Guide...
Page 649: ......


