background image

__ 5.

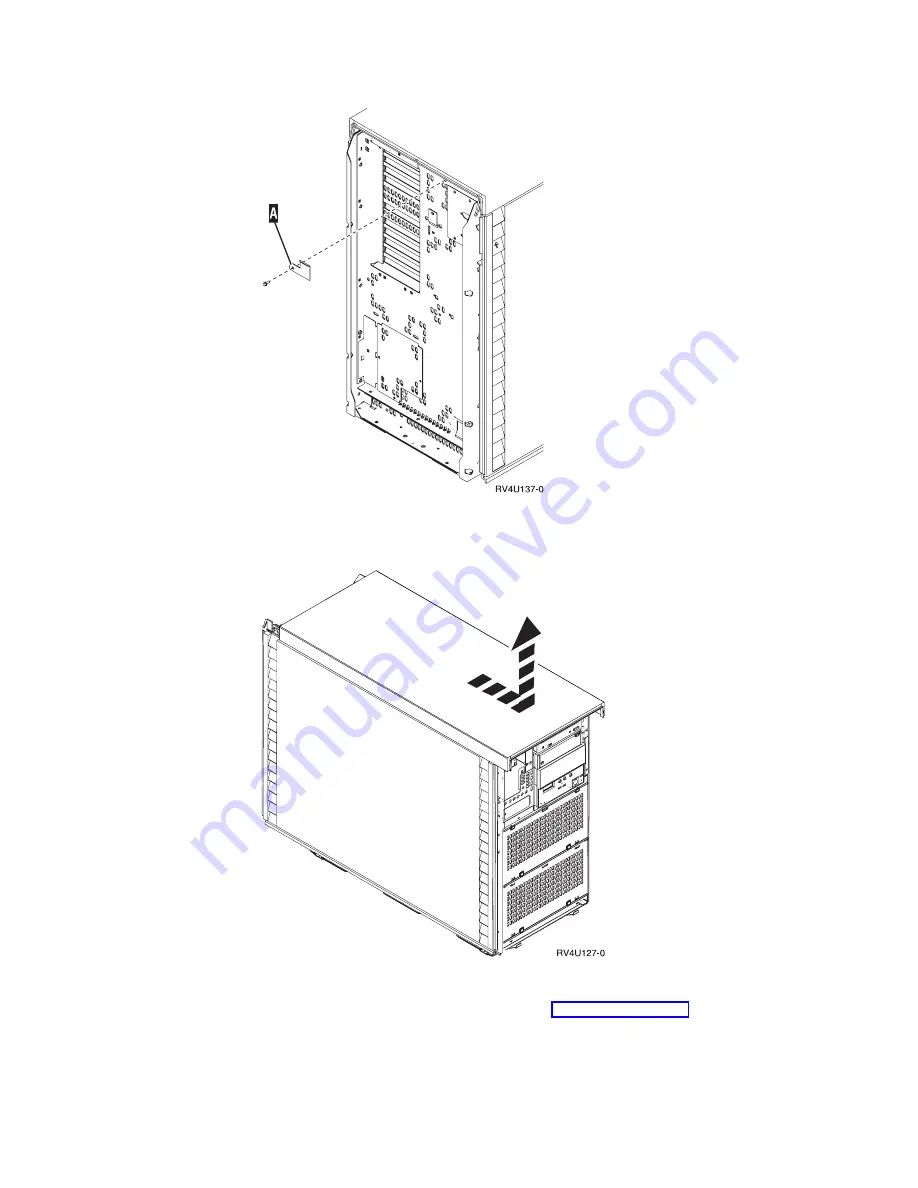
Remove the system unit side cover (Figure 30 on page 30) as follows:

a.

Slide up the cover latches that are shown at

A

to open the louvers and

expose the screws on either side of the cover.

b.

When you remove the screws, do not lay them top of the system unit.

Figure 28. Removing the top cover lock

Figure 29. Removing the top cover

Appendix A. Connecting cables to your AS400e System 620 or S20

29

Summary of Contents for AS/400e

Page 1: ...AS 400e Setting Up Your 5065 or 5066 Expansion Unit V ersion 4 SA41 5146 01...

Page 2: ......

Page 3: ...AS 400e Setting Up Your 5065 or 5066 Expansion Unit V ersion 4 SA41 5146 01...

Page 4: ...ion Unit SA41 5146 01 and to all subsequent releases and modifications until otherwise indicated in new editions This edition applies only to reduced instruction set computer RISC systems This edition...

Page 5: ...66 to your system unit 19 Chapter 4 Completing your installation 23 Chapter 5 Verifying Your New Configuration 25 Updating Vital Product Data 25 Appendix A Connecting cables to your AS400e System 620...

Page 6: ...iv Setting Up Your 5065 or 5066 Expansion Unit V4R5...

Page 7: ...If possible disconnect all power cords from the existing system before you add or remove a device RSFTD203 DANGER To prevent a possible electrical shock during an electrical storm do not connect or di...

Page 8: ...ies exist IBM does not currently collect and recycle used IBM products from customers in the United States other than those products that are involved in trade in programs Companies are available to d...

Page 9: ...ormation contact an IBM account representative CAUTION The optical link card contains a laser To avoid the release of toxic substances into the environment do not burn Discard the optical link as inst...

Page 10: ...viii Setting Up Your 5065 or 5066 Expansion Unit V4R5...

Page 11: ...expansion unit to your AS 400 system unit or AS 400 expansion unit v Powering up your AS 400 system unit and your expansion unit v Verifying your new configuration Prerequisite and related information...

Page 12: ...s you can give the form to the local IBM branch office or IBM representative for postage paid mailing v If you prefer to send comments by FAX use either of the following numbers United States and Cana...

Page 13: ...ntory of your system The configurator then determined if you needed to add an optical card or an SPCN card If you received these features in your new expansion unit package contact IBM or an Authorize...

Page 14: ...in mind v Avoid creating a safety hazard v Avoid damaging the cable Placing power cords for the 5066 You need to provide the appropriate receptacles for the power cords shipped with your 5066 The usab...

Page 15: ...Figure 1 Planning for redundant link one expansion unit Figure 2 Planning for redundant link with two expansion units Chapter 1 Preparing to set up your 5065 or 5066 3...

Page 16: ...er covering v Do not place the cables near any objects that are very hot or very cold v Do not coil the cables to a diameter less than 16 0 cm 6 3 inches v Do not bend the cables to a radius less than...

Page 17: ...u have a current backup of your operating system and licensed programs If you have backed up the operating system and licensed programs since the last time you applied PTFs that backup is acceptable _...

Page 18: ...system unit __ 6 Unplug any power cords such as for printers and display stations that are connected to the system unit __ 7 Unplug the power cord for the system unit from the electrical outlet If yo...

Page 19: ...o your 5065 Expansion Unit Use the following steps to install the SPCN cables and optical cables to the 5065 Expansion Unit __ 1 Find the sheet of labels for the optical cables in the information ship...

Page 20: ...F9469 by performing the following steps __ a Plug one end of the SPCN cable into the SPCN connector J15 on the expansion unit __ b Tighten the thumbscrews Figure 7 Opening or removing 5065 Expansion U...

Page 21: ...ug dust covers from the optical cable you are installing __ d Install the optical cable that is labeled 0 into the connector __ e Repeat steps 8a through 8d to install the optical cable that is labele...

Page 22: ...to your AS400e System 620 or S20 on page 27 to determine if you need to remove the side cover If your system unit is not an AS 400e system 620 perform the following steps To connect the SPCN cable an...

Page 23: ...cable connectors that have the following labels BUS 06 BUS 05 BUS 04 BUS 03 b Choose the next available set of optical cable connectors c Remove the terminating plugs from the optical cable connector...

Page 24: ...down before you proceed If your system unit is not powered down read Powering down your AS 400 system unit on page 5 and power down your system unit To make this procedure simpler refer to the other...

Page 25: ...nd of the optical cable __ 4 Label the optical cable 1 __ 5 Remove the back cover from unit X by gripping the upper corners of the cover and pulling it up and toward you __ 6 Refer to Figure 15 and lo...

Page 26: ...to Figure 17 on page 15 and install the optical cable that you removed from unit X into the optical connector on your 5065 that is labeled 0 The optical cable should now run between your system unit...

Page 27: ...optical connection of the 2682 connector on unit X Figure 15 on page 13 __ 17 Connect one end of the SPCN cable that came with your 5065 into connector J16 on your 5065 __ 18 Connect the other end of...

Page 28: ...16 Setting Up Your 5065 or 5066 Expansion Unit V4R5...

Page 29: ...r AS 400 system unit and open the back cover on your 5066 Do these steps to open and remove the covers 1 Remove the rear cover from your system unit by lifting it up and toward you 2 Open the rear cov...

Page 30: ...Figure 19 Opening the 5066 rear cover 18 Setting Up Your 5065 or 5066 Expansion Unit V4R5...

Page 31: ...em unit Your 5066 consists of two independent 5065 Expansion Units in a single frame This procedure refers to the upper 5065 as 5066 002 and the lower 5065 as 5066 001 Refer to Figure 21 on page 20 an...

Page 32: ...edure 2 Locate an available 2688 OLP card Figure 25 on page 21 on your system unit 3 Remove the terminating plugs from the optical connectors on the OLP card 4 Label each end of the optical cables Fig...

Page 33: ...optical connectors that are labeled 0 and 1 9 On unit 5066 002 install the other end of the optical cable into the optical connector that is labeled 0 10 Remove the dust covers from the second optica...

Page 34: ...J15 19 Tighten the thumbscrews 20 On unit 5066 002 connect another SPCN cable to the SPCN connector that is labeled J16 21 Tighten the thumbscrews 22 On unit 5066 001 connect the other end of the seco...

Page 35: ...nents into electrical outlets __ a The AS 400 system unit Note If you are setting up a 5066 and the power cords are two different lengths install the longer power cord into the upper unit __ b All exp...

Page 36: ...24 Setting Up Your 5065 or 5066 Expansion Unit V4R5...

Page 37: ...y __ 5 For future reference print the configuration list and place it in this book To print the configuration list proceed as follows a You need to sign on with service authority b On the AS 400 Main...

Page 38: ...ce log 7 Test battery interface Serial Opt Frame Unit Type Number Fault 01 0 00 00000 No 01 1 00 00000 No 03 0 00 00000 No 03 1 00 00000 No 3 02 0 00 00000 No 02 1 00 00000 No __ 6 At the Write Vital...

Page 39: ...er and pull it up and toward you __ 2 Look at the back of your system unit Can you see the optical cable connections on the back of your system unit No Yes You do not need to remove the side cover Go...

Page 40: ...t A on the back of the system unit b Loosen the screw and pivot the top cover lock at A out of the way c Slide the cover Figure 29 on page 29 forward toward the front of the system unit d Lift the cov...

Page 41: ...es that are shown at A to open the louvers and expose the screws on either side of the cover b When you remove the screws do not lay them top of the system unit Figure 28 Removing the top cover lock F...

Page 42: ...rt Discard the battery as instructed by local regulations RSFTC241 Your system unit contains a battery Remove the access cover Figure 31 on page 31 by doing the following a Remove all slotted head scr...

Page 43: ...2 On the back of the system unit loosen two screws and open the cover plate __ 3 Route the optical cable to the optical connector through the back of your system unit __ 4 Remove the two protective pl...

Page 44: ...Secure with the two screws c Slide the cover latches down to close the louvers __ 3 Install the top cover by sliding it towards the back of the system __ 4 Secure the screw and pivot the top cover lo...

Page 45: ...nt cover c Lock the front cover __ 7 Install the system unit back cover by doing the following __ a Grip the upper corners of the cover __ b Align the pins with the slots __ c Push the cover in and do...

Page 46: ...34 Setting Up Your 5065 or 5066 Expansion Unit V4R5...

Page 47: ...0e server S20 will support any combination of the expansion units that are listed below You can have a total of four expansion units v 5065 v 5072 v 5073 v 5082 AS 400e system 620 and server 720 Table...

Page 48: ...onfiguration for servers 640 650 730 and 740 continued Number of 5044s allowed Number of 5065 5072 5073 5082 or 5083s allowed 8 2 7 4 6 6 5 8 4 10 3 12 2 14 1 16 0 18 36 Setting Up Your 5065 or 5066 E...

Page 49: ...r operating system and licensed programs If you have backed up the operating system and licensed programs since the last time you applied PTFs that backup is acceptable v Ensure that you take a few mi...

Page 50: ...er before you can install disk units into the following positions Contact IBM or an Authorized Dealer if your expansion unit does not have a third high speed disk unit controller IOA Card 3 Last fill...

Page 51: ...Figure 33 Opening the front cover door 5065 Appendix C Installing disk units in the 5065 or 5066 Expansion Unit 39...

Page 52: ...ing electric shock when using or working on electrical equipment Follow the same precautions you would use without the wrist strap b If the disposable wrist strap appears damaged or cut discard the wr...

Page 53: ...he install Finding the Direct Select Address Follow these steps to find the Direct Select Address for the position you will be installing your new disk unit __ 1 Refer to the label on the inside of th...

Page 54: ...X BUS perform the following steps a If you have not already done so print the System Configuration List 1 On an AS 400 command line type STRSST Press the Enter key 2 When the Start a Service Tools me...

Page 55: ...n this example is 0420 0004 00FF __ 5 Locate the next available slot for the disk unit by reviewing the steps in Optimizing your new disk unit on page 37 __ 6 Record the Direct Select Address for your...

Page 56: ...onnect the opposite end to your system unit __ 12 Find the package that contains the new disk unit assembly and remove it from the static protective package Write the serial number SN xx xxxxxxx of th...

Page 57: ...n the Display disk configuration display select Display non configured units Press the Enter key __ 25 The display should list the disk unit that you installed The serial number should match the seria...

Page 58: ...the above conditions have been met select F12 to return to the Work with disk configuration display __ 33 On the Include Disk Units in Device Parity Protection display select the disk units to be incl...

Page 59: ...ce Manager display press F6 print the configuration e To return to the AS 400 Main menu press F3 Exit twice and then press the Enter key f Place the configuration list in the Basic System Operation Ad...

Page 60: ...trap appears damaged discard the wrist strap immediately and contact your dealer for a replacement Do not continue until a new wrist strap is available c When you unroll the strap remove the liner fro...

Page 61: ...e blue handle by pulling it out toward you before you install the disk unit into the expansion unit Note Support the disk unit as you install it into the expansion unit Do not hold the disk unit by th...

Page 62: ...e expansion unit __ 24 DANGER An electrical outlet that is not correctly wired could place hazardous voltage on metal parts of the system or the products that attach to the system It is the customer s...

Page 63: ...n to power on the AS 400 server __ 30 Do the following to verify your disk unit configuration __ 31 Do the following to verify your disk unit configuration a When the IPL or install the System menu ap...

Page 64: ...available to create a new parity set the units will be eligible for Start Device Parity Protection operation The disk units will not be eligible for the Include Device Parity Protection operation For...

Page 65: ...nits display appears showing the configuration your system will have when the add completes Note If you have selected the wrong ASP press F12 to change your options Press the Enter key to continue The...

Page 66: ...make your disk unit operational go to the AS 400 Information Center You can access the Information Center from the book AS 400 Information Center SK3T 2027 03 or from the following Web site http www...

Page 67: ...independent 5065 Expansion Units The installation instructions for each expansion unit in your 5066 are identical Before you begin v Ensure that you have a current backup of your operating system and...

Page 68: ...llation you do not power down your expansion unit If you encounter difficulties during the installation contact your authorized dealer or service provider __ 1 Is your main system unit powered off No...

Page 69: ...ric shock when using or working on electrical equipment Follow the same precautions you would use without the wrist strap b If the disposable wrist strap appears damaged discard the wrist strap immedi...

Page 70: ...he location of your new removable media device __ 2 Look at Table 6 to find the Direct Select Address for the location of your new removable media device Table 6 Removable media Direct Select Address...

Page 71: ...l display appears select the Hardware service manager option Press the Enter key __ 5 When the Hardware Service Manager display appears select the Device Concurrent Maintenance option __ 6 You can ins...

Page 72: ...oth blue handles in at the same time to lock the removable media device into place __ 18 The green light will stop blinking and remain on solid when you properly installed the removable media device _...

Page 73: ...Unplug any power cords such as printers and displays from electrical outlets __ 6 Unplug the power cord for the expansion unit from the electrical outlet __ 7 Refer to Figure 42 and use latch that is...

Page 74: ...__ 12 Remove the long plastic connector cover __ 13 Find the package that contains the new removable media device assembly and remove it from the static protective package __ 14 Hold the removable med...

Page 75: ...2 appears in the Function Data display b Press the Enter push button on the control panel c Press the Up or Down select push button until B appears in the Function Data display d Press the Enter push...

Page 76: ...talled the tape unit c If you have a printer print the configuration list Place the configuration list in Basic System Operation Administration and Problem Handling SC41 5206 04 Note To print the hard...

Page 77: ...World Trade Asia Corporation Licensing 2 31 Roppongi 3 chome Minato ku Tokyo 106 Japan The following paragraph does not apply to the United Kingdom or any other country where such provisions are inco...

Page 78: ...in which case the user will be required to correct the interference at his own expense Properly shielded and grounded cables and connectors must be used in order to meet FCC emission limits IBM is no...

Page 79: ...on IBM option cards Australia and New Zealand Class A Statement Attention This is a Class A product In a domestic environment this product may cause radio interference in which case the user may be re...

Page 80: ...68 Setting Up Your 5065 or 5066 Expansion Unit V4R5...

Page 81: ...s Very Satisfied Satisfied Neutral Dissatisfied Very Dissatisfied Accurate h h h h h Complete h h h h h Easy to find h h h h h Easy to understand h h h h h Well organized h h h h h Applicable to your...

Page 82: ...CLERK 3605 HWY 52 N ROCHESTER MN 55901 7829 _ _ _ _ _ _ _ _ _ _ _ _ _ _ _ _ _ _ _ _ _ _ _ _ _ _ _ _ _ _ _ _ _ _ _ _ _ _ _ _ _ _ _ _ _ _ _ _ _ _ _ _ _ _ _ _ _ _ _ _ _ _ _ _ _ _ _ _ _ _ _ _ _ _ _ _ _ _...

Page 83: ......

Page 84: ...Printed in the United States of America on recycled paper containing 10 recovered post consumer fiber SA41 5146 01...

Page 85: ...Spine information AS 400e Setting Up Your 5065 or 5066 Expansion Unit V4R5 Version 4...

Reviews: