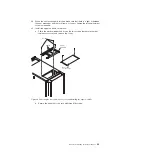
3. Move the heat exchanger latch plate to its correct position. Remove the two
screws from the latch plate, orient the latch plate as shown in the illustration,
and align the holes in the latch plate with the holes on the rack flange. Secure
the latch plate to the rack frame with the two screws. Close the door and make
sure that it latches securely.
Latch plate
Screws
Figure 12. Moving the heat exchanger latch plate to the correct position
Chapter 3. Special instructions if the heat exchanger comes installed on a rack
25
Summary of Contents for 1756
Page 1: ...Rear Door Heat eXchanger V2 Type 1756 Installation and Maintenance Guide ...
Page 2: ......
Page 3: ...Rear Door Heat eXchanger V2 Type 1756 Installation and Maintenance Guide ...
Page 38: ...28 Rear Door Heat eXchanger V2 Installation and Maintenance Guide ...
Page 64: ...54 Rear Door Heat eXchanger V2 Installation and Maintenance Guide ...
Page 90: ...80 Rear Door Heat eXchanger V2 Installation and Maintenance Guide ...
Page 98: ...88 Rear Door Heat eXchanger V2 Installation and Maintenance Guide ...
Page 101: ...website continued support line telephone numbers 79 Index 91 ...
Page 102: ...92 Rear Door Heat eXchanger V2 Installation and Maintenance Guide ...
Page 103: ......
Page 104: ... Part Number 00D2434 Printed in USA 1P P N 00D2434 ...


