

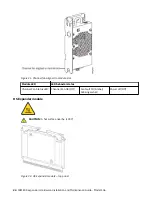


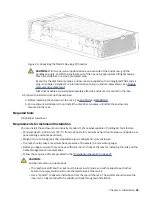


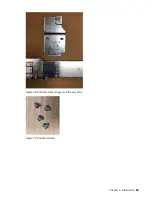


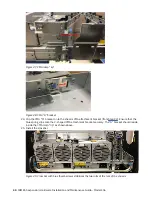


Figure 24. Unpacking the Model 106 using lift handles
CAUTION: With two persons—positioned one on each side of the enclosure—grip the
handles securely, and lift the enclosure out of the box using appropriate lifting technique.
Place the enclosure in a static-protected area.
Except for the disk drive modules, enclosures are supplied with all integrated PCBs and all
plug-in modules installed. For information about plug-in module replacement, see Module
removal and replacement.
Disk drive modules are installed separately after the enclosure is mounted in the rack.
3. Prepare to install and set up the enclosure.
a. Before installing the enclosure into a rack, see CAUTION and WARNING.
b. For rackmount installation, do not install the disk drive modules until after the enclosure is
mounted in the rack.
Required tools
#2 phillips screwdriver
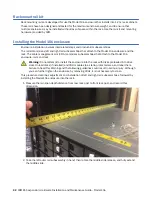
Requirements for rackmount installation
You can install the enclosure in an industry standard 1.2m cabinet capable of holding 4U form factors.
• Minimum depth: 1,206.5 mm (47.5") from rack posts to maximum extremity of enclosure (includes rear
panel cabling and cable bend radii).
• Weight: Up to 145.6 kg (321 lbs), dependent upon configuration, per enclosure.
• The rack should cause a maximum back pressure of 5 pascals (0.5 mm water gauge).
• Before you begin, ensure that you have sufficient room in front of the rack for installing the rails and the
Cable Management Arm assemblies.
• Follow the sequence of tasks provided in the “Installation checklist” on page 27.
CAUTION:
Enclosure rackmount precautions
• The mechanical lift and the rack must be level in all planes, and with respect to each other.
Failure to comply could result in mechanical failure of the rail kit.
• Use a “spotter” to observe installation from the rear of the rack. The spotter should ensure the
inner rail is fully mated with the middle rail track throughout installation.
Chapter 4. Installation 31
Summary of Contents for 106
Page 6: ...Russia Electromagnetic Interference Class A Statement 100 Homologation statement 100 vi...
Page 12: ...xii...
Page 18: ...xviii IBM ESS expansion Hardware Installation and Maintenance Guide Model 106...
Page 20: ...2 IBM ESS expansion Hardware Installation and Maintenance Guide Model 106...
Page 44: ...26 IBM ESS expansion Hardware Installation and Maintenance Guide Model 106...
Page 84: ...66 IBM ESS expansion Hardware Installation and Maintenance Guide Model 106...
Page 100: ...82 IBM ESS expansion Hardware Installation and Maintenance Guide Model 106...
Page 108: ...90 IBM ESS expansion Hardware Installation and Maintenance Guide Model 106...
Page 119: ......
Page 120: ...IBM SC27921101...