

Micro Life
1. INCLUDED IN THE BOX
1) Micro
Life
2)
ArcSoft Media Impression CD Software
3) 4x
AAA
Battery
4) Instruction
Manual
5)
Mini USB Cable
6) Pouch
2. CAMERA OVERVIEW
1
Power
Press this button to power the unit on or off.
2
Lens
Optical input to record videos and capture images.
Note:
Keep the lens clean. Dirt and fingerprints will affect the
quality of the picture.
3
Focusing dial
Adjust this dial to focus and get a clear image of your subject.
4
Zoom wheel /
Shutter
1. In PHOTO or VIDEO mode, press this button left to zoom out.
2. In PHOTO or VIDEO mode, press this button right to zoom in.
3. In PHOTO mode, press this button down to shoot an image.
4. In VIDEO mode, press this button down to begin recording videos.
Press this button again to stop recording.
5. In MENU mode, press this button left or right to navigate through
the menus.
6. In MENU mode, press this button down to confirm a selection.
5
Mode(up)
Press this button to cycle between PHOTO and VIDEO mode.
In MENU mode, this button acts as the UP directional key.
6
Light(down)
Press this button to cycle among the various LED light intensity
modes.(Low
Æ
Middle
Æ
High
Æ
Off)
In MENU mode, this button acts as the DOWN directional key.
7
Menu / delete
Press this button to enter or exit the settings menu, or MENU mode.
In PLAYBACK mode, press this button to delete a file.
8
Playback
Press this button to enter PLAYBACK mode.
Press this button again to see all images, and again to exit.
9
Sd card slot
SD Card storage location.
10
Mini usb interface
Download images and video clips to a computer using the included
USB cable.
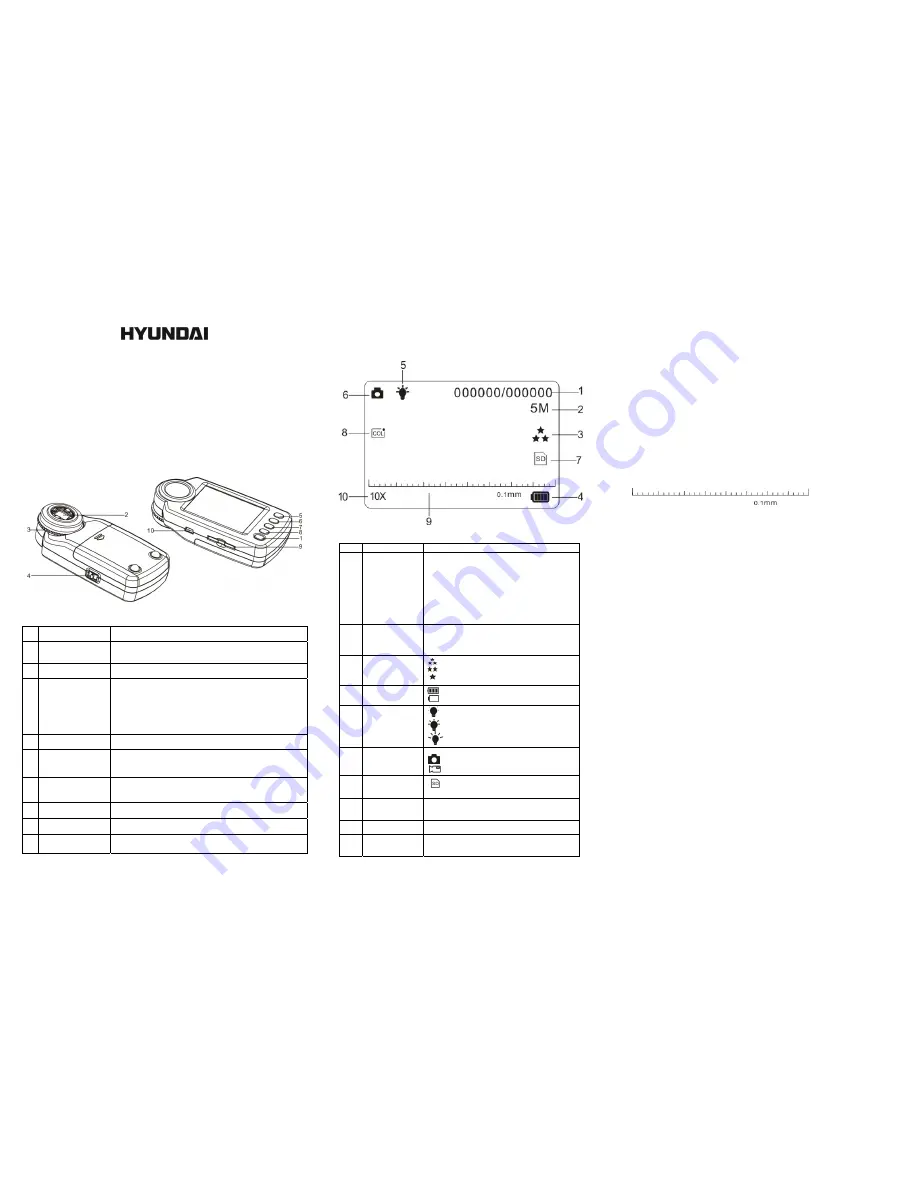
3. EXPLANATION OF STATUS ICONS
Item
Function Description
1
Photo / Video
Counter
Photo Mode:
Shows the amount of pictures
remaining in PHOTO mode.
Video Mode:
Shows the amount of time remaining
in VIDEO mode.
Playback Mode:
Shows the total amount of
pictures and videos.
*Please note: Amount remaining is dependent upon
the size of SD card used. A larger SD card will yield
more storage space.
2
Current
Resolution
5M = 2560x1920 pixels
3M = 2048x1536 pixels
1.3 = 1280x960 pixels
VGA = 640x480 pixels
3
Picture Quality
Super Fine Quality
Fine Quality
Normal Quality
4
Battery Status
Indicator
Battery status, fully charged
Battery status, no charge remaining
5
LED Intensity
Level Indicator
Low Intensity
Standard Intensity
High Intensity
6
Current Mode
PHOTO Mode
VIDEO Mode
7
SD Card Status
Indicator
An SD Card is inserted and will be used as s t
orage for photos and videos
8
Effect Status
Indicator
Shows the current effect status:
(Moving Insect / Sepia/ B&W/ Negative/ Text)
9
Measuring Rule
Measuring Ruler Status Indicator
10
Magnification
indicator
Magnification Status Indicator
4. BASIC OPERATION
Remove the battery door.
Insert 4x AAA alkaline batteries into the camera.
Close the battery door.
Press the POWER button to turn the camera ON.
Place your observed object below Micro Life’s lens.
The object will be displayed on the screen. Adjust the FOCUSING DIAL to attain the
clearest image of the selected object.
Adjust the FOCUSING DIAL. You will find two clear dots, which are in accordance with
the smaller zoom ratio (10X optical magnification) and the larger zoom ratio (17X optical
magnification). Slightly adjust the FOCUSING DIAL up/down until the ruler is displayed.
Then adjust it properly to attain the clearest image.
This microscope provides the several LED light intensity modes. First observe your subject
up-close. Then cycle through the various intensity levels until you are satisfied with the image.
You may use the embedded electronic ruler to measure the observed subject. Please see
the example image below. Each bar represents 0.1mm.You can calculate the length of the
subject according to the amount of bars it extends to.
Note
:
1.
Make sure the camera lies flatly on the observed object.
2.
The value measured by the ruler may have some deviations because of the difference in
focusing positions.
3.
The value is for reference only.
The current zoom ratio will appear on the lower left of the rule. Zoom your view by turning
ZOOM WHEEL left (zoom out) or right (zoom in). When the optical zoom ratio is 10x, the
maximum digital zoom ratio is up to 300x; when the optical zoom ratio is 17x, the maximum
digital zoom ratio is up to 500x.
Note
:
The bigger the digital zoom ratio, the larger the variation the ruller and the real zoom ratio,
and at the same time the worse the image quality. So please select the appropriate
digital zoom ratio according to your need.
Zoom your subject by pressing the ZOOM WHEEL left (zoom out) or right (zoom in).
Switch between PHOTO and VIDEO mode by pressing the MODE button. Press the
SHUTTER button to capture a photo or video. It will be saved onto the SD Card
To view your saved photos and videos, enter PLAYBACK mode by pressing the playback
button.
Images will be saved in JPEG format. Videos will be saved in AVI format.
5. PLAYBACK
The microscope offers 2 options for playback: a)
Single
b)
Thumbnail
Press the PLAYBACK button to enter single PLAYBACK mode.
In single PLAYBACK mode, press the up/down directional keys to flip through saved media.
When playing back in a slide show, you may stop playback by pressing the OK Key.
In single photo PLAYBACK mode, turn ZOOM WHEEL to Zoom in or Zoom out.
In zoom in mode, press the Ok button to enter Playback Photo mode. Press the ZOOM
WHEEL button to move left/ right and the MODE and LIGHT buttons to move up/ down to
view the photos
In thumbnail mode, press the ZOOM WHEEL left/right and press the up/down keys to
select your desired media. Press the SHUTTER button to view.
You may delete a single photo/video file or all files from your SD card by pressing
MENU/DELETE button while in single PLAYBACK mode.
Press the PLAYBACK button until PLAYBACK mode exits. (Single
→
Thumbnail
→
Exit)
Press the SHUTTER button to exit PLAYBACK mode.


