background image

115 63 11-96

Operator’s Manual

Manual de Operario

HU725BBC / 961430094

English/Español

Gasoline containing up to 10% ethanol (E10) is accept-

able for use in this machine.  The use of any gasoline ex-

ceeding 10% ethanol (E10) will void the product warranty.
Esta máquina puede utilizar gasolina con un con-

tenido de hasta el 10% de etanol (E10).

El uso de una gasolina que supere el 10% de etanol 

(E10) anulará la garantía del producto.

Please read the operator's manual carefully and make sure 

you understand the instructions before using the machine.

Por favor lea cuidadosamente y comprenda 

estas intrucciones antes de usar esta maquina.

Summary of Contents for 961430094

Page 1: ... willvoidtheproductwarranty Esta máquina puede utilizar gasolina con un con tenido de hasta el 10 de etanol E10 El uso de una gasolina que supere el 10 de etanol E10 anulará la garantía del producto Please read the operator s manual carefully and make sure you understand the instructions before using the machine Por favor lea cuidadosamente y comprenda estas intrucciones antes de usar esta maquina...

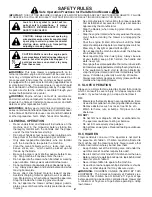
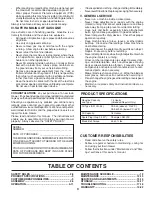
Page 2: ...ward anyone Avoid discharging material against a wall or obstruc tion Material may richochet back toward the operator Stop the blade when crossing gravel surfaces Do not operate the mower without proper guards plates grass catcher or other safety protective devices in place See manufacturer s instructions for proper operation and installation of accessories Only use accessories approved by the man...

Page 3: ...ly flammable and the vapors are explosive Extinguishallcigarettes cigars pipesandothersources of ignition Use only an approved container Never remove gas cap or add fuel with the engine running Allow engine to cool before refueling Never refuel the machine indoors Never store the machine or fuel container where there is an open flame spark or pilot light such as a water heater or on other applianc...

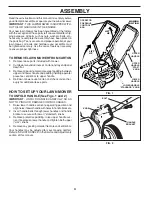
Page 4: ...EMOVE LAWN MOWER FROM CARTON 1 Remove loose parts included with mower 2 Cut down two end corners of carton and lay end panel down flat 3 Removeallpackingmaterialsexceptpaddingbetween upper and lower handle and padding holding operator presence control bar to upper handle 4 Roll lawn mower out of carton and check carton thor ougly for additional loose parts HOW TO SET UPYOUR LAWN MOWER TO UNFOLD HA...

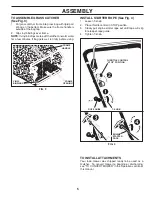
Page 5: ...before using TO INSTALL ATTACHMENTS Your lawn mower was shipped ready to be used as a mulcher To convert mower to bagging or discharging see TO CONVERT MOWER in the Operation section of this manual FIG 3 FRAME HANDLE VINYL BINDINGS FRAME OPENING INSTALL STARTER ROPE See Fig 4 1 Loosen T knob 2 Place throttle control in STOP position 3 Slowly pull engine starter rope out until rope will slip into l...

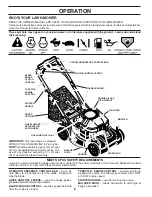
Page 6: ...the engine is started HOUSING GRASS CATCHER THROTTLE ENGINE CONTROL used for starting stopping the engine and allows you to select either FAST or SLOW engine speed STARTER HANDLE used for starting the engine MULCHER DOOR allows conversion to discharge or bagging operation STARTER HANDLE THROTTLE ENGINE CONTROL BLADE BRAKE CLUTCH CONTROL ENGINE OIL CAP WITH DIPSTICK HANDLE KNOBS GASOLINE FILLER CAP...

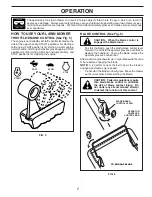
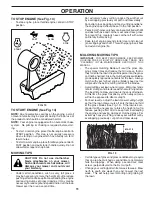
Page 7: ...stances attempt to defeat the function of this control The operation of any lawn mower can result in foreign objects thrown into the eyes which can result in severe eye damage Always wear safety glasses or eye shields while operating your lawn mower or per forming any adjustments or repairs We recommend standard safety glasses or a wide vision safety mask over spectacles OPERATION HOW TO USE YOUR ...

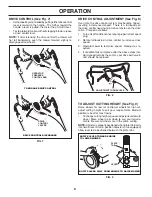
Page 8: ...nbuckle on the drive control housing to increase tension on the drive cable Proceed as follows 1 Turn unit off and disconnect spark plug wire from spark plug 2 Rotate turnbuckle on drive control to increase drive speed 3 Operate mower to test drive speed Readjust as re quired 4 If condition fails to improve after the above steps for ward speed remains the same your drive belt is worn and should be...

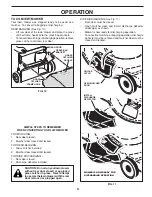
Page 9: ...IDE DISCHARGING See Fig 11 Rear door must be closed Open mulcher door and install discharge deflector under door as shown Mower is now ready for discharging operation Toconverttomulchingorbaggingoperation discharge deflector must be removed and mulcher door must be closed and locked SIMPLE STEPS TO REMEMBER WHEN CONVERTING YOUR LAWN MOWER FOR MULCHING 1 Rear door closed 2 Mulcher door closed and l...

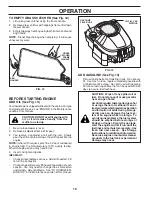
Page 10: ...tom of tank filler neck Do not over fill Use fresh clean regular unleaded gasoline with a minimum of 87 octane Do not mix oil with gasoline Purchase fuel in quantities that can be used within 30 days to assure fuel freshness CAUTION Wipe off any spilled oil or fuel Do not store spill or use gasoline near an open flame Alcohol blended fuels called gasohol or using ethanol or methanol can at tractmo...

Page 11: ...hing effort and to keep from overloading the engine and leaving clumps of mulched grass For extremely heavy mulching reduce your width of cut by overlapping previously cut path and mow slowly OPERATION Certaintypesofgrassandgrassconditionsmayrequire that an area be mulched a second time to completely hide the clippings When doing a second cut mow across perpendicular to the first cut path Change y...

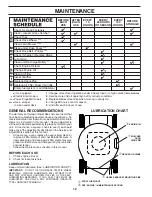
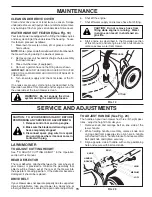
Page 12: ...IMPORTANT DO NOT OIL OR GREASE PLASTIC WHEEL BEARINGS VISCOUS LUBRICANTS WILL ATTRACT DUST AND DIRT THAT WILL SHORTEN THE LIFE OF THE SELF LUBRICATING BEARINGS IF YOU FEEL THEY MUST BE LUBRICATED USE ONLY A DRY POWDERED GRAPHITE TYPE LUBRICANT SPARINGLY SPRAY LUBRICANT SEE ENGINE IN MAINTENANCE SECTION Check for Loose Fasteners Clean Inspect Grass Catcher Check Tires Check Drive Wheels Clean Lawn ...

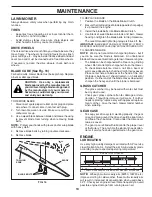
Page 13: ...G REPLACEONLYWITHAPPROVEDBOLTS TO SHARPEN BLADE NOTE We do not recommend sharpening blade but if you do be sure the blade is balanced An unbalanced bladewillcauseeventualdamagetolawnmowerorengine The blade can be sharpened with a file or on a grinding wheel Do not attempt to sharpen while on the mower To check blade balance drive a nail into a beam or wall Leave about one inch of the straight nail...

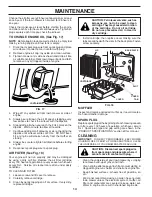
Page 14: ...g the dipstick until oil level settles at FULL DO NOT over fill or engine will smoke heavily from the muffler on startup 8 Always be sure to retighten oil dipstick before starting engine 9 Reconnect spark plug wire to spark plug AIR FILTER See Fig 18 Your engine will not run properly and may be damaged by using a dirty air filter Replace the air filter cartridge every 100 hours of operation or eve...

Page 15: ...t engage the drive system during the washout process 6 Shut off the engine 7 Shut off water supply and remove hose from fitting CAUTION Do not remove hose from fitting while engine is running Water in engine can result in shortened en gine life 8 Start engine as described in the Operation section of this manual and let engine run for a full minute to remove excess water from mower MAINTENANCE LAWN...

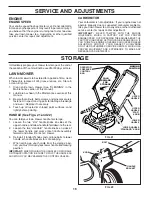
Page 16: ...andle to fold down to the rear 2 Loosen the two standard handle knobs on sides of the lower handle and pivot entire handle assembly forward and allow it to rest on mower 3 Reinstall standard knobs and carriage bolts to lower handle or handle brackets for safe keeping When setting up your handle from the storage posi tion you must manually lock lower handle into mowing position IMPORTANT WHEN FOLDI...

Page 17: ... 8 Depress control bar to handle 9 Control bar defective 9 Replace control bar 10 Fuel valve lever if equipped in OFF position 10 Turn fuel valve lever to the ON position 11 Weak battery if equipped 11 Charge battery 12 Disconnected battery connector if equipped 12 Connect battery to engine PROBLEM CAUSE CORRECTION ENGINE FUEL SYSTEM IMPORTANT ITISIMPORTANTTOPREVENTGUMDEPOSITS FROM FORMING IN ESSE...

Page 18: ...ter 4 Blade dragging in grass 4 Move lawn mower to cut grass or other hard surface before starting Grass catcher 1 Cutting height too low 1 Raise cutting height not filling 2 Lift on blade worn off 2 Replace blade if so equipped 3 Catcher not venting air 3 Clean grass catcher Blade brake 1 Defective blade control 1 Replace blade brake control clutch does not engage Engine dies 1 Cold engine 1 Allo...

Page 19: ...s Limited Warranty In most cases these items are NOT manufactured by Husqvarna in which case they may be covered separately by their respective manufacturer s warranties if one is provided and included with the product at the time of purchase The following transmission transaxle manufacturers Dana Hydro Gear Tuff Torq provide a warranty for the transmission transaxle to the ultimate purchaser or t...

Page 20: ...l problem or failure occurs 9 Reinforced Stamped Armor Protected 10 Year Limited Fabricated Limited Lifetime Deck Warranties These Limited Warranties are for the deck shell only mechanical components parts such as belts pulleys spindle housings bearings blades rods height adjusters caster anti scalp wheels etc are NOT covered The Limited Lifetime Warranty does not cover damage other than that resu...

Page 21: ...arranty 10 Years No Warranty No Warranty Fabricated Deck shell Limited Lifetime Warranty No Warranty No Warranty Battery 1 Year Pro rated No Warranty No Warranty Other Non Expendable Components 3 Years 1 Year No Warranty LE475 Edger Tillers Snow Throwers Engine Other Non Expendable Components 2 Years 90 days 90 days Tiller Tines No Warranty No Warranty Walk Behind Mowers High Wheel Trimmer Engine ...

Page 22: ... left Consumer Commercial Rental Armor Protected Stamped Deck Shell Example Below Fabricated Deck Shell Example Below Stamped Deck Shell below NOT reinforced Limited Lifetime Warranty on Tiller tines and Fabricated Deck shell is for the life of the product or 7 seven years after the last date of the complete unit s final production whichever comes first Deck Shell replacement will be limited to a ...

Page 23: ...s del fabricante para el func ionamiento e instalación de accesorios Use únicamente accesorios aprobados por el fabricante Detengalacuchillaolascuchillascuandocruceporcalzadas calles o caminos de grava Parar el motor cada vez que se abandona el aparato antes de limpiar la segadora o de remover residuos del tubo Apagar el motor y esperar hasta que las cuchillas estén completamente paradas antes de ...

Page 24: ...ntes de repostar la gasolina Nunca repostar la máquina al interior de un local Nuncaguardarlamáquinaoelcontenedordegasolinadonde hay una llama abierta chispa o luz piloto como una caldera u otros dispositivos Nunca llenar contenedores en un vehículo en un camión o caravana con un forro de plástico Colocar siempre los contenedoresenelsuelolejosdesuvehículoantesdellenar Quitar equipos que funcionan ...

Page 25: ...eseincluyenconlasegadora 2 Corte las dos esquinas de los extremos de la caja de cartón y tienda el panel del extremo plano 3 Remueva todo el material de empaque excepto la cuña entre el mango superior y él inferior y la cuña que sujeta la barra de los control que exige la presencia del operador junto con el mango superior 4 Haga rodar la segadora hacia afuera de la caja de cartón y revísela cuidad...

Page 26: ...a bolsa 2 Deslice los sujetadores de vinilo sobre el bastidor AVISO Si los sujetadores de vinilo están muy duros métalos en agua caliente por algunos minutos Si se moja la bolsa déjela que se seque antes de usarla FIG 3 MANGO DEL BASTIDOR DEL RECOGE DOR SUJE TADORES DE VINILO ALBERTURA DEL BASTIDOR INSTALACIÓN DEL CORDÓN ARRANCADOR Vea Fig 4 1 Afloje una manilla T 2 Mueva la palanca de control de ...

Page 27: ...E LA ACOLCHADORA permite la conversión para la operación de descarga o ensacado BARRA DE CONTROL QUE EXIGE LA PRESENCIA DEL OPERADOR AJUSTADOR DE LA RUEDA EN CADA RUDA CONTROL DE ACELERCION MOTOR CONTROL DE LA CUCHILLA FRENO CORDÓN ARRANCADOR MANILLAS DEL MANGO TAPA DEL DEPOSITO DE GASOLINA PALANCAS DE CONTROL DE LA IMPULSIÓN Estos símbolos pueden apareser sobre su segadora o en la literatura prop...

Page 28: ...DA RAPIDO LENTA STOP CONTROL DE LA CUCHILLA Vea Fig 6 PRECAUCIÓN Cuando el mando de la cuchilla está accionado la cuchilla gira Para accionar la cuchilla hacia el mango y presionar la palanca de mando cuchilla freno hacia adelante 1 abajo mantener la barra de control que exige la presencia del operador 2 Para detener la cuchilla soltar la palanca de control que exige la presencia del operador Deja...

Page 29: ...haciaelmango Cuantomás lejos se tira cualquiera palanca hacia el mango más rápida irá la unidad Para detener el movimiento hacia adelante sin apagar el cuchilla soltar cualquiera palanca de accionamiento AVISO Sidespuéshaberdesenganchadodelapalancadecontrol la segadora no roda hacia atrás empuje la segadora un poco hacia adelante para desenganchar las ruedas de la impulsión FIG 8 TORNIQUETE AJUSTE...

Page 30: ...carga debe ser removido y la protección contra la descarga debe estar cerrada y trabado FIG 10 SOPORTE DEL RECO GEDOR DE CÉSPED PUERTA TRASERA MANGO DEL BASTIDOR DEL RECOGEDOR DE CÉSPED GANCHO LATERAL DEL BASTIDOR DEL RECOGEDOR LA SEGADORA ESTA LISTA PARA LA OPERACIÓN DE LA DESCARGA ABIERTO LA PROTECCIÓN CONTRA LA DESCARGA DESVIADOR DE LA DESCARGA FIG 11 ABRA PASOS SIMPLES DE RECORDAR CUANDO CONVI...

Page 31: ...cuando las condiciones son polvorosas o sucias Vea PARA CAMBIAR EL ACEITE DEL MOTOR en la sec cion de Mantenimiento de este manual AGREGUE GASOLINA Vea Fig 13 Llene el estanque de combustible hasta la parte inferior del cuello de relleno del estanque de gasolina No lo llene demasiado Use gasolina regular sin plomo nueva y limpia con el mínimo de 87 octanos No mezcle el aceite con la gasolina Para ...

Page 32: ...a crecido demasiado puede ser necesario el elevar la altura del corte para reducir el esfuerzo necesario para empujar la segadora y para evitar sobrecargar el motor dejando montones de recortes de césped Para un césped muy pesado reduzca el ancho del corte pasando por encima del lugar anteriormente cortado y siegue lentamente vea Fig 15 Ciertos tipos de césped y sus condiciones pueden exigir que u...

Page 33: ...IONES GENERALES La garantía de esta segadora no cubre los artículos que han estado sujetos al abuso o a la negligencia del operador Para recibir todo el valor de la garantía el operador tiene que mantener la segadora según las instrucciones descritas en este manual Hay algunos ajustes que se tienen que hacer en forma periódica para poder mantener su unidad adecuadamente Todos los ajustes en la sec...

Page 34: ...ADO A CALO SI ES NECESARIO SUSTITUIR LOS PERNOS SUSTITUIRLOS SÓLO CON PERNOS APROBADOS PARA AFILAR LA CUCHILLA AVISO No recomendamos el afilar la cuchilla pero si lo hace asegúrese de que quede balanceada Una cuchilla que no está balanceada va a producir eventualmente daño en la segadora o en el motor La cuchilla puede afilarse con una lima o en una rueda rectificadora No trate de afilarla mientra...

Page 35: ...cartucho una vez al año o tras 100 horas de funcionamiento más a menudo si se utiliza en condiciones de suciedad y polvo particulares PARA LIMPIAR EL FILTRO DE AIRE 1 Suelte el tornillo e incline la cubierta para removerlo 2 Cuidadosamente remueva el cartucho 3 Límpielo golpeándolo suavemente en una superficie plana Si está muy sucio cambie el cartucho PRECAUCIÓN Los solventes de petróleo tales co...

Page 36: ...manguera de la guarnición mientras que el motor está funcionando El agua en motor puede dar lugar a vida acortada del motor 8 Encienda el motor según lo descrito en la sección de la operación de este manual y deje el motor funcionar por un minuto completo para quitar exceso de agua del cortacés pedes MANTENIMIENTO SERVICIO Y AJUSTES 1 Suelte la barra de control y pare el motor 2 Asegúresequelacuch...

Page 37: ...illasdelmango standard enamboslados delmangoinferiorypivoteelconjuntoenterodelmangohacia delante y permita le que se descanse sobre la segadora 3 Vuelva a poner las manillas standard y los pernos al mango inferior o a los puntales del mango para la seguridad Cuando prepare su mango a partir de la posición de almace namiento elmangoinferiornesecitara cerrarlomanualmente para la posición de sega IMP...

Page 38: ... del combustible está en la posición OFF a la posición ON 11 Batería débi si equipada 11 Cague la batería 12 Desconecte el conector de la batería si equipada 12 Conecte la batería al motor 13 Fusible quemado 13 Cambie el fusible PROBLEMA CAUSA CORRECCIÓN SOLUCIÓN DE PROBLEMAS MOTOR SISTEMA DE COMBUSTIBLE IMPORTANTE ES IMPORTANTE EVITAR QUE SE FORMEN DEPÓSITOS DE GOMA EN PARTES FUNDAMENTALES DEL SI...

Page 39: ...arrastra en el césped 4 Mueva la segadora a un lugar en donde el césped ha sido cortado o a una superficie firme para hacer arrancar el motor Recogedor de 1 Altura de corte demasiado baja 1 Eleve la altura de corte césped no se 2 Levantamiento de la cuchilla desgastado 2 Cambie las cuchillas llena si viene 3 Recogedor sin ventilación de aire 3 Limpie el recogedor de césped equipado El embrague 1 M...

Page 40: ...o según se indique en esas garantías separadas Husqvarna no tiene autorización para realizar ajustes o reparaciones contemplados por la garantía en motores fabricados por Briggs Stratton Honda Kawasaki o Kohler excepto modelos equipados con motores LCT Husqvarna no asume ninguna obligación de garantía derivada de esta garantía limitada relativa a los motores de otros fabricantes b Transmisiones Ex...

Page 41: ...r así como el fun cionamiento del motor por encima de las revoluciones de motor especificadas y recomendadas que se indican en el manual del operador l Funcionamiento de la unidad con escudos de corte protecciones o dispositivos de seguridad instalados incorrectamente retira dos o modificados m Cualquier filtro de aire retirado o dañado suciedad excesiva abrasivos agua salobre humedad corrosión óx...

Page 42: ...actores cortacésped residenciales de giro cero Tractores cortacésped residenciales de giro cero limitada de por vida Sin garantía Sin garantía a í t n a r a g n i S a í t n a r a g n i S o d a e t a r r o r p o ñ a 1 a í r e t a B a í t n a r a g n i S o ñ a 1 s o ñ a 3 s o r e d e c e r e p s e t n e n o p m o c s o r t O Cortabordes LE475 arados quitanieves r o t o M s a í d 0 9 s a í d 0 9 s o ...

Page 43: ... de garantía RZ Dos 2 años de garantía al consumidor piezas y mano de obra con red de distribuidores Hydro Gear EZ Un 1 año de garantía comercial piezas y mano de obra con Husqvarna Dos 2 años de garantía al consumidor piezas y mano de obra con red de distribuidores Hydro Gear MZ Dos 2 años de garantía comercial piezas y mano de obra con red de distribuidores Hydro Gear Consulte la garantía separa...

Page 44: ...12 03 2013 BY ...
Reviews: