10 –
English
ASSEMBLY
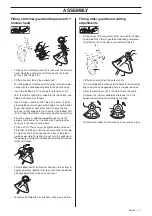
Fitting the loop handle
•
Clip the loop handle onto the shaft. Note that the loop
handle must be fitted between the arrows on the shaft.
•
Slide the spacer into the slot in the loop handle.
•
Fit the nut, knob and screw. Do not overtighten.
•
Now adjust the trimmer to give a comfortable working
position. Tighten the bolt/knob.
Assembling and dismantling the
two-piece shaft (324LDx)
Assembly:
•
Loosen the coupling by turning the knob.
•
Align the tab of the attachment (A) with the arrow on the
coupling (B).
•
Push the attachment into the coupling until the attachment
snaps into place.
•
Before using the unit, tighten the knob securely.
Dismantling:
•
Loosen the coupling by turning the knob (at least 3 times).
•
Push and hold the button (C). While securely holding the
engine end, pull the attachment straight out of the
coupling.
Assembling the cutting equipment
A
B
!
WARNING!
When fitting the cutting attachment it is
extremely important that the raised section
on the drive disc/support flange engages
correctly in the centre hole of the cutting
attachment. If the cutting attachment is fitted
incorrectly it can result in serious and/or
fatal personal injury.
!
WARNING! Never use a cutting attachment
without an approved guard. See the chapter
on Technical data. If an incorrect or faulty
guard is fitted this can cause serious
personal injury.
C
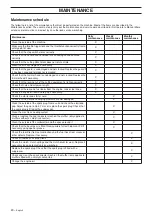
Summary of Contents for 324LDX-Series
Page 24: ......
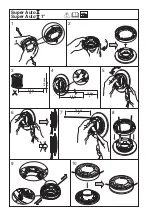
Page 25: ... Clic 1 2 3 5 6 7 10 11 8 5 m 28 4 8 4 2 m 14 2 4 2 7 mm 095 106 10 cm 4 6 15 cm S35 ...
Page 26: ... z R 6R z R 6R 1 2 4 3 2 4 2 7 mm 095 106 4 25 m 14 4 25 m 14 B 6 15 cm A 6 15 cm S35 5 ...
Page 27: ...T35 T35x Clic 1 2 3 5 6 7 9 8 5 m 28 4 8 4 3 m 14 2 4 2 7 mm 095 106 10 cm 4 6 15 cm ...


