background image

NEW 1060PLUS Graphics Tablet

6

/ 15

www.huion.com

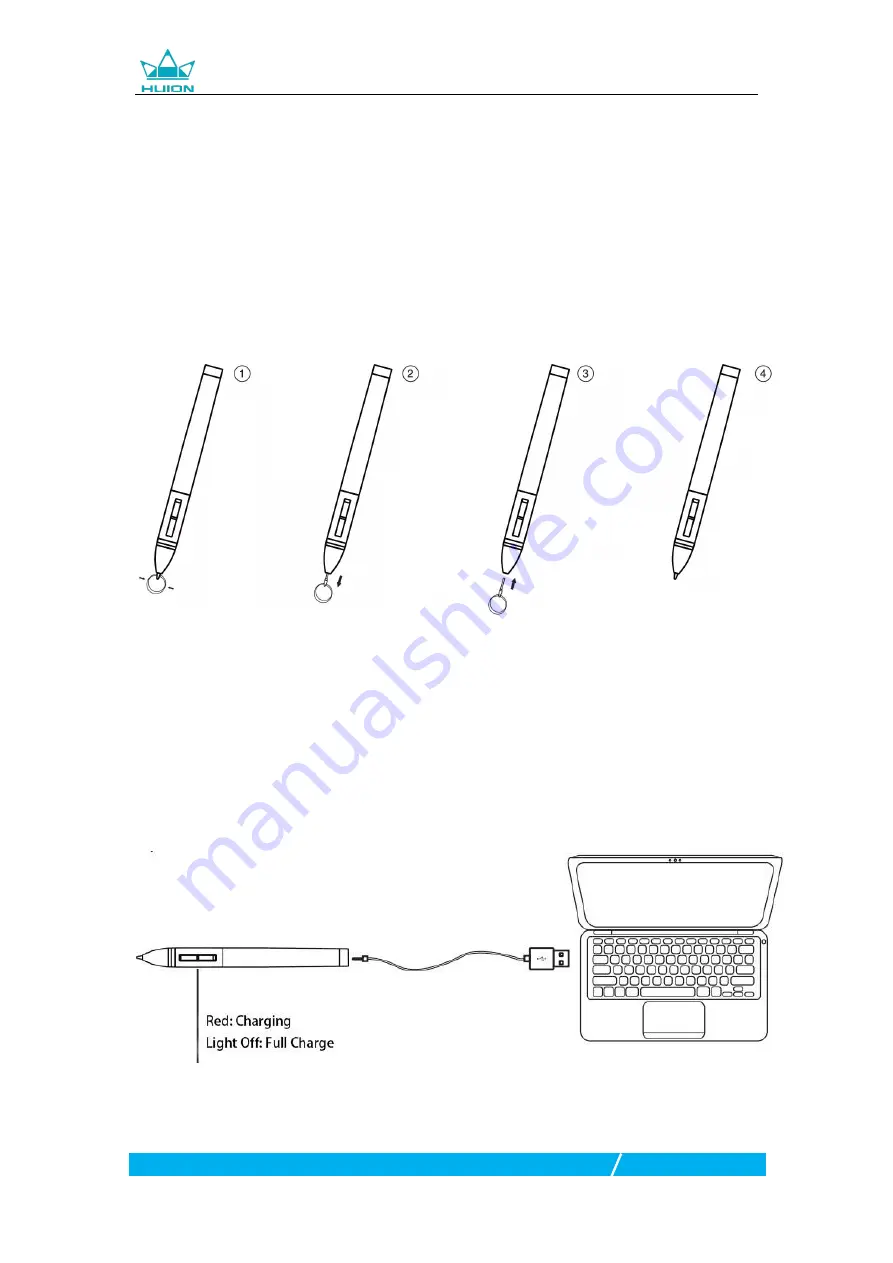
1.5 Pen Nib Replacement

The nib will be wear out after using for a long time, then you need to replace a new
nib.
1. Take out the new nib and clip from pen box.
2. Clasp the old nib and pull it straight out of the pen using the nib clip.
3. Insert the new nib straight into the pen and push the nib slowly and firmly until it
stops.

1.6 Charging the Pen

1. When the pen battery runs out, you need to charge the pen with attached pen
charging cable.
2. Insert one end of the charging cable into the rear of the stylus charging port, the
other end can be connected to a computer, power supply or power bank.

Summary of Contents for INSPIROY H1060P

Page 1: ...NEW 1060PLUS Graphics Tablet User Manual For Windows and Macintosh OS...

Page 2: ...off the tablet 6 To protect your tablet and save power please switch off the power when it is not in use 7 Do not disassemble the tablet and pen Do not disassemble or otherwise modify the tablet or pe...

Page 3: ...2 1 Using The Pen 7 3 Function Setting 9 3 1 Device Connection Prompt 9 3 2 Working Area Setting 9 3 3 Press Keys Function Setting 11 3 4 Pen Buttons Function Setting 11 3 5 Pressure Sensitivity Setti...

Page 4: ...ting and writing depicting different lines and colors just as the pen writes on the paper which brings you a real shock experience To give you a better understanding and using of your tablet please re...

Page 5: ...Card This tablet comes with an 8GB Micro SD card which build inside the pen driver and user manual you can connect to your computer to view the content Also you can save your work in the SD card 1 2...

Page 6: ...ownload You can also download the driver from our website www huion com download After finishing installation you can find the driver icon in the system tray area which means the driver was installed...

Page 7: ...d nib and pull it straight out of the pen using the nib clip 3 Insert the new nib straight into the pen and push the nib slowly and firmly until it stops 1 6 Charging the Pen 1 When the pen battery ru...

Page 8: ...not in use place the pen in the pen case or on the desk Do not place the pen on the surface of screen which may interfere with the use of other screen cursor positioning equipment may also cause your...

Page 9: ...nd double click to open it 2 1 4 Move Select the object then slide the pen tip across the screen to move it 2 1 5 Use the side buttons The buttons on the pen can be set to two different customizable f...

Page 10: ...he relationship between pen movement on the tablet and cursor movement on the monitor screen By default the entire active area of tablet maps to the entire monitor If more than one monitor is in use a...

Page 11: ...Area the entire active area of the tablet This is the default setting 2 Customized Area 1 Enter coordinate values or2 Drag the corners of the foreground graphic to select the screen area 3 2 3 Rotate...

Page 12: ...press key to find the default values Customized Setting Select the function to be achieved on the pop up dialog box then click APPLY or OK to take effect Enable Disable Press Keys Check Uncheck Enabl...

Page 13: ...e sensitivity will be changed by dragging the slider up and down the smaller the value the more pressure sensitive 3 6 Pen Pressure Testing Click start pressure test you can gradually apply pressure t...

Page 14: ...n input Pen features are supported in such as Microsoft Office Windows Journal Adobe Photoshop CC SketchBook 6 and so on 3 8 Data Export and Import The driver supports exporting and importing your cus...

Page 15: ...nsion 360 x 240 x 10mm Net Weight 770g Touch Resolution 5080LPI Report Rate 233PPS Pen Sensing Height 12mm Interface Micro USB Press Keys 12 Customized Press Keys 16 Customized Soft Keys OS Support Wi...

Page 16: ...sure you have correctly defined the Press Keys The computer can t enter sleep mode When you are not using the tablet please do not put the pen on the tablet surface which will keep the computer awake...

Reviews: