04
03
02
E2
a
Large
Allen Key
E1
F1
Desk
Tighten
Thickness
2 11/64 in (55mm) - 3 5/32 in (80mm)
1 3/16 in (30mm) - 2 11/64 in (55mm)
3/8 in (10mm) - 1 3/16 in (30mm)
Page 1: ...ve to provide you with the best quality products and services in the industry Should you have any issues please don t hesitate to contact us at Technical Support 1 800 556 0533 Mon Fri 8am 8pm CST Other Info support huanuoav com US CA V3 0 Monitor Desk Mount Instruction Manual ...
Page 2: ...ge or injury caused by improper mounting incorrect assembly or inappropriate use The desk must be capable of supporting five times the weight of the monitor and mount combined Check the VESA Pattern of Your Monitor before the Installation IMPORTANT SAFETY INFORMATION If your monitor VESA is greater than 200x200 mm 8x8 in or less than VESA 75x75mm 3x3 in this mount is NOT compatible If this mount is...
Page 3: ... Before starting assembly verify all parts are included and undamaged Do not use dam aged or defective parts lf you require replacement parts please contact our Technical Support line at 1 800 556 0533 or customer service at support huanuoav com Please note Not all hardware included in this package will be used Supplied Parts and Hardware for Step 2 Decorative Cover a x1 Monitor Connector 04 x1 Su...
Page 4: ...t M6X15MM Spacer 5mm C2 x8 Supplied Hardware for Step 4 Supplied Hardware for Step 5 03 Bolt M5X15MM B1 x4 Bolt M6X15MM B2 x4 Washer M6 C1 x4 Step 1 Install the Base Option A C Clamp Installation 02 01 Small Allen Key F2 F3 D3 Small Allen Key F2 b ...
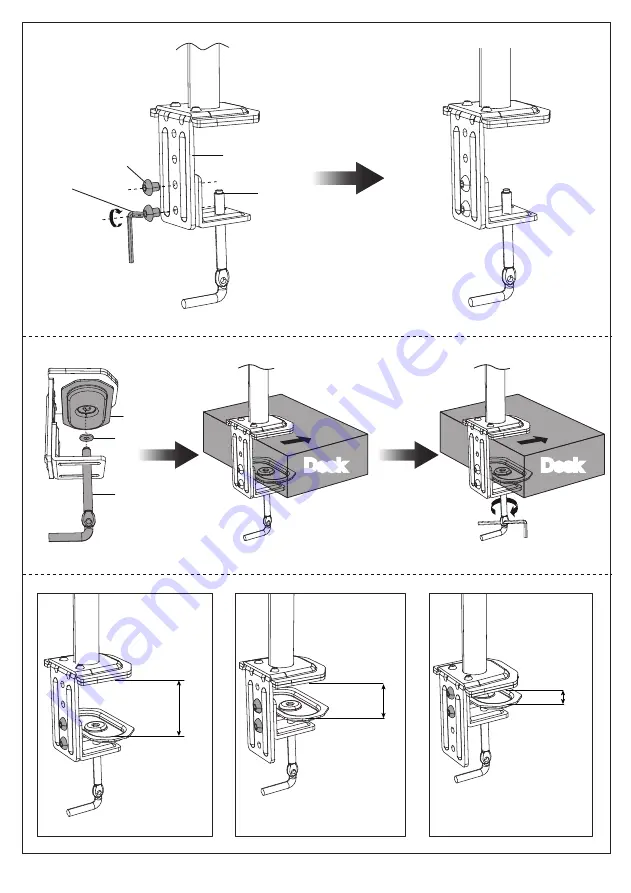
Page 5: ...04 03 02 E2 a 03 Large Allen Key E1 F1 Desk Desk Desk Desk Tighten Desk Thickness 2 11 64 in 55mm 3 5 32 in 80mm Desk Thickness 1 3 16 in 30mm 2 11 64 in 55mm Desk Thickness 3 8 in 10mm 1 3 16 in 30mm ...
Page 6: ...and mark the hole Drill a hole using the drill bit in a diameter of 7 16 in 55 64 in 11 22mm at the marked position through the mounting surface 01 Step 2 Secure Monitor Connector and Decorative Cover to Pole Assembly F1 Large Allen Key Tighten 04 a 04 Desk Desk Desk Desk a 03b 25 32 in 3 5 32 in 20 80mm 7 16 in 55 64 in 11 22mm D1 D2 ...
Page 7: ...ach Faceplate or Faceplate with Extender Bracekts to the Back of Monitor F4 F5 3 8 in 10mm Socket Wrench not included 05 06 06 Step 4 C2 If Needed C1 A1 A2 B1 B2 C2 If Needed C1 A1 A2 B1 B2 Or Step 3 Choose the Combination that Applies to Your VESA Hole Pattern 100 mm 75 mm 100 mm 75 mm For VESA hole pattern 3x3 in 75x75mm 4x4 in 100x100mm Option A No Need to Attach Extender Brackets 06 to Facepla...
Page 8: ...k 2X Cable tie Tilt Adjustment Tilt Adjustment F1 T Large Allen Key 1 If the monitors can stay at the desired height by itself no adjustment needed 2 The tilt angle of the monitor will not be adjusted if the set screw T is over tightened In this case you need to turn the set screw T in anti clockwise direction to decrease torque until the monitors can be hovered at any position 3 The monitors will...