RADIUS Authentication and Accounting
General RADIUS Setup Procedure
General RADIUS Setup Procedure
Preparation:
1. Configure one to three RADIUS servers to support the switch. (That is,
one primary server and one or two backups.) Refer to the documentation
provided with the RADIUS server application.
2. Before configuring the switch, collect the information outlined below.
Table 6-1.
Preparation for Configuring RADIUS on the Switch
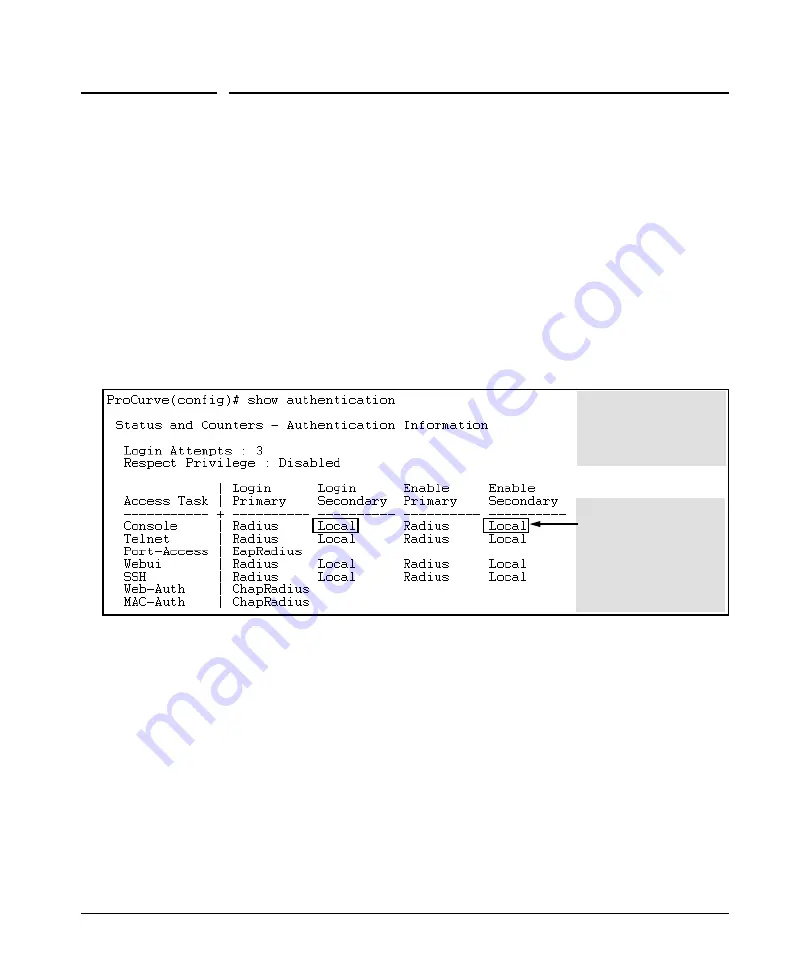
• Determine the access methods (console, Telnet, Port-Access (802.1X), web browser interface and/or SSH) for which
you want RADIUS as the primary authentication method. Consider both Operator (login) and Manager (enable) levels,
as well as which secondary authentication methods to use (local or none) if the RADIUS authentication fails or does
not respond.
Console access requires
Local as secondary
method to prevent lockout
if the primary RADIUS
access fails due to loss of
RADIUS server access or
other problems with the
server.
Note:
The
Webui
access
task shown in this figure is
available only on the
switches covered in this
guide.
Figure 6-1. Example of Possible RADIUS Access Assignments
• Determine the IP address(es) of the RADIUS server(s) you want to support the switch. (You can configure the switch
for up to three RADIUS servers.)
• If you need to replace the default UDP destination port (1812) the switch uses for authentication requests to a specific
RADIUS server, select it before beginning the configuration process.
• If you need to replace the default UDP destination port (1813) the switch uses for accounting requests to a specific
Radius server, select it before beginning the configuration process.
• Determine whether you can use one, global encryption key for all RADIUS servers or if unique keys will be required
for specific servers. With multiple RADIUS servers, if one key applies to two or more of these servers, then you can
configure this key as the global encryption key. For any server whose key differs from the global key you are using,
you must configure that key in the same command that you use to designate that server’s IP address to the switch.
• Determine an acceptable timeout period for the switch to wait for a server to respond to a request. ProCurve
recommends that you begin with the default (five seconds).
6-7
Summary of Contents for J8697A
Page 1: ...6200yl Access Security Guide 5400zl 3500yl ProCurve Switches K 11 XX www procurve com ...
Page 2: ......
Page 22: ...Product Documentation Feature Index xx ...
Page 55: ...Configuring Username and Password Security Front Panel Security 2 21 ...
Page 56: ...Configuring Username and Password Security Front Panel Security 2 22 ...
Page 58: ...Virus Throttling Contents Operating Notes 3 30 Connection Rate Log and Trap Messages 3 31 3 2 ...
Page 88: ...Virus Throttling Connection Rate Log and Trap Messages This page is intentionally unused 3 32 ...
Page 118: ...Web and MAC Authentication Client Status This page intentionally unused 4 30 ...
Page 356: ...Configuring and Monitoring Port Security Operating Notes for Port Security 11 44 ...
Page 370: ...Using Authorized IP Managers Operating Notes This page is intentionally unused 12 14 ...
Page 388: ...10 Index ...
Page 389: ......


