


ENWW
Draining the ink tank 101
The ink constantly circulates between the ink tanks and the BID. To compensate for the
ink adhering to the PIP, the press system supplies ink concentrate from the ink cans. The
imaging oil tank supplies the imaging oil when triggered by the level sensors. The press
supplies imaging agent to the ink tank when the conductivity value in the tank is low.
Draining the ink tank
Drain all the ink from the ink tank whenever there is an ink overflow or before a long-term
shutdown.
Before performing the procedure, make sure that you have the following items:
z
10-liter container for drained ink
z
ink-resistant gloves
Use the following procedure to drain the ink tank:
1
On the control panel, click
Get Ready
to allow the ink pumps to rotate. This ensures
that no sediment is formed at the bottom of the ink tank.
2
On the control panel, click
Standby
. The system changes to the Standby state.
3
Press an
Emergency Stop
button.
4
Open the ink cabinet door.
5
Place the empty container close to the ink container.
6
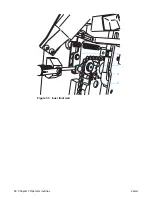
On the right side of the ink tank, locate the required drain hose.
7
Crimp the flexible drain hose to stop ink flow.
8
While holding the ink tank drain hose, unscrew the drain hose cap and place the end
of the hose in the empty waste container.
9
Straighten the drain hose. The ink flows into the waste container. If necessary, tilt the
waste container to allow the ink to drain.
10
When finished, place the hose back in the ink container and screw the cap in place.
Figure 8-2. Ink tanks
Drain hose cap
Ink tank drain hose
Summary of Contents for Indigo press 3050
Page 1: ...HP Indigo press 3050 User guide English version ...
Page 2: ...hp indigo press 3050 user guide ...
Page 13: ...12 Chapter 1 Preface ENWW ...
Page 23: ...22 Chapter 2 Getting started ENWW ...
Page 41: ...40 Chapter 4 HP Indigo press 3050 basics ENWW Figure 4 5 Related topics ...
Page 53: ...52 Chapter 5 The main windows ENWW ...
Page 83: ...82 Chapter 6 Operating the press ENWW ...
Page 91: ...90 Chapter 7 Operator routines ENWW Figure 7 7 Inner front wall O O O O ...
Page 99: ...98 Chapter 7 Operator routines ENWW ...
Page 136: ...ENWW 135 10PIP This chapter contains the following sections z Overview z Replacing the PIP ...
Page 189: ...188 Chapter 11 Paper transport ENWW ...
Page 219: ...218 Chapter 15 Scorotron ENWW ...
Page 257: ...256 Chapter 17 Pre transfer erase PTE ENWW ...
Page 271: ...270 Chapter 19 Chiller ENWW ...