background image

3

Illustrated parts catalog

NOTE:

HP continually improves and changes product parts. For complete and current information on 

supported parts for your computer, go to 

http://partsurfer.hp.com

, select your country or region, and then 

follow the on-screen instructions.

Item

Description

(1)

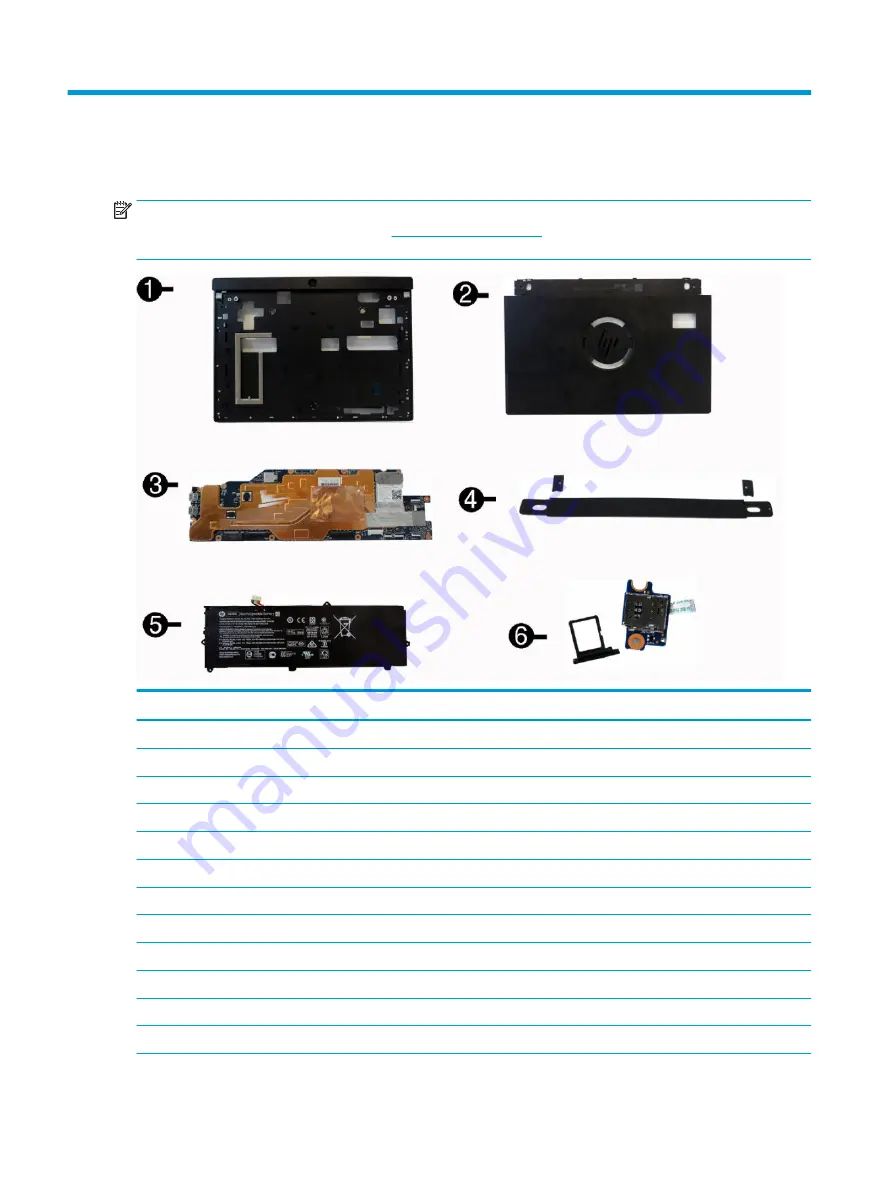
Mid frame (includes cameras, speakers, power connector/volume board and mid plate bezel)


Black, with barcode


Black, without barcode


White, with barcode


White, without barcode

(2)

Backplate (includes gold communication cable)


Black, with fingerprint reader, without NFC module


Black, without fingerprint reader, without NFC module


Black, with fingerprint reader, with NFC module


Black, without fingerprint reader, with NFC module


White, with fingerprint reader, without NFC module


White, without fingerprint reader, without NFC module

14

Chapter 3   Illustrated parts catalog

Summary of Contents for Engage Go Convertible System

Page 1: ...Maintenance Service Guide HP Engage Go Convertible System HP Engage Go Mobile System HP Engage Go Dock ...

Page 2: ...ranty HP shall not be liable for technical or editorial errors or omissions contained herein Second Edition November 2018 First Edition August 2018 Document Part Number L23399 002 Product notice This user guide describes features that are common to most models Some features may not be available on your computer Software terms By installing copying downloading or otherwise using any software produc...

Page 3: ...TANT Indicates information considered important but not hazard related for example messages related to property damage A notice alerts the user that failure to follow a procedure exactly as described could result in loss of data or in damage to hardware or software Also contains essential information to explain a concept or to complete a task NOTE Contains additional information to emphasize or su...

Page 4: ...iv About This Book ...

Page 5: ...onnectivity base 9 Cable matrix for HP Engage Go Convertible System without I O connectivity base 10 Cable matrix for HP Engage Go Convertible System with I O connectivity base 11 Cable matrix for HP Engage Go Convertible System with basic I O connectivity base and standalone printer 12 Cable matrix for HP Engage Go Convertible System with advanced I O connectivity base and standalone printer 13 3...

Page 6: ...lity head unit 26 Attaching an I O connectivity base to the HP Engage Go Convertible System 26 Connecting a standalone I O connectivity base to the HP Engage Go Convertible System 29 Configuring the I O connectivity base s powered serial ports 29 Connecting a standalone optional fingerprint reader to the I O connectivity base 31 Attaching an optional fingerprint reader to the I O connectivity base...

Page 7: ...sing HP PC Hardware Diagnostics Windows select products only 70 Downloading HP PC Hardware Diagnostics Windows 70 Downloading the latest HP PC Hardware Diagnostics Windows version 71 Downloading HP Hardware Diagnostics Windows by product name or number select products only 71 Installing HP PC Hardware Diagnostics Windows 71 Using HP PC Hardware Diagnostics UEFI 71 Starting HP PC Hardware Diagnosti...

Page 8: ...ing Windows tools 77 Restoring using HP Recovery Manager and the HP Recovery partition 77 Recovering using HP Recovery Manager 77 Recovering using the HP Recovery partition select products only 78 Recovering using HP Recovery media 78 Changing the computer boot order 79 Removing the HP Recovery partition select products only 79 Appendix A Power cord set requirements 80 General requirements 80 Japa...

Page 9: ... to assist with carrying Blind mate magnet assisted one handed docking experience Optional countertop mounting bracket Low profile electromechanical attach point for the convertible dock enabling connectivity to a smart locking system and POS peripherals Indicator light that shows status of the locking state Optional HP peripherals Carrying case with shoulder strap for hands free retailing or exte...

Page 10: ...webcam 4 Webcam light 13 Barcode scanner button 5 Webcam 14 SIM card door 6 Charging light 15 Volume down button 7 USB C charging ports 2 16 Volume up button 8 Barcode scanner button 17 Audio jack 9 Fingerprint reader optional NOTE You cannot have a WWAN LTE module and a barcode scanner in the same unit You can have neither or either but not both 2 Chapter 1 Product overview ...

Page 11: ...Case 2 HP Engage One Integrated Column Printer 6 Integrated MSR 3 Docking lock release button 7 HP Engage One Biometric Fingerprint Reader 4 Choice of two ElitePOS I O Connectivity Bases The display panel is an anti glare WLED SVA 400 nits panel NOTE The nits rating indicates the typical brightness of the panel prior to anti glare coating Integrated features 3 ...

Page 12: ...ponents Basic components 1 Cash drawer jack 7 USB Type C port 2 Power connector 8 RJ 45 network jack 3 USB Type C power port 9 Security cable slot 4 Powered serial ports 3 10 MicroSD card reader 5 USB 2 0 ports 4 11 Audio out headphone Audio in microphone jack 6 USB 3 0 ports 2 IMPORTANT To avoid damage to the system DO NOT plug a telephone cable into the cash drawer jack 4 Chapter 1 Product overv...

Page 13: ...3 Powered USB 24 V port 9 RJ 45 network jack 4 Power connector 10 Security cable slot 5 USB Type C power port 11 MicroSD card reader 6 Powered serial ports 2 12 Audio out headphone Audio in microphone jack IMPORTANT To avoid damage to the system DO NOT plug a telephone cable into the cash drawer jack HP Engage One Advanced I O Connectivity Base components 5 ...

Page 14: ...ter to the power connector on the I O connectivity base 3 To connect an AC adapter to the mobility system when it is not connected to an I O connectivity base connect the AC adapter to a grounded AC outlet 1 and then connect the power adapter s USB Type C connector to the USB Type C power port on the underside of the dock s column 2 NOTE The image below is shown with a stability base 6 Chapter 1 P...

Page 15: ...r assistance I O connectivity base serial number location Each I O connectivity base has a unique serial number and a product ID number that are located on the exterior of the I O connectivity base Keep these numbers available for use when contacting customer service for assistance Regulatory information is located in the base plate Install the base plate back if it is removed Mobility head unit s...

Page 16: ...s 1 Column printer AC power cord 5 I O connectivity base mini USB Type B to USB Type A data cable 2 Column printer AC adapter cable 6 I O connectivity base USB Type C cable 3 Cash drawer cable purchased separately with cash drawer 7 I O connectivity base 120 W AC power cord 4 Column printer cash drawer cable 8 Chapter 2 Cable routing configurations ...

Page 17: ...ectivity base 180 W AC power cord 4 Column printer 24 V PUSB power and data Y cable 2 Cash drawer cable purchased separately with cash drawer 5 I O connectivity base USB Type C cable 3 Column printer cash drawer cable Cable matrix for HP Engage Go Convertible System with integrated column printer and advanced I O connectivity base 9 ...

Page 18: ...Cable matrix for HP Engage Go Convertible System without I O connectivity base Cables 1 AC power cord 10 Chapter 2 Cable routing configurations ...

Page 19: ...I O connectivity base USB Type C cable 5 USB C mini dock captive USB Type C cable 3 Advanced I O connectivity base 180 W AC power cord NOTE In the European region the USB C mini dock is sold as an aftermarket option kit only In all other regions the USB C mini dock is sold as drop in box option Cable matrix for HP Engage Go Convertible System with I O connectivity base 11 ...

Page 20: ...USB Type A to Type B data cable 2 Basic I O connectivity base 120 W AC power cord 5 Basic I O connectivity base USB Type C cable 3 Printer serial data cable IMPORTANT Connect either the serial data cable 3 or the USB Type A data cable 4 between the I O connectivity base and the printer Do not connect both 12 Chapter 2 Cable routing configurations ...

Page 21: ...y base 180 W AC power cord 5 Advanced I O connectivity base USB Type C cable 3 Printer 24 V PUSB power cable IMPORTANT Connect either the 24 V PUSB power and data Y cable 1 or the 24 V PUSB power cable 3 and serial data cable 4 between the I O connectivity base and the printer Do not connect all three Cable matrix for HP Engage Go Convertible System with advanced I O connectivity base and standalo...

Page 22: ...s power connector volume board and mid plate bezel Black with barcode Black without barcode White with barcode White without barcode 2 Backplate includes gold communication cable Black with fingerprint reader without NFC module Black without fingerprint reader without NFC module Black with fingerprint reader with NFC module Black without fingerprint reader with NFC module White with fingerprint re...

Page 23: ...splay panel NOTE The display panel is spared with all required parts Solid state drive M 2 256 GB TLC PCIe 128 GB SATA 3 TLC WLAN modules Intel Wireless AC 8265 802 11ac 2x2 WiFi Bluetooth 4 2 Combo Adapter vPro Intel Wireless AC 8265 802 11ac 2x2 WiFi Bluetooth 4 2 Combo Adapter non vPro WWAN modules LTE CAT4 Huawei HP lt4132 LTE HSPA w GPS M 2 AC adapter 65 W external Power cord 1 8 m 1 0 m Duck...

Page 24: ...ally for a while but it has been degraded in the internal layers reducing its life expectancy Networks built into many integrated circuits provide some protection but in many cases the discharge contains enough power to alter device parameters or melt silicon junctions Generating static The following table shows that Different activities generate different amounts of static electricity Static elec...

Page 25: ...e connected and fit snugly into the banana plug connector on the grounding mat or workstation Heel straps Toe straps Boot straps can be used at standing workstations and are compatible with most types of shoes or boots On conductive floors or dissipative floor mats use them on both feet with a maximum of one megohm 10 resistance between the operator and ground Static Shielding Protection Levels Me...

Page 26: ...and extremes of heat and cold Operate the computer on a sturdy level surface Leave a 10 2 cm 4 inch clearance on all vented sides of the computer and above the display to permit the required airflow Never restrict the airflow into the computer by blocking any vents or air intakes Do not place the keyboard with the keyboard feet down directly against the front of the desktop unit as this also restr...

Page 27: ...h a way that they cannot be caught or snagged by parts being removed or replaced CAUTION When servicing this computer ensure that cables are placed in their proper location during the reassembly process Improper cable placement can damage the computer Hard Drives Handle hard drives as delicate precision components avoiding all physical shock and vibration This applies to failed drives as well as r...

Page 28: ...n the laser product installation guide may result in hazardous radiation exposure To reduce the risk of exposure to hazardous radiation Input power The power information in this section may be helpful if you plan to travel internationally with the computer The computer operates on DC power which can be supplied by an AC or a DC power source The AC power source must be rated at 100 240 V 50 60 Hz A...

Page 29: ... and the same operating guidelines listed above still apply Keep liquids away from the mobility system and I O connectivity base Never cover the vents on the mobility system or I O connectivity base with any type of material Install or enable power management functions of the operating system or other software including sleep states Turn off the mobility system before you do either of the followin...

Page 30: ... recommends that you keep the printer in working order by periodically cleaning the debris from the printer To clean the printer open the cover remove the paper roll and then use a can of compressed air to blow the debris out from the bottom plate where it accumulates Cleaning I O ports The mobility system has a series of ports Dust and debris can collect in these ports which can reduce connectivi...

Page 31: ...s or cables Arrange them so that no one may accidentally step on or trip over them Do not pull on a cord or cable When unplugging from the AC outlet grasp the cord by the plug To reduce the risk of serious injury read the Safety Comfort Guide It describes proper workstation setup and provides guidelines for posture and work habits that increase your comfort and decrease your risk of injury It also...

Page 32: ...k the mobility head unit NOTE Both authentication methods can be used or there can be no authentication method required to unlock the mobility head unit No authentication required is the default method The light on the dock s lock release button indicates the locking status Amber The mobility head unit is locked and can not be unlocked without the proper Windows login permission White The mobility...

Page 33: ... an active AC outlet You must disconnect the power cord and wait approximately 30 seconds for the power to drain to avoid damage to the internal components of the system 3 Insert a flat blade screwdriver between the MSR and the mobility head unit and then disengage the MSR 1 Tilt the MSR 2 up slightly and pull the MSR 3 from the USB Type C port and clips IMPORTANT To avoid damaging the MSR and or ...

Page 34: ...y base to the HP Engage Go Convertible System You can attach an I O connectivity base to the bottom of the mobility system dock s stability base 1 Turn off the mobility system properly through the operating system and turn off any external devices 2 Disconnect the power cords from the mobility system and I O connectivity base IMPORTANT Regardless of the power on state voltage is always present on ...

Page 35: ... the underside of the I O connectivity base 1 and then lifting the cover off the I O connectivity base 2 4 Connect the USB Type C power cable to the USB Type C port on the underside of the dock s column Attaching an I O connectivity base to the HP Engage Go Convertible System 27 ...

Page 36: ... the I O connectivity base and the dock s column 6 To connect and secure the USB Type C power cable attach the cable clip to the cable 1 insert the cable tie into the hole 2 below the USB Type C port on the hub and then slide the cable clip onto the cable tie and connect the cable to the port 3 7 Connect the I O connectivity base s AC adapter to the I O connectivity base and a grounded AC outlet S...

Page 37: ...the I O connectivity base s power supply to the I O connectivity base and a grounded AC outlet See Connecting an AC adapter to power on page 6 Configuring the I O connectivity base s powered serial ports The serial ports can be configured as standard non powered serial ports or powered serial ports Some devices use a powered serial port If the serial port is configured as a powered port devices th...

Page 38: ... an active AC outlet You must disconnect the power cord and wait approximately 30 seconds for the power to drain to avoid damage to the internal components of the I O connectivity base 3 Remove the five screws on the underside of the I O connectivity base 1 that secure the bottom plate to the I O connectivity base and then remove the bottom plate from the I O connectivity base 2 4 Adjust the volta...

Page 39: ...re below to connect a standalone fingerprint reader to the I O connectivity base 1 Turn off the mobility system properly through the operating system and turn off any external devices 2 Disconnect the power cords from the mobility system and I O connectivity base IMPORTANT Regardless of the power on state voltage is always present on the system board as long as the system is plugged into an active...

Page 40: ...ou can attach the fingerprint reader to either side of the I O connectivity base but if you attach it to the left side of the I O connectivity base the fingerprint reader covers the microSD slot and the headset jack on the I O connectivity base 1 Turn off the mobility system properly through the operating system and turn off any external devices 2 Disconnect the power cords from the mobility syste...

Page 41: ...he fingerprint reader 1 and route the cable under the routing clip on the fingerprint reader 2 Remove the mounting screw 3 from the underside of the I O connectivity base and then attach the bracket on the fingerprint reader assembly to the underside of the I O connectivity base 4 using the screw that was removed from the base and the short screw included in the kit Attaching an optional fingerpri...

Page 42: ... an optional countertop mounting bracket to mount the mobility system s column to a countertop NOTE The mounting bracket requires an 80 mm hole in the countertop The thickness of the countertop must be 10 mm to 50 mm 1 If the dock s stability base is attached to the column remove the screw on the underside of the column 1 and then remove the base 2 from the column 34 Chapter 5 Hardware configurati...

Page 43: ...onnect 3 Hold the top piece of the mounting bracket against the bottom of the column route the cables through the hole in the mounting surface and then place the column over the hole on the mounting surface 4 The bottom piece of the mounting bracket can be oriented in two ways depending on the thickness of your mounting surface Orient the bracket properly for your application before attaching it M...

Page 44: ...nst the bottom of the mounting surface 2 and then insert the screw 3 though the mounting bracket Then tighten the screw 4 so that the screw is fully inserted into the column and then tighten the wing nut 5 on the screw to fasten the bracket to the mounting surface 36 Chapter 5 Hardware configurations and upgrades ...

Page 45: ...g system and turn off any external devices 3 Disconnect the power cord from the AC outlet and disconnect any external devices IMPORTANT Regardless of the power on state voltage is always present on the system board as long as the system is plugged into an active AC outlet You must disconnect the power cord and wait approximately 30 seconds for the power to drain to avoid damage to the internal com...

Page 46: ...7 2 Lift the hand strap up 1 3 Slide the screw covers 2 on each side of the hand strap back and then up Remove the screws 3 that secure the strap to the mobility head unit To replace the hand strap reverse the removal procedures 38 Chapter 6 Removal and replacement procedures for the mobility head unit ...

Page 47: ... access the cables underneath that connect the backplate to the system board 2 IMPORTANT Cables route from the backplate to the system board Be sure not to accidentally disconnect the cables when lifting the backplate 5 If equipped disconnect the NFC and or fingerprint reader cables from the system board 1 6 Disconnect the communication cable from the system board 2 and then remove the backplate T...

Page 48: ...move the screw that secures the drive to the system board 1 and then slide the drive out of the system board connector 2 To install a solid state drive reverse the removal procedures Display NOTE The display panel is spared with all required parts To remove the display 1 Prepare the computer for disassembly see Preparing to disassemble the computer on page 37 2 Remove the hand strap see Hand strap...

Page 49: ...4 Disconnect the battery cable from the system board 5 Pull the mid plate bezel from the chassis Display 41 ...

Page 50: ...r 1 and the touch cable from the reverse ZIF connector 2 on the system board 7 Remove the 13 screws that secure the display to the chassis 8 Rotate the top of the display panel away from the computer chassis 1 42 Chapter 6 Removal and replacement procedures for the mobility head unit ...

Page 51: ...9 Pull touch cable 2 and the display cable 3 through the holes in the chassis above the battery To replace the display reverse the removal procedures Display 43 ...

Page 52: ...ckplate on page 39 4 Remove the display see Display on page 40 5 From the back of the computer disconnect the battery cable from the system board 6 From the front of the computer remove the five screws 1 that secure the battery and then lift the battery out of the computer 2 To install the battery reverse the removal procedures 44 Chapter 6 Removal and replacement procedures for the mobility head ...

Page 53: ...39 4 Disconnect the battery see Battery on page 44 5 Remove the display see Display on page 40 6 From the back of the chassis disconnect the cable from the system board 1 7 From the front of the chassis remove the SIM insert from the SIM board 1 8 Remove the screw that secures the SIM board to the computer 2 and the lift the board out of the computer 3 To install the SIM board reverse the removal ...

Page 54: ...olid state drive M 2 on page 40 5 Disconnect the battery see Battery on page 44 6 Remove the display see Display on page 40 7 Disconnect the following cables from the back of the system board 1 WLAN antenna cables 2 WWAN antenna cables 3 Speaker cable 4 Power cable ZIF 5 Battery cable 6 SIM board cable ZIF 8 Position the computer upright with the system board facing you 9 Disconnect the three webc...

Page 55: ...of the computer 5 IMPORTANT It is very important to enter the FeatureByte properly when updating the DMI configuration Incorrect FeatureByte information can cause various issues such as preventing the touch screen from working To install the system board reverse the removal procedures System board 47 ...

Page 56: ...SPK Black Speakers LCM Black Display POWER White Power button POGO Black POGO connector SIM White SIM board SSD Black M 2 SSD drive TOUCH White Display Sys Bd Label Color Component Sys Bd Label Color Component CN2251 Black Front facing webcam MIC ALS Black Webcam light CN2250 Black Rear facing webcam 48 Chapter 6 Removal and replacement procedures for the mobility head unit ...

Page 57: ...P technician To remove the WWAN module 1 Prepare the computer for disassembly see Preparing to disassemble the computer on page 37 2 Remove the hand strap see Hand strap on page 38 3 Remove the rear cover see Backplate on page 39 4 Disconnect the battery see Battery on page 44 5 Remove the display see Display on page 40 6 Remove the system board see System board on page 46 7 Lift the foam 1 and ta...

Page 58: ...X 1 connector on the module and the cable labeled 2 white sticker to the MAIN 2 connector on the module NOTE WWAN modules are designed with a notch to prevent incorrect insertion Be sure to re adhere the tape to across the antenna connectors when replacing the WWAN module 50 Chapter 6 Removal and replacement procedures for the mobility head unit ...

Page 59: ...932 Kanji 949 Korean 936 Simplified Chinese and 950 Traditional Chinese Integrated barcodes Code 39 Code 93 Code 128 UPC A UPC E JAN8 EAN JAN13 EAN Interleaved 2 of 5 Codabar Code 128 PDF 417 two dimensional Code 128 extended GS1 Databar QR code and Datamatrix Print Monochrome in either 44 standard or 56 compressed columns on 80 mm wide thermal paper Paper path 80 0 mm Roll Diameter 50 8 mm max 2 ...

Page 60: ...the printer runs out of paper The printer may continue to accept data from the host system even though it is unable to print Data may be lost as a result Loading the printer receipt paper 1 Open the receipt cover by pushing up evenly on each side of the cover 1 until it unsnaps 2 Remove the test printout or used paper roll if necessary 3 Place the receipt paper into the paper compartment on the sp...

Page 61: ...eter of 22 0 5 mm 0 87 outside and 11 5 0 5 mm 0 45 inside Qualified paper grades Contact the manufacturer of your choice to order paper HP recommends the following paper grades produced by their respective manufacturers There are a number of paper manufacturers qualified to provide this paper provided the POS paper rolls are from the recommended grades for monochrome black ink paper Qualified man...

Page 62: ... KT55 F20 Koehler AG Hauptstr 2 4 D 77704 Oberkirch Germany http www koehlerpaper com en Voice 49 7802 81 0 Fax 49 7802 81 4330 KT55 F20 Mitsubishi Int l Corp USA 655 Third Ave New York New York 10017 http www mitsubishicorp com us en Voice 212 605 2000 Fax 212 605 2597 P 5035 T 8051 TP 8065 PP 5051 OJI Paper Company Ltd Ginza 4 chome Tokyo 104 Japan http www ojipaper co jp english Voice 81 3 3563...

Page 63: ...quency high frequency Printer has been turned on and is ready to operate No action is required Printer beeps and the green light flashes in various combinations These all indicate a serious condition Stop using the printer Contact your authorized HP service representative Printing issues Condition Possible causes Possible solutions Where to go for more information Colored stripe on the receipt Pap...

Page 64: ...horized HP service representative NOTE Using nonrecommended paper may damage the printhead and void the warranty Printer does not function Condition Possible causes Possible solutions Where to go for more information Printer does not function when turned on and light is off Power is not plugged in Check that the host or power supply is getting power Printer does not function when turned on and the...

Page 65: ... stuck the printer has a failsafe to release the cover s latches Using a thin pointed object press the rectangular button adjacent to the printhead With enough pressure the latches should release and the receipt cover should open Troubleshooting the printer 57 ...

Page 66: ...PC Settings dialog box tap the Calibrate button and then proceed to step 3 3 Follow the on screen instructions to press the target marks on the touch screen At the end of the calibration process the touch module should be aligned with the video and the touch points will be accurate Configuring optional HP integrated peripheral modules To configure the integrated USB peripheral refer to the HP Poin...

Page 67: ...stablish a setup password that controls access to the Computer Setup F10 Utility and the settings described in this section Secure integrated I O functionality including the serial USB or parallel ports audio or embedded NIC so that they cannot be used until they are unsecured Enable or disable removable media boot ability Solve system configuration errors detected but not automatically fixed duri...

Page 68: ...menu press Esc 5 To apply and save changes select Main Save Changes and Exit If you have made changes that you do not want applied select Ignore Changes and Exit To reset to factory settings or previously saved default settings some models select Apply Factory Defaults and Exit This option will restore the original factory system defaults NOTE Not all settings shown in the following sections are a...

Page 69: ...icroCode Revision Processor Stepping Memory Speed DIMM 1 Size DIMM 3 Size System BIOS version ME Firmware Version Reference Code Revision Video BIOS Version Super I O Firmware Version USB Type C Controller s Firmware Version Born On Date Serial Number SKU number UUID Universally Unique Identifier Asset Tracking Number Feature Byte Build ID Product Family System Board ID System Board CT System Diag...

Page 70: ...Settings Lets you configure upload and download settings Proxy Server select to enable use of a proxy server Edit Proxy Server If Proxy Server is enabled lets you specify the server address in server port format Test Network Connection select to check the network connection based on the selection in Automatic BIOS Update Setting IPv4 Configuration select Automatic or Manual If Manual is selected y...

Page 71: ... on screen if the computer is capable of booting this far If the POST detects an error before this point a beep code is generated instead Computer Setup Security NOTE Support for specific Computer Setup options may vary depending on the hardware configuration Table 9 2 Computer Setup Security Option Description Create BIOS Administrator Password Lets you set and enable a BIOS administrator passwor...

Page 72: ...en tampered with before the host CPU executes that code as part of the process of resuming from the low power state Enabled When this box is checked the HP Sure Start will continue to verify the integrity of the BIOS in System Flash each time the system is in a Sleep Hibernate or Off state Additionally the HP Sure Start will verify the integrity of the BIOS in System Flash on each Warm Boot Window...

Page 73: ...Once a hard drive has been erased with a program that utilizes Secure Erase firmware commands no file recovery program partition recovery program or other data recovery method will be able to extract data from the drive System Management Command Allows authorized personnel to reset security settings during a service event Default is enabled Restore Security Settings to Default Restoring settings t...

Page 74: ...ve priority in the boot sequence and will be recognized as drive C if any devices are attached NOTE To drag a device to a preferred place press Enter To remove the device from consideration as a bootable device press F5 You can use F5 to disable individual boot items as well as disable UEFI boot and or legacy boot NOTE MS DOS drive lettering assignments may not apply after a non MS DOS operating s...

Page 75: ...bled M 2 SSD Select to show the device in the operating system Default is enabled Allow PCIe PCI SERR Interrupt Allows PCI devices to report PCI PCIe System Error signals such as address parity errors data parity errors and critical errors other than parity Default is enabled Power Button Override disable 4 sec 15 sec Lets you disable or enable and select the number of seconds you have to hold dow...

Page 76: ... Port 3 USB 2 0 Port 4 USB 2 0 Port 5 USB 2 0 Port 6 SATA0 SATA1 SATA4 Bottom USB Type C port Media card reader Cash Drawer Port USB Type C Controller Firmware Update Option ROM Launch Policy These policies control whether the Legacy Option ROM or the UEFI driver is loaded Default is All UEFI Configure Option ROM Launch Policy All legacy All UEFI All UEFI except video Power Management Options Runt...

Page 77: ... shutdown goes to the S4 state S0 On Solid white LED S3 Stand By 3 blinks at 1Hz 50 duty cycle followed by a pause of 2 seconds white LED repeated cycles of 3 blinks and a pause S4 Hibernation 4 blinks at 1Hz 50 duty cycle followed by a pause of 2 seconds white LED repeated cycles of 4 blinks and a pause S5 Soft Off LED is off Recovering the Configuration Settings This method of recovery requires ...

Page 78: ...e Diagnostics Windows select More and then select Run as administrator or To access HP PC Hardware Diagnostics Windows from HP Support Assistant a Type support in the taskbar search box and then select the HP Support Assistant app or Select the question mark icon in the taskbar b Select Troubleshooting and fixes c Select Diagnostics and then select HP PC Hardware Diagnostics Windows 2 When the too...

Page 79: ...ate to the folder on your computer or the USB flash drive where the exe file was downloaded double click the exe file and then follow the on screen instructions Using HP PC Hardware Diagnostics UEFI NOTE For Windows 10 S computers you must use a Windows computer and a USB flash drive to download and create the HP UEFI support environment because only exe files are provided For more information see...

Page 80: ...stics UEFI download instructions are provided in English only and you must use a Windows computer to download and create the HP UEFI support environment because only exe files are provided Downloading the latest HP PC Hardware Diagnostics UEFI version To download the latest HP PC Hardware Diagnostics UEFI version to a USB flash drive 1 Go to http www hp com go techcenter pcdiags The HP PC Diagnost...

Page 81: ...www hp com support 2 Select Get software and drivers select your type of product enter the product name or number in the search box that is displayed select your computer and then select your operating system 3 In the Diagnostics section follow the on screen instructions to select and download the Remote UEFI version for the product Customizing Remote HP PC Hardware Diagnostics UEFI settings Using...

Page 82: ...3 Make your customization selections 4 Select Main and then Save Changes and Exit to save your settings Your changes take effect when the computer restarts 74 Chapter 10 Using HP PC Hardware Diagnostics ...

Page 83: ...al information Schedule regular backups to avoid information loss You can use Windows tools to back up personal information and create system restore points and recovery media allowing you to restore from backup refresh the computer and reset the computer to its original state NOTE If computer storage is 32 GB or less Microsoft System Restore is disabled by default For more information and steps s...

Page 84: ...r BD RE rewritable Blu ray discs which are not compatible with HP Recovery Manager software If your computer does not include an integrated optical drive with DVD writer capability you can use an external optical drive purchased separately to create recovery discs as described above If an external optical drive is used you must connect it directly to a USB port on the computer It cannot be connect...

Page 85: ...ition select products only or use the HP Recovery media For more information see Recovering using HP Recovery Manager on page 77 If you have not already created recovery media see Creating HP Recovery media select products only on page 75 Using Factory Reset select products only Restores the computer to its original factory state by deleting all information from the hard drive and recreating the p...

Page 86: ...hard drive is still working The HP Recovery partition select products only allows System Recovery only To start HP Recovery Manager from the HP Recovery partition IMPORTANT For a tablet with a detachable keyboard connect the tablet to the keyboard base before beginning these steps select products only 1 Type recovery in the taskbar search box select HP Recovery Manager and then select Windows Reco...

Page 87: ...ss esc and then press f9 for boot options For tablets without keyboards Turn on or restart the tablet quickly hold down the volume up button and then select f9 or Turn on or restart the tablet quickly hold down the volume down button and then select f9 3 Select the optical drive or USB flash drive from which you want to boot and then follow the on screen instructions Removing the HP Recovery parti...

Page 88: ...ncy responsible for evaluation in the country where the power cord set will be installed 2 The power cord set must have a minimum current capacity of 10A 7A Japan only and a nominal voltage rating of 125 or 250 volts AC as required by each country s power system 3 The diameter of the wire must be a minimum of 0 75 mm2 or 18AWG and the length of the cord must be between 1 8 m 6 feet and 3 6 m 12 fe...

Page 89: ...d set fittings appliance coupler and wall plug must bear the certification mark of the agency responsible for evaluation in the country where it will be used 2 The flexible cord must be Type SVT or equivalent No 18 AWG 3 conductor The wall plug must be a two pole grounding type with a NEMA 5 15P 15A 125V or NEMA 6 15P 15A 250V configuration 3 Appliance coupler flexible cord and wall plug must bear...

Page 90: ... beginning steps in this chapter Current BIOS steps 1 Follow steps a through l below to restore the nonvolatile memory that can contain personal data Restoring or reprogramming nonvolatile memory that does not store personal data is neither necessary nor recommended a Turn on or restart the computer and then press esc while the Press the ESC key for Startup Menu message is displayed at the bottom ...

Page 91: ...tform Module TPM and or fingerprint reader one or two prompts will appear one to clear the TPM and the other to Reset Fingerprint Sensor press or tap F1 to accept or F2 to reject l Remove all power and system batteries for at least 24 hours 2 Complete one of the following Remove and retain the storage drive or Clear the drive contents by using a third party utility designed to erase data from an S...

Page 92: ...4 KBytes not customer accessible No Yes Stores NIC configuration and NIC firmware NIC EEPROM is programmed using a utility from the NIC vendor that can be run from DOS A utility is required to write data to this memory and is available from the NIC vendor Writing data to this ROM in an inappropriate manner will render the NIC non functional DIMM Serial Presence Detect SPD configuration data 256 By...

Page 93: ...pplied using this utility Bluetooth flash select products only 2 Mbit No Yes Stores Bluetooth configuration and firmware Bluetooth flash is programmed at the factory Tools for writing data to this memory are not publicly available but can be obtained from the silicon vendor A utility is required for writing data to this memory and is made available through newer versions of the driver whenever the...

Page 94: ...diagnostics The UEFI BIOS provides functionality beyond that of the legacy BIOS In addition the UEFI BIOS works to initialize the computer s hardware before loading and executing the OS the run time environment allows the loading and execution of software programs from storage devices to provide more functionality such as advanced hardware diagnostics with the ability to display more detailed syst...

Page 95: ...oot Keys a Turn on or restart the computer and then press esc while the Press the ESC key for Startup Menu message is displayed at the bottom of the screen b Select the Security menu select Secure Boot Configuration and then follow the on screen instructions c At the Secure Boot Configuration window select Secure Boot select Clear Secure Boot Keys and then follow the on screen instructions to cont...

Page 96: ...oading 72 starting 72 using 71 HP PC Hardware Diagnostics Windows downloading 70 installing 71 using 70 HP Recovery Manager correcting boot problems 79 starting 78 HP Recovery media recovery 78 using 76 HP Recovery partition recovery 78 removing 79 HP Sure Start 87 I I O connectivity base advanced components 5 attaching fingerprint reader 32 attaching to mobility system 26 basic components 4 conne...

Page 97: ... restoring 75 S screws correct size 19 serial number I O connectivity base 7 mobility head unit 7 serial ports configuring for power 29 service considerations 18 SIM board removing 45 software servicing computer 19 software configuration 58 solid state drive removal 40 static electricity 16 supported discs recovery 76 system board illustrated 15 removing 46 system memory removing personal data fro...

Reviews: