background image

IMPORTANT:

Recovery permanently erases everything on your computer hard drive, including your 

downloaded files. If possible, back up your files before you recover your computer.

NOTE:

For more information about performing a system recovery on your computer, go to 

http://www.support.google.com

.

Before you begin the recovery process, you need the following prerequisites:

A USB flash drive or SD memory card with a capacity of 4 GB or greater. All data is erased from this 

storage device when the recovery media is created, so back up all files from the device before you begin.

A computer with internet access. You must also have administrative rights to the computer.

Computer AC adapter. The computer must be plugged into AC power during recovery.

The “Chrome OS is missing or damaged” screen displaying on your computer. If this message is not 

already displayed:

Turn on the computer, press and hold the 

esc

+

f3

 keys, and then press the power button. The 

computer restarts, and the screen shows the “Chrome OS is missing or damaged” screen.

Installing the Chromebook Recovery Utility

The Chromebook™ Recovery Utility recovers the original operating system and software programs that were 

installed at the factory. You can install this utility from the Chrome Web Store on any computer.

To install the Chromebook Recovery Utility:

Open the Chrome Web Store, search for 

chrome recovery

, select Chromebook Recovery Utility from 

the Apps list, and follow the on-screen instructions.

Creating recovery media

You can use recovery media to recover the original operating system and software programs that were 

installed at the factory.

To create recovery media:

1.

Turn on a computer that has internet access.

NOTE:

You must have administrative rights to the computer.

2.

Select the Launcher icon, and then select All Apps.

3.

In the Apps window, select Recovery, and then select Get started.

4.

Follow the on-screen instructions to create the recovery media.

NOTE:

All data and partitions on your recovery media will be deleted. Do not remove the USB flash


drive or SD memory card until the process is complete.

Recovering the Chrome operating system

Use these instructions to recover the Chrome operating system on your computer using the recovery media 

that you created.

Installing the Chromebook Recovery Utility

59

Summary of Contents for Elite c645 G2 Chromebook

Page 1: ...Maintenance and Service Guide SUMMARY This guide provides information about spare parts removal and replacement of parts security backing up and more ...

Page 2: ...es Wi Fi is a registered trademark of Wi Fi Alliance The information contained herein is subject to change without notice The only warranties for HP products and services are set forth in the express warranty statements accompanying such products and services Nothing herein should be construed as constituting an additional warranty HP shall not be liable for technical or editorial errors or omissi...

Page 3: ...ct the computer air vents Use the computer only on a hard flat surface Do not allow another hard surface such as an adjoining optional printer or a soft surface such as pillows or rugs or clothing to block airflow Also do not allow the AC adapter to come into contact with the skin or a soft surface such as pillows or rugs or clothing during operation The computer and the AC adapter comply with the...

Page 4: ...tic parts 19 Cables and connectors 19 Drive handling 19 Electrostatic discharge information 20 Generating static electricity 20 Preventing electrostatic damage to equipment 21 Personal grounding methods and equipment 21 Grounding the work area 22 Recommended materials and equipment 22 Cleaning your computer 23 Enabling HP Easy Clean select products only 23 Removing dirt and debris from your comput...

Page 5: ... Chromebook Recovery Utility 59 Creating recovery media 59 Recovering the Chrome operating system 59 Setting up your computer after a reset or recovery 60 Erasing and reformatting the recovery media 60 7 Specifications 61 Computer specifications 61 35 6 cm 14 0 in display specifications 61 Solid state drive specifications 62 8 Statement of memory volatility 64 Current BIOS steps 64 Nonvolatile mem...
Page 6: ...ng angle UWVA 45 NTSC embedded DisplayPort eDP 1 2 without panel self refresh PSR 250 nits FHD UWVA 45 NTSC eDP 1 2 without PSR 250 nits WWAN FHD UWVA 45 NTSC eDP 1 2 without PSR 250 nits touch on panel TOP FHD UWVA 100 sRGB eDP 1 3 PSR 400 nits FHD UWVA 100 sRGB eDP 1 3 PSR low blue light 1000 nits privacy panel HP Eye Ease certification High definition HD 1366 768 standard viewing angle SVA 45 N...

Page 7: ... Type A 2 models without WWAN or USB 3 2 Gen 1 Type A 1 models with WWAN Keyboard pointing devices Keyboard island style spill resistant 3 coat paint backlit 3 coat paint backlit privacy Textured Power requirements Battery 3 cell 58 Whr polymer HP Long Life HP Fast Charge Technology Smart AC adapters USB Type C non power factor correction nPFC straight 1 8 m 6 ft 65 W 45 W Power cord C5 convention...

Page 8: ...card slot select products only Supports a wireless subscriber identity module SIM card 2 Security cable slot Attaches an optional security cable to the computer NOTE The security cable is designed to act as a deterrent but it might not prevent the computer from being mishandled or stolen 3 AC adapter and battery light White The AC adapter is connected and the battery is fully charged Amber The AC ...

Page 9: ...rovides high speed data transfer and for select products charges small devices such as a smartphone when the computer is on or in Sleep mode NOTE Use a standard USB Type A charging cable or cable adapter purchased separately when charging a small external device 6 Audio out headphone Audio in microphone combo jack Connects optional powered stereo speakers headphones earbuds a headset or a televisi...

Page 10: ...transfer and for select products charges small devices such as a smartphone when the computer is on or in Sleep mode NOTE Use a standard USB Type C charging cable or cable adapter purchased separately when charging a small external device and Connects a display device that has a USB Type C connector providing DisplayPort output 4 AC adapter and battery light White The AC adapter is connected and t...

Page 11: ...nt electrical and mechanical safety information The Safety Comfort Guide is available on the web at http www hp com ergo Table 2 3 Display components and their descriptions Component Description 1 WWAN antennas select products only Send and receive wireless signals to communicate with wireless wide area networks WWANs 2 WLAN antennas Send and receive wireless signals to communicate with wireless l...

Page 12: ...y the software The antennas are not visible from outside the computer For optimal transmission keep the areas immediately around the antennas free from obstructions For wireless regulatory notices see the section of the Regulatory Safety and Environmental Notices that applies to your country or region Keyboard area Keyboards can vary by language Touchpad The touchpad settings and components are de...

Page 13: ... press the key briefly to exit Sleep select products only IMPORTANT Pressing and holding down the power key results in the loss of unsaved information If the computer has stopped responding and shutdown procedures are ineffective press and hold the power key for at least 10 seconds to turn off the computer 2 Fingerprint reader select products only The fingerprint reader allows you to unlock the co...

Page 14: ...eir descriptions Component Description 1 esc key Activates certain computer functions when pressed in combination with other keys such as tab or shift 2 Search key Opens a search box 3 Action keys Execute frequently used system functions Bottom Use the illustration and table to identify the bottom components Bottom 9 ...

Page 15: ... on the product IMPORTANT Check the following locations for the labels described in this section the bottom of the computer inside the battery bay under the service door on the back of the display or on the bottom of a tablet kickstand Service label Provides important information to identify your computer When contacting support you might be asked for the serial number the product number or the mo...

Page 16: ...onents Component 1 HP product name 2 Warranty period 3 Product ID 4 Serial number Regulatory labels Provide regulatory information about the computer Wireless certification labels Provide information about optional wireless devices and the approval markings for the countries or regions where the devices have been approved for use Labels 11 ...

Page 17: ...og 3 Use this chapter to determine the spare parts that are available for the computer Computer major components To identify the computer major components use this illustration and table 12 Chapter 3 Illustrated parts catalog ...

Page 18: ... N18576 001 For use in models without WWAN AMD Ryzen 7 5825C processor and 16 GB of system memory N12896 001 AMD Ryzen 5 5625C processor and 16 GB of system memory N12893 001 AMD Ryzen 5 5625C processor and 8 GB of system memory N12895 001 AMD Ryzen 5 5625C processor and 8 GB of system memory and 64 GB of eMMC storage N12894 001 AMD Ryzen 3 5425C processor and 8 GB of system memory and 64 GB of eM...

Page 19: ...use in models with WWAN N12908 001 For use in models with WLAN N12909 001 13 Smart card reader NOTE The smart card reader cable is available using spare part number N18575 001 The smart card reader bracket is available in the Bracket Kit as spare part number N18576 001 N12914 001 14 Battery 3 cell 58 Whr NOTE The battery bracket is available in the Bracket Kit as spare part number N18576 001 M1258...

Page 20: ... models N12924 001 For use in nonprivacy models N12925 001 2 Camera module N12929 001 3 Display panel includes panel adhesive NOTE The panel tape kit is available as spare part number N13937 001 FHD 250 nits touch on panel TOP N12897 001 FHD 250 nits N12898 001 FHD 250 nits WWAN N22021 001 FHD 400 nits N12899 001 Display assembly subcomponents 15 ...

Page 21: ...use with 400 nit displays N12907 001 Ambient light sensor includes cable N13938 001 not illustrated Miscellaneous parts To identify the miscellaneous parts use this table Table 3 3 Miscellaneous part descriptions and part numbers Component Spare part number AC adapters USB Type C AC adapter nPFC 3 pin 1 8 m 6 ft 45 W L43407 001 65 W L67440 001 SIM card tray N12920 001 Screw Kit N12930 001 Bracket ...

Page 22: ...05333 001 HP Prelude Pro 15 6 backpack M03617 001 HP Prelude Pro 15 6 top load case M03618 001 HP business 14 1 laptop bag M55007 001 HP bluetooth travel mouse L62043 001 HP USB mouse L95713 001 HP nano lock 918431 001 HP Sure Key cable lock L65088 001 Power adapter duckhead Japan L33157 001 Power adapter C5 AC conventional 1 0 m 3 3 ft Japan 226768 001 Power cords C5 conventional 1 0 m 3 3 ft Arg...

Page 23: ...001 Brazil 923430 002 Denmark 923430 003 Europe Austria Belgium Finland France Germany the Netherlands Norway and Sweden 923430 004 India 923430 006 Israel 923435 001 Italy 923430 007 Japan 931252 001 North America 923430 008 People s Republic of China 931251 001 South Africa 923430 009 South Korea 931250 001 Switzerland 923430 010 Taiwan 923430 012 Thailand 923430 011 United Kingdom 923430 013 Po...

Page 24: ...ic parts Cables and connectors Handle cables with extreme care to avoid damage IMPORTANT When servicing the computer be sure that cables are placed in their proper locations during the reassembly process Improper cable placement can damage the computer Apply only the tension required to unseat or seat the cables during removal and insertion Handle cables by the connector whenever possible In all c...

Page 25: ...vices or microcircuitry Often the spark is neither felt nor heard but damage occurs An electronic device exposed to electrostatic discharge ESD might not appear to be affected at all and can work perfectly throughout a normal cycle The device might function normally for a while but it has been degraded in the internal layers reducing its life expectancy Networks built into many integrated circuits...

Page 26: ...tatic safe containers such as tubes bags or boxes Protect all electrostatic parts and assemblies with conductive or approved containers or packaging Keep electrostatic sensitive parts in their containers until they arrive at static free stations Place items on a grounded surface before removing them from their container Always be properly grounded when touching a sensitive component or assembly Av...

Page 27: ... or test equipment Use fixtures made of static safe materials when fixtures must directly contact dissipative surfaces Keep the work area free of nonconductive materials such as ordinary plastic assembly aids and polystyrene foam Use conductive field service tools such as cutters screwdrivers and vacuums Avoid contact with pins leads or circuitry Recommended materials and equipment HP recommends c...

Page 28: ...Easy Clean tile 2 Now that your device is disabled for a short period see Removing dirt and debris from your computer on page 23 for the recommended steps to clean the high touch external surfaces on your computer After you remove the dirt and debris you can also clean the surfaces with a disinfectant See Cleaning your computer with a disinfectant on page 24 for guidelines to help prevent the spre...

Page 29: ...and debris from your computer on page 23 Caring for wood veneer select products only on page 25 or both you might also choose to clean the surfaces with a disinfectant A disinfectant that is within HP s cleaning guidelines is an alcohol solution consisting of 70 isopropyl alcohol and 30 water This solution is also known as rubbing alcohol and is sold in most stores Follow these steps when disinfec...

Page 30: ...ct with sharp objects or rough surfaces that might scratch the wood See Removing dirt and debris from your computer on page 23 for the recommended steps to clean the high touch external surfaces on your computer After you remove the dirt and debris you can also clean the surfaces with a disinfectant See Cleaning your computer with a disinfectant on page 24 for sanitizing guidelines to help prevent...

Page 31: ... System Log Post operating system failures are logged in the Event Viewer 1 Turn on the computer and allow the operating system to open 2 Select the search icon in the taskbar 3 Type Event Viewer and then press enter 4 Select the log from the left panel Details display in the right panel Chrome 1 Go to support google com chrome 2 Search collect Chrome device logs Technical bulletins To locate tech...

Page 32: ... Component and diagnosis information failure detection and required action To locate diagnosis information and actions 1 Go to http www hp com go techcenter pcdiags 2 Select Get Support 3 Near the bottom of the window select Notebook PCs and then select your location Accessing support information 27 ...

Page 33: ...ecial note of each screw size and location during removal and replacement Preparation for disassembly To remove and replace computer components use these procedures For initial safety procedures see Removal and replacement procedures preliminary requirements on page 19 1 Turn off the computer If you are unsure whether the computer is off or in Hibernation turn the computer on and then shut it down...

Page 34: ...90 1 3 While holding the bottom edge of the computer place your thumbs on the top cover below the keyboard and to the left and right of the touchpad 2 and then press and pull up to release the bottom cover 4 Close the computer and place it upside down 3 5 Pull the bottom cover off the computer by pulling up at the seam between the hinges 4 Bottom cover 29 ...

Page 35: ... Punctures can cause a short inside the battery which can result in battery thermal runaway Do not handle or touch the battery enclosure with sharp objects such as tweezers or pliers which might puncture the battery Do not compress or squeeze the battery case with tools or heavy objects stacked on top of the case These actions can apply undue force to the battery Do not touch the connectors with a...

Page 36: ... Remove the five Phillips M2 0 4 0 screws 2 that secure the battery to the computer 3 Remove the battery from the computer 3 To replace the battery reverse the removal procedures Solid state drive To remove the solid state drive use this procedure and illustration Table 5 3 Solid state drive descriptions and part numbers Description Spare part number 512 GB N17382 001 256 GB N17381 001 128 GB N173...

Page 37: ...s M2 0 2 0 screw 2 that secures the drive 3 Pull the drive out of the socket 3 4 To replace an M 2 2230 drive with a M 2 2280 drive remove the adapter bracket by removing the Phillips M2 0 2 0 screw 1 that secures the adapter bracket and then removing the bracket 2 Install the new drive 32 Chapter 5 Removal and replacement procedures for authorized service provider parts ...

Page 38: ... state drive be sure a thermal pad is installed on the drive On M 2 2230 drives install a thermal pad as shown by callout 1 On M 2 2280 drives install a thermal pad as shown by callout 2 To install the solid state drive reverse the removal procedures NOTE Solid state drives are designed with a notch to prevent incorrect insertion WLAN module To remove the WLAN module use this procedure and illustr...

Page 39: ...d then contact technical support Before removing the WLAN module follow these steps 1 Prepare the computer for disassembly see Preparation for disassembly on page 28 2 Remove the bottom cover see Bottom cover on page 28 3 Disconnect the battery cable from the system board see Battery on page 30 Remove the WLAN module 1 Remove the Phillips M2 0 2 5 screw 1 and then remove the bracket from the modul...

Page 40: ... module authorized for use in the computer by the governmental agency that regulates wireless devices in your country or region If you replace the module and then receive a warning message remove the module to restore device functionality and then contact technical support Before removing the WWAN module follow these steps 1 Prepare the computer for disassembly see Preparation for disassembly on p...

Page 41: ...k WWAN antenna cables 4 If the WWAN antenna is not connected to the terminal on the WWAN module a protective sleeve must be installed on the antenna connector as shown in the following illustration To install the WWAN module reverse this procedure Speakers To remove the speakers use this procedure and illustration 36 Chapter 5 Removal and replacement procedures for authorized service provider part...

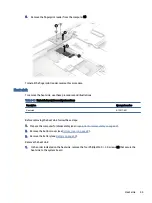
Page 42: ...om the system board see Battery on page 30 Remove the speakers 1 Disconnect the speaker cables from the system board 1 2 Remove the two Phillips M2 0 5 0 screws from each speaker 2 3 Remove the speakers from the computer 3 NOTE When installing the speakers be sure that the rubber washers 4 are installed with each screw To install the speaker reverse this procedure Fan To remove the fan use this pr...

Page 43: ...emove the fan from the computer 3 To install the fan reverse this procedure Touchpad To remove the touchpad use this procedure and illustration Table 5 8 Touchpad description and part number Description Spare part number Touchpad includes bracket N12916 001 Touchpad cable with Mylar N14811 001 Before removing the touchpad follow these steps 1 Prepare the computer for disassembly see Preparation fo...

Page 44: ...dure USB board USB boards differ depending on whether the computer offers WWAN To remove the USB board use these procedures and illustrations Table 5 9 USB board description and part number Description Spare part number USB board for use in models with WWAN N12908 001 USB board for use in models with WLAN N12909 001 USB board cable for use in models with WWAN N12910 001 USB board cable for use in ...

Page 45: ... 2 that secure the bracket and then remove the bracket 3 3 WWAN models only Remove the SIM card from the slot on the side of the computer 1 4 Remove the Phillips M2 0 2 5 screw 2 that secures the metal clip and then remove the clip 3 5 Lift the clear plastic so you can access the connectors and screws on the USB board 1 6 Disconnect the right speaker cable from the board 2 40 Chapter 5 Removal and...

Page 46: ...et description and part number Description Spare part number Lock bracket available in the Bracket Kit N18576 001 Before removing the lock bracket follow these steps 1 Prepare the computer for disassembly see Preparation for disassembly on page 28 2 Remove the bottom cover see Bottom cover on page 28 3 Disconnect the battery cable from the system board see Battery on page 30 4 Remove the USB board...

Page 47: ...reader insert available in the Miscellaneous Parts Kit N14812 001 Before removing the card reader follow these steps 1 Prepare the computer for disassembly Preparation for disassembly on page 28 2 Remove the bottom cover see Bottom cover on page 28 3 Remove the battery see Battery on page 30 Remove the card reader 1 Disconnect the cable from the ZIF connector on the card reader board 1 2 Remove th...

Page 48: ... card reader reverse this procedure Fingerprint reader and board To remove the fingerprint reader and board use this procedure and illustration Table 5 12 Fingerprint reader and board description and part number Description Spare part number Fingerprint reader N14814 001 Fingerprint reader board N18574 001 Fingerprint reader cable N18575 001 Fingerprint reader and board 43 ...

Page 49: ...er see Bottom cover on page 28 3 Remove the battery see Battery on page 30 Remove the fingerprint reader and board 1 Disconnect the cable from the ZIF connector on the right side of the fingerprint reader board 1 2 Disconnect the cable from the ZIF connector on the left side of the board 2 3 Remove the board from the computer 3 4 Disconnect the cable from the ZIF connector on the fingerprint reade...

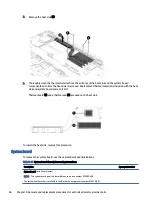
Page 50: ...iption Spare part number Heat sink N12917 001 Before removing the heat sink follow these steps 1 Prepare the computer for disassembly see Preparation for disassembly on page 28 2 Remove the bottom cover see Bottom cover on page 28 3 Remove the battery see Battery on page 30 Remove the heat sink 1 In the order indicated on the heat sink remove the four Phillips M2 0 3 0 screws 1 that secure the hea...

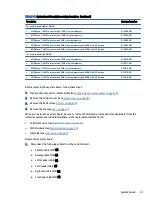
Page 51: ...the heat sink To install the heat sink reverse this procedure System board To remove the system board use these procedures and illustrations Table 5 14 System board descriptions and part numbers Description Spare part number System board includes processor NOTE The system board repair kit is available as spare part number N19985 888 The system board bracket is available in the Bracket Kit as spare...

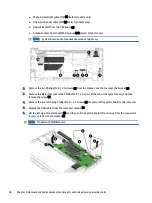
Page 52: ... processor and 8 GB of system memory and 64 GB of eMMC storage N22019 001 AMD Ryzen 3 5425C processor and 8 GB of system memory and 64 GB of eMMC storage N22016 001 Before removing the system board follow these steps 1 Prepare the computer for disassembly see Preparation for disassembly on page 28 2 Remove the bottom cover see Bottom cover on page 28 3 Remove the battery see Battery on page 30 4 R...

Page 53: ...the bracket 2 3 Remove the Mylar that covers the Phillips M2 0 2 5 screw at the top of the system board and then remove the screw 3 4 Remove the two remaining Phillips M2 0 2 5 screws 4 that secure the system board to the computer 5 Release the USB cables from the computer chassis 5 6 Lift the left side of system board 6 and then pull the system board left and away from the connectors to remove it...

Page 54: ...panel follow these steps 1 Prepare the computer for disassembly see Preparation for disassembly on page 28 2 Remove the bottom cover see Bottom cover on page 28 3 Remove the battery see Battery on page 30 4 Remove the WLAN module see WLAN module on page 33 5 Remove the heat sink see Heat sink on page 45 Remove the display assembly 1 Disconnect the WLAN antenna cables 1 from the terminals on the WL...

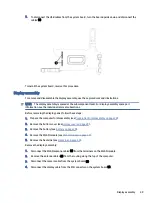
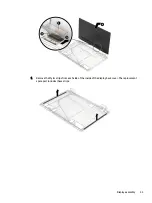
Page 55: ...play bezel a Release the top edge of the display bezel 1 from the display assembly b Release the left and right edges of the display bezel 2 from the display assembly c Release the bottom edge of the display bezel 3 from the display assembly d Remove the display bezel 4 from the display assembly NOTE All four sides of the bezel are secured with adhesive The top and bottom also have hooks to secure...

Page 56: ... To remove the hinges from the display rear cover a Remove the two Phillips M2 5 2 5 broadhead screws 1 and the Phillips 2 5 3 0 screw 2 from each hinge b Remove the hinges from the display back cover 3 The display hinges are available as spare part number N12927 001 13 To remove the display panel Display assembly 51 ...

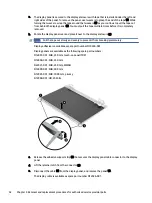
Page 57: ...o prevent it from breaking prematurely Display adhesive is available as spare part number N10449 001 Display panels are available as the following spare part numbers N12897 001 FHD 250 nits touch on panel TOP N12898 001 FHD 250 nits N22021 001 FHD 250 nits WWAN N12899 001 FHD 400 nits N12901 001 FHD 1000 nits privacy N12900 001 HD 250 nits c Release the adhesive support strip 1 that secures the di...

Page 58: ...f Remove the Mylar strips from each side of the inside of the display back cover The replacement spare part includes these strips Display assembly 53 ...

Page 59: ...the bracket from the display back cover 2 b Use a tool to detach the camera module 1 from the display back cover The module is attached with double sided adhesive Note that the camera routes under the camera so that you must remove the camera before you can disconnect the cable c Disconnect the cable from the module 2 Note that the camera routes under the camera The camera module is available as s...

Page 60: ... part number N10434 001 16 To remove the WWAN antennas and cables release the cables from the retention clips on the inside of the display back cover 1 peel the wireless antennas 2 off the display back cover and then remove them 3 The WWAN cables and antennas are available as spare part number N12922 001 Display assembly 55 ...

Page 61: ... are available as the following spare part numbers N12902 001 Models without WWAN and a 250 nit panel N12903 001 Models without WWAN and a privacy panel N12904 001 Models without WWAN and a 400 nit panel N12905 001 Models with WWAN and a 250 nit panel N12906 001 Models with WWAN and a privacy panel N12907 001 Models with WWAN and a 400 nit panel To reassemble and replace the display assembly rever...

Page 62: ...privacy models without WWAN N15103 xx1 Top cover with keyboard not backlit models without WWAN N15105 xx1 Table 5 16 Spare part country codes For use in country or region Spare part number For use in country or region Spare part number For use in country or region Spare part number Belgium A41 Iceland DD1 Solvenia BA1 Brazil 201 India D61 South Korea AD1 Bulgaria 261 Israel BB1 Spain 071 Chile 161...

Page 63: ...s Chrome device You are having problems with your user profile or settings You restarted your computer and it still doesn t work properly You want to change the owner of your computer To reset your computer 1 Under the Settings menu select Advanced 2 In the Powerwash section select Powerwash 3 Select Restart 4 In the window that appears select Powerwash and then select Continue 5 Follow the on scr...

Page 64: ... Chromebook Recovery Utility The Chromebook Recovery Utility recovers the original operating system and software programs that were installed at the factory You can install this utility from the Chrome Web Store on any computer To install the Chromebook Recovery Utility Open the Chrome Web Store search for chrome recovery select Chromebook Recovery Utility from the Apps list and follow the on scre...

Page 65: ...rome OS reinstalled Setting up your computer after a reset or recovery After a reset or recovery is complete perform the initial setup process For details about setting up the computer go to http www support google com Erasing and reformatting the recovery media When you create recovery media the USB flash drive or SD memory card is formatted as a recovery tool After recovery you must erase the re...

Page 66: ...1540 g 3 40 lb Input power Operating voltage and current 19 5 V dc 3 33 A 65 W 19 5 V dc 2 31 A 45 W Temperature Operating 5 C to 35 C 41 F to 95 F Nonoperating 20 C to 60 C 4 F to 140 F Relative humidity noncondensing Operating 10 to 90 Nonoperating 5 to 95 Maximum altitude unpressurized Operating 15 m to 3 048 m 50 ft to 10 000 ft Nonoperating 15 m to 12 192 m 50 ft to 40 000 ft NOTE Applicable ...

Page 67: ...m 28 9 mm Weight 10 g 10 g 10 g Interface type PCIe PCIe PCIe Ready time maximum to not busy 1 0 ms 1 0 ms 1 0 ms Access times logical 0 1 ms 0 1 ms 0 1 ms Transfer rate Sequential read up to 2150 MBps up to 2150 MBps up to 2150 MBps Random read Up to 300 000 IOPs Up to 300 000 IOPs Up to 300 000 IOPs Sequential write up to 1550 MBps up to 1550 MBps up to 1550 MBps Random write Up to 100 000 IOPs ...

Page 68: ...Table 7 3 Solid state drive specifications continued 256 GB 512 GB 1 TB NOTE Certain restrictions and exclusions apply Contact support for details Solid state drive specifications 63 ...

Page 69: ... and AMD based system boards NOTE If your tablet has a keyboard base connect to the keyboard base before beginning steps in this chapter Current BIOS steps Use these instructions to restore nonvolatile memory 1 Follow these steps to restore the nonvolatile memory that can contain personal data Restoring or reprogramming nonvolatile memory that does not store personal data is neither necessary nor ...

Page 70: ...f the system has a Trusted Platform Module TPM fingerprint reader or both one or two prompts will appear one to clear the TPM and the other to Reset Fingerprint Sensor Press or tap f1 to accept or f2 to reject l Remove all power and system batteries for at least 24 hours 2 Complete one of the following Remove and retain the storage drive or Clear the drive contents by using a third party utility d...

Page 71: ...uration data for select platforms that support HP Sure Start For more information see Using HP Sure Start select products only on page 70 Data cannot be written to this device via the host processor The content is managed solely by the HP Sure Start Embedded Controller This memory is protected by the HP Sure Start Embedded Controller Real Time Clock RTC battery backed up CMOS configuration memory ...

Page 72: ... Firmware present only in select Elite or Z models For more information go to http www hp com support Select Identify your product for manuals and specific product information and then follow the on screen instructions 1 5 MB or 7 MB Yes Yes Stores Management Engine Code Settings Provisioning Data and iAMT third party data store Management Engine Code is programmed at the factory Code is updated v...

Page 73: ... KB flash Yes Yes Stores fingerprint templates Fingerprint reader memory is programmed by user enrollment in HP ProtectTools Security Manager Only a digitally signed application can make the call to write to the flash Questions and answers Use this section to answer your questions about nonvolatile memory 1 How can the BIOS settings be restored returned to factory settings IMPORTANT The restore de...

Page 74: ...he memory module such as size serial number data width speed and timing voltage and thermal information This information is written by the module manufacturer and stored on an EEPROM You cannot write to this EEPROM when the memory module is installed in a computer Third party tools do exist that can write to the EEPROM when the memory module is not installed in a computer Various third party tools...

Page 75: ...tinuously monitors your computer s BIOS for attacks or corruption If the BIOS becomes corrupted or is attacked HP Sure Start restores the BIOS to its previously safe state without user intervention Those select computer models ship with HP Sure Start configured and enabled HP Sure Start is configured and already enabled so that most users can use the HP Sure Start default configuration Advanced us...

Page 76: ...s must be approved by an acceptable accredited agency responsible for evaluation in the country or region where the power cord set will be used The power cord sets must have a minimum current capacity of 10 A and a nominal voltage rating of 125 V ac or 250 V ac as required by the power system of each country or region The appliance coupler must meet the mechanical configuration of an EN 60 320 IEC...

Page 77: ...lexible cord and wall plug must bear a T mark and registration number in accordance with the Japanese Dentori Law The flexible cord must be Type VCTF three conductor 0 75 mm or 1 25 mm conductor size The wall plug must be a two pole grounding type with a Japanese Industrial Standard C8303 7 A 125 V ac configuration 4 The flexible cord must be Type RVV three conductor 0 75 mm conductor size Power c...

Page 78: ...ttery in general household waste Follow the local laws and regulations in your area for battery disposal HP encourages customers to recycle used electronic hardware HP original print cartridges and rechargeable batteries For more information about recycling programs see the HP website at http www hp com recycle Recycling 73 ...

Page 79: ... illustrated 16 spare part number 16 display bezel illustrated 15 spare part number 15 display cable illustrated 16 spare part number 16 display components 6 display panel illustrated 15 product description 1 spare part number 15 E electrostatic discharge ESD 19 20 preventing damage 19 21 esc key identifying 8 F fan illustrated 13 removal 37 spare part number 13 37 fingerprint reader illustrated 1...

Page 80: ... security 2 serviceability 2 solid state drive 1 video 2 wireless 2 product name 1 product name and number computer 10 R recovery media creating 59 erase 60 recovery performing 58 regulatory information regulatory label 10 wireless certification labels 10 removal and replacement procedures 28 solid state drive 31 removing personal data from volatile system memory 64 resetting 58 S Screw Kit spare ...

Page 81: ...d SuperSpeed port identifying 4 5 V vent identifying 10 video product description 2 W wireless antennas identifying 6 wireless certification label 10 wireless product description 2 WLAN antennas illustrated 16 spare part number 16 WLAN antennas identifying 6 WLAN device 10 WLAN label 10 WLAN module removal 33 spare part numbers 33 workstation guidelines 19 WWAN antennas illustrated 16 spare part n...

Reviews: