


4.
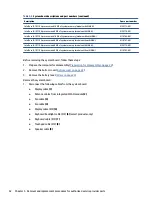
Lift the front and right side of the system board (2), and then pull the board up and to the right away
from the connectors to remove it (3).
Reverse this procedure to install the system board.
Display assembly
To remove and disassemble the display assembly, use these procedures and illustrations.
Table 5-10
Display assembly descriptions and part numbers
Description
Spare part number
Display assembly, antiglare, SVA, 400 nits
M11036-001
Display assembly, BrightView, UWVA, 400 nits
M11037-001
Display assembly, antiglare, SVA, 1000 nits, privacy
M11038-001
Before removing the display panel, follow these steps:
1.
Prepare the computer for disassembly (
Preparation for disassembly on page 22
2.
Remove the bottom cover (
).
3.
Disconnect the battery cable from the system board (see
).
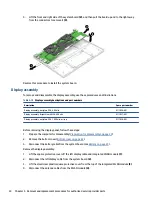
Remove the display assembly:
1.
Lift the square protective cover off the left display cable and integrated WLAN module (1).
2.
Disconnect the left display cable from the system board (2).
3.
Lift the small clear plastic square protective cover from the top of the integrated WLAN module (3).
4.
Disconnect the antenna cables from the WLAN module (4).
34
Chapter 5 Removal and replacement procedures for authorized service provider parts
Summary of Contents for Elite C1030 Chromebook
Page 4: ...iv Safety warning notice ...
Page 7: ...10 Recycling 55 Index 56 vii ...
Page 8: ...viii ...