background image

EL-MF877-00

Page

3

Template Revision B

PSG instructions for this template are available at

EL-MF877-01

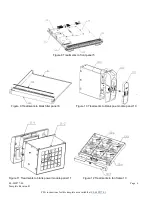
38. Remove film 6-3 from front panel 6-1.
39. Remove plastic panel 10-1.
40. Unscrew the screw on plastic panel 10-2, and then remove plastic panel 10-2 from frame 10-3.
41. Unscrew the screws on plastic panel 11-1, and then remove plastic panel 11-1 from panel 11-2.
42. Unscrew the screws on fan 13-1, and then remove fan 13-1 from fan frame 13-4.Remove shielding finger 12-3 from fan

frame 13-1.

43. Unscrew the screws on PCB 13-2, and then remove PCB 13-2 from fan frame 13-4.Unscrew the screws on fan 12-5,

and then remove fan 13-5 from fan frame 13-1.

44. Unscrew the screws on plastic panel 13-3, and then remove plastic panel 13-3 from fan frame 13-4.
45.

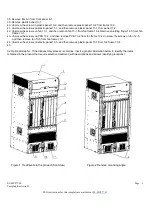
3.2 Optional Graphic. If the disassembly process is complex, insert a graphic illustration below to identify the items
contained in the product that require selective treatment (with descriptions and arrows identifying locations).

Figure 1 Treatments to the product (front view)

Figure 2 Remove mounting angle

Summary of Contents for A9508-V

Page 1: ...included in product Printed Circuit Boards PCB or Printed Circuit Assemblies PCA With a surface greater than 10 sq cm 11 Batteries All types including standard alkaline and lithium coin or button style batteries 1 Mercury containing components For example mercury in lamps display backlights scanner lamps switches batteries 0 Liquid Crystal Displays LCD with a surface greater than 100 sq cm Include...

Page 2: ...crew the screws on rear cover 14 and then remove rear cover 14 from the chassis 14 Unscrew the screws on rib 15 and then remove rib 15 from the chassis 15 Unscrew the screws on PCB 16 and then remove PCB 16 16 Unscrew the screws on PCB 17 and then remove PCB 17 17 Unscrew the screws on racket 7 1 and then remove racket 7 1 from upper frame 7 10 18 Unscrew the screws on racket 7 2 and then remove r...

Page 3: ...m fan frame 13 4 Remove shielding finger 12 3 from fan frame 13 1 43 Unscrew the screws on PCB 13 2 and then remove PCB 13 2 from fan frame 13 4 Unscrew the screws on fan 12 5 and then remove fan 13 5 from fan frame 13 1 44 Unscrew the screws on plastic panel 13 3 and then remove plastic panel 13 3 from fan frame 13 4 45 3 2 Optional Graphic If the disassembly process is complex insert a graphic i...

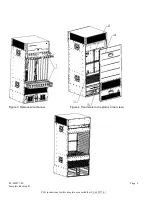
Page 4: ...EL MF877 00 Page 4 Template Revision B PSG instructions for this template are available at EL MF877 01 Figure 3 Remove wire channel Figure 4 Treatments to the product rear view ...

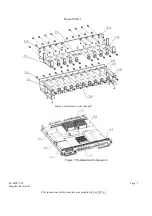
Page 5: ...EL MF877 00 Page 5 Template Revision B PSG instructions for this template are available at EL MF877 01 Figure 5 Part 1 Figure 6 Treatments to wire channel 7 Figure 7 Treatments to front panel 4 ...

Page 6: ...this template are available at EL MF877 01 Figure 8 Treatments to front panel 5 Figure 9 Treatments to blank filler panel 6 Figure 10 Treatments to blank poe module panel 10 Figure 11 Treatments to blank power module panel 11 Figure 12 Treatments to fan frame 13 ...

Reviews: