


Chapter 3
Preparing Superdome for Booting
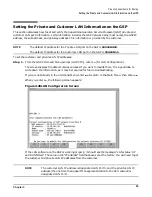
Setting Up the CE Tool (PC)
57
Preferred types are HP70092, HP70096 or HP70094, HP70098.
Step 8. Click Apply.
This option is not highlighted if the terminal type you want is already selected.
Step 9. Click OK.
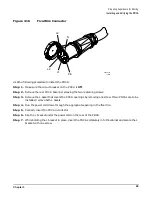
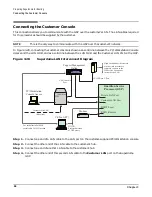
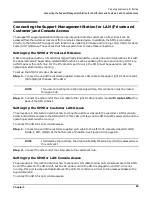
Connecting the CE Tool to the Local RS-232 Port on the GSP (Recommended)
This connection allows you to communicate directly with the GSP. You can create one window only on your
CE tool to monitor the GSP. When enabled, it gives you direct access to the GSP and any partition.
Use the following procedure to connect the CE tool to the Local RS-232 Port on the GSP:
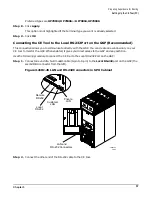
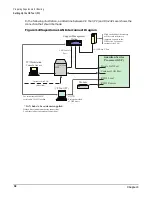
Step 1. Connect one end of a Null modem cable (9-pin to 9-pin) to the Local RS-232 port on the GSP (the
second DB9 connector from the left).
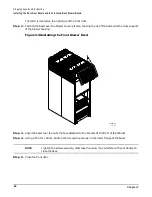
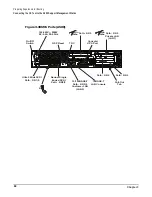
Figure 3-21RJ-45 LAN and RS-232 Connectors in SPU Cabinet
Step 2. Connect the other end of the RS-232 cable to the CE tool.
60IN050A
9/8/00
LAN and
RS-232 Connectors
Local
RS232
Remote
RS232
LAN
Customer
LAN
Private
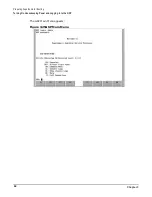
Summary of Contents for 9000 Superdome
Page 8: ...Contents 8 ...
Page 9: ...9 Preface ...
Page 21: ...21 IEC 60417 IEC 335 1 ISO 3864 IEC 617 2 International Symbols ...
Page 22: ...22 Figure 9 Superdome Declaration of Conformity Page 1 ...
Page 23: ...23 Figure 10 Superdome Declaration of Conformity Page 2 ...
Page 24: ...24 ...
Page 32: ...Chapter 1 Introduction Installation Warranty 8 ...
Page 130: ...Chapter 4 Verifying and Booting Superdome Enabling iCOD 106 ...
Page 172: ...Appendix A hp Server rx2600 Support Management Station Configuring the SMS 148 ...
Page 184: ...Appendix C Superdome LAN Interconnect Diagram 160 ...
Page 193: ...Appendix F 169 F A180 Support Management Station ...
Page 230: ...Appendix G Connecting Multiple SPU Cabinets Connecting Cables 206 ...
Page 256: ...Appendix H JUST Exploration Tool Error Conditions 232 ...