background image

Using the microSD memory card reader

Optional microSD memory cards provide secure data storage and convenient data sharing. These cards are 
often used with digital cameras and smartphones as well as with other computers.

Inserting a microSD memory card

CAUTION:

To prevent damage to a microSD memory card or the computer, do not use force to remove or 

replace the tray.

1.

Position the computer display-side up on a flat surface.

2.

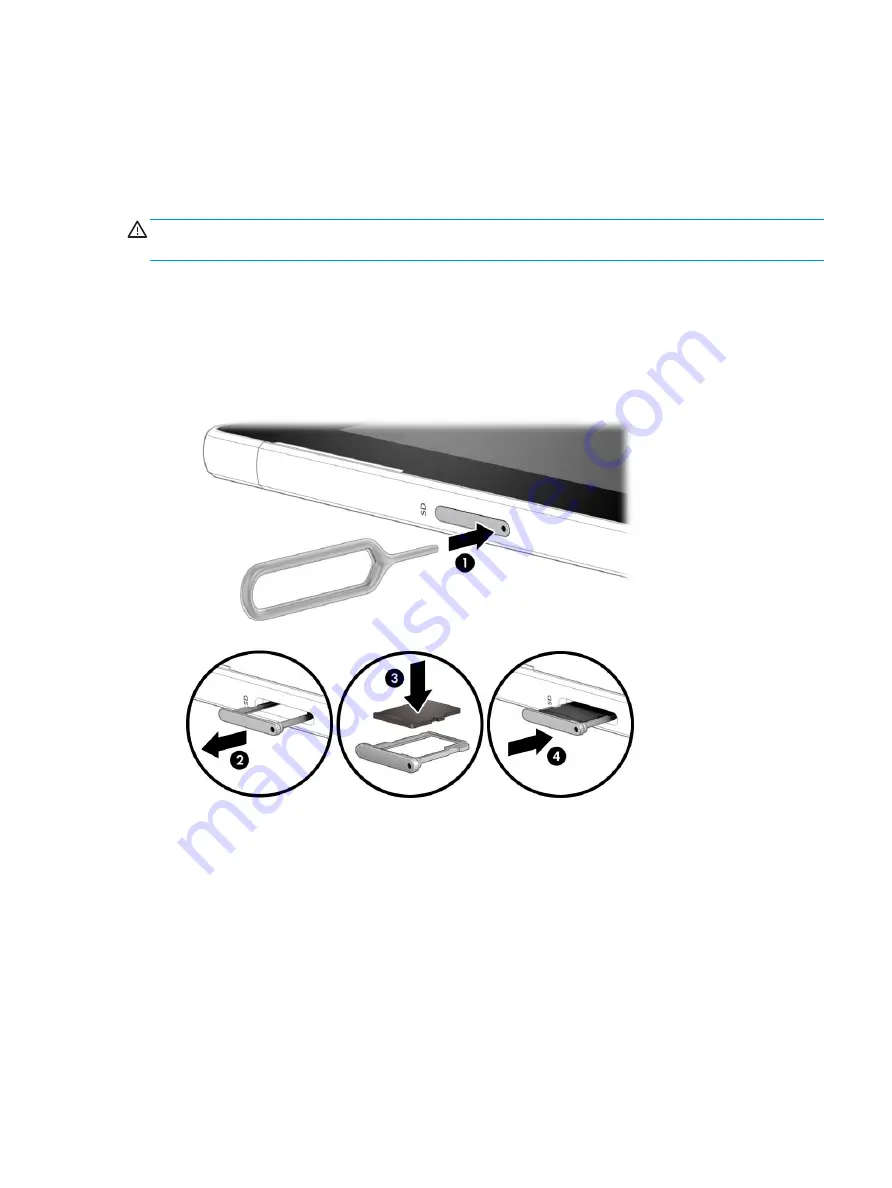
Insert the card removal tool or a small straightened paper clip (1) into the card tray access hole.

3.

Press the tool or clip in gently until the card tray is ejected.

4.

Remove the tray (2) from the computer and insert the card (3).

5.

Replace the tray in the computer. Press in gently on the tray (4) until it is firmly seated.

You will hear a sound when the device has been detected, and a menu of options may be displayed.

Using the microSD memory card reader

19

Summary of Contents for 12-g0xx

Page 1: ...HP ENVY x2 12 Detachable PC Maintenance and Service Guide IMPORTANT This document is intended for HP authorized service providers only ...

Page 2: ...First Edition February 2018 Document Part Number L18928 001 Product notice This user guide describes features that are common to most models Some features may not be available on your computer Not all features are available in all editions of Windows This computer may require upgraded and or separately purchased hardware drivers and or software to take full advantage of Windows functionality Go to...

Page 3: ... another hard surface such as an adjoining optional printer or a soft surface such as pillows or rugs or clothing to block airflow Also do not allow the AC adapter to contact the skin or a soft surface such as pillows or rugs or clothing during operation The device and the AC adapter comply with the user accessible surface temperature limits defined by the International Standard for Safety of Info...

Page 4: ...iv Safety warning notice ...

Page 5: ... keys 12 Top 13 Bottom 13 Rear 14 Pen 15 Labels 16 Using a nano SIM card select products only 17 Inserting a nano SIM card 17 Removing a nano SIM card 18 Using the microSD memory card reader 19 Inserting a microSD memory card 19 Removing a microSD memory card 20 3 Illustrated parts catalog 21 Computer components 21 Cables 24 Miscellaneous parts 25 4 Removal and replacement preliminary requirements...

Page 6: ... 51 Power board and cable 52 Display and touch cables 53 Cable identification 54 Left USB board 55 Audio jack and cable 57 Right USB board 58 POGO pin keyboard connector cable 60 System board 61 WLAN antennas 65 Speakers 68 WWAN antennas 70 Infrared camera LED board 71 P sensor 73 6 Using Setup Utility BIOS 75 Starting Setup Utility BIOS 75 Updating Setup Utility BIOS 75 Determining the BIOS versi...

Page 7: ... name or number 80 Customizing Remote HP PC Hardware Diagnostics UEFI settings 80 8 Specifications 82 9 Backing up restoring and recovering 83 Using Windows tools 83 Creating HP Recovery media select products only 83 Using HP Recovery Manager to create recovery media 84 Before you begin 84 Creating the recovery media 84 Using the HP Cloud Recovery Download Tool to create recovery media 85 Restorin...

Page 8: ...Index 91 viii ...

Page 9: ...ghtView ultra slim bent UWVA 400 nits touch screen display assembly 3 2 aspect ratio Simultaneous pen and touch Flush glass panel cover support Touch solution with flush glass or bezel multitouch enabled eDP1 4 PSR Support Active Stylus including tilt function Microsoft HDR Streaming capable Memory On board system memory non customer accessible non upgradable Support for up to 8 GB of LPDDR3 1866 ...

Page 10: ...WLAN options by way of wireless module incorporated onto system board Intel Dual band wireless AC 8265 802 11AC 2 2 WiFi Bluetooth 4 2 Combo Adapter non vPro Compatible with Miracast certified devices WiFi SAR enabled in BIOS Connected Standby support Wireless WAN Intel XMM 7360 LTE Advanced Support LTE bands LTE FDD B1 B2 B3 B4 B5 B7 B8 B11 B12 B13 B17 B18 B19 B20 B21 B26 B28 B29 B30 B66 LTE TDD ...

Page 11: ...e keyboard TouchPad requirements TouchPad with image sensor MultiTouch gestures enabled Support for Modern TrackPad gestures Taps enabled as default Power requirements Battery 3 cell 49 WHr long life fast charge Li ion battery AC adapter 45 W USB Type C non PFC duck head 65 W USB Type C non PFC duck head Power cord 1 00 m premium power cord with a C5 connector duckhead Security Support for Trusted...

Page 12: ...oviding DisplayPort output NOTE Cables and or adapters purchased separately may be required 2 AC adapter and battery light White The AC adapter is connected and the battery is fully charged Blinking white The AC adapter is disconnected and the battery has reached a low battery level Amber The AC adapter is connected and the battery is charging Off The battery is not charging 3 Volume button Contro...

Page 13: ...ging the computer battery and Connects a USB device that has a Type C connector such as a cell phone camera activity tracker or smartwatch and provides high speed data transfer and Connects a display device that has a USB Type C connector providing DisplayPort output NOTE Cables and or adapters purchased separately may be required 5 Audio out headphone Audio in microphone combo jack Connects optio...

Page 14: ...cameras also allow a facial recognition logon to Windows instead of a password logon NOTE Camera functions vary depending on the camera hardware and software installed on your product The antennas are not visible from the outside of the computer For optimal transmission keep the areas immediately around the antennas free from obstructions For wireless regulatory notices see the section of the Regu...

Page 15: ...e a stand 2 and then lower the computer 3 into the connectors of the keyboard softcover Closing and opening the keyboard softcover 1 To close the keyboard softcover and carry the computer lift the computer to disconnect it 1 and then swing the bottom edge back to lie flush against the keyboard softcover 2 Close the keyboard softcover 3 Keyboard softcover 7 ...

Page 16: ... keyboard softcover and use the computer raise the top of the keyboard softcover 1 swing the bottom of the computer forward 2 and then connect the computer to the keyboard 3 8 Chapter 2 Getting to know your computer ...

Page 17: ... keyboard softcover 3 and then lift the computer to remove it 4 TouchPad Component Description 1 TouchPad zone Reads your finger gestures to move the pointer or activate items on the screen 2 Left TouchPad button Functions like the left button on an external mouse 3 Right TouchPad button Functions like the right button on an external mouse Keyboard softcover 9 ...

Page 18: ...onent Description 1 Caps lock light On Caps lock is on which switches the key input to all capital letters 2 Mute light On Computer sound is off Off Computer sound is on 10 Chapter 2 Getting to know your computer ...

Page 19: ...utes specific functions when pressed in combination with another key 3 Windows key Opens the Start menu NOTE Pressing the Windows key again will close the Start menu 4 Action keys Execute frequently used system functions NOTE On select products the f5 action key turns the keyboard backlight feature off or on Keyboard softcover 11 ...

Page 20: ...splay to the monitor display to a simultaneous display on both the computer and the monitor Turns the keyboard backlight off or on NOTE To conserve battery power turn off this feature Mutes or restores speaker sound Decreases speaker volume incrementally while you hold down the key Increases speaker volume incrementally while you hold down the key Plays the previous track of an audio CD or the pre...

Page 21: ...ation press the button briefly to exit Hibernation CAUTION Pressing and holding down the power button results in the loss of unsaved information If the computer has stopped responding and shutdown procedures are ineffective press and hold the power button down for at least 5 seconds to turn off the computer To learn more about your power settings see your power options Right click the Power icon a...

Page 22: ...Rear Component Description 1 Rear camera Allows you to video chat record video and record still images 14 Chapter 2 Getting to know your computer ...

Page 23: ...o select an item or perform a right click function NOTE Depending on the application these button functions might vary The button functions cannot be customized For more information about the pen refer to the documentation provided with the pen Also refer to Pen Windows Ink 1 Select Start and then select Settings 2 Select Devices select Pen Windows Ink and then follow the on screen instructions Pe...

Page 24: ...ur computer When contacting support you may be asked for the serial number the product number or the model number Locate this information before you contact support Your service label will contain the information shown below Component 1 HP product name select products only 2 Model number 3 Product ID 4 Serial number 5 Warranty period Regulatory label s Provide s regulatory information about the co...

Page 25: ...card by cutting or sanding the card To insert a nano SIM card 1 Position the computer display side up on a flat surface 2 Insert the removal tool or a small straightened paper clip 1 into the card tray access hole 3 Press the tool or clip in gently until the card tray is ejected 4 Remove the tray 2 from the computer and insert the card 3 5 Replace the tray in the computer Press in gently on the tr...

Page 26: ...htened paper clip 1 into the card tray access hole 3 Press the tool or clip in gently until the card tray is ejected 4 Remove the tray 2 from the computer and remove the card 3 5 Replace the tray in the computer Press in gently on the tray 4 until it is firmly seated To remove a nano SIM card reverse the steps 18 Chapter 2 Getting to know your computer ...

Page 27: ...o remove or replace the tray 1 Position the computer display side up on a flat surface 2 Insert the card removal tool or a small straightened paper clip 1 into the card tray access hole 3 Press the tool or clip in gently until the card tray is ejected 4 Remove the tray 2 from the computer and insert the card 3 5 Replace the tray in the computer Press in gently on the tray 4 until it is firmly seat...

Page 28: ...on in the notification area at the far right of the taskbar Then follow the on screen instructions 3 Place the computer display side up on a flat surface 4 Insert the card removal tool or a small straightened paper clip 1 into the card tray access hole 5 Press the tool or clip in gently until the card tray is ejected 6 Remove the tray 2 from the computer and remove the card 3 7 Replace the tray in...

Page 29: ...proves and changes product parts For complete and current information on supported parts for your computer go to http partsurfer hp com select your country or region and then follow the on screen instructions Computer components Computer components 21 ...

Page 30: ...1 7 Rear camera L14774 001 8 Solid state drive M 2 includes Mylar screw POGO cover and WLAN RF foil 256 GB PCIe NVMe L16843 001 128 GB SATA 3 TLC L16842 001 Speakers include Mylar screw POGO cover bottom thermal Mylar side thermal Mylar and thermal grease 9 Left speaker For use in models without WWAN L14786 001 For use in models with WWAN includes WWAN antenna L14768 001 10 Right speaker For use i...

Page 31: ...lar screw POGO cover L14755 001 22 Thermal solution includes replacement thermal material and Mylar screw POGO cover L14783 001 23 Battery 3 cell 49 WHr 4 365 AHr Li ion includes Mylar screw POGO cover bottom thermal Mylar side thermal Mylar and thermal grease 924961 856 24 Back cover includes Mylar screw POGO cover bottom thermal Mylar side thermal Mylar and thermal grease For use in models witho...

Page 32: ...rmal Mylar and thermal grease L14766 001 5 Display panel cable includes Mylar screw POGO cover bottom thermal Mylar side thermal Mylar and thermal grease L14775 001 6 WWAN antenna kit L14789 001 7 Touch cable includes Mylar screw POGO cover L14778 001 8 Right USB board cable includes Mylar screw POGO cover bottom thermal Mylar side thermal Mylar and thermal grease L14765 001 9 Power board and cabl...

Page 33: ...348 001 For use in Europe L19343 001 For use in Switzerland L19351 001 For use in the United Kingdom L19354 001 HP USB Type C adapter USB Type C to HDMI adapter 831752 001 USB Type C to HDMI 2 0 adapter 935325 001 USB Type C to RJ45 adapter 855560 001 USB Type C to VGA adapter 831751 001 HP USB Type C to USB Type A dongle 833960 001 Keyboard backlit For use in Belgium L16739 A41 For use in the Cze...

Page 34: ...kit for use only in models with a WWAN module includes SSD top absorber SSD shielding WWAN left foil gasket and WWAN left gasket L21710 001 Touch control board foil for use only in models with a WWAN module L20775 001 Mylar shielding foil kit for use only in models with a WWAN module L14793 001 Display panel connector foil kit for use only in models with a WWAN module includes display panel connec...

Page 35: ...ions include some of the considerations that you must keep in mind during disassembly and assembly procedures NOTE As you remove each subassembly from the computer place the subassembly and all accompanying screws away from the work area to prevent damage Plastic parts CAUTION Using excessive force during disassembly and reassembly can damage plastic parts Use care when handling the plastic parts ...

Page 36: ...fore removing or inserting a drive shut down the computer If you are unsure whether the computer is off or in Hibernation turn the computer on and then shut it down through the operating system Before handling a drive be sure that you are discharged of static electricity While handling a drive avoid touching the connector Before removing a diskette drive or optical drive be sure that a diskette or...

Page 37: ...ve these precautions Keep components in their electrostatic safe containers until you are ready to install them Before touching an electronic component discharge static electricity by using the guidelines described in this section Avoid touching pins leads and circuitry Handle electronic components as little as possible If you remove a component place it in an electrostatic safe container The foll...

Page 38: ... proper materials are selected to avoid static charging When grounding is not possible use an ionizer to dissipate electric charges Workstation guidelines Follow these grounding workstation guidelines Cover the workstation with approved static shielding material Use a wrist strap connected to a properly grounded work surface and use properly grounded tools and equipment Use conductive field servic...

Page 39: ... resistance between the operator and ground To be effective the conductive must be worn in contact with the skin The following grounding equipment is recommended to prevent electrostatic damage Antistatic tape Antistatic smocks aprons and sleeve protectors Conductive bins and other assembly or soldering aids Nonconductive foam Conductive computerop workstations with ground cords of one megohm resi...

Page 40: ...d Service Provider only parts Make special note of each screw size and location during removal and replacement Display assembly Description Spare part number Display assembly includes microphone assembly L14784 001 Back cover for use in models without WWAN includes Mylar screw POGO cover bottom thermal Mylar side thermal Mylar and thermal grease L14770 001 Back cover for use in models with WWAN in...

Page 41: ...nd any other foreign objects Failure to follow this caution can result in damage to the display panel assembly 4 With the display facing you starting from the top right corner use a non marking tool to disengage the display panel from the tablet 1 5 Separate the top of the display moving from right to left 2 6 Separate the right side of the display moving from top to bottom 3 7 Separate the left s...

Page 42: ... display To install the display assembly 1 Rotate the display onto the tablet and first press on the top left corner and snap the display into place 1 2 Work from left to right on the top of the display pressing the display into place in the tablet 2 3 Press the bottom right of the display into place in the tablet 3 34 Chapter 5 Removal and replacement procedures for Authorized Service Provider pa...

Page 43: ...e in on both sides of the bottom of the display 4 5 pressing the display into the tablet until it snaps into place 5 Install the four screws 1 and then replace the Mylar screw POGO cover 2 Component replacement procedures 35 ...

Page 44: ... following illustration 1 Long gasket 243 mm x 5 mm 2 Short gasket 21 mm x 5 mm When reassembling models with a WWAN module be sure to install the gaskets onto the tablet from spare part kit L21710 001 as shown in the following illustration 1 35 mm x 3 mm 2 35 mm x 3 mm 36 Chapter 5 Removal and replacement procedures for Authorized Service Provider parts ...

Page 45: ...sconnect the power from the tablet by first unplugging the power cord from the AC outlet and then unplugging the AC adapter from the tablet 4 Remove the display panel assembly see Display assembly on page 32 Remove the Mylar shield Peel the Mylar shield off the tablet 1 while holding down the M 2 solid state drive cover 2 IMPORTANT Be sure to hold down the M 2 solid state drive cover or it may als...

Page 46: ...ield see Mylar shield WWAN models only on page 37 Remove the thermal solution 1 Remove three Mylar pieces from the thermal solution 1 2 Remove the six Phillips M2 0 2 0 screws 2 that secure the thermal solution to the system board 3 Starting from bottom left lift thermal solution from the tablet to remove it 3 NOTE The thermal paste near the bottom left of the thermal solution can stick to the sys...

Page 47: ...Reverse this procedure to install the thermal solution Component replacement procedures 39 ...

Page 48: ...om the tablet by first unplugging the power cord from the AC outlet and then unplugging the AC adapter from the tablet 4 Remove the display panel assembly see Display assembly on page 32 5 Remove the Mylar shield see Mylar shield WWAN models only on page 37 Remove the battery 1 Remove the remaining Phillips M 2 0 2 0 screw 1 from the bracket on top of the battery connector 2 Remove the bracket fro...

Page 49: ...move the two Phillips PM2 0 2 5 screws 3 that secure the battery to the tablet and the remove the battery from the tablet 4 Reverse this procedure to install the battery Component replacement procedures 41 ...

Page 50: ...perating system 2 Disconnect all external devices connected to the tablet 3 Disconnect the power from the tablet by first unplugging the power cord from the AC outlet and then unplugging the AC adapter from the tablet 4 Remove the display panel assembly see Display assembly on page 32 5 Remove the Mylar shield see Mylar shield WWAN models only on page 37 6 Disconnect the battery cable from the sys...

Page 51: ...rive and then pull the drive out of the connector 4 NOTE Solid state drives are designed with notches to prevent incorrect insertion Reverse this procedure to install the solid state drive Component replacement procedures 43 ...

Page 52: ...ord from the AC outlet and then unplugging the AC adapter from the tablet 4 Remove the display panel assembly see Display assembly on page 32 5 Remove the Mylar shield see Mylar shield WWAN models only on page 37 6 Disconnect the battery cable from the system board see Battery on page 40 Remove the WWAN module 1 Remove the gasket from of top of the WWAN module 1 2 Disconnect the WWAN antenna cable...

Page 53: ...be installed on the antenna connectors as shown in the following illustration Reverse this procedure to install the WWAN module When installing a WWAN module be sure to install the gasket included in spare part kit L14792 001 over the antenna connectors and screw When installing a WWAN module be sure to install the gasket included in spare part kit L15398 005 on the bottom of the module as shown i...

Page 54: ...46 Chapter 5 Removal and replacement procedures for Authorized Service Provider parts ...

Page 55: ...perating system 2 Disconnect all external devices connected to the tablet 3 Disconnect the power from the tablet by first unplugging the power cord from the AC outlet and then unplugging the AC adapter from the tablet 4 Remove the display panel assembly see Display assembly on page 32 5 Remove the Mylar shield see Mylar shield WWAN models only on page 37 6 Disconnect the battery cable from the sys...

Page 56: ...ared camera cable from the system board 3 Detach the infrared camera 2 from the tablet The infrared camera is attached to the tablet with double sided adhesive 4 Remove the infrared camera 3 Remove the front facing camera 48 Chapter 5 Removal and replacement procedures for Authorized Service Provider parts ...

Page 57: ... facing camera 2 from the tablet The front facing camera is attached to the tablet with double sided adhesive 3 Remove the front facing camera 3 Remove the rear facing camera 1 Disconnect the LED board cable from the system board 1 and then remove it from on top of the rear facing camera 2 NOTE The cable remains connected to the tablet Component replacement procedures 49 ...

Page 58: ...era cable from the system board 3 Detach the rear facing camera 2 from the tablet The rear facing camera is attached to the tablet with double sided adhesive 4 Remove the rear facing camera 3 Reverse this procedure to install the camera 50 Chapter 5 Removal and replacement procedures for Authorized Service Provider parts ...

Page 59: ...nplugging the power cord from the AC outlet and then unplugging the AC adapter from the tablet 4 Remove the display panel assembly see Display assembly on page 32 5 Remove the Mylar shield see Mylar shield WWAN models only on page 37 6 Disconnect the battery cable from the system board see Battery on page 40 Remove the volume button board 1 Release the ZIF connector 1 to which the volume button bo...

Page 60: ...e power from the tablet by first unplugging the power cord from the AC outlet and then unplugging the AC adapter from the tablet 4 Remove the Mylar shield see Mylar shield WWAN models only on page 37 5 Remove the battery Remove the power board and cable 1 Disconnect the power cable 1 from the system board 2 Lift and peel the cable off the tablet 2 The cable is attached to the tablet with adhesive ...

Page 61: ... the power cord from the AC outlet and then unplugging the AC adapter from the tablet 4 Remove the display panel assembly see Display assembly on page 32 5 Remove the Mylar shield see Mylar shield WWAN models only on page 37 6 Disconnect the battery see Battery on page 40 Disconnect the display and touch cables 1 Remove the silver Mylar from on top of the main connector on the display 1 2 Rotate t...

Page 62: ...r and thermal grease L14775 001 POGO keyboard pin connector cable includes Mylar screw POGO cover bottom thermal Mylar side thermal Mylar and thermal grease L14776 001 Left USB board cable includes Mylar screw POGO cover bottom thermal Mylar side thermal Mylar and thermal grease L14766 001 Identify the main cables Use the following illustration to identify the main cables in the tablet 1 Audio jac...

Page 63: ...ablet is off or in Hibernation turn the tablet on and then shut it down through the operating system 2 Disconnect all external devices connected to the tablet 3 Disconnect the power from the tablet by first unplugging the power cord from the AC outlet and then unplugging the AC adapter from the tablet 4 Remove the display panel assembly see Display assembly on page 32 5 Remove the Mylar shield see...

Page 64: ... Lift the board out of the tablet 3 4 Remove the left USB board Reverse this procedure to install the left USB board 56 Chapter 5 Removal and replacement procedures for Authorized Service Provider parts ...

Page 65: ...let 3 Disconnect the power from the tablet by first unplugging the power cord from the AC outlet and then unplugging the AC adapter from the tablet 4 Remove the display panel assembly see Display assembly on page 32 5 Remove the Mylar shield see Mylar shield WWAN models only on page 37 6 Disconnect the battery see Battery on page 40 Remove the audio jack 1 Disconnect the audio jack cable from the ...

Page 66: ...on and then shut it down through the operating system 2 Disconnect all external devices connected to the tablet 3 Disconnect the power from the tablet by first unplugging the power cord from the AC outlet and then unplugging the AC adapter from the tablet 4 Remove the display panel assembly see Display assembly on page 32 5 Remove the Mylar shield see Mylar shield WWAN models only on page 37 6 Dis...

Page 67: ...3 Lift the board out of the tablet 3 4 Remove the right USB board Reverse this procedure to install the right USB board Component replacement procedures 59 ...

Page 68: ...let by first unplugging the power cord from the AC outlet and then unplugging the AC adapter from the tablet 4 Remove the display panel assembly see Display assembly on page 32 5 Remove the Mylar shield see Mylar shield WWAN models only on page 37 6 Remove the battery see Battery on page 40 Remove the POGO pin connector cable 1 Disconnect the POGO pin connector cable from the system board 1 2 Remo...

Page 69: ...ese steps 1 Shut down the tablet If you are unsure whether the tablet is off or in Hibernation turn the tablet on and then shut it down through the operating system 2 Disconnect all external devices connected to the tablet 3 Disconnect the power from the tablet by first unplugging the power cord from the AC outlet and then unplugging the AC adapter from the tablet 4 Remove the display panel assemb...

Page 70: ...N module 1 Main terminal The 2 black WLAN antenna cable connects to the WLAN module 2 Aux terminal 10 Front facing camera cable 11 IR camera cable 12 Rear facing camera cable 13 Front facing camera LED cable 14 P sensor cable 15 Right speaker cable 62 Chapter 5 Removal and replacement procedures for Authorized Service Provider parts ...

Page 71: ...en pulling the tray out of the slot 2 3 Remove the SD card slot tray by inserting a paper clip or similar thin tool into the release hole 1 and then pulling the tray out of the slot 2 4 Remove the two Phillips M2 0 2 0 screws 1 that secure the system board to the tablet Component replacement procedures 63 ...

Page 72: ...hen installing a system board on a model with a WWAN module be sure to install gaskets onto the system board as shown in the following image 1 156 mm x 3 mm 2 87 mm x 3 mm 3 22 mm x 3 mm 4 36 mm x 3 mm 5 11 mm x 2 5 mm 64 Chapter 5 Removal and replacement procedures for Authorized Service Provider parts ...

Page 73: ...unplugging the AC adapter from the tablet 4 Remove the display panel assembly see Display assembly on page 32 and then remove the following components a Mylar shield see Mylar shield WWAN models only on page 37 b Battery see Battery on page 40 c Thermal solution see Thermal solution on page 38 d Solid state drive see Solid state drive on page 42 e WWAN module if applicable see WWAN module select m...

Page 74: ...om the left speaker a Peel the WWAN antenna up to access the antenna cable 1 b Peel the WLAN antenna off the speaker 2 3 Right WLAN antenna Remove the right WLAN antenna from the right speaker 66 Chapter 5 Removal and replacement procedures for Authorized Service Provider parts ...

Page 75: ...a Disconnect the antenna cable from the WLAN module 1 b Peel the antenna off the speaker 2 Reverse this procedure to install the WLAN antennas Component replacement procedures 67 ...

Page 76: ...tem 2 Disconnect all external devices connected to the tablet 3 Disconnect the power from the tablet by first unplugging the power cord from the AC outlet and then unplugging the AC adapter from the tablet 4 Remove the display panel assembly see Display assembly on page 32 and then remove the following components a Mylar shield see Mylar shield WWAN models only on page 37 b Battery see Battery on ...

Page 77: ...rs 4 Reverse this procedure to install the speakers When installing the speakers be sure to attach the Mylar pieces as shown in the following illustration 1 Left speaker 2 Right speaker Component replacement procedures 69 ...

Page 78: ... outlet and then unplugging the AC adapter from the tablet 4 Remove the display panel assembly see Display assembly on page 32 and then remove the following components a Mylar shield see Mylar shield WWAN models only on page 37 b Battery see Battery on page 40 c Thermal solution see Thermal solution on page 38 d Solid state drive see Solid state drive on page 42 e WWAN module if applicable see WWA...

Page 79: ...down through the operating system 2 Disconnect all external devices connected to the tablet 3 Disconnect the power from the tablet by first unplugging the power cord from the AC outlet and then unplugging the AC adapter from the tablet 4 Remove the display panel assembly see Display assembly on page 32 and then remove the following components a Mylar shield see Mylar shield WWAN models only on pag...

Page 80: ...e adhesive that secures it to the tablet and then remove the board from the tablet 2 Reverse this procedure to install the infrared camera LED board 72 Chapter 5 Removal and replacement procedures for Authorized Service Provider parts ...

Page 81: ...C adapter from the tablet 4 Remove the display panel assembly see Display assembly on page 32 and then remove the following components a Mylar shield see Mylar shield WWAN models only on page 37 b Battery see Battery on page 40 c Thermal solution see Thermal solution on page 38 d Solid state drive see Solid state drive on page 42 e WWAN module if applicable see WWAN module select models only on pa...

Page 82: ... Peel the middle of the P sensor and then remove it from the tablet 3 Reverse this procedure to install the P sensor 74 Chapter 5 Removal and replacement procedures for Authorized Service Provider parts ...

Page 83: ...e on the HP website Most BIOS updates on the HP website are packaged in compressed files called SoftPaqs Some download packages contain a file named Readme txt which contains information regarding installing and troubleshooting the file Determining the BIOS version To decide whether you need to update Setup Utility BIOS first determine the BIOS version on your computer To reveal the BIOS version i...

Page 84: ...y the most recent BIOS update and compare it to the BIOS version currently installed on your computer If the update is more recent than your BIOS version make a note of the date name or other identifier You may need this information to locate the update later after it has been downloaded to your hard drive b Follow the on screen instructions to download your selection to the hard drive Make a note...

Page 85: ...tics Windows select More and then select Run as administrator or To access HP PC Hardware Diagnostics Windows from HP Support Assistant a Type support in the taskbar search box and then select the HP Support Assistant app or Select the question mark icon in the taskbar b Select Troubleshooting and fixes c Select Diagnostics and then select HP PC Hardware Diagnostics Windows 2 When the tool opens s...

Page 86: ...t to the computer desktop or To run the tool from a USB flash drive download it to a USB flash drive 4 Select Run Installing HP PC Hardware Diagnostics Windows To install HP PC Hardware Diagnostics Windows follow these steps Navigate to the folder on your computer or the flash drive where the exe file was downloaded double click the exe file and then follow the on screen instructions Using HP PC H...

Page 87: ...HP PC Hardware Diagnostics UEFI download instructions are provided in English only and you must use a Windows computer to download and create the HP UEFI support environment because only exe files are provided Downloading the latest HP PC Hardware Diagnostics UEFI version To download the latest HP PC Hardware Diagnostics UEFI version to a USB flash drive 1 Go to http www hp com go techcenter pcdia...

Page 88: ... name or number follow these steps 1 Go to http www hp com support 2 Select Get software and drivers enter the product name or number select your computer and then select your operating system 3 In the Diagnostics section follow the on screen instructions to select and download the Remote UEFI version for the product Customizing Remote HP PC Hardware Diagnostics UEFI settings Using the Remote HP P...

Page 89: ...omization selections 4 Select Main and then Save Changes and Exit to save your settings Your changes take effect when the computer restarts Using Remote HP PC Hardware Diagnostics UEFI settings select products only 81 ...

Page 90: ...F Nonoperating 20 C to 60 C 4 F to 140 F Relative humidity noncondensing Operating 10 to 90 Nonoperating 5 to 95 Maximum altitude unpressurized Operating 15 m to 3 048 m 50 ft to 10 000 ft Nonoperating 15 m to 12 192 m 50 ft to 40 000 ft NOTE Applicable product safety standards specify thermal limits for plastic surfaces The device operates well within this range of temperatures 82 Chapter 8 Speci...

Page 91: ...back up your personal information Schedule regular backups to avoid information loss You can use Windows tools to back up personal information and create system restore points and recovery media allowing you to restore from backup refresh the computer and reset the computer to its original state NOTE If computer storage is 32 GB or less Microsoft System Restore is disabled by default For more info...

Page 92: ...RW or BD RE rewritable Blu ray discs which are not compatible with HP Recovery Manager software If your computer does not include an integrated optical drive with DVD writer capability you can use an external optical drive purchased separately to create recovery discs as described above If an external optical drive is used you must connect it directly to a USB port on the computer It cannot be con...

Page 93: ...ition select products only or use the HP Recovery media For more information see Recovering using HP Recovery Manager on page 85 If you have not already created recovery media see Creating HP Recovery media select products only on page 83 Using Factory Reset select products only Restores the computer to its original factory state by deleting all information from the hard drive and recreating the p...

Page 94: ... hard drive is still working The HP Recovery partition select products only allows System Recovery only To start HP Recovery Manager from the HP Recovery partition IMPORTANT For a tablet with a detachable keyboard connect the tablet to the keyboard base before beginning these steps select products only 1 Type recovery in the taskbar search box select HP Recovery Manager and then select Windows Rec...

Page 95: ...y press esc and then press f9 for boot options For tablets without keyboards Turn on or restart the tablet quickly hold down the volume up button and then select f9 or Turn on or restart the tablet quickly hold down the volume down button and then select f9 3 Select the optical drive or USB flash drive from which you want to boot and then follow the on screen instructions Removing the HP Recovery ...

Page 96: ...roved by an acceptable accredited agency responsible for evaluation in the country or region where the power cord set will be used The power cord sets must have a minimum current capacity of 10 amps and a nominal voltage rating of 125 or 250 V AC as required by the power system of each country or region The appliance coupler must meet the mechanical configuration of an EN 60 320 IEC 320 Standard S...

Page 97: ...ord and wall plug must bear a T mark and registration number in accordance with the Japanese Dentori Law The flexible cord must be Type VCT or VCTF 3 conductor 1 00 mm conductor size The wall plug must be a two pole grounding type with a Japanese Industrial Standard C8303 7 A 125 V configuration 4 The flexible cord must be Type RVV 3 conductor 0 75 mm conductor size Power cord set fittings applian...

Page 98: ...in general household waste Follow the local laws and regulations in your area for battery disposal HP encourages customers to recycle used electronic hardware HP original print cartridges and rechargeable batteries For more information about recycling programs see the HP Web site at http www hp com recycle 90 Chapter 11 Recycling ...

Page 99: ...chipset product description 1 components bottom 13 display 6 left side 5 pen 15 rear 14 right side 4 top 13 computer components 21 connector power 4 5 connectors service considerations 28 D display and touch cables removal 53 spare part number 53 display assembly removal 32 spare part number 32 display panel product description 1 display panel assembly spare part number 22 docking connector identi...

Page 100: ...ystem recovery 85 P P sensor removal 73 spare part number 23 73 packaging guidelines 30 pen button identifying 15 plastic parts service considerations 27 POGO pin connector cable removal 60 spare part number 60 POGO pin connector identifying 13 pointing device product description 3 ports product description 2 USB Type C power connector and SuperSpeed port 4 5 power board and cable spare part numbe...

Page 101: ...eys using 11 supported discs recovery 84 system board removal 61 spare part numbers 22 61 system recovery 85 system restore point creating 83 T thermal solution removal 38 spare part number 23 spare part numbers 38 tools required 27 TouchPad buttons 9 TouchPad zone identifying 9 transporting guidelines 30 traveling with the computer 16 U USB Type C adapter spare part numbers 25 USB Type C bracket ...

Reviews: