background image

29

ECO

°C
°F

SC

V

V

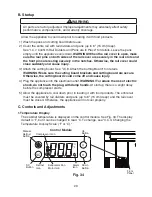
Fig. 34

Up 

Button

Down 

Button

Front 

Panel

SC 

Button

Manual 

Defrost 

Button

Control Module

Compressor Icon

Defrost 

Icon

Evaporator Fan 

Motor Icon

Alarm 

Icon

B. Startup

 WARNING

All parts are factory-adjusted. Improper adjustments may adversely affect safety, 
performance, component life, and warranty coverage.

Allow the appliance to cool down prior to loading it with food products.

1) Wash the pans and cutting board before use.
2) Cover the entire rail with rail dividers and pans (up to 6" (15 cm) deep).  

See "I.C.7. Confirm Rail Dividers and Pans are in Place" for details. Leave the pans 
empty until the appliance cools down. 

WARNING! When the rail cover is open, make 

sure the rear pins on both sides of the rail cover are securely in the rear slots and 
the front pins are resting securely in the notches. Otherwise, the rail cover could 
close suddenly and cause injury.

3) Attach the cutting board. See "I.C.8. Attach the Cutting Board" for details.  

WARNING! Make sure the cutting board brackets and cutting board are secure. 
Otherwise, the cutting board could come off and cause injury.

4) Plug the appliance into the electrical outlet. 

WARNING! To reduce the risk of electric 

shock, do not touch the plug with damp hands. 

At startup, there is a slight delay 

before the compressor starts. 

5) Allow the appliance to cool down prior to loading it with food products. The entire rail 

must be covered by rail dividers and pans (up to 6" (15 cm) deep) and the rail cover 
must be closed. Otherwise, the appliance will not cool properly.

C. Controls and Adjustments

1. Temperature Display

The cabinet temperature is displayed on the control module. See Fig. 34. The display 
default is °F, but it can be changed to read °C. To change, see "II.C.3. Changing the 
Temperature Display Scale (°F or °C)."

Summary of Contents for PR46A Series

Page 1: ...Models Refrigerated Prep Table with Raised Rail Steelheart Series Refrigerated Kitchen Equipment Instruction Manual Issued 11 1 2018 hoshizakiamerica com ...

Page 2: ...bility of the installer Product failure or property damage due to improper installation is not covered under warranty Hoshizaki provides this manual primarily to assist qualified service technicians in the installation maintenance and service of the appliance Should the reader have any questions or concerns which have not been satisfactorily addressed please call send an e mail message or write to...

Page 3: ...34 I Cooling Performance 35 J Cabinet Condensation 35 III Cleaning and Maintenance Instructions 36 A Cleaning 36 1 Exterior 36 2 Cabinet Interior 36 3 Door Drawer Gaskets 36 4 Shelves 36 5 Drawers 37 6 Cutting Board 37 7 Pans 37 8 Rail Rail Dividers and Rail Cover 37 9 Rail Air Duct 38 B Maintenance 39 1 Condenser 39 2 Condensate Drain 40 3 Power Supply Connection 40 IV Preparing the Appliance for...

Page 4: ...proper service Consult instruction manual service manual before attempting to install or service this product All safety precautions must be followed Dispose of properly in accordance with federal or local regulations Do not place any potential ignition sources in or near the appliance Risque De Feu Ou D Explosion Le Frigorigène Est Inflammable Suivre attentivement les instructions de manipulation...

Page 5: ...ion or fire THE APPLIANCE MUST BE GROUNDED The appliance is equipped with a NEMA 5 15 three prong grounding plug to reduce the risk of potential shock hazards It must be plugged into a properly grounded independent 3 prong wall outlet If the outlet is a 2 prong outlet it is your personal responsibility to have a qualified electrician replace it with a properly grounded independent 3 prong wall out...

Page 6: ...o the appliance or allow children or animals to do so Death or serious injury could occur or the appliance could be damaged Be careful not to pinch fingers when opening and closing the doors drawers or rail cover prep table models or when handling food pans Be careful when opening and closing the doors drawers or rail cover when children are in the area Open and close the doors drawers and rail co...

Page 7: ...l cover and do not lift the appliance by the rail hood or rail cover The rail hood and rail cover are not designed to bear any outside weight Do not place anything on the air duct panels beneath the pans in the rail The air duct panels are not load bearing WARNING continued Additional Warnings for Prep Table Models The entire rail must always be covered by rail dividers and pans Otherwise the appl...

Page 8: ...6 F 7 C to 30 C Engineered to maintain NSF temperatures up to 100 F 38 C Operation of the appliance for extended periods outside of these temperature ranges may affect appliance performance For best operating results The appliance should not be located next to ovens grills or other high heat producing equipment The location should provide a firm and level foundation for the appliance The appliance...

Page 9: ...exposed to the sun or to heat remove the film after the appliance cools Remove all accessory containers before discarding the packing materials Dispose of all packing materials in a proper and environmentally responsible manner Check for missing or damaged accessories C Setup 1 Remove the Appliance from the Pallet 1 Move as close to the final location as possible 2 Remove the 2 bolts securing the ...

Page 10: ...ttom of the appliance with the two 4 8 T2 screws provided See Fig 2 2 Adjust the leg on the anti tip bracket The maximum gap between the leg and the floor is 1 2 13 mm WARNING The anti tip bracket must be properly installed and adjusted Otherwise the unit may tip resulting in injury or damage Fig 3 Shelf Support Clip Pilaster Shelves 5 Install the Shelves 1 For each shelf place the shelf support c...

Page 11: ... cause injury 7 Confirm Rail Dividers and Pans are in Place Confirm rail dividers and 1 3 size pans included with the appliance are in place See Fig 5 The entire rail must always be covered by rail dividers and pans Otherwise the appliance will not cool properly Use only pans up to 6 15 cm deep Do not use damaged rail dividers or pans Wash the pans before use At startup leave the pans empty until ...

Page 12: ...ee Fig 6 2 Slide the cutting board under the cutting board brackets then tighten the screws WARNING Make sure the cutting board brackets and cutting board are secure Otherwise the cutting board could come off and cause injury Note Wash the cutting board before use Fig 6 Cutting Board Brackets Cutting Board ...

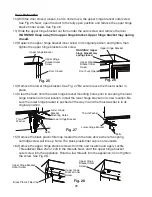
Page 13: ...acket Spring cartridge can cause the upper hinge bracket to move suddenly with extreme force Door and Lower Hinge Removal and Relocation 1 Remove all items from the appliance Make sure the appliance is unplugged from the electrical outlet Move the appliance out for ease of access then lock the casters 2 With the door closed loosen but do not remove the upper hinge bracket outer screw See Fig 7 Nex...

Page 14: ...ge installation See Fig 13 Install the spring cartridge in its new location Reinstall the filler cap and filler screws on the opposite side of the door Filler Screws Filler Cap Door Spring Cartridge Screws Fig 13 Lower Door Prep and Upper Hinge Bracket Relocation 10 Remove the filler cap and nylon bearing from the bottom of the door See Fig 14 Reinstall on the opposite side 11 Make sure the thrust...

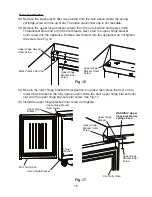
Page 15: ...the lower hinge bracket thrust washer is in place then place the door on the lower hinge bracket in the fully open position Slide the door upper hinge bracket outer slot onto the upper hinge bracket outer screw See Fig 17 15 Install the upper hinge bracket inner screw and tighten Fig 16 Fig 17 Door Fully Open Lower Hinge Bracket Upper Hinge Bracket Outer Screw Upper Hinge Bracket Outer Screw Door ...

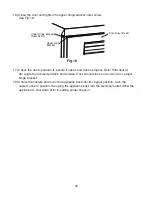
Page 16: ...and closes properly Note Hold door at 45 angle from closed position and release Door should close on its own If not adjust hinge bracket 18 Unlock the casters and move the appliance back into its original position Lock the casters once in position then plug the appliance back into the electrical outlet Allow the appliance to cool down prior to putting product back in Door Fully Closed ...

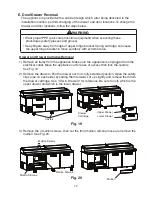
Page 17: ...nd gloves Keep fingers away from edge of upper hinge bracket Spring cartridge can cause the upper hinge bracket to move suddenly with extreme force Drawer and Drawer Cartridge Removal 1 Remove all items from the appliance Make sure the appliance is unplugged from the electrical outlet Move the appliance out for ease of access then lock the casters See Fig 19 2 Remove the drawers Pull the drawer ou...

Page 18: ...r side then remove the cartridge frames from the unit Pilaster and Filler Screw Relocation 6 Remove the 12 pilaster filler screws from the current drawer section See Fig 22 Fig 21 Fig 22 Rear Pilaster Filler Screws Rear Screws Front Screws Left Drawer Cartridge Frame Right Drawer Cartridge Frame Front Pilaster Filler Screws Rear Pilaster Filler Screws Front Pilaster Filler Screws ...

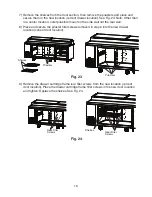
Page 19: ...t the rear wall 8 Place and secure the pilaster filler screws removed in step 6 into the new drawer location current door location Shelves Pilasters Pilasters 9 Remove the drawer cartridge frame rear filler screws from the new location current door location Place the drawer cartridge frame filler screws in the new door location and tighten Replace the shelves See Fig 24 Fig 23 Rear Filler Screws S...

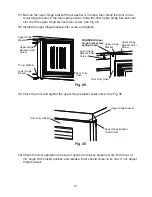
Page 20: ...nge bracket mounting holes prior to securing the lower hinge bracket in its new location Install the lower hinge bracket in its new location Be sure the lower hinge bracket is pushed all the way in and the thrust washer is in its original position Lower Hinge Bracket Bolts Thrust Washer Lower Hinge Bracket Bolts Thrust Washer 15 Remove the black plastic filler cap located from the hole above where...

Page 21: ...WARNING Upper hinge bracket may spring closed 19 Close the door and tighten the upper hinge bracket outer screw See Fig 30 Fig 29 Upper Hinge Bracket Outer Screw Upper Hinge Bracket Outer Screw Door Fully Open Lower Hinge Bracket Upper Hinge Bracket Thrust Washer Upper Hinge Bracket 20 Check the door operation to assure it opens and closes properly Note Hold door at 45 angle from closed position a...

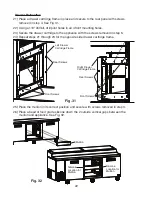
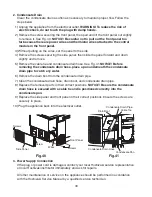
Page 22: ...l pilot holes in all 4 front mounting holes 23 Secure the drawer cartridge to the appliance with the screws removed in step 5 24 Repeat steps 21 through 23 for the opposite side drawer cartridge frame 25 Place the mullion in its correct position and secure with screws removed in step 3 26 Place a bead of food grade silicone down the 2 outside vertical gaps between the mullion and appliance See Fig...

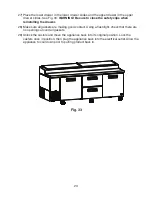
Page 23: ...ng the drawer 28 Make sure all gaskets are making good contact Using a flashlight check that there are no openings around all gaskets 29 Unlock the casters and move the appliance back into its original position Lock the casters once in position then plug the appliance back into the electrical outlet Allow the appliance to cool down prior to putting product back in Fig 33 ...

Page 24: ...s your personal responsibility to have a qualified electrician replace it with a properly grounded independent 3 prong wall outlet Do not remove the ground prong from the power cord and do not use an adapter plug Failure to follow these instructions may result in death electric shock or fire To reduce the risk of electric shock do not touch the plug with damp hands Do not use an extension cord Do ...

Page 25: ...ow the rail cover to open 7 Have the rail dividers pans rail cover cutting board brackets and cutting board been properly installed 8 Has the power supply voltage been checked or tested against the nameplate rating Is the power supply a properly grounded independent wall outlet Does the electrical connection meet all national state and local code and regulation requirements 9 Have the refrigerant ...

Page 26: ...inch fingers when opening and closing the doors drawers or rail cover or when handling food pans Be careful when opening and closing the doors drawers or rail cover when children are in the area Open and close the doors drawers and rail cover prep table models with care Opening the doors drawers or rail cover too quickly or forcefully may cause injury or damage to the appliance or surrounding equi...

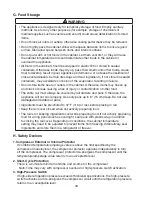
Page 27: ...t to develop result in poor appliance performance or increase the likelihood of cross contamination Certain dressings and food ingredients if not stored in sealed containers may accelerate corrosion of the evaporator resulting in failure Do not store items near air outlets Otherwise items may freeze up and crack or break causing a risk of injury or contamination of other food The entire rail must ...

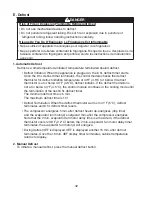
Page 28: ...ppliance Do not allow the appliance to bear any outside weight To prevent deformation or cracks do not spray insecticide onto the plastic parts or let them come into contact with oil To avoid damage to the gasket use only the door drawer handle when opening and closing To avoid damage to the top seal do not lift the appliance by the top panel or remove the top panel Do not leave the doors drawers ...

Page 29: ...resting securely in the notches Otherwise the rail cover could close suddenly and cause injury 3 Attach the cutting board See I C 8 Attach the Cutting Board for details WARNING Make sure the cutting board brackets and cutting board are secure Otherwise the cutting board could come off and cause injury 4 Plug the appliance into the electrical outlet WARNING To reduce the risk of electric shock do n...

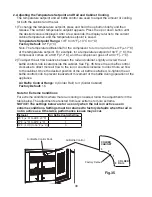
Page 30: ...htly unscrew the air baffle control knob located inside the cabinet See Fig 35 Move the air baffle control clockwise to direct more air flow to the rail or counter clockwise to direct more air flow to the cabinet Once the desired position of the air baffle is attained re tighten the air baffle control knob to prevent inadvertent movement of the baffle during operation of the appliance Air Baffle C...

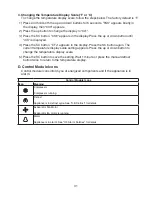
Page 31: ...splay Press the SC button again The current temperature display scale setting appears Press the up or down button to change the temperature display scale 5 Press the SC button to save the setting Wait 1 minute or press the manual defrost button twice to return to the temperature display D Control Module Icons Control module icons inform you of energized components and if the appliance is in alarm ...

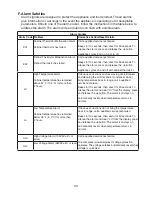
Page 32: ... temperature of 40 F 4 5 C or below If defrost thermistor is at or below 40 F 4 5 C defrost initiates If the defrost thermistor is not at or below 40 F 4 5 C the control module continues in the cooling mode until the termination of the next 6 hr defrost timer The minimum defrost time is 5 min The maximum defrost time is 1 hr Defrost Termination When the defrost thermistor warms to 41 F 5 C defrost...

Page 33: ...h Temperature Alarm Cabinet temperature has remained above 57 F 13 9 C for more than 2 hours If obvious corrections such as closing doors drawers and cleaning the air filter and or condenser do not bring temperature back in range call a qualified service technician Beeps for 10 seconds then silent for 50 seconds To silence the alarm and clear Hi from the display press and release the up button The...

Page 34: ...always be covered by rail dividers and pans Otherwise the appliance will not cool properly Use only pans up to 6 15 cm deep Do not use damaged rail dividers or pans Ingredients must be pre chilled to 37 F 3 C or less before placing in rail Keep the rail cover closed when not actively preparing food The rail is for keeping ingredients cool while preparing food If not actively preparing food for a l...

Page 35: ... II C 2 Adjusting the Temperature Setpoint for details Appliance in defrost cycle The cabinet temperature may rise temporarily during the defrost cycle but this will not affect the food inside Pans and rail dividers not in place The entire rail must always be covered by rail dividers and pans up to 6 15 cm deep or the appliance will not cool properly Warm or hot ingredients inside rail Only load i...

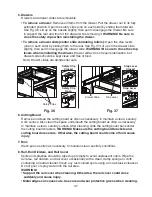
Page 36: ...wder alkaline cleaner acid scouring pad and especially those strong cleaners for use on a ventilating fan or a cooking range To prevent corrosion and damage to stainless steel surfaces use only products formulated for use on stainless steel appliances Do not use steel wool abrasive products or products containing sodium hypochlorite chlorine bleach Use a clean cloth for cleaning 1 Exterior Wipe th...

Page 37: ...y Clip Open Stop Lever Drawer Slide 6 Cutting Board Remove and clean the cutting board as often as necessary to maintain a clean sanitary work surface Also clean the space underneath the cutting board as often as necessary to maintain a clean sanitary surface After cleaning slide the cutting board back under the cutting board brackets WARNING Make sure the cutting board brackets and cutting board ...

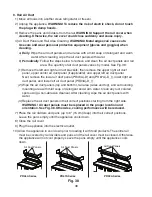
Page 38: ...t air duct panel upper center air duct panel if applicable and upper left air duct panel Next remove the lower air duct panel PR46A D and PR67A D_ lower right air duct panel and lower left air duct panel PR93A D_ 2 Wipe the air duct panels top and bottom rail area sides and top and surrounding mounting area with mild soap or detergent and warm water Clean any rust colored spots using a non abrasiv...

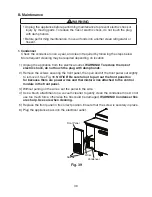
Page 39: ... touch the plug with damp hands 2 Remove the screws securing the front panel then pull and lift the front panel out slightly to remove it See Fig 39 NOTICE Be careful not to pull out the front panel too far because there are power wires and thermistor wires attached to the control module in the front panel 3 Without pulling on the wires set the panel to the side 4 Use a brush attachment on a vacuu...

Page 40: ...e a pan underneath the condensate drain pipe to catch any water 6 Remove the drain boot from the condensate drain pipe 7 Clean the condensate drain hose drain boot and condensate drain pipe 8 Replace the removed parts in their correct positions NOTICE Be sure the condensate drain hose is secured with a cable tie and is positioned correctly into the condensate pan 9 Replace the side panel and front...

Page 41: ...e prevent the doors drawers from closing to reduce the risk of children getting trapped NOTICE When preparing the appliance for long storage clean the appliance See III A Cleaning for details 1 Before shutting down the appliance move all foods into another clean refrigerator or freezer 2 Unplug the appliance WARNING To reduce the risk of electric shock do not touch the plug with damp hands ...

Page 42: ...ormément à la réglementation gouvernementale Ne pas perforer la tubulure contenant le frigorigène Risque de feu ou d explosion si la tubulure contenant le frigorigène est perforée suivre les instructions de manutention avec soin Éliminer conformément aux règlements fédéraux ou locaux WARNING When preparing the appliance for disposal remove the doors drawers to reduce the risk of children getting t...

Page 43: ...43 618 Hwy 74 South Peachtree City GA 30269 USA P 770 487 2331 F 770 487 3360 hoshizakiamerica com 1A5260 010 ...

Reviews: