


Chapter
7
Commissioning a New System
New System Start-up Procedures
1. Ensure that the installation has been properly performed.
2. Ensure that the tube-shipping plug has been removed from the potable water outlet port of the Water Control
Manifold (Compact System) or from the RO Membrane/Vessel Product Water Port (Modular System) and that
all 1/4-inch and 3/8-inch product water tubes are connected.
3. Check the RO Membrane Element as described below.
Note:
Some systems are shipped WITHOUT the RO Membrane Element. This is to accommodate, for
example, boat builders who install the system well in advance of commissioning the boat and the Horizon
Reverse Osmosis System.
If the RO Membrane Element has been installed, there will be an Element Serial Number tag attached to the
RO Membrane/Vessel Assembly. Find this serial number tag to ensure that the RO Membrane Element has
been installed.
If the RO Membrane Element Serial Number tag is missing or does not contain a serial number and date, then
immediately contact the company that sold the system to you or Horizon Reverse Osmosis. Provide Horizon
Reverse Osmosis with the system serial number and model number of this Seafari Quest System.
Caution: DO NOT
attempt to operate the system without a RO Membrane Element installed in the system,
as extensive damage will result.
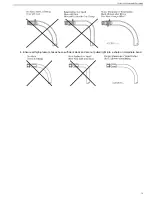
4. Ensure that the manual bypass lever located on the side of the 3-Way Product Water Solenoid Diversion Valve
is positioned outward (away from the coil body).
5. Check each hose and tube connection to the system to ensure that the installer has properly connected and
routed each hose and tube. Ensure that there are no kinks or blockages in any of the hoses or tubes leading
to and from the Seafari Quest System. Improper routing and any blockage in any line causes damage to the
system.
Do not rely on the installer’s word; check it yourself.
6. Make sure that the electrical power source, the boat’s circuit breaker, to the system is switched "OFF."
7. Open the front panel of the Main Power Enclosure. Check all electrical and electronic connections for proper
wiring and attachment.
8. Ensure that the installer has used the proper-sized power wire and Booster Pump wire.
9. Close the Main Power Enclosure front panel.
10. Open the Sea Cock Valve.
11. Open any auxiliary valve within the incoming feed line, Outgoing Brine Discharge Line and Outgoing Product
Water Line.
Caution:
Any auxiliary valve in these lines damages the Horizon Reverse Osmosis System if left closed
during starting and/or operation of the system.
12. If the optional Clean Rinse Valves are installed, ensure that they are positioned properly for normal operation.
13. Switch the electrical power source to the “ON” position, the boat’s circuit breaker.
33
Summary of Contents for Seafari Quest Compact 200
Page 2: ......
Page 3: ...Seafari QUEST 200 600 Owner s Manual Horizon Reverse Osmosis Manual PN B651100001...
Page 4: ......
Page 8: ......
Page 16: ......
Page 22: ......
Page 52: ......
Page 60: ......
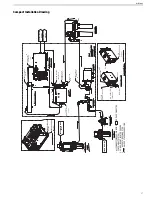
Page 62: ...2 12 4 12 8 10 7 3 1 6 5 9 12 11 4 Seafari QUEST 200 600 60...
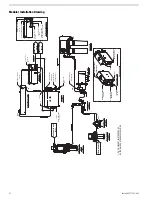
Page 68: ...11 13 6 14 16 1 4 5 9 3 10 8 2 7 8 15 12 Seafari QUEST 200 600 66...
Page 70: ...9 3 5 4 1 10 8 16 14 11 2 15 12 13 7 8 6 Seafari QUEST 200 600 68...
Page 72: ...11 13 6 14 16 1 4 5 9 3 10 8 2 7 8 15 12 Seafari QUEST 200 600 70...
Page 74: ...9 3 5 4 1 10 8 16 14 11 2 15 12 13 7 8 6 Seafari QUEST 200 600 72...
Page 76: ...13 15 8 16 9 1 6 7 4 12 11 3 10 11 20 14 5 2 21 19 17 18 Seafari QUEST 200 600 74...
Page 78: ...4 7 6 1 12 11 9 16 13 3 20 14 15 10 11 8 5 2 18 21 19 17 21 Seafari QUEST 200 600 76...
Page 80: ...13 15 8 16 9 1 6 7 4 12 11 3 10 11 20 14 5 2 21 19 17 18 Seafari QUEST 200 600 78...
Page 82: ...4 7 6 1 12 11 9 16 13 3 20 14 15 10 11 8 5 2 18 21 19 17 21 Seafari QUEST 200 600 80...
Page 85: ...9 9 6 3 8 7 1 5 1 4 9 6 2 11 12 10 12 10 1 83 Exploded Parts View...
Page 89: ...19 10 13 20 4 15 5 3 8 6 14 15 11 9 7 13 10 20 2 19 18 22 21 12 16 17 1 87 Exploded Parts View...
Page 91: ...5 6 2 3 2 6 7 9 9 8 1 10 5 89 Exploded Parts View...
Page 101: ...12 8 9 2 10 13 1 3 5 4 14 11 6 15 7 99 Exploded Parts View...
Page 104: ...8 15 14 13 6 2 1 16 5 10 3 6 6 8 4 12 7 15 11 9 Seafari QUEST 200 600 102...
Page 114: ......
Page 115: ......