background image

266

Multi Database

Using Another Multi Database

1.

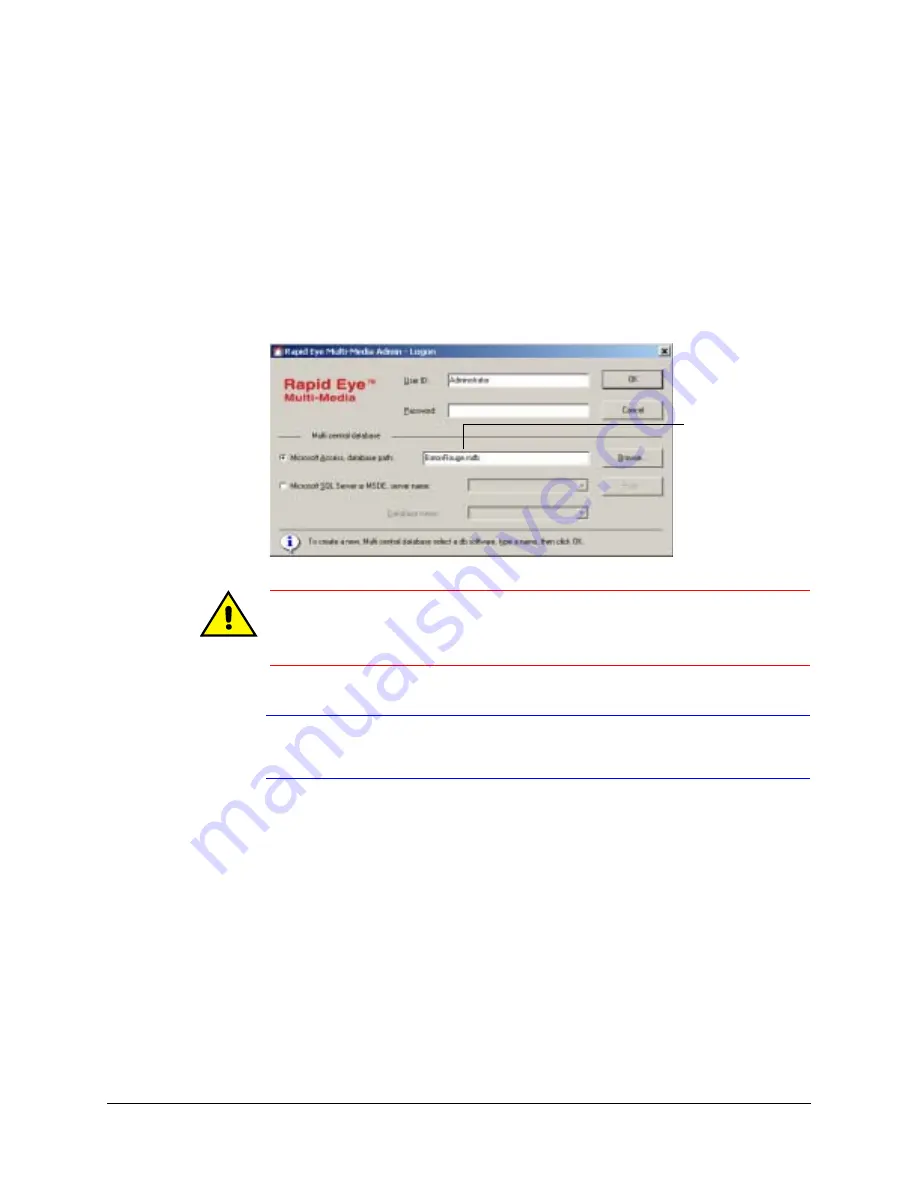
Launch Admin (or View). The Logon window appears.

2.

In the Central Database section, leave or switch the database (Access or SQL server) 
by clicking its button. Enter the name of the Multi db that you need. 

3.

Enter an user account name in the User ID field. The account name must be part of 
the Multi database selected in the previous step.

4.

Enter the password to the account in the Password field. Click OK.

Figure 15-2

Specifying the Multi Database

Caution

Take care when entering the name of a database in the Admin logon window.

Entering the name of a non-existent database starts the Admin database 
tool. See 

Creating a Multi Database 

on page 

267

.

Note

Once you have set Admin to use a Multi central database (Multi db), the same 
Multi db is used every time that you log on.

Converting a Multi Database from SQL to Access

A SQL server database can hold many more alarms than an MS-Access database. To 
convert a SQL database to an Access format, Honeywell recommends removing alarm data 
from the SQL database beforehand.

To switch to another 
Multi database, 
change the central 
database (Multi db) 
name.

Summary of Contents for Rapid Eye

Page 1: ...Document 800 02953V4 Rev A 03 10 System Administrator Guide Rapid Eye Multi Media Digital Video Recorder ...

Page 2: ......

Page 3: ...System Administrator Guide ...

Page 4: ...eatures such as simplex audio the virtual keyboard archival policies and logs have all been added or updated V3 Rev A 11 09 Document updated for the latest Rapid Eye V9 0 software release 12 09 New features include full LocalView on Active Alert units the ability to disable LocalView for improved system performance and option to set the bandwidth throughput as High Low V4 Rev A 03 10 Document upda...

Page 5: ...ware for Site Maintenance 33 For Questions 33 2 Adding a Site to the Multi Database 35 Adding a Site 35 Icons and Alternate Command Access 36 Another Site Name 36 Updating a Site 37 Renaming a Site 37 Deleting a Site 37 Physical Removal of a Site 38 Other Site Related Functions 38 Grouping Sites in a Folder 39 Creating a New Folder with Rapid Eye Admin Application 39 Assigning a Site to a Folder 3...

Page 6: ...n Basics 61 Maintenance Session 61 Starting a Maintenance Session 61 Support for Older Unit Models 62 Making a Site Operational 63 Unit Time Zone and Clock 64 Setting the Time Zone of a Multi Media Unit 65 Conflicting Time Zones 66 Setting the Clock Automatically with SNTP 66 Setting the System Clock Manually 67 Adjusting the Clock on a PC Running Rapid Eye Software 67 Using a PC Clock to Set a Un...

Page 7: ...6 Enabling a PTZ Camera 97 Using a PTZ Camera 98 Displaying the PTZ Dartboard Control 98 Using the Dartboard Control 99 Toggling Between Zonal Mode and Pull Mode 99 Pulling the Rubber Band 100 Using Zonal Mode 100 Programming a PTZ Dome 101 Configuring a Preset on a PTZ Camera 101 Testing a Preset 102 Behavior of PTZ After a Session Closes 103 Support for RapidDome PTZ Features 105 RapidDome PTZ T...

Page 8: ...ion with Masking 128 Masking an Area of the Video Feed 128 Masking Part of a Video Feed from Motion Detection 128 False Positives 129 Customizing Detection Scheduling 129 Motion Detection Reference 129 Motion Search 130 Tamper Detection 131 Configuring Tamper Detection 132 Calibrating of Tamper Detection 132 Scene Changed Tamper Detection 133 Calculating the Length of the Video Archive 134 Rapid E...

Page 9: ...ule for a Data Recording Device 159 Reference for Searching Rules and Regular Expressions 160 NetPIT and PIT Devices 161 Multi Audio 162 Audio Hardware 162 Using Multi Audio 163 Audio Interference 163 Using Audio with LocalView 164 Enabling Audio for Onsite Use by LocalView 164 Eagle Audio 164 Multiple Operators Connecting to One Unit 165 Sessions 165 Streams 165 Live Video 166 One Operator Connec...

Page 10: ...sword 194 Checking if the Correct System Password Was Entered 194 User Password 194 Administrator Password 195 Setting the Administrator Account s Password 195 Rights of User Accounts 196 Checking Rights Granted and Accessible Sites 197 Right to Use Admin 198 Granting Access to Admin 198 Right to Use Maintenance 198 Right to Use View 200 Right to Access a Site 200 Defining the Sites that Can Be Ac...

Page 11: ...ial Up 230 Changing Long Distance Prefixes 230 RAS Connection to an Alarm Station 231 Setting Up a Connection to a RAS Server 232 Making an Alarm Station Operational 233 Using More Than One Alarm Station Definition 234 Creating Extra Alarm Station Definitions for the Same PC 234 Disconnecting When Alarms Are in Progress 234 Setting Up an Alarm Station for Alarm Callback 235 Overview of Automatic C...

Page 12: ...ith View 267 Creating a Multi Database 267 Naming Restrictions 268 Creating an Empty MS Access Compatible Multi Database 268 SQL Server Template 269 Using Microsoft SQL Server with an Empty Database 270 Using Admin to Create a SQL Compatible Multi Database 270 Database Based On Another 271 Making a Copy of a Multi Database 272 Renaming a Multi Database 272 Multi Database for MinAdmin Software 273 ...

Page 13: ...41 Figure 3 2 Setting Up a Common Network Connection 43 Figure 3 3 LocalView Network Settings DHCP 44 Figure 3 4 Inputting the Site Name from LocalView into a DHCP Connection 44 Figure 3 5 Report of a Dynamic IP Assigned by DHCP to a Rapid Eye Unit 45 Figure 3 6 DNS Setup in Microsoft Windows 46 Figure 3 7 Connection Settings for NAT Use of an Internet Router 47 Figure 3 8 Unit IP for Network Conn...

Page 14: ...or PTZ Showing Command Feedback 99 Figure 6 4 Changing the PTZ Control Mode 99 Figure 6 5 Dragging the Mouse Pointer in a PTZ Camera Window 100 Figure 6 6 Using PTZ Zonal Mode 100 Figure 6 7 PTZ Dome with or without Auto focus 101 Figure 6 8 Programming a PTZ Preset 102 Figure 6 9 Testing Presets on a PTZ Camera 102 Figure 6 10 PTZ Camera Behavior After Use 103 Figure 6 11 Detail of PTZ Setup for ...

Page 15: ...rd 186 Figure 10 4 After Removing a System Password 188 Figure 10 5 Use the LVP Utility when a Unit Replaces Another 191 Figure 10 6 Example of Using LVP Utility to Reset System Password 193 Figure 10 7 Summary of a User s Rights on the Users Tab 197 Figure 10 8 Setting an Account s Session Time Limit 201 Figure 10 9 Limiting an Account s Access to Devices 202 Figure 10 10 Identifying Camera Recor...

Page 16: ... Playback Select Date and Time Window 248 Figure 12 16 Select Streams for Archival Playback Window 249 Figure 12 17 Archival Playback Options and Controls 249 Figure 12 18 Options for the Admin Application 250 Figure 12 19 Archiving Log Report 251 Figure 12 20 Archival Log Filtering Options 251 Figure 12 21 Archival Logs in the View Application 252 Figure 13 1 Adding a Tour Name 254 Figure 13 2 De...

Page 17: ... Domes 98 Table 6 2 Position After PTZ Sessions Close 104 Table 6 3 Intellibus Settings for ACUIX Domes 110 Table 7 1 Status Icons for a Response Rule 126 Table 7 2 Motion Detection Commands 129 Table 7 3 Contrasting Motion Detection and Motion Search 131 Table 7 4 Effect of the Number of Cameras on the Video Archive 136 Table 7 5 Effect of Camera Scheduling on the Video Archive 136 Table 7 6 Effe...

Page 18: ...ecurity Situations 203 Table 10 5 Event Reference by Source and Tab 208 Table 10 6 Event Default Settings for Log and Alarm 209 Table 11 1 Defining a Connection to an Alarm Station 220 Table 11 2 Connection Information for a Rapid Eye Site to an Alarm Station 220 Table 11 3 Router Mappings Example for Unit Callback to Alarm Stations 224 Table 11 4 Matching Area Codes for Sites and Alarm Stations 2...

Page 19: ...tup provides procedures for receiving video from cameras customizing your video settings and configuring event recording Chapter 6 Pan Tilt and Zoom PTZ Setup describes programming connected PTZ cameras Chapter 7 Enhancing Video provides procedures for configuring scheduling event recording motion detection and tamper detection It also covers how to use the Rapid Eye storage estimator Chapter 8 Co...

Page 20: ...fused Related Documents This document is a necessary prerequisite for understanding the Rapid Eye system For more information please refer to the following documents that are available on the Documentation CD that came with your unit Document title Description Rapid Eye Multi Media Digital Video Recorder Installation Guide Written for installers and new users to the Honeywell Rapid Eye DVR system ...

Page 21: ...onds Text strings displayed on the screen Syntax The message Unauthorized displays object entered Swiss721 BT Bold Words or characters that you must type The word enter is used if you must type text and then press the Enter or Return key Enter the password Menu titles and other items you select Double click Open from the File menu Buttons you click to perform actions Click Exit to close the progra...

Page 22: ...22 ...

Page 23: ...t the setup and supervision of Honeywell Rapid Eye Multi Media DSP units your organization should designate a System Administrator Multi SA for your Rapid Eye CCTV system About Using a PC to Operate Rapid Eye Units Using One Rapid Eye Unit or Many at Once Admin software is used to manage a central database Multi db of Rapid Eye Multi Media DSP units Older Rapid Eye units Multi Media and Multi mode...

Page 24: ...terface About Rapid Eye Active Alert Units and LocalView Availability of LocalView on V9 DVRs Offering Video Analytics LocalView is now fully supported by Rapid Eye s latest V9 software Earlier V9 software cannot access full LocalView features only network configuration is available Visit www honeywellvideo com support downloads downloads_dvr html to download the latest Rapid Eye software Availabi...

Page 25: ...oft com kb 224305 View Software Only View Operators Personnel who operate Multi Media DSP units to monitor video respond to alarms and make video clips only need View software on their PCs Use the View CD ROM to install the View application without the Admin application Admin and View Software Multi SA The system administrator of your Rapid Eye system Multi SA needs access to Admin software and Vi...

Page 26: ...To install ActiveX Control Pad on a PC running Windows 7 follow the instructions below 1 Click Links see Figure 1 1 2 Click the Http link given in the internet explorer to download the Setuppad exe file to install ActiveX Control Pad 3 Once the download is complete run Setuppad exe Setuppad exe is a win32 cabinet self extractor file 4 If a Yes No dialog box appears click Yes to continue the Active...

Page 27: ...ou the following options see Figure 1 3 Reinstall using recommended settings This program installed correctly Figure 1 3 Program Compatibility Assistant 1 Click Option 1 Reinstalling using recommended settings The installation will continue with the following steps 2 If a Yes No dialog box appears click Yes to continue the ActiveX Control Pad installation 3 Click Yes to continue the installation s...

Page 28: ...for Microsoft Software 4 Click Continue see Figure 1 5 Figure 1 5 Microsoft ActiveX Control Pad Setup 5 If needed change the installation directory by clicking Change Folder Then click on the icon next to Complete to complete the installation of the ActiveX Control Pad see Figure 1 6 ...

Page 29: ...estart message see Figure 1 7 Figure 1 7 Restart Your Computer to Apply Changes 7 It is recommended that you restart your PC Click Restart Now Application Error Workaround 2 Right click on the downloaded Setuppad exe file Select Troubleshoot Compatibility from the list of options that appears The Select troubleshooting option dialog box appears see Figure 1 8 Click icon to complete the installatio...

Page 30: ...age 30 or Option B Using Troubleshoot Program on page 31 when selecting a troubleshooting option Option A Using Recommended Settings 1 Click Try recommended settings see Figure 1 8 2 The Windows compatibility mode see Figure 1 9 may show Windows XP Service Pack 2 Click Start the program to start the installation of ActiveX Control Pad ...

Page 31: ...3 Follow step 3 to step 7 of Application Error Workaround 1 on page 27 Option B Using Troubleshoot Program 1 Click Troubleshoot program see Figure 1 8 2 Select the first option The program worked in earlier versions of Windows but won t install or run now and click Next see Figure 1 10 Figure 1 10 Program Compatibility Problems Noticed ...

Page 32: ...nd 3 1 Right click on the downloaded Setuppad exe file Select Properties from the list of options that appears 2 Select the Compatibility tab 3 Select the first option to choose Window XP Service Pack 2 or Windows XP Service Pack 3 Click OK 4 Now run the downloaded Setuppad exe file 5 Follow step 3 to step 7 of Application Error Workaround 1 on page 27 Running Admin Software on First Use The purpo...

Page 33: ...ny Sites on page 253 Using View Software for Site Maintenance After units are installed and a Multi db is created the View application is used to run a Maintenance Session During a Maintenance Session the following settings can be changed Unit Time Zone and Clock To identify recorded video it is important to set a unit s time zone and clock See Unit Time Zone and Clock on page 64 Video See Video F...

Page 34: ...ist Information About Your Rapid Eye Multi System See Microsoft Windows The version used on the PC running Admin for example Windows XP Connection type For a LAN connection the Multi Media unit s IP address and so on If you are using a dial up connection to the unit include a list of communication tools used on the PC running Multi software fax AOL CompuServe the type of modem the telephone number...

Page 35: ...ng in the Right Pane 1 Right click the right pane on the Sites tab of the Admin application 2 Click Add on the menu that appears The Add Site window appears Figure 2 2 Figure 2 2 Naming a Site 3 Enter a name in the Site Name box This name is used to identify a unit 4 You have the option of adding a connection now or later See Connecting to a Rapid Eye Unit on page 41 5 Click Save and Close Right c...

Page 36: ...ance Session When using a connection on a DHCP enabled network the Site Name on the System tab of a Maintenance Session can differ from the Site Name in a site definition The LocalView Site Name is used in this situation see Dynamic Host Configuration Protocol page 43 Right click an item to display a context sensitive tool tip Click to add an item Click to update an item Click to delete an item Fo...

Page 37: ...name of the Rapid Eye unit on the Sites tab in the View software Note For connections using DHCP a different site name is shown on the System tab of a Maintenance Session Do not change that site name it serves a different purpose See Dynamic Host Configuration Protocol page 43 Deleting a Site Deleting a site in the Multi central database has no effect on the Rapid Eye unit The unit continues to re...

Page 38: ...Rapid Eye unit from its means of communications refer to the Rapid Eye Multi Media Digital Video Recorder Installation Guide Other Site Related Functions Cameras displays an empty list when adding a site after running a Maintenance Session using View software Cameras lists the names of the cameras connected to the unit LVP The last valid password utility is used only for replacement units or for s...

Page 39: ...he name by pressing Enter Assigning a Site to a Folder Using the mouse drag a site icon and drop it on a folder When the mouse button is released the folder into which the site was dropped is opened A site can be moved to another folder but cannot be copied To assign many sites at once press Ctrl while selecting sites and then drag the group of sites to a folder Renaming a Folder 1 Right click a f...

Page 40: ...abase Grouping Folders In a Rapid Eye database folders can be dragged into other folders or back to the root of the database A folder that holds other folders displays or to its left Double click a folder to expand or hide its contents ...

Page 41: ... under Connections to the Site see Figure 3 1 One connection or many can be setup for example to operate a unit through a network and by local dial up Using Admin Software Admin software is used to set up or modify a connection to a Rapid Eye unit Figure 3 1 shows how to add a connection Add a connection while Updating a Site page 37 or while Adding a Site page 35 A connection is made using the Vi...

Page 42: ...P Address of a Rapid Eye Unit Before setting up a network connection for remote PCs the simplest way to change a unit s IP address or to enable DHCP is to use LocalView to access the unit s network settings Do so by using LocalView to either Access the network settings of the DVR See the Rapid Eye Multi Media Digital Video Recorder Installation Guide Use the Quick Setup Wizard Refer to the Rapid E...

Page 43: ...te To set Network Settings using LocalView ensure that no one is running a remote Maintenance Session on the unit Rapid Eye Active Alert units that run V8 1 or older V9 software can ONLY access network settings on LocalView Rapid Eye DVRs with the latest V9 software have full LocalView access Download the latest software at www honeywellvideo com support downloads downloads_dvr html Dynamic Host C...

Page 44: ...t Working with Connections page 41 3 In the Add Connection window select Use Existing Network Connection see Figure 3 4 4 In the IP Address field enter the site name used in LocalView as indicated in step 1 of this procedure 5 You have the option of changing the connection name site name Network to indicate the use of a dynamic IP Address by entering the Connection Name For example Figure 3 4 show...

Page 45: ... in step 3 DHCP can change an address if it is not reserved compromising future attempts to connect to the unit DHCP Reference Timeout on Network without DHCP If DHCP is unavailable on your network a unit s request for DHCP services times out after two minutes DNS Registration The DNS registration of DHCP leases is made with the DNS specified by the DHCP server and network card properties Contact ...

Page 46: ... in Microsoft Windows Using an Internet Router for Network Address Translation Step 1 Use a Router s Mappings in a Rapid Eye Connection While Working with Connections page 41 1 Obtain the outside IP address of the internet router from the network administrator or from the installer 2 In the Add Update Connection window select Use Existing Network Connection 3 In the IP Address field enter the inte...

Page 47: ...apid Eye unit 1 on Rapid Eye unit 1 Use the router IP in the connection s IP Address Set to Session value in the connection 49 100a Use the constant value for Rapid Eye 10 000 192 168 101 11c Set to Maintenanced value 49 101 10 001 192 168 101 11 Set to FTPd value 49 102 21 192 168 101 11 for Rapid Eye unit 2 on Rapid Eye unit 2 Use the router IP in the connection s IP Address Set to Session value...

Page 48: ...to the unit until the change is mapped in the internet router Direct Connection to a Standalone PC A standalone PC running Admin and View software is connected to one unit by using a network crossover cable Figure 3 9 Using a Direct Connection to Operate a Multi Media Unit 1 Using Microsoft Windows set the IP Address on the PC s network card to an address on the same subnet as the Rapid Eye unit a...

Page 49: ...n Name see Figure 3 10 4 Click Save and Close For a report see Connection Report on page 56 Figure 3 11 Dial Up Connection Note If a prefix number is needed to access an outside line set the prefix the extra telephone keystroke such as a 9 or an 8 in Microsoft Window s Telephony program Table 3 2 IP Defaults Used by Multi Media Units Point Rapid Eye Unit Default Address Operator PC Network Card IP...

Page 50: ...e unit in the Phone Number field including country and long distance codes 4 Leave the Country Code and Area Code City Code boxes empty Steps 4 and 5 trick Windows Dial up Networking into making a local call across different area codes Click Save and Close An Add Site Update Site window appears 5 Click Close Look for the Primary Connection column on the Sites tab The first letter of dial up d appe...

Page 51: ...area codes be included in all telephone numbers Dial up connections between a Multi Media unit and an alarm station running View are explained in Dial Up Connection to an Alarm Station on page 224 Offering Many Dial Up Connections to the Same Unit More than one dial up connection to the same Multi Media unit may be needed Table 3 3 lists configurations and the number of connections for best result...

Page 52: ...rk or dial up connection Figure 3 13 List of Connections to a Site some in some out of unit calling area permutations of all of the above Dial Up Connection page 49 and Irregular Use of Area Codes page 50 2 4 in another country international long distance Dial Up Connection page 49 1 some out of site country all permutations Dial Up Connection page 49 and Irregular Use of Area Codes page 50 2 5 Ta...

Page 53: ...on that same network From a security point of view the View operator does not need to know the RAS username and password A Connection that Behaves Like Dial Up A session request behaves just as if you had reached the site s Multi Media unit by connecting directly to it by dial up Such a connection behaves as if it were a simple dial up connection Two dial up sites cannot be used at the same time w...

Page 54: ...that span area codes or long distance calls within one area code see Irregular Use of Area Codes page 50 5 Select the Override PPP Settings checkbox see Figure 3 15 If a connection is being added a PPP is appended to the connection name You have the option of either Entering another name in the Connection Name box such as adding RAS or Leaving the connection name in the Connection Name box as it w...

Page 55: ...ew The definitions of Rapid Eye sites do not contain RAS or PPP information The sites are meant to behave as if they were on a View operator s LAN See Figure 3 16 Using only one RAS dependent unit at a time See RAS Server on page 53 In both cases a RAS server has been set up on a server that accesses Rapid Eye Multi Media unit s on a network Planning to Connect to Many Units For access to a RAS se...

Page 56: ...live retrieval and alarm are sent to port 10 000 This port should be left open in your organization s firewall for the sockets used by Multi Connection Report Figure 3 17 Site Tab Primary Connections Report In the Admin application the site tab reports the primary connection to a Rapid Eye site see Figure 3 17 Connection Codes The codes used to identify the primary connection are listed in Table 3...

Page 57: ...larm station unavailability you can Assign more than one alarm station to a unit Set the order in which alarm stations are called Preparations Before you prioritize alarm stations Create Alarm stations using the Alarm Station tab See Adding an Alarm Station Name and Reports on page 218 Set events to trigger alarms An alarm station is ineffective until events are set to trigger alarms See Events De...

Page 58: ...ch alarm station that you have assigned 6 You have the option of ending the site edit Click Save and Close The Admin window reappears listing your system s sites on the Site tab 7 You need to use the View application to update security for the Multi Media unit See Updating Security on a Multi Media Unit on page 143 Setting a Site to Not Report Alarms to a Specific Station 1 Using Admin click the S...

Page 59: ...ge 227 Customizing the Dial Up Connection to an Alarm Station 1 While creating or updating a site select an alarm station 2 In the Report Alarms to these Alarm Stations pane click See Figure 3 18 The Update Station to Call in Case of Alarms dialog box appears 3 Modify the telephone number so that it is as one would dial it You have the option of Removing adding long distance country and area codes...

Page 60: ...umber shows an asterisk in the entry s display 2 In the Report Alarms to these Alarm Stations pane click The Update Station to Call in Case of Alarms dialog box appears see Figure 3 18 3 Click Default in the Update Station to Call in Case of Alarms dialog box The telephone number returns to the one entered in the Alarm Station definition 4 Update security for the unit See Updating Security on a Mu...

Page 61: ...Security on a Multi Media Unit on page 143 Scope of a Maintenance Session A Maintenance Session involves only the unit on which it runs Use View to open a Maintenance Session on more than one unit at a time Two operators cannot each run a Maintenance Session on the same unit While a Maintenance Session runs the unit s LocalView interface continues to display video but is unavailable for unit opera...

Page 62: ...kets used by Multi For other ports used by Multi see the Rapid Eye Multi Media Digital Video Recorder Installation Guide Support for Older Unit Models Setup and Maintenance Older model Rapid Eye units are supported If an older unit lacks a newer feature the feature is not shown in a Maintenance Session The interface appears as it did in the last available upgrade for older units For example a Reco...

Page 63: ...rking within minutes of being turned on There are a few crucial steps needed to make your Rapid Eye site an outstanding security tool First Maintenance Session You run the first Maintenance Session at a site after Adding that site to a Multi central database See Adding a Site on page 35 Upgrading a Multi unit Site Registration When the first Maintenance Session runs the validity of the communicati...

Page 64: ...tomatically You need to specify the drivers for PTZ pan tilt zoom cameras Test the alarms For events set to trigger alarms test if these events give you the anticipated results See Events Defined on page 205 Honeywell recommends using a system password Without a system password your Rapid Eye sites can be accessed by Admin users in other organizations To avoid this situation see Securing a Site on...

Page 65: ... zone is set immediately there is no need to reboot the unit TIP The time zone is set on a unit by unit basis Repeat this procedure for every unit in your system Using SNTP to automatically update the time Units need you to specify the time zone Table 4 1 Effect of Time Zone Setting on Display and Clips Operator PCa Unit Time Zoneb Time Shownc Sessions and Clips Showing 4 00 PM Eastern Time Easter...

Page 66: ...nistrator to find out if a Simple Network Time Protocol SNTP server is in use Multi Media units on a LAN can benefit from the automatic setting It is accurate to within a fraction of a second 1 Obtain the IP address of an SNTP server You have the option of also obtaining the address of an alternate server 2 Using View select a unit whose clock needs to be set 3 Start a Maintenance Session 4 Click ...

Page 67: ...ystem Clock Manually A Multi SA can synchronize the clock of a Rapid Eye Multi Media unit using a PC s clock as reference This is more useful for units connected only by dial up but can also be used for units on a LAN TIP Check set the clock on an operator s PC before setting a unit clock manually Adjusting the Clock on a PC Running Rapid Eye Software To adjust the PC time date and time zone 1 Cli...

Page 68: ...incorrect time more than a few seconds for a long length of time an hour or more on an operational unit can create problems for operators who need to retrieve video when the clock is set correctly During the span of incorrect time video is not erased and continues to be recorded however two instances of video can be created at the same timestamps Using the Seek or Jump controls shows the video of ...

Page 69: ...an a few seconds for a short time period a few seconds a few minutes up to an hour you need to reset the clock correctly either automatically or manually A Follow Up May Be Needed Clearing Storage If the clock remains set to an incorrect time more than a few seconds for a considerable length of time many hours days or weeks it can become inconvenient and confusing for an operator who needs to play...

Page 70: ...mistakenly reboot your PC when prompted to click the Reboot button in the Maintenance window Automatic Reboot of Multi Media Unit A Multi Media unit reboots by itself when Changes to a modem serial device are applied Modem settings are explained in Setting Up a Modem Serial Device on page 152 System files are upgraded as explained in System Files on page 144 Power to the unit is interrupted and re...

Page 71: ...5 Find and Open the software upgrade file you have downloaded 6 Click Next The message that opens describes the exact version that you are upgrading to Click Next to start the upgrade 7 The unit will reboot automatically once the upgrade has completed Maintenance Reference Ending Maintenance To end a Maintenance Session close the Maintenance window Other actions can also close sessions Click OR Cl...

Page 72: ...n page 49 Events Defined alarms action page 205 Feedback Box Reference system files report page 73 Hardware Report Honeywell report page 155 Motion Detection motion search configuration action page 127 Multi Audio audio configuration page 162 Obtaining Unit Statistics Honeywel report page 139 Pan Tilt and Zoom PTZ Setup video PTZ configuration page 95 Setting Up a Modem Serial Device dial up conne...

Page 73: ...ge 147 For PTZ Serial Devices and Video PTZ To select a driver for cameras that pan tilt and zoom PTZ and to enable PTZ type camera s at a site page 95 Multi audio Audio At user discretion page 162 Alarms Events At user discretion to set up logs or alarms triggered by events page 205 n a Serial Devices Data recording At user discretion to set up logs or alarms triggered by events page 157 Honeywel...

Page 74: ...eboot page 70 Resetting System Multi Media unit reboot page 70 Restarting System Multi Media unit reboot page 70 Runtime System Failure Apply or Multi Media unit reboot page 70 Starting remote unit Start of Maintenance Session page 61 Starting System Multi Media unit reboot page 70 Statistics received Use of Statistics tab page 139 System Operational Apply or Multi Media unit reboot page 61 and pa...

Page 75: ...inue or start a Maintenance Session page 61 2 On the Video tab select the name of a camera in the Name column Default camera names are Camera1 Camera2 and so on 3 Click the name of the camera once more a box appears around the name 4 Enter a new name for the camera if needed maximum 40 characters Press Enter ...

Page 76: ...ame column select the box next to the camera icon and name The camera is enabled when a checkmark appears in the box If no video appears consider that the camera may be turned off disconnected from the unit not powered or damaged See Environmental Interference for Video Feeds on page 93 Re Enabling All Newly Connected and Powered Cameras You have the option of either Enabling the new cameras one b...

Page 77: ...een in the Enhanced Preview window See The Enhanced Preview of Resolution on page 85 See also the Rapid Eye Multi Media Digital Video Recorder Remote View Operator Guide Note The resolution and quality of video displayed by the Remote View application can also be affected by the available bandwidth of the network the unit is installed in See Setting a Bandwidth Throughput Option on page 149 to set...

Page 78: ...continue or start a Maintenance Session for the Rapid Eye site how to do so is shown on page 61 Figure 5 2 Recording Tab with Six Cameras Recording Enabling the Recording of a Video Feed 1 Continue or start a Maintenance Session 2 On the Recording tab illustrated in Figure 5 2 note that in the Record column recording is OFF by default for all cameras when the unit is new Cells that are unavailable...

Page 79: ...FF Caution Disabling a camera resets the recording settings and other configurations to default settings The defaults are used when the camera is re enabled Customizing Settings for Recorded Video Flexibility Use the Recording tab to customize a Resolution Frame Rate and Quality for each camera s Continuous recording and Event recording settings The recording settings can be the same for all camer...

Page 80: ...frame rates may have to be lowered Frame Rates on Multi Media and DSP Units Rapid Eye DSP units Rapid Eye DSP units have a maximum frame rate setting of 480 ips at CIF resolution for NTSC units 400 ips for PAL units This maximum frame rate can be divided among connected cameras however needed For example each of 16 cameras can be set to 30 ips or 8 cameras can be set to 60 ips and so on To automat...

Page 81: ... Setting 1 On the Recording tab click a cell in the Quality column 2 Select a value a compression factor from the drop down list that appears The values range from 6 to 10 The default value is 7 Quality and the Storage of Video Lower values take less storage space but can display block like artifacts in the video The highest Quality setting can double the use of storage space Duplicating Settings ...

Page 82: ...t shorten the video archive to the point of making it unusable Report The values selected on the Recording tab are also shown on the Video tab Estimating Storage Capacity As higher values for Frame Rate Resolution and Quality are set the amount of time that video audio and data can be stored in a unit the video archive shortens The Estimated Storage Capacity reports a useful forecast in days of th...

Page 83: ...iguous Connections For optimizing the digital signal processing DSP of video and its storage an installer needs to make camera connections contiguous on the back of a unit Connections are contiguous if they start at camera VIDEO INPUT 1 and continue sequentially For example connecting three cameras to inputs 1 2 and 3 is contiguous connecting the cameras to inputs 1 3 and 4 is not nor would using ...

Page 84: ... number of cameras connected to the unit Optimization cannot be used if the cameras are not connected contiguously See Optimizing Recorded Video page 83 Making Optimized Resolution and Frame Rate Settings In the Automatic DSP Performance Maximization window double click an automatic option see Figure 5 6 Manual Display of Maximization Window To display the Automatic DSP Performance Maximization wi...

Page 85: ... 160 x 120 at the size that it would appear on a monitor The outlines show the optimal size of a video feed on the PC s monitor for that resolution The many highlighted resolution labels can be used to display another resolution 4 You have the option of experimenting with Viewing the video feed at optimal size for a resolution Click the resolution labels within a resolution outline or use the Reso...

Page 86: ...resence helping to guarantee a longer video archive Need to know how many cars Objects can be effectively counted at low resolution and make using higher resolutions unnecessary To identify unknown vehicles a person s facial traits and so on better camera positions and higher resolution may be needed Identification may not be as crucial when subjects are known such as employees uniformed personnel...

Page 87: ...ragged to a larger size the pixels are also enlarged The image s sharpness is not preserved More stretching can degrade the subject of an image beyond recognition Compare Figure 5 9 and Figure 5 10 A high resolution 704 480 NTSC shows recognizable facial characteristics and very few artifacts such as pixelation color variance and so on If storage time is an issue recordings at a more modest resolu...

Page 88: ...se Microsoft Windows TechSmith s SnagIt and so on Screen Area Size of Camera Windows on a PC Monitor Adjusting Microsoft Windows Display Properties for a PC monitor can have an effect on how resolution is perceived See Monitor Settings to Customize Windows for a PC on page 91 Camera Tips for Visual Identification Figure 5 11 Camera Placement Can Be more Important than High Resolutions Detail of re...

Page 89: ...g View software The resolution gauge for recorded video differs from the live video gauge The gauge for live video is explained in the Rapid Eye Multi Media Digital Video Recorder Remote View Operator Guide Gauge Indicates at Which Resolution the Recording Was Made When an operator runs a retrieval session a resolution gauge is displayed on each camera window indicating the resolution at which the...

Page 90: ...t for NTSC Also called half Also called full highest setting for Multi Media LT Highest NTSC setting Gauge in a Retrieval Sessionb PAL Resolution 192 x 144 384 x 288 704 x 288 704 x 576 Comment Lowest PAL resolution Honeywell default for PAL including upgrades Highest setting for Multi Media LT Highest PAL setting Gauge in a Retrieval Sessionb a Legacy used by older Multi units is included for com...

Page 91: ...osoft Dual View Using Two Monitors on page 92 PAL Resolution 192 x 144 384 x 288 704 x 288 Comment Lowest PAL resolution Honeywell default for PAL including upgrades Highest PAL setting Gauge in a Retrieval Sessiona a Gauges are explained in Resolution Gauge for Retrieval Session page 89 Table 5 4 Recording Resolutions for Multi Media LT NTSC PAL Table 5 5 Display Properties for Optimal Video at H...

Page 92: ...o set up a Dual View system see your Microsoft documentation Hardware note a second video card is needed on the View operator s PC for Microsoft s Dual View setup Larger Monitors and Microsoft Windows Figure 5 14 Microsoft Windows Screen Area Settings Setting Microsoft Windows Larger computer monitors and better video cards are assets when setting Microsoft Windows for high screen area settings No...

Page 93: ...e and should be spot checked Run a video retrieval to do so See Behavior of PTZ After a Session Closes on page 103 Scheduling The video archive can be spot checked for recorded video when cameras are scheduled to record See Scheduling Configuration on page 117 Physical Compromise Even when cameras are set as recommended changing environmental factors can compromise video at the source Obvious fact...

Page 94: ...94 Video Feed Setup ...

Page 95: ...rt 2 other serial devices might only be assignable to port 1 Many domes daisy chained can be connected to the Multi Media unit if they use the same PTZ Communications settings For the address set on each camera consult the installer Other dome communications settings can be found in the dome manufacturer s documentation Serial Device Settings for PTZ Assigning and Configuring a New PTZ Device 1 Fi...

Page 96: ...whenever a PTZ camera is selected during a Live session Installers can connect OUTPUT 1 to the external controller so that the signal disables the controller while a Multi Media operator uses a PTZ camera When a PTZ camera is not selected the signal from OUTPUT 1 stops so that control of the PTZ serial bus is returned to the external controller Assigning another PTZ device to another Port or to th...

Page 97: ...e see Assigning and Configuring a New PTZ Device on page 95 5 Select a driver that matches a PTZ camera Drivers are listed in Table 6 1 6 If more than one PTZ camera is sharing the device select a Camera Address that matches the address set on the dome hardware 7 Select the Port Attributes of the dome Data Bits Stop Bits Baud Rate and Parity 8 Select the position that a PTZ camera takes after a Vi...

Page 98: ...e PTZ Control In LocalView a PTZ button is shown when a Live tab is selected It is available when a PTZ camera is selected Table 6 1 PTZ Drivers for Controllers and Domes Driver name a Baud Rate Support for Domes Controllers PIT Devices Bossware 19200 PIT device to which domes are connected Honeywell Fixed Camera 9600 Honeywell HCU484 Intellibus PTZ 38400 Honeywell ACUIX dome camera Javelin 308 96...

Page 99: ... command that you need is highlighted If you are using the Hold option press and hold the mouse button to make the command repeat as needed Toggling Between Zonal Mode and Pull Mode 1 In a Live player select a PTZ camera 2 Select Options New Players in the Live Video Player s View menu 3 Select the PTZ Control mode that you want to use Figure 6 4 shows Pull Mode selected 4 You can also select the ...

Page 100: ...it is highlighted for illustration Zoom Use the wheel on the mouse If the mouse does not have a wheel see Using the Dartboard Control on page 99 Presets and other commands In a Live session and in LocalView right click on a PTZ camera s video to obtain a menu of PTZ commands and video resolution commands In a Maintenance Session use the commands on the dartboard Using Zonal Mode Figure 6 6 Using P...

Page 101: ...ng a PTZ Dome Figure 6 7 PTZ Dome with or without Auto focus PTZ Preset Presets are set during a Maintenance Session A PTZ camera can be set to return to the first preset when a Live session ends and the camera is no longer in use Auto focus View supports an auto focus control when two dots appear in the Focus arc of the PTZ controller Click between the dots to toggle auto focus on and off See Fig...

Page 102: ... are saved 9 You have the option of immediately Setting up another preset Repeat steps 4 to 8 using another preset in step 5 Testing the preset See Testing a Preset on page 102 Setting presets for another PTZ camera at that site Figure 6 8 Programming a PTZ Preset Testing a Preset Figure 6 9 Testing Presets on a PTZ Camera 1 You have the option of running either A Maintenance Session Click the Vid...

Page 103: ...tion on page 127 and Events Defined on page 205 for more information Ultrak KD6i Domes Before an aperture setting can be changed manually on an Ultrak KD6i dome you need to turn OFF the auto aperture option Auto aperture is also known as auto iris on the PTZ controller The Return to auto focus command has no effect on Ultrak KD6i domes Kalatel Domes On Kalatel domes the iris controls in View toggl...

Page 104: ...ation of your video archive is a concern see Quality on page 137 Ultrak KD6i Dome Restriction The return to auto focus command has no effect on the Ultrak KD6i dome Caution Do not use the Return To Auto Iris command on Ultrak KD6i domes Table 6 2 Position After PTZ Sessions Close At Session End Comment Behavior Stay put The camera remains in the last position used by the operator If it is panning ...

Page 105: ...ome is positioned at these presets Figure 6 11 shows details of a PTZ setup for the RapidDome Driver on the Video tab during a Maintenance Session Details show controls for the mimic tour preset tour and privacy zone The selection of presets and tours is made using the list above the PTZ controller In the list Vector is used to select a preset tour Figure 6 11 Detail of PTZ Setup for the RapidDome...

Page 106: ...buttons in the Tour Programming section see Figure 6 11 6 Pan tilt and zoom the camera as needed 7 Click End 8 After the tour is programmed you can Click Test to test the mimic tour Rename the mimic tour Click inside the box in the Tour Programming section Enter a name Save the name by clicking the mouse outside of the box 9 You have the option of programming another mimic tour for the dome camera...

Page 107: ... 12 A list appears showing Vector 1 Vector 2 Vector 3 and so on by default Select the Vector to be programmed 6 To add a preset to the preset tour right click in the Tour Programming table A menu appears showing the Insert command as in Figure 6 12 7 Click Insert A preset is added to the list Speed You have the option of setting the time in seconds that the dome will take to reach the preset Selec...

Page 108: ... a name In Figure 6 13 Entrances has replaced the default name of Vector 1 9 Click Program Vector to send the tour of presets to the camera To program another tour of presets for the dome camera repeat step 6 to step 7 as needed Figure 6 13 Location of the Program Vector Button Testing a Preset Tour on a RapidDome Camera 1 While using View select the site at which you have programmed a Preset Tour...

Page 109: ... protocol can be configured using Rapid Eye View software In preparation installers should Set each ACUIX dome to Intellibus mode IBus Set DIP switches 5 8 to ON for each ACUIX dome The Camera Address can then be set using rotary switches SW1 to SW4 on the PCB at the base of the dome Connect the domes to a port on the Rapid Eye unit Notify the Multi SA of the number of the port used on the Rapid E...

Page 110: ...ing and configuring a PTZ dome see Video Tab Settings for PTZ on page 96 4 Select an ACUIX dome 5 In Port Attributes enter values for Baud Rate Stop Bits Data Bits and Parity as shown in Table 6 3 6 Do not use the same Camera Address for two ACUIX domes that share the same port 7 Repeat step 4 to step 6 for each ACUIX dome in your system Shortcut for selecting all of the items listed in the table ...

Page 111: ...s is copied to the Multi Media DSP unit A configuration file for an ACUIX dome includes PTZ tours PTZ presets privacy zones and all other camera settings 6 Click Manage Files The Manage Files dialog box appears Figure 6 16 showing the ACUIX dome configuration files bin The configuration file naming convention is camera name_camera address_year_month_day_hour_minute_second bin for example Lobby_4_2...

Page 112: ...e Serial tab select the port to which the Intellibus device was assigned 3 Click Discover to update the table of ACUIX domes 4 Select one or more ACUIX domes To select all of the cameras listed click the checkbox at the top of the Name column see Figure 6 15 5 Click Download to Camera A standard file opening window appears showing the drives and folders available on the operator PC 6 Select a conf...

Page 113: ...r PC 6 Select a drive folder and a firmware file for the ACUIX dome These files should have an ngd file extension 7 Click Open 8 A Maintenance Message dialog box appears to confirm your selection Click Yes to proceed 9 If there are many ACUIX domes connected to the unit and all were selected in step 4 of this procedure a Sequence for Upgrading Cameras dialog box appears Select a sequence and then ...

Page 114: ...114 Pan Tilt and Zoom PTZ Setup ...

Page 115: ...ideo are independent of Continuous and Event Recording settings Figure 7 1 Continuous and Event Recording Settings On the Recording tab set higher values for Event Recording settings than for Continuous Recording The following settings can be changed Resolution pixel pixel Frame Rate number of images per second Quality more or less compression Each camera can have its own Event Recording values se...

Page 116: ... units Live Video The settings for Continuous Recording and Event Recording are independent of those for live video Setting Lower Values for Continuous Recording The settings for Continuous Recording need to be lower or equal to the Event Recording settings If higher values cannot be set for Event Recording the values that are being used for Continuous Recording may be set too high Using the Boost...

Page 117: ... enabled An Outside World event motion event or a Customer device event can automatically trigger Event Recording See Scheduling a Response to an Event of Interest on page 123 for more information Continuous Recording may suffice while nothing of interest occurs Scheduling Configuration Scheduling is optional and can be shared by the Continuous Recording of video the raising of Alarms and a Respon...

Page 118: ...ing the Length of the Video Archive on page 134 Live Video Live video is not affected by scheduling Alarms The reporting of alarms is scheduled in the same way as Continuous video recording using the Default schedule or another defined schedule See Alarms and Scheduling page 121 Motion If Motion is enabled on a camera the motion events are recorded only when a camera is scheduled to record If moti...

Page 119: ...e Figure 7 3 Figure 7 3 Customizing a Schedule Customizing a Schedule 1 On the Schedules tab during a Maintenance Session select Define Schedules The tab displays the grid of the Default schedule see Figure 7 3 2 Use the Schedule drop down arrow to select a schedule that you want to customize 3 Select or deselect cells in the Time Day grid as needed The customization is saved automatically Use the...

Page 120: ...re for other cameras that need a schedule assigned Using a 15 Minute Increment in a Schedule 1 On the Schedules tab during a Maintenance Session select Define Schedules 2 In the Time Day grid right click an hour cell to display a menu 3 Select 15 Breakdown A 15 Breakdown window appears showing four fifteen minute cells for that hour on that day see Figure 7 4 4 Click the cells as needed to schedul...

Page 121: ... assign a schedule to alarms all alarms will use that schedule Alarms cannot be scheduled independently A schedule for the alarms can be independent from those used by cameras For example you can set events to trigger alarms only after business hours while cameras keep recording Assigning a Schedule to Alarms A schedule is assigned to alarms in the same way as for cameras Alarms can be set to be A...

Page 122: ...dules tab 3 Select Holiday Exception see Figure 7 5 Enter a name for the holiday or exception in the Name field 4 Choose whether to list the day as a holiday or an exception by selecting the option with the Type drop down arrow Figure 7 5 Specifying Holidays and Exceptions 5 Ensure that the Date you enter is unused and in the future To enter a date either Enter a date In the Date box select the pa...

Page 123: ...he correct date and the same name The old item with the faulty date remains on the list 3 Select the holiday exception with the faulty date Click Delete Scheduling a Response to an Event of Interest The Response schedule is used to make simple cause and effect rules to program how a Multi Media unit responds to events of interest For example Figure 7 6 shows Trigger If camera 1 senses motion Respo...

Page 124: ...ck the Schedules tab see Figure 7 6 3 Click Response Figure 7 6 displays for making rules and customizing a response Authority Setting and customizing rules can be performed by your organization s Multi SA or by other operators who have the right to run a Maintenance Session Checklist for Setting a Rule in the Response Schedule Figure 7 7 Customizing the Response for a Rule Six steps to settings u...

Page 125: ...Making a PTZ camera go to a PTZ preset or tour Activating an Output on the Multi Media unit to activate a buzzer for example Combinations of the above responses If an Action cell is unavailable the action has not been set up yet 5 Set the response to be logged or to raise an alarm You can customize the duration of a response and if the response is Logged or Raises an Alarm see 5 in Figure 7 7 See ...

Page 126: ... Always on No schedule is used Cameras using this setting record at all times Use Schedule Default The simplest way to simultaneously schedule all cameras and alarms is to customize the Default schedule This is useful when all the cameras and alarms need to be active at the same time such as during business hours See Customizing a Schedule page 119 and Notes on Holidays and Exceptions page 122 Use...

Page 127: ...Motion detection can warn or log the following situations in real time Unauthorized use of an area A construction crane moving outside of a scoped area a burglar in an unauthorized area after hours and so on Scheduled appointment Checking the arrival and departure times of a truck at a loading dock deliveries even natural phenomena such as tides and so on Catastrophes Complements sensors for fire ...

Page 128: ...larm The log can be used to obtain video from the time s when the door is opened saving a unit operator from having to search through video Red Mask and Green Mask In motion detection when the mask is red movement behind a mask is ignored The masking behaves opposite to that of motion search In motion search the parts that are masked in green act as motion triggers rather than as a mask Masking Pa...

Page 129: ...or pedestrians can trigger unwanted motion detection Motion search There are cases when performing a timely search for motion is more effective than constantly testing for motion See Motion Search on page 130 Video Settings and Motion Detection When an alarm based on motion detection is enabled changing the picture settings brightness and so on can trigger that alarm You can limit the triggering o...

Page 130: ...til motion that needs to be reported shows up as green or red Blue pixels indicate that motion is detected but not reported Hold Hold is the amount of time in seconds that motion events are ignored for after a motion event has triggered a report The value is displayed when the slider is clicked The Hold value ranges from 1 short to 60 long The default is 15 seconds Log You can set motion in a vide...

Page 131: ...anel on the Video Tab Table 7 3 Contrasting Motion Detection and Motion Search Operator Task Motion Tool Comments Detection Log motion or warn of motion during Live Sessions in real time session Video tab Motion panel This method constantly checks for motion Motion events can be logged or can trigger alarms as they occur Video feed can be masked where motion is not a concern Search Search recorded...

Page 132: ...nds will trigger Blur and Scene Change tamper detection Calibrating of Tamper Detection Figure 7 13 Calibration of Blind Tamper Detection Detection Meter Above each slider for setting the detection threshold of Blind Blur and Scene Changed a meter shows the tamper detection activity The meter is green when activity is below the threshold and red when the activity is above the threshold If there is...

Page 133: ...s about the scene displayed by the camera Learning is reported to the left of Scene Changed for 2 to 3 minutes depending on the complexity of the scene Do not blind or blur a camera while Learning is displayed When the learning ends Running is displayed to the left of Scene Changed Reset is enabled when Scene Changed is enabled Clicking Reset starts Learning again and should be used whenever the c...

Page 134: ...estimates use Honeywell s Rapid Eye Storage Estimator that is installed with the Rapid Eye software To compare and understand the effect of different factors on storage see the tables for Number of Cameras Audio Scheduling Cameras Frame Rate for Continuous Recording Quality and Resolution in the following sections Estimate from a Unit s Statistics If a Multi System Administrator Multi SA only need...

Page 135: ...days see Table 7 9 If the storage capacity is too small for your needs lower the resolution and frame rate of continuous recording Storage Process Video Audio Data Recordings of video audio and data are not permanent When a unit s storage fills the oldest recorded video audio and data are replaced with more recent recordings The amount of time that recordings are available is known as the length o...

Page 136: ...heduling Configuration on page 117 Table 7 4 Effect of the Number of Cameras on the Video Archivea Cameras Recording Duration of Video Archive Estimated in Days Oldest Available Video Rounded to Shortest Time 1 1153 3 years 1 month 4 288 9 months 8 144 4 months 12 95 3 months 16 72 2 months 16 audio 57 1 month a Resolution 320 x 240 Frame Rate 1 Quality 8 Storage 500 GB Table 7 5 Effect of Camera ...

Page 137: ...ding a video feed from a camera that is constantly panning requires much more storage space If the duration of your video archive is a concern Honeywell recommends that you reconsider if constant panning is necessary to your security needs See Behavior of PTZ After a Session Closes on page 103 Table 7 6 Effect of Frame Rates on the Video Archive Frame Rate Images Per Second Video Archive Estimated...

Page 138: ...e Table 7 8 Recording Resolution Effect on Video Archive Video Standard Resolution Pixels Video Archive Estimated in Days Oldest Available Videoa Rounded to Shortest Time NTSC 160 x 120 4803 13 years 1 month NTSC 320 x 240b 1153 3 years 1 month NTSC 640 x 240 670 1 year 7 months NTSC 640 x 480 320 10 months NTSC 704 x 480 274 9 months PALc 192 x 144 3336 9 years 1 month PALc 384 x 288 801 2 years ...

Page 139: ...igh plus Quality 704 x 480 max 1 10 max Result 6 months 21 days 190 High plus Frames 704 x 480 10 10 Result 19 days 2 days 19 30a Result 6 days 0 days 6 a A frame rate of 30 ips can be used on 1 to 4 cameras A maximum of 10 ips can be used for 9 cameras Table 7 9 Comparing the Available Storage for One Camera to Nine cont d Resolution Frame Rate Quality 1 Camera Archive 9 Cameras Archive Storage C...

Page 140: ... Elapseda The time that has passed since the latest change to configuration or latest reboot of the Multi Media unit Can also be used to estimate the oldest available imagea Day hour minute second Percent Full The portion of storage in use At 100 recycling occurs Percentage of storage capacity Stream Device connected to a Multi Media unit a camera microphone and so on Text Start Time Time of earli...

Page 141: ... or storage should be handled with care Clearing the storage may be needed in the rare cases where a unit is Disposed of Moved or transferred to another organization Figure 8 1 Clear Storage Button on Statistics Tab Caution The only safeguard to prevent unnecessary use of Clear Storage is setting a password to the Administrator account When you click Clear Storage or Clear Stream video and data ar...

Page 142: ...to clear one or more streams if there is ever A move or transfer of a camera or unit to another location Some testing of a new camera or training operators to use PTZs and so on Changing the Name of a Stream Different names can be assigned to cameras on the Video tab see Cameras on page 75 The name of a device set up by the customer is assigned on the Serial Devices tab see Customer Data and Custo...

Page 143: ...nd so on Your Multi SA should warn View operators that use of the Clear Storage and Clear Stream buttons not advisable without first communicating the reasoning to your organization s security personnel Updating Security on a Multi Media Unit Figure 8 2 Securing a Unit after Changing Passwords 1 Use View to start a Maintenance Session for the Multi Media unit 2 Click Update security on the Securit...

Page 144: ... be taken to make a record of the system password The system password is needed if you need to make a new site definition for the Multi Media unit See Deleting a Site on page 37 System Files Your Multi System Administrator Multi SA or your organization s security officer may find it useful to download a copy of a unit s System Log or other system file as needed Downloads of files from a Multi Medi...

Page 145: ...elected at a time 4 Click Download A Receive file from Remote Site dialog box appears 5 Specify the location where you want to download the file to You also have the option of renaming the file 6 Click Save A copy of the file is sent from the Multi Media unit to the location specified in step 5 7 Use a text editor or word processor to view the contents of the file Table 8 1 Rapid Eye Downloadable ...

Page 146: ...ck the System Files tab 4 Click Upload The Send file to remote site dialog box appears 5 Specify the name of the file that you are planning to upload and its location on the PC or network Caution Double check that you are uploading the correct file The file name should not be more than eight characters long Uploading the wrong file can halt a Multi Media unit causing that site to become inoperable...

Page 147: ...the Multi Media unit and displayed in the upper left corner of the System tab under Site Info The version of a Multi Media unit s software may differ from the version number of the Admin and View applications See Making a Site Operational on page 63 Figure 8 5 System Tab and Configuration Options See Camera Signal Format on page 149 for more information See Making the Fault Relay Operational on pa...

Page 148: ...em Monitor Enable status pulse Enables the Fault Relay to trigger Power outages and other causes can lead to a unit s failure to record video or failure to function Failure to do either for more than 19 minutes triggers the Fault Relay located on the unit s back panel See the Rapid Eye Multi Media Digital Video Recorder Installation Guide Monitor alarm reporting Enables delays greater than 19 minu...

Page 149: ... see Figure 8 5 Enable is the default setting Select the Disable option to disable LocalView This should improve the performance of your Rapid Eye DVR as resources are not wasted on an unused feature Once disabled LocalView can only be used to configure network settings Setting a Bandwidth Throughput Option The available bandwidth of the network your Rapid Eye unit s are connected to will affect t...

Page 150: ...t is turned off This avoids having to use the configuration shell to make changes after the move These changes can also be made using LocalView Changing Network Settings on a Unit 1 See your network administrator about any planned changes to the Network Settings 2 Using View continue or start a Maintenance Session for the Rapid Eye site 3 On the System tab enter changes in the IP Address Subnet Ma...

Page 151: ...e listed in the Rapid Eye Multi Media Digital Video Recorder Installation Guide These TCP ports should be left open in a firewall for sockets used in Multi operations For example Multi sessions live retrieval and alarm are sent to port 10 000 Default System Values for a Multi Media Unit Table 8 2 Default Network Communications Settings Box Valuea IP Address of Multi Media Unit 172 25 2 1 Subnet Ma...

Page 152: ...ble for dial up connection If you are unsure see your Multi SA Subnet Maskb 255 255 0 0 Gatewayb 172 25 100 4 MAC Address N Aa stored on unit for DHCP use Throughput High Low Low Signal Format NTSC PAL NTSC System Monitor Enable Status Pulse Off see System Monitor page 148 Monitor Alarm Reporting Off Max Network Data Regulate Data Rate Off Send no more than kilobits per secondc 32 Local Monitoring...

Page 153: ...e Serial Devices tab Baud Rate Wait for Connection and so on The box names and their default values are listed in Table 8 4 4 You have the option of changing the values as needed Figure 8 7 Serial Devices Tab Showing Internal Port Modem Data For an external modem drag the modem icon to the port icon Port icons Modem icon Table 8 4 Default Modem and Dial Up Communications Settings Device Box Value ...

Page 154: ...xes appear in the right half of the Serial Devices tab Baud Rate Wait for Connection and so on 4 Change the values to those suggested by the external modem s documentation 5 Drag the modem icon to the port icon with the number of the port identified in step 1 PTZ Serial Device A PTZ serial device is only used to control cameras that pan tilt and zoom PTZ A Multi SA obtains the Multi Media unit s p...

Page 155: ...tion 5 Drag the modem icon to the port icon with the number of the port identified in step 1 Hardware Report During a Maintenance Session for the Rapid Eye site click the Hardware tab The report includes a serial number of the Multi Media unit on the Rapid Eye site the version of software running the Multi Media unit the date of manufacture and internal hardware used by the unit Using Monitor Outp...

Page 156: ...f the Multi Media unit cannot produce a test pattern For these units the Color Bars option is not available on the Monitor Out tab of a Maintenance Session External Hardware Control of a Public Display Monitor You can connect a third party hardware switch to a Multi Media unit The switch can freeze a public display monitor and control whether the next camera or previous camera is monitored For wir...

Page 157: ... system and so on A Multi Media unit can record these messages Video From a Customer Device Event A message from a third party device is treated as a Customer device event by a Multi Media unit see Events Defined on page 205 You have the option of having up to 100 messages per device either logged trigger an alarm or both These customer device events are synchronized to the recorded event video Ta...

Page 158: ...ume that a cash register is connected to a Multi Media unit and you know the cash register communication settings 1 Start a Maintenance Session for the Rapid Eye site Wait until a System Operational message appears Click the Serial Devices tab 2 Expand New Devices as needed to see a Data Input icon see Figure 8 9 3 Drag the Data Input icon to a port icon as needed If you drop the icon on a port th...

Page 159: ...vice is coded as one or more numbers or text refer to the documentation for the device or A regular expression of your choice see Reference for Searching Rules and Regular Expressions on page 160 3 Click Add 4 The default Buffer Size value of 250 bytes should be adequate for most organizations however consider that you may need to use a bigger buffer if any rules use wildcards see Table 8 7 For la...

Page 160: ... A rule at the beginning of a line Ex Hume finds Hume at the start of lines A control code when used with a backslash Ex C finds the control C control code Dollar sign A rule at the end of a line when placed after it Ex Kant finds only Kant at the end of lines Dash A range of characters set in square brackets Ex a z matches any lower case letter Plus sign The character that it follows once or more...

Page 161: ...VBPIT1 or up to four devices AVBPIT4POS See Figure 8 10 When assigned to a port on a Multi Media unit the configuration values of the serial interface are shown see Figure 8 11 Figure 8 11 A NetPIT Device on PORT 3 Showing Serial Interface Settings When expanded a NetPIT device shows 16 virtual ports labeled A to P see Figure 8 12 A PIT device AVBPIT4POS shows 4 virtual ports labeled A to D When a...

Page 162: ...casting on both All sound sources are mixed at a View operator s station regardless of the number of sites being monitored at once Each Rapid Eye site can send up to two channels of audio to a View operator Audio Hardware Microphones powered speakers and so on need to be connected to a Multi Media unit The operator PC also needs a microphone and speaker for two way audio and a sound card For more ...

Page 163: ...nels and to as many sites at once as can be opened Figure 8 13 Audio Tab Audio Interference Checking one s installation for hard to predict situations includes spotchecking for Live audio Coordinate the testing of audio with fire alarm and security alarm testing Using View connect to that Multi Media unit and check audio for feedback and interference before and during alarms Caution Loud alarms ca...

Page 164: ...onitoring checkbox The channel 2 Enable Record and name fields become unavailable They are not needed for monitoring audio by a LocalView operator 2 In the Channel 1 controls add checkmarks to the Enable boxes for Talk Listen or both as needed 3 You have the option of adding checkmarks to Record boxes for Talk Listen or both as needed The Enable box needs to be checked before the Record box can be...

Page 165: ... that can share the streams that are left from a unit s pool of available streams see Table 8 9 For Multi Media LT units the num ber of simultaneous View operators may be less Live or Live alarm 10 Retrieval 10 Event 10 Data 10 Alarm 10 Motion 10 Maintenance 1b b Other sessions are terminated if the Reboot command is used in a Mainte nance Session Table 8 9 Stream Availability from One Unit Sessio...

Page 166: ...oups of cameras are defined in Table 8 10 For example Let 2 operators view live video from 3 cameras in group C 3 cameras 2 operators 6 live streams A third operator can view live video using only 2 of the cameras in group C Let 8 operators each running a live session use the same live camera A ninth operator cannot view live video using a camera from the same group One Operator Connecting to Mult...

Page 167: ... administrator Good reasons for protecting access to Admin are explained in Limiting the Use of Admin on page 180 The Administrator can also run the View application to configure units System Password The system password is not used by users Authorized users do not need to know the system password It protects units from Admin and View users in other organizations See System Password on page 184 Us...

Page 168: ...neywell recommends that you add a password to them If two or less users are using the Multi Media unit s in your organization you may not need to create other user accounts Admin Remote Administrator Account The Administrator account in the Admin application grants a remote operator access to every Rapid Eye unit in your organization Users of this account can also use every function in the Admin a...

Page 169: ...Central User Management Only LocalView can be used to re enable a unit to use Local User Management Creating Accounts For View Whether user management is central or local Admin can always be used to add accounts for connecting to a unit from a PC running View Older Units User management is not available on older Rapid Eye models such as Multi units Local User Management Creating Accounts Using Loc...

Page 170: ... Media units using the View application or LocalView Figure 9 1 Changing User Management Setting a Unit to Central User Management 1 While using Admin to update or create a site s definition click the Change button next to Local User Management is in effect see Figure 9 1 A dialog box appears to confirm setting the site to central user management After clicking Yes the message next to the button c...

Page 171: ...ndicates that there is a discrepancy in the User Management settings The Multi SA has the option of setting User Management to Central or of leaving it on Local Using Admin and View to Create a User Account Whether user management is central or local Admin is used to create accounts for operating units from a PC running the View application 1 Using Admin click the Users tab 2 To display the Add Us...

Page 172: ...t on page 175 Updating Security Onsite Using a Central Account When Central User Management is enabled an operator account created with Admin can also be used onsite in LocalView To enable use of the account onsite use View to update security on that unit See Updating Security on a Multi Media Unit on page 143 Language The Multi SA has the option of customizing the language that an operator of tha...

Page 173: ...ch account user within a group This can be useful for multilingual staff for example two operators can have the same rights yet see the interface in a language that they can deal with more effectively Basing Account Rights on Another User Note This feature is available in Admin but not in LocalView 1 Using Admin click the Users tab 2 Double click the name of an account Note The Administrator accou...

Page 174: ... do so enter a password in the Password box Enter the password again in the Confirm Password box Some characters cannot be used in a password such as a double quote Nothing happens if you try to enter an invalid character 6 You have the option of modifying the account rights See Granting More or Less Rights to an Account on page 175 7 Click Save Account for Accessing One Unit Accounts created usin...

Page 175: ...ts of User Accounts on page 196 Customizing the Rights in an Account 1 While adding or updating an account click a checkbox next to a Right see Figure 9 3 Adding a checkmark adds that right to the account Removing the checkmark removes that right from the account 2 To limit site and camera access see Limiting the Use of Cameras and Other Devices by Partitioning on page 201 3 After modifying rights...

Page 176: ...Video Analytics V4 Rapid Eye DVR Integration Application Note publication number 800 03866 for more information on using Video Analytics with Rapid Eye Note The HVA commands can be used whether a Rapid Eye unit being operated offers HVA or not If not clicking HVA commands only produces a message Availability of LocalView on V9 DVRs Offering Video Analytics LocalView is now fully supported by Rapid...

Page 177: ...t of time for use of a site See Right to Access a Site page 200 LocalView When using LocalView there is no time limit for operating a unit Denying Access Denying access to sites is a security measure that is used against an operator who must be stopped from using Multi Media units as soon as possible The account data is preserved For less severe cases removing an account may be a sufficient measur...

Page 178: ...eleting an Account Used to Access LocalView Onsite Local User Management For accounts created using LocalView 1 Using LocalView click the Configuration tab 2 Select User Management 3 Select the user that you want to delete and click Delete 4 When you are warned that the user is about to be deleted click Yes to continue or No to cancel Central User Management When Admin is used to set a unit to Cen...

Page 179: ...re triggered by an Outside World event See Events Defined on page 205 Hybrid use Multi can be used as a security device to supervise users See Tracing Events on page 210 and Denying Access on page 213 Securing the Multi System What Level of Security is Needed Multi can be used effectively in high and low security situations Use of security features is optional making the system a flexible tool in ...

Page 180: ...is used by only one person At the very least Honeywell recommends that you add a system password see System Password on page 184 Limiting the Use of Admin Like most Multi Media security features limiting the installation and use of Admin to the PCs of Multi System Administrators is optional Table 10 1 Security Priorities Priority Action Page Limit installation of Admin to Multi SA PCs page 180 Lim...

Page 181: ...e installed before the documentation is available for viewing Documents cannot be viewed directly from a software CD However a documentation CD is included if you need to circulate the documentation Password Guidelines Like most Multi Media security features use of passwords is optional Honeywell recommends using and changing the system password and the password of the default Administrator accoun...

Page 182: ...inistrator password Set only by a Multi SA A View operator cannot set a user account password only the Multi SA can Using Text Securely in Multi Password Boxes To prevent onlookers from obtaining a password asterisks appear onscreen as you type in these boxes To prevent use of the Windows Clipboard to obtain passwords Multi software prevents the copying or cutting of passwords from password boxes ...

Page 183: ...er by using sa as a logon account with no password SQL Server Logon Reserved for Multi Operators 1 Run SQL Server Enterprise Manager 2 Add a new log on 3 The public and db_owner database roles need to be assigned to the log on so that a user can connect to the Multi db update it and if Multi SAs are to use Admin to create a Multi db create a new SQL based Multi db TIP Creating a SQL server type of...

Page 184: ...erators do not have to remember the system password to use a Multi Media unit Only the Multi System Administrator needs to keep a record of it in case a unit is added or removed from your Multi system Road Map to Setting the System Password Setting or changing the system password requires three procedures Use Admin to set a system password in the Multi Central database Use View to run a Maintenanc...

Page 185: ... prevents confusion and access problems For example when touring many sites the sites with a system password that differs from the current system password will be skipped over Caution Do not leave an older system password on a Rapid Eye site record or unit in your CCTV system Extra Steps in Some System Password Scenarios After your system is secured with a system password a Multi SA may need to pe...

Page 186: ...File menu or Press the F8 key 2 Enter a password in the System Password field as shown in Figure 10 3 A double quote character cannot be used Figure 10 3 System Password 3 Re enter the password in the Confirm Password field 4 Click Save and Close to set the system password Changing the System Password on Each Multi Media Unit 1 Using View start a Maintenance Session for a site that is designated f...

Page 187: ...tem Passwords and Security Status After changing the System password and synchronizing security at your sites the Admin Sites tab reports a yes in the Secure column of each site s line For other values see Table 10 2 Table 10 2 System Password Status Value Action Meaning and Recommended Action Details No needed The worst report in a high security environment The site is not secure from unauthorize...

Page 188: ...e System Password command in the File menu Press the F8 key 2 Delete the asterisks from the System Password field 3 Delete the asterisks from the Confirm Password field The System Password window should look like Figure 10 4 above 4 Click Save and Close 5 Using View click to start a Maintenance Session for a site 6 Click the Security tab in the Maintenance window 7 Click Update Security on the Sec...

Page 189: ...mmand in the File menu Press the F8 key 3 Delete the asterisks in the System Password and Confirm Password boxes The two boxes in the System Password window should now be empty see Figure 10 4 4 Click Save and Close 5 Using View start a Maintenance Session for site s from which you want to remove the system password Either Right click the site name on the Site tab to select Maintenance from the sh...

Page 190: ...then updating security on only a few units when there are many Multi Media units in your Rapid Eye system Doing so repeatedly to different unit subsets serves no security purpose and can lead to unnecessary confusion should repair or sale of units occur Changing a system password means you need to update the security on every unit in your Multi db Using Another Multi Central Database Using other M...

Page 191: ...er Replacing a Unit when a System Password Is Enabled TIP This unit replacement procedure only applies when you replace a unit at a site that has already been defined and is operational The procedure does not apply to adding a new site to your Multi system To simply add a site to your system see Adding a Site on page 35 1 Check that the Multi Media unit is powered up at the site 2 Using Admin upda...

Page 192: ...definition the last valid password LVP entry for that site remains blank in your Multi central database Multi db When a system password is added this database entry is updated along with the unit There are situations when a discrepancy can occur between the system password held by a unit and the system password entry in the Multi db An LVP utility is available to resolve these discrepancies The LV...

Page 193: ...ox see Figure 10 6 6 Confirm the password 7 Click Save and Close 8 Using View start a Maintenance Session to register the site Failure to Run a Maintenance Session If the site cannot be accessed it is possible that You ve obtained an incorrect system password from the unit s previous owner You ve incorrectly entered the password into the LVP utility A Maintenance Session is being run by another us...

Page 194: ...ser s account double click the name in the User Name column The Update User dialog box appears 3 Enter the password in the Password field A double quote character cannot be used in a password 4 Re enter the password in the Confirm password field 5 Click either Save and Close to update the user s password Close to cancel the update You will be asked to confirm that the changes are to be ignored Cli...

Page 195: ...ing the password to the Administrator account is an essential security precaution The password should be carefully guarded against loss and changed regularly The password protects against The most basic hacking of Admin by unauthorized users Inadvertent use of the clear storage feature by adding an important safeguard For information about this feature see Clearing Storage on page 141 Password Ind...

Page 196: ...strator Account When an organization s security needs are limited and Multi software is used by very few people one or two you may elect to simply change the password of the Administrator account and not create any accounts for other users What to Avoid The locking out of authorized legitimate users from the Multi Media units on your Rapid Eye system is a worst case scenario that requires many ste...

Page 197: ...cess to some of the sites See Defining the Sites that Can Be Accessed on page 200 Rights of Users Based on Others You have the option to base user accounts on any other The rights of all such users can then be modified together A user account can also be based on the Administrator account This grants all rights to that user including use of the Admin application Removing Rights When a right is rem...

Page 198: ... the Administrator account can remove an important safeguard to prevent inadvertently clearing storage See Clearing Storage on page 141 Right to Use Maintenance Each of these rights are sensitive for system security Each right only gives access to portions of a Maintenance Session see Table 10 3 You can start a Maintenance Session in View with any one of these three rights The tabs that appear in ...

Page 199: ...tion Time Unit Time Zone and Clock page 64 System configuration System Tab in a Maintenance Session page 147 Video includes picture motion PTZ and AGC Cameras page 75 Serial devices Customer Data and Customer Device Events page 157 Eagle Audio Eagle Audio page 164 Hardware Hardware Report page 155 Audio Multi Audio page 162 Public display monitor Using Monitor Output 1 as a Public Display Monitor ...

Page 200: ...right requires the user to have the right to View Live Video Process alarms The right to respond to alarms using an alarm session to acknowledge and to reset alarms Time limit The right to make use of sites but for a limited amount of time TIP Why limit the use of View This depends on your organization s security protocols Perhaps some operators should only be allowed to monitor live video and not...

Page 201: ...e Figure 10 8 above You can also set the default time limit for new users on the Options dialog box of the Admin application see Figure 11 9 Select View Options in the Admin application to open the Options dialog box Select the Default time limit of a new User in minutes checkbox and then adjust the minutes as needed with the up and down arrows Limiting the Use of Cameras and Other Devices by Part...

Page 202: ...e tree of sites below the User can access selected sites option select a site by clicking the checkbox next to the name of the site The checkmark that appears means that access to the site is granted to the user of the account 5 Expand the site as in Figure 10 9 In the branch of cameras and devices below the name of a site select one or many devices A checkmark means that access to the device is g...

Page 203: ...would be available to review if there was an incident Such an abuse can be traced as explained in Tracing Events on page 210 See also Cameras on page 75 Table 10 4 Security Situations Situation Preventative and or Last Resort Measures Vandalism Schedule onsite equipment inspections Use access control to control Multi Media unit access Vandalism or operator error Schedule regular connections to eac...

Page 204: ...pplement tracing of events as explained in Tracing Events on page 210 Boosted recording can override a unit to record a video feed from a camera with recording turned OFF see Figure 10 10 Clearing Storage to Destroy Recorded Video and Deny Service Clearing a unit s storage or one of its streams destroys all recorded video and during the time that a unit is emptied up to a few hours see Clearing St...

Page 205: ...ow a malevolent user to change passwords for the Administrator s account and to the system then update security on units and locking everyone out Circulating passwords only to the users that need them and utilizing access control are your best assets to combat this type of security breach Countermeasures If ever such a breach occurs contact Multi technical support for help as explained in For Ques...

Page 206: ...s connecting to a site and so on Notification of such events is usually of more concern than video of that event See Tracing Events on page 210 Setting an Event to Trigger an Alarm or To Be Logged When events occur the Multi Media unit can respond in the following ways The Event is Logged The Multi Media unit logs the time of the event These events are not listed in an alarm session Sound an alarm...

Page 207: ...r a Customer device event click Update on the Serial Devices tab after selecting an Alarm or Log checkbox 4 You also have the option of having the event entered into the log To do so select the Log checkbox so that it shows a checkmark Who Can Set Alarms To set events as alarms and or to be logged two items must be included in of the user s account rights The Modify configuration right and Access ...

Page 208: ...ed Possible Causes an Alarm or Log Entry Could Indicate Outside World event System no video recordinga A cut cable dead camera or power outage Inputs activate input ports 1 to 16 Security sensor has been triggered or the unit is booting Inputs deactivate input ports 1 to 16 Security sensor has been reset or the unit is booting Video signal unlock cameras 1 to 16 Cut cable hardware failure in a Mul...

Page 209: ...e configuration settings can be changed onsite using LocalView These changes are not logged nor do they trigger an alarm when the configuration event is set to do so Table 10 5 Event Reference by Source and Tab cont d Source Event in Maintenance Except Where Noted Possible Causes an Alarm or Log Entry Could Indicate Table 10 6 Event Default Settings for Log and Alarm Source Event Log Alarm View Op...

Page 210: ... can record or report these or other events To authorize other users to do so the Multi SA can add the Modify configuration right to their user account With this right the operator can Start a Maintenance Session at a site Set events to be logged to trigger alarms or to be ignored as needed Arm disarm alarms Event Log A Multi Media Unit event is always logged to help troubleshoot your system Use a...

Page 211: ...e From and To fields are properly set to perform a valid search Figure 10 13 Search for Events Window Working with Search Results You can use the search results to View video from the time of the events located by the search Select a log entry and click Video Print the log entry of an event Select one or more evnets and click Print Select a printer if needed and click OK Select font information if...

Page 212: ... Alarm Notification After making an alarm station operational see Making an Alarm Station Operational on page 233 notification of an event s occurrence can be Immediate When Multi Media units are networked to an alarm station or you are running an alarm session at the site when and where the alarm occurs or your PC is set up for Live alarm sessions and you happen to be connected to the site where ...

Page 213: ... to the View application over telephone lines use Admin to enter the PPP username and password for a PC in the definition of an alarm station See Dial Up Connection to an Alarm Station on page 224 A unit connecting by dial up to a RAS server that is in front of a Multi Media alarm station Using an alarm callback that includes a RAS server is illustrated in RAS Connection to an Alarm Station on pag...

Page 214: ... on a station a Multi SA s efforts to rectify the situation are hampered When creating accounts you can plan to limit the amount of time that sites can be used by a user account See Right to Access a Site on page 200 for more information Outside Hackers To prevent someone who has a copy of Multi software outside of your organization from accessing your sites change your system password see System ...

Page 215: ...s for an Unwanted User Caution Honeywell does not recommend the following strategies for dealing with unwanted users They are explained so that they do not produce a false sense of security or are mistakenly used For a correct strategy see Denying Access to a User of Your Multi System on page 214 Changing the user s password For this to work the unwanted user would have to first refresh the Local ...

Page 216: ...ft Windows procedure is used 1 On the Windows desktop click Start 2 Click Control Panel 3 Double click Add Remove Programs 4 On the Change or Remove Programs tab use the scroll bar to locate the Rapid Eye Multi program Select either Rapid Eye Multi Media Admin and View version number or Rapid Eye Multi Media View version number 5 Click Change Remove Follow the InstallShield utility instructions to...

Page 217: ...by your Multi Media System Administrator Multi SA to send its alarms to a designated PC alarm station Note You should have user accounts and at least one site configured before setting up an alarm station You will need users to use the alarm station and a site to send the alarms Checklist to Configure a Multi Media Alarm Station 1 Adding an Alarm Station Name and Reports on page 218 2 Identifying ...

Page 218: ...ver s telephone number and IP address of the networked PC used as an alarm station Caution Let your network administrator know that alarms are sent to port 10 003 This port should be left open in your organization s firewall for the sockets used by Multi alarms For other ports that may be needed see the Rapid Eye Multi Media Digital Video Recorder Installation Guide Adding an Alarm Station Name an...

Page 219: ...ave one definition for local sites and another for sites in other cities Use Descriptive Names To further avoid complexity use descriptive names such as location name units or city name units Chicago sites or Illinois sites Identifying and Defining a Connection Caution Honeywell recommends that Multi SAs check if their organization allows the type of connection they plan to use For example your or...

Page 220: ...with alarm station networked to it page 231 Network address translation n a page 222 Table 11 2 Connection Information for a Rapid Eye Site to an Alarm Station To Set Up Alarm Station Using A Multi SA Needs Identical dial up calls to on alarm station s modem from Multi Media units reporting to it The alarm station s Telephone number PPP user name and password Various local long distance or interna...

Page 221: ...ing network routers to allow the unit names or passwords through for further processing Network Connection to an Alarm Station TIP Your Rapid Eye site might not need this type of connection to an alarm station For some installations a dial up connection would meet your requirements For other means of connecting to an alarm station see Table 11 2 on page 220 Figure 11 2 Alarms Sent to an Alarm Stat...

Page 222: ... one to many address translation This is useful to connect to alarm stations through A WAN The Internet Another segment of the same LAN Figure 11 3 Receiving Alarms from a Unit Over a WAN or the Internet IP Addresses The key is to configure a router to translate and map the Callback s source IP port The Network Administrator of the destination s LAN can supply a Multi SA with the outside IP addres...

Page 223: ... to the IP Address field see Figure 11 4 Figure 11 4 Connecting Through a WAN to an Alarm Station on a LAN 2 Enable the Use Network Address Translation option 3 Assign a value to the Callbacks Source Port In Figure 11 4 for example the value of Callbacks has been changed from 10 003 the default to 56 080 The source port value must be below 65 532 4 Select the Multi Media sites that report alarms t...

Page 224: ...elephone system POTS or higher speed integrated services digital network ISDN You also need to know the telephone number to reach that modem Table 11 3 Router Mappings Example for Unit Callback to Alarm Stations Admin setting to destination Network device mappings NAT Port to network router Router s Outside IP network constant Physical Port unit firewall Inside IP alarm station Alarm station C Cal...

Page 225: ...pty for a dial up connection to an alarm station except if a remote access service RAS server apart from the alarm station is part of the connection For RAS servers see RAS Connection to an Alarm Station on page 231 2 Select the Use Dial up Networking option 3 Leave the Country Code as dialing same country unless the Multi Media unit is in a different country than the alarm station Caution Honeywe...

Page 226: ...Station Operational on page 233 Entering Area Codes in Site and Alarm Station Definitions When the country and area codes of an alarm station match those of the sites reporting to it calls to the alarm station are considered local If they do not match a long distance code 1 by default plus an area code is used to make the call This is illustrated in Figure 11 7 TIP Long distance or local Honeywell...

Page 227: ...59 Irregular Area Code Use Why customize When a unit is not in the same area code as its alarm station Sometimes a local call can be used when the alarm station is close by You can customize an alarm station s Long distance codes for irregular and toll free uses Dialing speed by using a delay code and or Telephone exchange at the Rapid Eye site or at the alarm station A copy of the telephone numbe...

Page 228: ...Customization is needed when your telephone company does not require a long distance call for calling another area code Remove the long distance code for a remote Multi Media unit site by site as needed in the Update Station to Call in Case of Alarms dialog box obtained by updating the alarm station on the Update Site dialog box See Figure 11 8 on page 228 and Customizing a Dial Up Connection to a...

Page 229: ...e second pause indicated by the three commas before the rest of the number is dialed Telephone Exchange A telephone exchange might be a component in the connection chain between a Rapid Eye site and an alarm station Find out if your system has an exchange at the Rapid Eye site at the alarm station or at both ends Telephone Exchange at an Alarm Station In the alarm station definition add an extensi...

Page 230: ...n alarm station see Table 11 2 on page 220 Planning for a Few International Units If only a few units reporting to an alarm station are outside of the alarm station s country it is more effective to add the prefixes site by site as needed Add the prefixes to the Update Station to Call in Case of Alarms box opened by updating the alarm station on the Update Site dialog box See Customizing a Dial Up...

Page 231: ...d another alarm station from sites in country b as needed You can then add whichever alarm station is most appropriate for a site on a site by site basis To create alarm station definitions see Adding an Alarm Station Name and Reports on page 218 When most units are outside the operator s country it is best to change the country code in the alarm station definition see Setting Up a Dial Up Connect...

Page 232: ... connection to an alarm station For other means of connecting to an alarm station see Table 11 2 on page 220 Setting Up a Connection to a RAS Server 1 While adding or updating an alarm station definition as explained in Adding an Alarm Station Name and Reports page 218 you will see the Add Update Alarm Station dialog box Enter the alarm station s IP Address in its field ee Figure 11 11 2 Select th...

Page 233: ...e use of long distance codes and so on use the same procedures and suggestions as indicated in Customizing a Dial Up Connection to an Alarm Station page 227 and International Dial Up on page 230 Processing a Dial up Callback When a Rapid Eye Multi Media unit uses telephone lines to communicate with a Multi alarm station the unit needs to use the alarm station s PPP user name and password for dial ...

Page 234: ... to shuttle alarms to the same PC for example one for local sites and another for remote sites To avoid complexity use descriptive names such as local sensors and remote sensors To create alarm station definitions see Adding an Alarm Station Name and Reports on page 218 Disconnecting When Alarms Are in Progress Closing View or disconnecting a session after a successful alarm callback voids that ca...

Page 235: ...ported in the alarm session reboot the unit b Update Security for the unit make sure no new alarms are generated to avoid alarm generation disable all of the events reporting alarms rearm any pending Alarms reported through an alarm session if necessary pause for 10 to 15 seconds then try enabling all the events which generates alarms Note The above steps a and b are to avoid any racing conditions...

Page 236: ... that When the Rapid Eye software is installed and started for the first time it does not have any information about the alarms that are not rearmed Therefore automatically rearming alarms will not be supported on the initial startup After the application has been running and alarm callbacks are received it maintains information about the status of the alarms Rearmed Not Rearmed If the application...

Page 237: ...PC Alarms from a De Listed or Unregistered Unit Situations View operators are warned with a message when a call about an alarm is from a Multi Media unit that has been Removed from a Multi Media database Multi db Your Multi Media system administrator Multi SA can remove a Multi Media unit from a Multi db However the de listed unit that you have removed may still be operating at a customer site set...

Page 238: ... list of alarm stations Stations already assigned to the site are listed the Report Alarms to column 4 To move alarm stations back to the available Alarm Stations column either Select one or more station names in the Report Alarms to column then click the left arrow or Double click the stations that you want to move 5 Click Save and Close The Update Site dialog box reappears listing the alarm stat...

Page 239: ... archived data and viewing and searching through archival logs and past archive details Configuring an Archival Policy Configure an Archival policy to archive data from a unit 1 Right click in the Archival tab of the Admin application Figure 12 1 Archival Tab of the Admin Application 2 Click Add on the menu that appears Note You can also use the toolbar buttons to configure the archival policies C...

Page 240: ...hare path with write permission If the folder or share path is not available during archiving the policy will backup data in the working directory the location where the application is installed by default 5 Select an archival server location in the Browse for Folder dialog box Figure 12 3 and click OK Figure 12 3 Browse for Archival Server Location You can also create a new folder ...

Page 241: ...ated with this Policy 8 Click the checkbox next to the sites or folders that you want associated with the archival policy see Figure 12 5 Depending on what boxes are checked you can associate all the sites some of the sites one site or just a couple cameras at a site with the archival policy Click Save and Close after your selections are made Daily Scheduled Archival Policy Note When a scheduled d...

Page 242: ...rrows to change the From and To archival Times If you are using an Immediate Archival Policy you can also change the From and To archival dates Click Save and Close Figure 12 7 Updating a Site Cameras 1 to 16 will be listed here for each unit The number of cameras displayed is not dependent on the number of cameras connected to the unit Archiving will only occur for connected cameras Point of sale...

Page 243: ...k connection Sites that use a dial up connection are not currently supported Figure 12 8 Filled In Archival Policy Window 11 Click Save and Close to save the archival policy Note It is recommended that you double check the cameras to be backed up for a site After configuring the policy you should open individual sites and check the camera associations again Add Archival Policy Window after it has ...

Page 244: ... will overwrite the data from the same time period To run an archival policy 1 Launch the View application and select the Archival tab The archival policies and servers that have already been configured are listed here Note Only Immediate policies are listed on the View application Scheduled policies will run automatically when scheduled and do not need to be run manually 2 If you have recently ad...

Page 245: ...a system password set or if the archival server is not accessible Figure 12 11 Archiving Progress Bar 5 Click Close when the archiving is 100 completed Note Only one archival policy can run at a time immediate or scheduled If a policy is running when a scheduled policy is set up to run the scheduled policy will be queued to run when the first archival policy is finished Note If you click Cancel th...

Page 246: ...ata files copy them or move them to a backup server Note If the Server Location folder or share path is not available during archiving the archival policy will backup data in the working directory the location where the application is installed by default Note If you are trying to archive more than 30 minutes video the data will be stored in data files of 30 minutes each If you are archiving two h...

Page 247: ... Share Name field see Figure 12 13 4 Click the browse button to select a Server Location Figure 12 13 Add Archival Server Window Note The Server Location can be a local folder or a network share path Data will backup to the working directory location where the application is installed by default if the server location is not accessible If data has been backed up to the working directory you can ch...

Page 248: ...s found on the archival server will be listed after clicking Discover Sites see Figure 12 14 as an example Figure 12 14 Discovering Sites on an Archival Server Playing Back Archived Video and Data Before you can play back archived data you must first set up an archival server and discover the sites on the archival server see Setting Up an Archival Server page 247 and Discovering Sites on the Archi...

Page 249: ...o from the selected streams will play back in the View application Use the playback controls to find the video you are looking for See the Rapid Eye Multi Media Digital Video Recorder Remote View Operator Guide for more information on playback options and controls Figure 12 17 Figure 12 17 Archival Playback Options and Controls Note Playback of archived data is NOT continuous Because the archived ...

Page 250: ...ation 3 You have the option of setting the archival logs to be automatically deleted by selecting the Delete archival logs older than in days option If necessary use the arrows to change number of days before the archival logs will be deleted default 30 days 4 Click Save and Close 5 Now run a couple of archival policies so that you generate some archival logs Viewing Archival Logs with the Admin A...

Page 251: ...gure 12 20 The filtering details can be seen on the bottom bar of the Archival Log Report window To filter the archival log Figure 12 20 Archival Log Filtering Options 5 Click Close when you are finished viewing the Archival Log Report Log filtering details a Click Filter b Select one of the Time Filter options Narrow the filter time as much as possible to avoid a large number of archival logs c T...

Page 252: ... Log tab 2 Select the Archival Log option and click Refresh 3 Select the appropriate dates and times in the Show Archival Logs from and to fields 4 Click Display Archival Log The archival log displays see Figure 12 21 Figure 12 21 Archival Logs in the View Application 5 Close the View application when you have finished your session Select times to show archival logs from ...

Page 253: ...information Public display monitors which displays multiple cameras at one site by connecting a monitor to one Multi Media unit See Using Monitor Output 1 as a Public Display Monitor on page 155 Preliminary Checklist Before Defining a Site Tour Your Multi System Administrator Multi SA needs at least two sites to define a tour See Adding a Site on page 35 for more information For systems using one ...

Page 254: ...ve and Close The Add Update Tour dialog box reappears listing the names of the sites you ve added See Customizing a Tour on page 255 for more information on changing your tour options Figure 13 1 Adding a Tour Name Note The meaning of the word tour can be different for some cameras that pan tilt and zoom PTZ PTZ cameras can be programmed to move independently when not in use by an operator For mor...

Page 255: ...onnection to be used to reach the site By default the first connection in the site s definition is used see Selecting Another Connection to a Site During a Tour on page 256 Changing the Order of Sites in a Tour 1 Using Admin select the Tours tab 2 To display the Update Tour dialog box do one of the following Double click the name of the tour that you want to customize or Select the tour that you w...

Page 256: ...you can adjust the minutes or seconds to change the time spent at the site as needed see Figure 13 3 5 Click Save and Close TIP Should you plan to view a site for long periods say thirty minutes or more consider using a Live Session instead of changing the durations of time spent at each site Selecting Another Connection to a Site During a Tour 1 Using Admin click the Tours tab 2 To display the Up...

Page 257: ...Changing the Time Spent at a Site During a Tour on page 256 7 Close the Add Update Tour dialog box Removing a Tour 1 Using Admin click the Tours tab 2 Select the tour that you want to delete 3 Do one of the following Click on the toolbar Click Delete on the Actions menu or Press the Delete key on the keyboard 4 You are warned that the tour is about to be deleted Click Yes to continue or No to canc...

Page 258: ...258 Touring Many Sites ...

Page 259: ...takes approximately 530 bytes There can be many entries as many as your database engine allows See your organization s database administrator for rules on managing the size of the database Viewing the Alarm Log Figure 14 1 Viewing the Alarm Log The alarms produced in the last 24 hours are listed when the log is opened The log can appear to be empty if there have been no alarms on this day Earlier ...

Page 260: ...ers most is that a sequence of year month day be used in the format and that months be expressed in numbers not text The double m and d ensure that single digits are padded with zeroes For example June 7 2009 should be expressed as 2009 06 07 Selecting Log Items Use Windows mouse and keyboard techniques to select deselect log items For example To select more than one user or site press the Ctrl or...

Page 261: ...elect These Users in the User Filter pane to filter the logs by user Select one or more users in the Received by list Press the Ctrl or Shift keys to select multiple users 3 Select These Sites in the Site Filter pane to filter the logs by site Select one or more sites in the Alarm from list Press the Ctrl or Shift keys to select multiple sites 4 Click OK The Alarm Log Report will automatically fil...

Page 262: ...1 Logged Data Column Value Section Reference User Name Name of user logged on to alarm station or using alarm session Using Admin and View to Create a User Account page 171 Site Name Name as specified in the site definition Adding a Site page 35 Action New Ack Rearm Right to Use View page 200 Action Time Date and universal coordinated time UTC at which the action was taken n a Alarm Time Date and ...

Page 263: ...rom the information on the Multi db Database Creation Creating a database is a rare event that may be needed as little as once or twice during the life of your Multi Media system Honeywell supports two Microsoft database engines Access and SQL Server MinAdmin Your Multi SA has the option of supplying a Multi db that offers a limited Administrator account to run MinAdmin software TM READY ALARM HDD...

Page 264: ...out of the box This is a simple way to get started Switching to another Multi db If you are given a Multi db prepared during the installation or at some other time see Converting to Another Database on page 265 Creating an empty Multi db see Creating a Multi Database on page 267 Copying a Multi db You can base a new MS Access Multi db on an MS SQL or MSDE and vice versa see Database Based On Anoth...

Page 265: ...tabase server on your network To create a db you may need to know the database password If use of this password is restricted let the database administrator either create the new Multi database from your machine or run Admin on the Multi SA s PC to create the database from there Consulting Management Information System Personnel The Multi SA may need a database administrator to advise on or decide...

Page 266: ...fying the Multi Database Caution Take care when entering the name of a database in the Admin logon window Entering the name of a non existent database starts the Admin database tool See Creating a Multi Database on page 267 Note Once you have set Admin to use a Multi central database Multi db the same Multi db is used every time that you log on Converting a Multi Database from SQL to Access A SQL ...

Page 267: ...ce Acknowledge the error message and enter the name again Creating a Multi Database TIP Creating a Multi db is a rare occurrence Only one Multi db is needed for all of the Rapid Eye sites in your system Honeywell recommends using the default REMCentral mdb if you plan to use only one Multi database The installers of your system may have already created a Multi db to test the installation Using the...

Page 268: ...tes in your system Naming Restrictions Multi Database Naming Restrictions There are restrictions when choosing a name for your Multi database Do not use A user name Names that you will need for a user of the Multi db A Multi db with the same name as a user account causes an error when View is started Administrator It is the name of the default user in any Multi db User Naming Restrictions When add...

Page 269: ...ault user in any Multi db as a database name A Multi db with the same name as a user account causes an error when View is started SQL Server Template Asking your SQL Database Administrator for Help An Admin user may find it useful to ask a SQL server database administrator for help when creating a SQL server compatible Multi db The SQL server may have been configured using customized folder names ...

Page 270: ...e administrator provides you with A SQL account and password The SQL Administrator logon is sa by default but it and its password may have been changed The SQL server name The Share name of the folder that will hold the Multi db 2 Make sure a SQL Server client is installed on the PC used to connect to a SQL Server 3 Launch Admin The Admin Logon window appears 4 In the Admin Logon window enter Admi...

Page 271: ... listed on the Users tab Database Based On Another To copy a Multi db use the Admin Logon window as a database tool The procedure is similar to creating an empty Multi db The Create Database window is used to select a model Multi db see step 3 in Figure 15 4 You need an account and password for the model database to log on to the copy of the Multi db SQL Server When making a copy of a SQL database...

Page 272: ...ally identified and listed at log on 6 Click OK The Create Database window appears See Figure 15 4 above 7 Select either Create from existing MS Access database Browse for or enter the location and name of an mdb file or Create from existing SQL database Select a server and enter a database name of an mdb file 8 Click OK The new database is created based on the data in the model db The Admin windo...

Page 273: ...e 15 5 Options for Generating a MinAdmin Multi Database Template You can produce DAT files for MinAdmin users Use of the DAT file and the template is discussed in the MinAdmin User Guide Upgrading a Multi Database Upgrades from v4 to v5 are Automatic You don t have to know what version of Multi software you are upgrading only that a message appears for upgrades from earlier versions of v2 or v3 so...

Page 274: ...gs on for the first time to the upgraded View a dialog box appears stating that the local database needs an upgrade 4 Click Yes The user mdb file is upgraded after being backed up to user bak TIP On PCs used by many accounts there is a user mdb file for each account Producing a Local Database Your Multi SA can deliberately make it impossible for operators to connect to a Multi db when using MinAdm...

Page 275: ...base Admin and View will continue to use it each time that you log on Logging on to Admin is a simple matter of starting Admin and clicking OK as explained in Starting Admin on page 264 TIP To log on to Admin use either a The Administrator account or b An account in which user rights and site access are based on the Administrator The First Use Exception On first use you are offered an empty defaul...

Page 276: ...dmin or View View s Logon window automatically displays the database selected to run Admin 3 Leave a checkmark in the checkbox next to The Central database is accessible from this PC You should uncheck this box after one successful logon only if a PC is stand alone or mobile Leave or enter your user account name in the User ID field 4 Enter your password in the Password field 5 Click OK For Routin...

Page 277: ...s PC option If so proceed with the logon If not check with your Multi SA if the PC used to run View can connect to the PC or server holding the Multi Central database If the answer is affirmative select the checkbox next to The Central database is accessible from this PC 2 While View is running operators can either Click on the View toolbar or Click the Refresh command on the View menu Note See yo...

Page 278: ...en the database The Multi central database Multi db has been deleted Unavailability of a network connection to the Multi db TIP Check the network s status When using Admin this error has the side effect of creating a new central database that has the same name as the regular database ...

Page 279: ...duce distribute transcribe translate or reduce to electronic medium or machine readable form or language derive source code without the express written consent of the Supplier and Licensors disseminate or otherwise disclose the software to third parties except that Customer may make up to two 2 archival copies for use as backup provided all copyright notices are reproduced and included on such cop...

Page 280: ...280 End User License Agreement ...

Page 281: ... in secure environment 181 used to create database 267 administrator account after password is set 196 changing password 195 Honeywell recommends 168 many users 168 options 172 overview 167 password 168 196 267 password and Multi SA 182 password as storage clearing safeguard 143 password optional but recommended 182 remote 168 security precaution 195 setting password 195 to create Multi database 2...

Page 282: ...camera day unit 140 categories of events 205 central user management see user management character in regular expression 160 password length 182 clearing storage administrator account password 143 button 141 safeguard 143 195 security risk 143 198 tracing 143 client IP 153 154 clock clearing storage 69 correct time setting 64 manual setting 67 Mult Media unit 64 on a PC 67 refresh button SNTP serv...

Page 283: ...nce call 50 multiple lines 51 number needed 51 specifying 49 direct sunlight see security risk and tamper detection documentation limiting distribution 181 door access sensor see customer device double quote in password 182 download file from Multi Media unit 145 duty cycle event recording 82 E Eagle audio 164 employee timesheet motion detection 127 environment interfering with video 93 estimated ...

Page 284: ...lephone numbers include area codes 51 tips to prevent jeopardizing performance 202 using passwords 182 host IP 153 154 human resources officer 179 I identification see security presence or identification image quality compression Rapid Eye unit 137 images per second IPS 80 individual identifying see security presence or identification input trigger for event recording 124 installing admin software...

Page 285: ... 203 maintenance tab monitor out 156 serial devices 152 statistics 139 system configuration 147 system files 144 manufacturer password 185 masking green mask 128 higher area 128 part of video 128 red mask 128 video area of 128 Microsoft Access see Multi database Microsoft Access Microsoft SQL Server see Multi database Microsoft SQL Server Microsoft Windows clipboard 182 dual view 92 screen area 91...

Page 286: ...m password in use 191 192 alarm station see also alarm station changing communication settings 150 clock setting 64 downloading file 145 identification 147 moving 141 142 150 remove system password from all 188 removing system password 189 serial number 63 147 serial port 158 system log 144 145 148 uploading file to 146 version number 147 Multi Media unit operator account and PPP 213 account optio...

Page 287: ...and username 53 rogue 144 213 security 177 sound at PC 162 spotting video 128 time zone conflict 66 unauthorized 144 213 uploading file to unit 146 Orbiter dome 98 outside world event see event outside world P PAL incompatible with NTSC 198 Multi Media DSP 90 Multi Media LT 90 setting 149 video archive shorter than NTSC 138 pan see PTZ panning PTZ and video archive 104 parameters system password 1...

Page 288: ...closes 97 zonal mode 99 100 PTZ driver 73 public display monitor hardware control of 156 localview 157 monitor output 1 157 Q Quick Setup Wizard 42 Quick Start Guide 42 R Rapid Eye Active Alert 43 technical support 34 Rapid Eye Active Alert unit 24 Rapid Eye unit user see Multi Media unit operator RapidDome baud rate 98 feature support 105 mimic tour 106 mimic tour testing 106 preset tour 107 pres...

Page 289: ...urity needs 179 recommended actions 181 unit system log 144 security risk 93 breach of trust 203 burglary 127 camera brightness 204 camera recording set to OFF 203 204 camera spot check live 93 camera spot check recorded video 93 checklist 203 clear storage button 143 198 204 countermeasure 204 crane 127 darkness 93 dew and frost 93 direct sunlight 93 203 environmental interference video 93 explos...

Page 290: ...50 NTSC PAL 149 pulse 148 system administrator see Multi SA system configuration maintenance tab 147 system files maintenance tab 144 system monitoring see fault relay system password 187 after mistakenly deleting a site 194 copying to Multi Media unit 187 effect 187 limiting user access 167 LVP last valid password 192 203 many units in a system 190 Multi SA s responsibility 181 Multi technical su...

Page 291: ... user accounts 167 user management Admin software 169 central 170 central and localview 171 local 169 older units 169 user password after assigning to user 194 after setting 194 changing 194 optional 182 overview 182 setting 194 user Rapid Eye unit see Multi Media unit operator V vandalism see security risk and tamper detection vermin motion detection 127 version number 147 video color 77 screen a...

Page 292: ...292 ...

Page 293: ......

Page 294: ... 31 299 410 200 Honeywell Systems Group Deutschland Johannes Mauthe Straße 14 D 72458 Albstadt Germany www honeywell com security de 49 74 31 8 01 0 Honeywell Systems Group France Immeuble Lavoisier Parc de Haute Technologie 3 7 rue George Besse 92160 Antony France www honeywell com security fr 33 0 1 40 96 20 50 Honeywell Systems Group Italia SpA Via della Resistenza 53 59 20090 Buccinasco Milan ...

Reviews: