Honeywell PX4i User Manual Download Page 77

PX4i and PX6i High Performance Printer User Guide

65

To access your printer’s home page

1. Start your web browser application.

2. In the address field, enter the IP address of your printer.

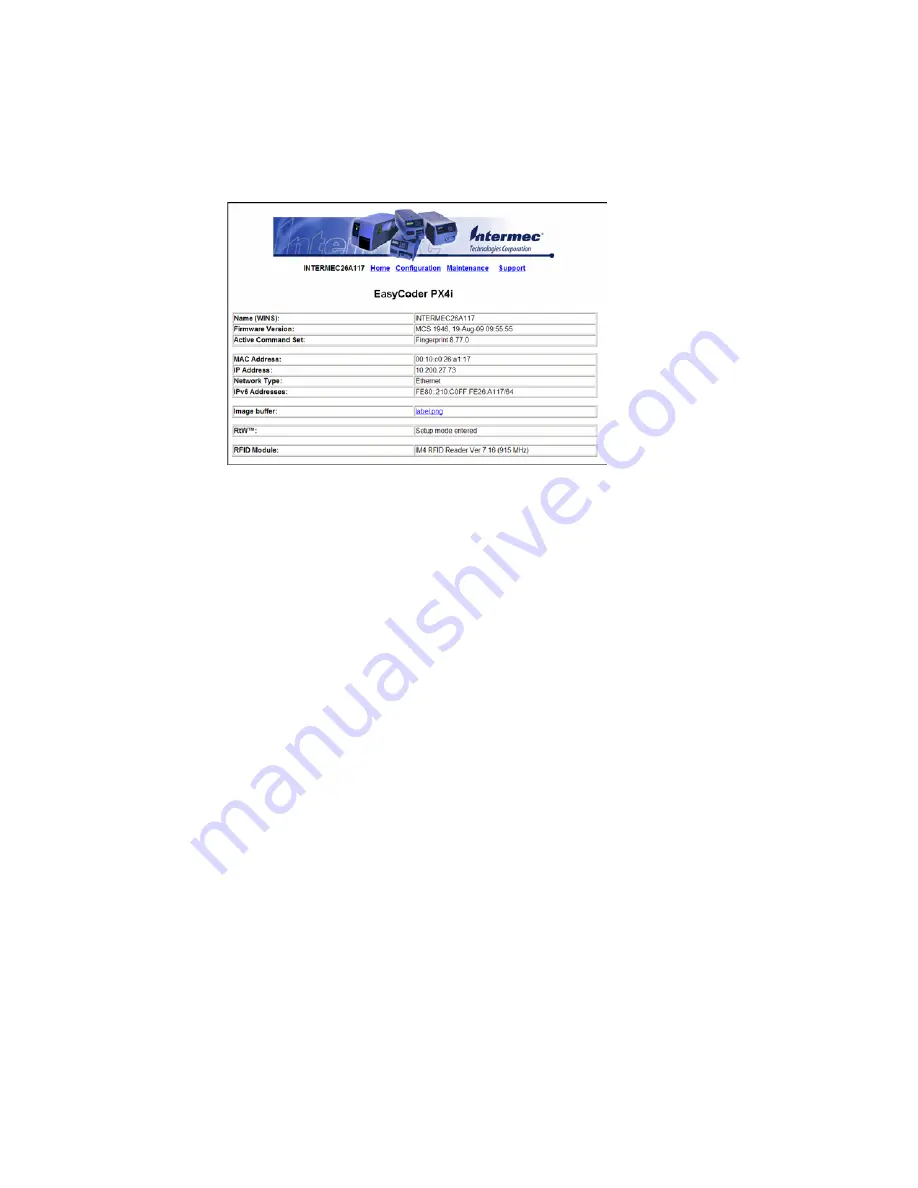
3. Press Enter. Your printer’s home page appears.

4. The home page displays the assigned name, firmware version, Active 

Command Set, MAC address, and IP address of your printer. The home page 
also displays the contents of the image buffer, as well as the status of the 
Ready-to-Work indicator.

5. Click Configuration.

6. Click the link for the settings you want to configure.

7. When you are prompted, enter your login and password. The default values are: 

login = 

admin

, password = 

pass

.

Use the next sections to understand and configure the settings on each configura-
tion page.

Configuring Communications Settings

Use the communications page to configure serial communications, the communi-
cations interface, and the keyboard layout.

Summary of Contents for PX4i

Page 1: ...User Guide PX4i PX6i High Performance Printer ...

Page 2: ...ishing performance or use of this material HII disclaims all responsibility for the selec tion and use of software and or hardware to achieve intended results This document contains proprietary information that is protected by copyright All rights are reserved No part of this doc ument may be photocopied reproduced or translated into another language without the prior written consent of HII Copyri...

Page 3: ...Printer Start Up Screen 2 Understanding the Control Panel 3 Understanding the Buttons 4 Understanding the LEDs 4 Understanding the Screen 5 Understanding the Printer Sounds 5 Loading Media 5 Loading Media for Tear Off Printing 6 Loading Media for Peel Off Printing 12 Loading Media for Cut Off Printing 20 Loading Media for Internal Batch Takeup Printing 28 Loading Media for Printing From an Externa...

Page 4: ... to the USB Host Port 61 Connecting a USB Hub to the USB Host Port 62 Chapter 3 Configuring the Printer 63 Configuring Your Printer From the Screen 63 Configuring Your Printer From the Printer Home Page 64 Configuring Communications Settings 65 Configuring Media Settings 66 Configuring RFID Settings Printer With RFID Option 66 Configuring Print Engine Settings 67 Configuring Web Shell Settings 68 ...

Page 5: ...nloading Fonts and Graphics 85 Chapter 4 Troubleshooting 87 Troubleshooting the Printer 87 Understanding Error Messages 87 Fingerprint Error Messages 88 IPL Error Messages 89 Troubleshooting Printer Problems and Finding Solutions 91 Print Quality Problems and Possible Solutions 91 Networking Problems and Possible Solutions 93 RFID Problems and Possible Solutions 93 Resetting the Printer 94 To rese...

Page 6: ...ith Gaps Gap Stock 120 Tickets With Black Mark Mark Stock 122 Media With RFID Tags or Inlays 124 Accessories for the Printer 124 Appendix B Default Settings 127 Default Configuration 127 Fingerprint Default Configuration 127 IPL Default Configuration 130 Appendix C Setup Menus 133 Fingerprint Setup Menus 133 IPL Setup Menus 136 Appendix D Advanced Configuration 139 Printer File System Fingerprint ...

Page 7: ...PX4i and PX6i High Performance Printer User Guide v Creating a Web Style Guide File 144 ...

Page 8: ...vi PX4i and PX6i High Performance Printer User Guide ...

Page 9: ...PX4i and PX6i High Performance Printer User Guide vii ...

Page 10: ...viii PX4i and PX6i High Performance Printer User Guide ...

Page 11: ...d your service center go to www honeywellaidc com and select Support Contact your service enter to obtain a Return Material Authorization number RMA before you return the product To obtain warranty or non warranty service return your product to Honeywell postage paid with a copy of the dated purchase record Limited Warranty For warranty information go to www honeywellaidc com and click Get Resourc...

Page 12: ...x PX4i and PX6i High Performance Printer User Guide ...

Page 13: ... in harsh industrial environments and easily adapt to changes in host environments or applications The PX4i and PX6i support a maximum print width of four or six inches respec tively Throughout this manual both models of the printer are referred to as printer unless otherwise noted Identifying the Parts of the Printer Use this section to familiarize yourself with the parts of the printers Front Vi...

Page 14: ...ision for IEEE parallel interface board USB interface Intake slot for external media supply Intake slot for external media supply Wireless antenna connector option USB host port Ethernet interface Printer Language Description Fingerprint Fingerprint is a BASIC inspired programming language you use to design label formats and write custom printer application software Printer Language IPL IPL is an ...

Page 15: ... provides buttons LEDs and a liquid crystal display LCD for you to interact with the printer Use this illustration to familiarize yourself with the buttons and lights on the printer Language How to Access the Command Language Menu IPL Go to SETUP TEST SERVICE CMD LANGUAGE Fingerprint or Direct Protocol Go to SETUP PRINT DEFS CMD LANGUAGE ZSim or DSim Step 1 Press Step 2 Enter the Fingerprint passw...

Page 16: ... Feeds a blank label or other media type Feed Shift Performs a Testfeed feeds a blank label and adjusts the media feed i Displays error messages Ready to Work status and communication channel information or After you press use these buttons to scroll through error and information messages Pause Pause Shift Setup Feed Feed Shift LED State Description Power Solid green Power is on Status Solid green...

Page 17: ...dio alarm For help see the Printer Language IPL Developer s Guide If you are running Fingerprint the printer beeps when you press a button You can also use a Fingerprint command to turn off this beep the printer beeps when an error occurs you can use Fingerprint commands to specify the frequency and duration of beeps for different conditions or even make the printer play simple melodies For help s...

Page 18: ...ck Self adhesive continuous stock with liner Self adhesive labels with liner Tickets with gaps gap stock with or without perforations Tickets with black marks mark stock with or without perforations You can also install an optional label taken sensor so that the next copy in the batch is not printed until the current copy is removed For more information see Accessories for the Printer on page 124 ...

Page 19: ...PX4i and PX6i High Performance Printer User Guide 7 2 Open the front door and media cover 3 PX6i only Pull the locking handle down f ...

Page 20: ...8 PX4i and PX6i High Performance Printer User Guide 4 Raise the printhead by turning the printhead lift lever counter clockwise 5 If necessary remove the empty core from the media supply roll post ...

Page 21: ...erformance Printer User Guide 9 6 If you are using a media roll with a 76 mm 3 in core install a 3 inch adapter on the media supply hub 7 Fit a new roll of media on the supply post and push the roll in as far as it will go ...

Page 22: ...ute the media under the slack absorber and forward toward the print mechanism The slack absorber can be routed for better access and then snap locked in open position 9 Route the media through the print unit and push it in as far as it will go Route the Media ...

Page 23: ...PX4i and PX6i High Performance Printer User Guide 11 Media Path 10 Lower the printhead by turning the printhead lift lever clockwise 11 PX6i only Push the locking handle up ...

Page 24: ... by grabbing the outer edge and pulling it downwards Loading Media for Peel Off Printing In peel off or self strip mode self adhesive labels are separated from the liner immediately after printing Peel off printing can only be used for self adhesive labels with liner requires the optional peel off assembly cannot be performed with the optional fanfold guide installed sets high demands on the media...

Page 25: ... labels that have a label length of less than 25 mm 1 in You can also install an optional label taken sensor so that the next copy in the batch is not printed until the current copy is removed For more information see Accessories for the Printer on page 124 To load media for peel off printing 1 Turn off the printer 2 Open the front door and media cover 3 PX6i only Pull the locking handle down f ...

Page 26: ...nce Printer User Guide 4 Raise the printhead by turning the printhead lift lever counter clockwise 5 Pull out the green clip on the liner takeup hub and dispose of any wound up liner 6 Remove any empty core from the media supply hub ...

Page 27: ...erformance Printer User Guide 15 7 If your are using a media roll with a 76 mm 3 in core fit an adapter on the media supply hub 8 Fit a new roll of media onto the media supply hub and push the roll in as far as it will go ...

Page 28: ...de 9 Route the media under the slack absorber and forward toward the print mechanism The slack absorber can be rotated for better access and then snap locked in open position 10 Route the media through the print unit and push it in as far as it will go ...

Page 29: ... PX6i High Performance Printer User Guide 17 11 Pull out approximately 40 cm 15 in of labels and remove the labels from the liner 12 Route the liner around the tear bar and back under the print unit 40 cm 15 in ...

Page 30: ...18 PX4i and PX6i High Performance Printer User Guide 13 Secure the liner to the takeup hub with the green clip and rotate the hub until the media is pulled tight Secure the Liner Media Path ...

Page 31: ...PX4i and PX6i High Performance Printer User Guide 19 14 Turn the printhead lift lever clockwise to lower the printhead 15 PX6i only Push the locking handle up ...

Page 32: ...tter option to cut off the media Cut off printing can be used for non adhesive continuous stock and self adhesive labels with liner cut only liner between labels The cutter option is designed for paper based media with a thickness between 60 and 175 µm roughly corresponding to a paper weight of 60 to 175 grams m2 basis weight 40 to 120 lb cuts through the media approximately 37 mm 1 5 in in front ...

Page 33: ...rom operating when it is in the open position can be fitted with an optional tray for collecting cutoff labels requires the front door to be removed You can also install an optional label taken sensor so that the next copy in the batch is not printed until the current copy is removed For more information see Accessories for the Printer on page 124 To load media for cut off printing 1 Turn off the ...

Page 34: ...22 PX4i and PX6i High Performance Printer User Guide 3 PX6i only Pull the locking handle down 4 Turn the printhead lift lever counter clockwise to raise the printhead ...

Page 35: ...PX4i and PX6i High Performance Printer User Guide 23 5 Remove any empty core from the media supply hub 6 If your are using a media roll with a 76 mm 3 in core fit an adapter on the media supply hub ...

Page 36: ... a new roll of media onto the media supply hub and push the roll in as far as it will go 8 Route the media under the slack absorber and forward toward the print mechanism The slack absorber can be rotated for better access and then snap locked in open position ...

Page 37: ...PX4i and PX6i High Performance Printer User Guide 25 9 Route the media through the print unit and push it in as far as it will go Route the Media Media Path ...

Page 38: ...26 PX4i and PX6i High Performance Printer User Guide 10 Turn the printhead lift lever clockwise to lower the printhead 11 PX6i only Push the locking handle up ...

Page 39: ... PX6i High Performance Printer User Guide 27 12 Adjust the position of the green edge guides so that the media is guided with a minimum of play 13 Route the media through the cutter between the two guide plates ...

Page 40: ...or pre perfo rated tickets and tags are wound up inside the printer The roll of printed labels tickets or tags can then be removed Batch takeup printing requires the optional factory installed internal liner batch takeup accessory The takeup hub can accommodate 30 to 40 of a full size media roll Internal batch takeup can be used for these types of media Self adhesive labels fitted on liner Pre per...

Page 41: ...nd PX6i High Performance Printer User Guide 29 2 Open the front door and media cover 3 Turn the printhead lift lever counter clockwise to raise the printhead 4 Remove any empty core from the media supply hub ...

Page 42: ...nd PX6i High Performance Printer User Guide 5 Loosen the single screw that holds the guide plate at the rear of the media compartment 6 Remove the tear bar from the print unit and replace it with the guide plate ...

Page 43: ...Performance Printer User Guide 31 7 If you are using a media roll with a 76 mm 3 in core fit an adapter on the media supply hub 8 Fit a new roll of media onto the media supply hub and push the roll in as far as it will go ...

Page 44: ...de 9 Route the media under the slack absorber and forward toward the print mechanism The slack absorber can be rotated for better access and then snap locked in open position 10 Route the media through the print unit and push it in as far as it will go ...

Page 45: ...X4i and PX6i High Performance Printer User Guide 33 11 Pull out approximately 40 cm 15 in of labels 12 Route the labels around the guide plate and back under the print unit to the takeup hub 40 cm 15 in ...

Page 46: ...34 PX4i and PX6i High Performance Printer User Guide 13 Wind up some of the media on the takeup hub and secure it with the green clip Winding and Securing the Media Media Path ...

Page 47: ...ter User Guide 35 14 Turn the printhead lift lever clockwise to lower the printhead 15 Adjust the position of the green edge guides so that the media is guided with a minimum of play 16 Close the media cover but keep the front door open ...

Page 48: ... these printing methods Tear off straight through Cut off Peel off upper slot only Internal batch takeup It is strongly recommended using the fanfold guide accessory This guide makes loading media easier and accurately guides the media The fanfold guide can be adjusted for various media widths down to 40 mm 1 57 in Note Make sure to protect the media from dust dirt or other foreign particles that ...

Page 49: ...stable for various media widths The minimum width is 40 mm 1 58 in Fit the fanfold guide into the upper slot in the rear plate when the supply is at the same level as the printer or in peel off mode Fit the fanfold guide into the lower slot in the rear plate when the supply is placed lower than the printer 2 Feed the media through the slot in the rear plate Feeding Media Through the Upper Slot ...

Page 50: ... wound with the ink coated side facing either outward or inward Thermal transfer printing lets you use a wide range of receiving face materials and provides a durable printout that is less vulnerable to external influences such as oil chemicals heat and sunlight than direct thermal printing Make sure to select ribbon that matches the type of receiving face material and set up the printer according...

Page 51: ...PX4i and PX6i High Performance Printer User Guide 39 2 PX6i only Pull the locking handle down f 3 Turn the printhead lift lever counter clockwise to raise the printhead ...

Page 52: ...ny unused ribbon and the empty ribbon core 5 Adjust the ribbon supply bobbin for your ribbon If your ribbon is 55 to 60 mm 2 16 to 2 3 in wide compress the ribbon supply bobbin and move it so it snaps into the first innermost groove EasyCo der PX4i 55 60 mm 2 1 2 3 ...

Page 53: ...ibbon is 88 to 90 mm 3 5 in wide compress the ribbon supply bobbin and move it so it snaps into the second groove If your ribbon is 110 mm 4 3 in wide compress the ribbon supply bobbin and move it so it snaps into the third outermost groove 80 90 mm 3 5 110 mm 4 3 ...

Page 54: ... Guide 6 Press the ribbon roll onto the ribbon supply bobbin and route the ribbon through the print unit Pull out 20 cm 8 in of ribbon 7 Without releasing the ribbon turn the printhead lift lever clockwise to lower the printhead and lock the ribbon ...

Page 55: ...e Printer User Guide 43 8 Press the cardboard core at the front end of the ribbon onto the rewind hub During printing the rewind hub rotates counter clockwise 9 Turn the printhead lift lever counter clockwise to raise the printhead ...

Page 56: ...6i High Performance Printer User Guide 10 Wind up the ribbon until all of the transparent leader has passed the printhead and the ribbon becomes tight 11 Turn the printhead lift lever clockwise to lower the printhead ...

Page 57: ...You can print a test label perform a testprint to make sure that your printer is working properly get your printer s setup hardware and network information get RFID tag information check print quality and determine which adjustments to make To perform a testprint 1 Press to enter the Setup menu and use the keypad to go to the TESTPRINT menu If you are running Fingerprint go to SETUP PRINT DEFS TES...

Page 58: ...urrent configuration parameters stored in the printer s memory defined pages defined formats defined graphics defined fonts and any installed printer options HW Contains printer memory information printer mileage printhead settings firmware checksum program and version number Network Contains WINS name MAC address IP selection IP address netmask default router name server mail server primary WINS ...

Page 59: ...roperly aligned with the antenna If necessary avoid printing on the thickest part of the label For printers running Fingerprint If you are using thermal transfer labels start with the ribbon constant set to 80 and the ribbon factor set to 25 You may need to adjust these values depending on the type of media you choose To write to Gen 2 RFID tags using the TAGFIELD command set the start and length ...

Page 60: ...ser Guide To write to Gen 2 RFID tags set the start and length parameters of the RFID tag field setup command a to even numbers For help configuring RFID parameters see the Fingerprint Command Reference Manual or the IPL Command Reference Manual ...

Page 61: ...You can also use the serial port to send com mands directly to the printer through a terminal connection for instance with Tel net Before you can establish a serial connection make sure that the settings on the PC match those of your printer Parameter Default Setting Baud rate 9600 Data bits IPL or Character length Fingerprint 8 Parity None Stop bits 1 RTS CTS Fingerprint only Disable ENQ ACK Fing...

Page 62: ...nload and install the Honeywell Print Driver software on your PC 2 Connect the USB cable to the Type B connector on the back of the printer and connect the other end to your PC You do not need to set up any parameters for USB communications Connecting the Printer to a PC Through the IEEE 1284 Port You can use the parallel connection with LabelShop or Honeywell Print Driver The parallel port suppor...

Page 63: ...can use the network connection with LabelShop or the Honeywell Printer Driver You can also use this connection to send commands directly to the printer through a terminal connec tion Telnet or FTP To connect your printer to your Ethernet network 1 Make sure that Ethernet is selected as your Network Type On the keypad press to enter the Setup menu Go to SETUP NETWORK NETWORK TYPE ETHERNET Press aga...

Page 64: ... IP settings of your printer by sending Fingerprint or IPL commands through a serial connection After you configure the IP settings you can disconnect the printer from your PC and communicate with the printer using Ethernet communications To configure the IP settings serially using Fingerprint Note You need to have administrator privileges to configure IP settings 1 Connect the printer to your PC ...

Page 65: ... Note You must specify at least two of the three parameters for the command to take effect 3 Disconnect the printer from the PC 4 On your PC enter the IP address of the printer in the address field of your web browser for example http 10 200 27 94 and press Enter The home page of the printer appears Setting Up 802 11 Radio Communications If your printer has an optional 802 11 b g radio you can tra...

Page 66: ...nications using PrintSet 1 Download and install PrintSet on your PC 2 Connect one end of the serial cable to your printer and connect the other end to your PC 3 If necessary change the serial port settings on your PC to match your printer 4 On your PC start PrintSet 5 In the General Tasks box click Add Printer 6 Step through the Add Printer Wizard until you have successfully added your printer 7 I...

Page 67: ...rming this test should you transfer the certificate to the printer The printer can accept PEM pem DER der and PKCS 12 p12 or pfx certificates 6 Verify that the printer is connected to the access point and make sure it has an IP address allocated to it Use the following sections to set most of your wireless communication settings For more information see the Fingerprint Command Reference Manual or ...

Page 68: ...wo hexadecimal digits representing the value of the character Note The default password for logging in as an admin is pass If you have changed the password you will need to use your password instead of pass 2 Send one of the following WPA WPA2 ON commands to turn on WPA or WPA2 authentication Send the WPA PSK or WPA2 PSK command to set a pre shared key setup wlan WPA OFF setup wlan WPA2 ON setup w...

Page 69: ...fies the PAC file to use for EAP FAST authentication The ACQUIRE_PAC setting checks to see if automatic PAC file provisioning is enabled You can set ACQUIRE_PAC to on or off Send the following command to set PAC to use tmp my pac with a pass phrase of verysecret setup 8021x PAC tmp my pac verysecret Send the following command to set ACQUIRE_PAC to on setup 8021x ACQUIRE_PAC ON 7 If you are using c...

Page 70: ... WEP keys The following example sets WEP key 1 to 01234 and enables WEP key 1 STX SI ws WEP1 0x3031323334 ETX STX SI ws WEP_KEY 1 ETX 3 Send the following command to activate the settings STX SI ws ACTIVE 1 ETX To configure the printer to use WPA PSK or WPA2 PSK mode 1 Send the following commands to login as an admin and set the SSID STX ESC x su p pass admin ETX STX SI ws SSID xxxxx ETX where xxx...

Page 71: ... EAP FAST STX SI ws EAP_USER xxxx ETX STX SI ws EAP_PASS xxxx ETX where xxxx is the unique username and the unique password for this protocol 4 If you are using TTLS you may need to send this command to set the TTLS outer name STX SI ws TTLS_USER xxxx ETX where xxxx is the outer name 5 If you are using EAP FAST you can use PAC and ACQUIRE_PAC commands The PAC setting specifies the PAC file to use ...

Page 72: ... STX SI ws ACTIVE 1 ETX Connecting Peripherals to the USB Host Port You can connect these peripheral devices to the USB host interface port on the printer USB mass storage device Keyboard Bar code scanner USB hub Using a USB Mass Storage Device You can use a USB mass storage device thumb drive to store additional fonts and images for the printer You can also use the device to upgrade your firmware...

Page 73: ... Fingerprint applications Some applications may require more complex input from users than the simple push of a button The printer comes with five keyboard layouts US Swedish French German and User Defined To change the keyboard layout 1 Plug your USB keyboard into the USB host connector on the back of the printer 2 Turn on the printer 3 On your printer keypad press 4 Navigate to COM USB KEYBOARD ...

Page 74: ...o that you can connect several USB devices to the printer at the same time Note If the USB hub is not powered you can only connect one USB mass storage device and one HID keyboard or scanner peripheral to the USB hub at a time If the USB hub is powered you can connect multiple USB mass storage devices and multiple HID peripherals at once ...

Page 75: ...g SmartSystems Foundation remotely using Wavelink Avalanche Configuring Your Printer From the Screen To configure your printer from the screen you need to enter Setup mode To enter Setup mode Press the button You mainly use the arrow keys to navigate in Setup mode Use This Key To Do This or Scroll through the main menu and sub menus Select a sub menu item Exit a sub menu without changing the setti...

Page 76: ...u systems Setup Menus on page 133 Configuring Your Printer From the Printer Home Page If you are using an Ethernet or 802 11 wireless connection you can change config uration settings from your printer s home page Note You should have already connected your printer to your network and obtained an IP address SETUP SER COM UART1 SETUP PRINT DEFS SETUP MEDIA SETUP SER COM UART3 Option SETUP SER COM U...

Page 77: ... printer The home page also displays the contents of the image buffer as well as the status of the Ready to Work indicator 5 Click Configuration 6 Click the link for the settings you want to configure 7 When you are prompted enter your login and password The default values are login admin password pass Use the next sections to understand and configure the settings on each configura tion page Confi...

Page 78: ...tup Configuring Media Settings Use the media page to view and change media settings such as XSTART position media type and contrast To configure media settings 1 Click Printer Media 2 Enter the correct information for the media you are using 3 Click Submit Setup Configuring RFID Settings Printer With RFID Option Use the RFID page to configure settings for printing on RFID media ...

Page 79: ...p Configuring Print Engine Settings Use the print engine page to adjust the media feed direction start and stop adjust positions and print speed The value of the head resistance is read only and is measured by the firmware when the printer starts up To configure print engine settings 1 Click Printer Print Engine 2 Enter the correct information for the print engine 3 Click Submit Setup ...

Page 80: ...ges Use the following table to understand the Web Shell settings Setting Description Testfeed value Calibrates the label stop sensor performs a testfeed Selecting this setting is equivalent to issuing the TESTFEED command on the printer Ribbon Sensor value Detects if the printer runs out of ribbon during printing Default Setup Returns the printer to factory default settings Passwords alerts and th...

Page 81: ...ly Sent when the printed label is not taken from the printer This setting applies to label and ticket media and requires an optional label taken sensor Cutter Error There was an error related to the label cutter Head Lifted A printer job was sent to the printer while the printhead was lifted Out of Ribbon You have thermal transfer ribbon selected and the printer is out of ribbon Pause Mode The pri...

Page 82: ...ccessfully completed Odometer Count 1 The amount of media printed has reached a preset amount measured in meters or in number of labels The Delay repeat setting represents how often the alert message will be sent when the preset value is reached Notification Method The method used to send an alert message You can choose from mail SNMP trap or both Setting Description Setting Description Printer Na...

Page 83: ...ctions Sets restrictions on who is allowed to upgrade the printer firmware or view and change network settings You cannot remove admin from the list of authorized users Users allowed to update Defines who may perform a firmware upgrade using FTP PrintSet or IFAB This setting does not affect upgrading from a Compact Flash card Users allowed to read write protected LAN1 settings Fingerprint only Def...

Page 84: ...n method for your mail server settings SMTP settings from DHCP Choose this setting if you want the printer to receive settings automatically from your DHCP server This setting requires that you choose DHCP and IP Selection in the TCP IP section Manual settings Choose this option to manually configure the Mail Server address and port The default port is 25 Mail addresses Defines the e mail addresse...

Page 85: ...authentication key for SNMPv3 The default value is auth_key Encryption Key The privacy key for SNMPv3 The default value is priv_key System Name Administrative name for the SNMP node Authentication Failure Trap Defines if a trap is sent when an unauthorized SNMP request tries to access the printer Choose Enable to send the trap Trap Address Settings Click Add to specify these trap address settings ...

Page 86: ...address is set to a static address that you enter in the Static Address field Current addresses A list of all the currently configured IP addresses for the Ethernet interface The address starting with FE80 is the link local address and is available regardless of the configuration method you choose Static address This address applies if you selected manual as the configuration method The IP address...

Page 87: ... new settings 4 Reboot the printer for the changes to take effect Note Once you change the network type to Wireless 802 11 you cannot communicate with the printer using Ethernet You need to change the command through the Setup menu or send a command through a serial connection Configuring Avalanche Settings Use the Avalanche page to view and change Wavelink Avalanche settings ...

Page 88: ...ings Use the SmartSystems page to view or change the SmartSystems server IP address and the master port number Setting Description Enabler Mode Click one of the option buttons Disabled Disables Avalanche Manual settings Enables Avalanche You need to enter the Agent address and Port in the text fields Find agent by broadcast Enables Avalanche and the network connection broadcasts to find the agent ...

Page 89: ...martSystems settings Configuring Wireless LAN Settings Use the Wireless LAN page to view and change 802 11 settings Note The Wireless LAN settings are only available if your printer has the wireless 802 11 radio interface option installed and is running Fingerprint 8 77 0 or later or IPL v2 77 0 or later To configure wireless LAN settings 1 Click Network Admin Wireless LAN ...

Page 90: ...key Authentication Sets the type of authentication to use for your WEP keys You can choose between Auto Open System and Shared WPA Sets the Wi Fi Protected Access WPA to either on or off WPA Pre shared key Sets the WPA Pre shared key WPA2 Sets the Wi Fi Protected Access version 2 to either on or off Roaming setting Sets the roaming reluctancy to 1 2 or 3 Setting the roaming reluctancy to 0 turns o...

Page 91: ...se the inner authentication method PAP TTLS only MSCHAPv2 EAP MSCHAPv2 EAP MD5 EAP GTC Outer Name TTLS only Specify the EAP identity passed in the clear The default is anonymous PAC Key A ID Info The Protected Access Credential PAC setting is used to specify the PAC file used by EAP FAST authentication This setting is automatically filled up by the printer if ACQUIRE_PAC is enabled and current ins...

Page 92: ...a serial or network con nection If your printer uses the Fingerprint language you use the SETUP command fol lowed by the node subnode and parameters setting This Fingerprint example sets the media setting to labels with gaps SETUP MEDIA MEDIA TYPE LABEL w GAPS If your printer uses the IPL language you would send this command STX SI T1 ETX Root Certificate The common name of the installed root CA c...

Page 93: ... network Through the Console you can drag and drop configuration bundles OS updates and firmware upgrades to multiple computers create a golden device configuration to use when updating other computers remotely change settings on SmartSystems enabled computers and peripherals With an AutoDeploy license SmartSystems can automatically push software con figuration settings and other files to connecte...

Page 94: ...g an Ethernet or Wireless Network If you have an 802 11 wireless radio option installed in your printer you need to choose between an Ethernet network or a wireless 802 11 network You can choose the network type of your printer directly from the screen using commands sent from your PC using SmartSystems Foundation For help see Configuring Your Printer Using SmartSystems Foundation on page 81 from ...

Page 95: ...ct Wireless 802 11 interface 3 Reboot the printer for the change to take effect Upgrading Firmware The latest firmware and software is available for download from the Downloads page on the Honeywell website at www honeywellaidc com You can upgrade your printer s firmware using PrintSet You can download PrintSet from the downloads page for the printer on the Honeywell website at www honeywellaidc c...

Page 96: ...tatus messages briefly appears USB memory stick connected USB memory stick not supported Note If not status message appears when you insert the USB storage device remove and reinsert the USB storage device To manually verify the USB storage device is supported Using a USB Mass Storage Device on page 60 3 Insert the USB storage device in the appropriate slot on your PC 4 In the root directory of th...

Page 97: ... the location of the firmware upgrade file 6 Double click the file and then click Upgrade Downloading Fonts and Graphics The printer supports 15 scalable Unicode TrueType and TrueDoc fonts as standard The Unicode standard allows the use of special characters for various languages including non Latin fonts such as Arabic Cyrillic Chinese including enhanced Simplified Chinese GB18030 Japanese Korean...

Page 98: ...86 PX4i and PX6i High Performance Printer User Guide ...

Page 99: ...st of the problems you encounter If you cannot find the answer to your problem in this section you may need to contact Product Support Understanding Error Messages Use the following tables to troubleshoot common error messages you may see dis played on your printer s screen Keep in mind that some error messages are specific to the type of firmware you are running have corresponding error numbers c...

Page 100: ...tings Load the printer with media and select the appropriate media type For help see Loading Media on page 5 Blinking 1007 LSS too low This error can occur when you run a test feed without any media installed or if you have incorrect media settings Load the printer with media and select the appropriate media type For help see Loading Media on page 5 Blinking 1008 Testfeed not done The printer did ...

Page 101: ...But if the application handles the break ON BREAK or runtime error ON ERROR GOTO the Ready to Work indicator is not affected and the application sets the status For more information see the Fingerprint Command Reference Manual Off Printhead not found Printhead not found Off Rebooted The printer has been rebooted Off Initializing The printer is initializing Off Printer crash Printer crash In most i...

Page 102: ...lect the appropriate media type For help see Loading Media on page 5 Blinking Paper Fault The printer did not perform a test feed before it printed out test labels Performing a test feed calibrates the sensor To perform a testfeed press the button Blinking Press Feed Press the button to resume Blinking Paused This is not an error condition This message appears when the print job is paused Blinking...

Page 103: ... Replacing the Printhead on page 105 The platen roller may be worn For help contact your service representative The printout is dark overall Or There is excessive bleeding on the media Try these possible solutions in order Make sure that your media setting is appropriate for the type of media you are using The contrast may be too high Try decreasing the contrast The printhead pressure may be too h...

Page 104: ...per Type TTR Step 4 Press Step 5 Press to exit the Setup menu The transfer ribbon breaks Try these possible solutions in order Make sure that your media setting is appropriate for the type of media you are using Make sure that the ribbon is fitted correctly Reload the ribbon For help see Loading Ribbon on page 38 The energy control may be faulty For help contact your service representative The tra...

Page 105: ...ID MODE to ENABLE I get one of these error messages Error in filename Fingerprint or Direct Protocol No RFID support IPL An RFID kit is not installed in the printer For help contact your local representative None of the RFID commands work and I get this message RFID Inactive RFID MODE is disabled Change MODE to ENABLE Printing on regular media not RFID is slow and halted in between labels RFID MOD...

Page 106: ...to modify the TAGFORMAT For help see the Fingerprint Command Reference Manual or the IPL Command Reference Manual For more information see the EPC Tag Data Standard v1 1 revision 1 27 available from the EPCglobal website at www epcglobalinc org Data can be written unlawfully to a write protected ISO 18000 6B tag For some ISO 18000 6B tag chips the functionality to protect the tag memory from being...

Page 107: ... Adjusting the Printer You may need to adjust your printer to accommodate your printing needs or improve performance You can adjust the pressure arm label stop sensor LSS position printhead pressure label taken sensor Adjusting the Pressure Arm The printer is factory adjusted for full size media width If you are using media that is less than full width Adjust the position of the pressure arm so th...

Page 108: ... tip of the arm is centered with the media Note Move the pressure arm at the part closest to the knob not at the tip If the arm is difficult to move lift the printhead and pull the printhead bracket free from the magnet in the arm 6 When the pressure arm is centered tighten the knob to secure the arm 7 Adjust the edge guides 8 If necessary load ribbon 9 Close the front door and media cover Center ...

Page 109: ... the sensor is on the upper media guide and the other part of the sensor is under the lower guide To adjust the LSS 1 Use a slotted screwdriver to turn the adjustment screw Rotate the screw clockwise to move the sensor toward the center section Rotate the screw counterclockwise to move the sensor outward away from the center section 2 Look at the print mechanism from the front with the printhead l...

Page 110: ...SETUP PRINT DEFS LSS TEST LSS AUTO If you are running IPL go to SETUP TEST SERVICE LSS TEST LSS AUTO 8 The screen displays the LSS AUTO menu with the cursor in the center Note There is no way to adjust the LSS function the menus only indicate values obtained from the LSS The test menu can determine if the sensor unit is not physically in position is blocked by dust or stuck labels or is defective ...

Page 111: ...ther For help see Cleaning the Printer on page 101 the media does not have some kind of preprint that may disturb detection there is enough difference between the black marks and the surrounding areas the liner is transparent enough the LSS works properly with another type of media Adjusting the Printhead Pressure The pressure of the thermal printhead against the direct thermal media is factory ad...

Page 112: ... you are running IPL go to SETUP TEST SERVICE LTS 2 Modify one or more LTS settings Maintaining the Printer To keep your printer working properly you should perform regular maintenance Setting How to Modify LTS Adjust Step 1 Press The printer feeds a label Step 2 Remove the label and press again The printer displays the sensitivity value that is automatically selected by the firmware and the range...

Page 113: ... with a soft cloth slightly moistened with water or a mild detergent Cleaning the Media Guides The label stop sensor which controls the media feed is covered by two plastic guides The guides are transparent to allow the light to pass between the two parts of the label stop sensor These areas must be kept clean from dust stuck labels and adhesive residue Warning To avoid possible personal injury or...

Page 114: ...ck for objects such as dust adhesive residue or labels that may be blocking the beam of light If necessary clean the guides To clean the media guides 1 Open the front door and media cover 2 Pull the upper guide straight out Warning Isopropyl alcohol CH 3 2CHOH CAS 67 63 0 is a highly flammable moderately toxic and mildly irritating substance ...

Page 115: ...d on a regular basis is important for the life of the printhead and for the printout quality You should clean the printhead each time you replace the media This section describes how to clean the printhead using cleaning cards If additional cleaning is required for example removing adhesive residue from the platen roller or tear bar use a cotton swab moistened with isopropyl alcohol To clean the p...

Page 116: ...ser Guide 2 Open the front door and media cover 3 Turn the printhead lift lever counter clockwise to raise the printhead 4 Remove any media and transfer ribbon 5 Open the cleaning card envelope and pull out the cleaning card Read the warning text ...

Page 117: ...bbon Replacing the Printhead The printhead is subject to wear both from the direct thermal media or ribbon and from the rapid heating and cooling process during printing So you need to period ically replace the printhead How often you need to replace the printhead depends factors such as the print images the type of direct thermal media or ribbon in use the amount of energy to the printhead the pr...

Page 118: ...106 PX4i and PX6i High Performance Printer User Guide 2 Open the front door and media cover 3 PX6i only Pull the locking handle down f ...

Page 119: ...h Performance Printer User Guide 107 4 Turn the printhead lift lever counter clockwise to raise the printhead 5 Remove any media and transfer ribbon 6 Pull the printhead bracket away from the magnet in the pressure arm ...

Page 120: ... Guide 7 Disconnect the hooks of the printhead bracket from the shaft and pull out the printhead as far as the cables allow 8 Disconnect the cables from the printhead Note the snap lock on the inner connector Pull at the connectors not at the cables ...

Page 121: ...PX6i High Performance Printer User Guide 109 9 Connect the two cables to the replacement printhead 10 Connect the hooks of the printhead bracket to the headlift shaft Make sure that the cables are not in the way ...

Page 122: ...User Guide 11 Turn the printhead lift lever clockwise so the magnet engages the printhead bracket 12 PX6i only Push the locking handle up 13 Load a new supply of media and ribbon For help see Loading Media on page 5 and Loading Ribbon on page 38 ...

Page 123: ... 9 4 in PX6i Weight 14 8 kg 32 6 lb Power Specifications Printer Voltage v100 240 V 3 1A 50 60Hz Temperature and Humidity Specifications Operating Temperature 5 C to 40 C 41 F to 104 F Storage Temperature 20 C to 70 C 4 F to 152 F Humidity 10 to 90 non condensing Communications and Connectivity Serial port RS 232 USB device USB full speed host Ethernet 100 Mbps 802 11b g optional IPv6 Memory 32MB ...

Page 124: ...in 114 mm 4 5 in 167 4 mm 6 59 in Print Length maximum Fingerprint IPL 32767 dots 409 5 cm 161 25 in at 203 2 dpi 277 5 cm 109 23 in at 300 dpi 409 5 cm 161 25 in at 203 dpi Note The maximum print length is also restricted by the amount of free SDRAM memory Media Width PX4i PX6i 25 to 120 mm 1 to 4 72 in 76 2 to 170 mm 3 to 6 69 in Media Roll Diameter maximum 213 mm 8 38 in Tear Off 205 mm 8 07 in...

Page 125: ...munications see Connecting the Printer to a PC Through the USB Device Port on page 50 The printer is a self powered device Only connect one printer to each USB port on the PC either directly or through a hub You can connect other devices such as a keyboard or a mouse to the same hub If you need more than one USB printer to a host you should use different USB ports Parameter Default Setting Baud ra...

Page 126: ...nterface The printer has a USB host interface for connecting USB devices such as HID bar code scanners and keyboards USB storage devices and USB hubs USB Host Interface Ethernet Interface The Ethernet interface has an RJ 45 socket for use with a standard RJ 45 cable The interface supports 10 100 Mbps Fast Ethernet 10BASE T 100BASE TX and is fully compliant with the IEEE 802 3u standard The network...

Page 127: ... mode Parallel IEEE 1284 Pins and Descriptions LED Status Description Green On Link Off No link Blinking Network activity Yellow On 100BASE TX Off 10BASE T Pin Description Transmitter Comments 1 nStrobe Host 2 to 9 Data 0 7 Host 10 nAcknowledge Printer 11 Busy Printer 12 Perror Printer 13 Select Printer 14 nAutoFd 15 to 16 Not connected 17 Chassis ground 18 External 5 V DC Max 500 mA 19 to 30 Sign...

Page 128: ...eter standard 38 to 40 mm 1 5 in Core inside diameter with adapter 76 2 mm 3 in Core width must not protrude outside the media Maximum roll outside diameter Tear off and cut off Peel off and batch takeup 213 mm 8 38 in 205 mm 8 07 in Minimum media width PX4i PX6i 25 mm 1 00 in 76 mm 3 00 in Maximum media width PX4i PX6i 114 3 mm 4 50 in 170 mm 6 69 in Printer Measurement Value PX4i Maximum 120 mm ...

Page 129: ...06 in outside the face material and should protrude equally on both sides External Media Width Excluding Liner c a Non Adhesive Strip Printer Measurement Value PX4i Maximum 120 mm 4 72 in Minimum 25 0 mm 1 00 in PX6i Maximum 170 mm 6 69 in Minimum 76 0 mm 3 00 in Printer Measurement Value PX4i Maximum 118 4 mm 4 66 in Minimum 23 8 mm 0 94 in PX6i Maximum 168 4 mm 6 63 in Minimum 74 4 mm 2 93 in ...

Page 130: ...esive Labels External Media Width Including Liner a Liner b The backing paper must not extend more than a total of 1 6 mm 0 06 in outside the labels and should protrude equally on both side Recommended minimum transparency 40 DIN 53147 a c b b SELF ADHESIVE STRIP Printer Measurement Value PX4i Maximum 120 mm 4 72 in Minimum 25 0 mm 1 00 in PX6i Maximum 170 mm 6 69 in Minimum 76 0 mm 3 00 in ...

Page 131: ...es not guarantee that such short labels will work but it is up to users to test this in their unique application Label Gap e The Label Stop Sensor LSS must be able to detect the extreme front edges of the labels Printer Measurement Value PX4i Maximum 118 4 mm 4 66 in Minimum 23 8 mm 0 94 in PX6i Maximum 168 4 mm 6 63 in Minimum 74 4 mm 2 93 in Measurement Value Minimum without LTS 8 mm 0 32 in Min...

Page 132: ... Set media type to one of these values Fingerprint LABEL w GAPS IPL GAP Tickets With Gaps Gap Stock Media Width a c d b b SELF ADHESIVE LABELS FEED DIRECTION Printer Measurement Value PX4i Maximum 120 mm 4 72 in Minimum 25 0 mm 1 00 in PX6i Maximum 170 mm 6 69 in Minimum 76 0 mm 3 00 in ...

Page 133: ...n c This position is variable For help see Adjusting the Label Stop Sensor on page 97 Detection Slit Length d The length of the detection slit excluding corner radii must be a minimum of 2 5 mm 0 10 in on either side of the LSS detection position c Detection Slit Height e Media Type Set media type to one of these values Fingerprint GAP STOCK IPL GAP Note Do not allow a perforation to break the edg...

Page 134: ...tection Position c This position is variable For help see Adjusting the Label Stop Sensor on page 97 TICKETS TAGS b c d e FEED DIRECTION Printer Measurement Value PX4i Maximum 120 mm 4 72 in Minimum 25 0 mm 1 00 in PX6i Maximum 170 mm 6 69 in Minimum 76 0 mm 3 00 in Measurement Value Minimum 20 0 mm 0 8 in Maximum 6 143 mm 241 in Depends on SDRAM size ...

Page 135: ... black on a whitish background Do not allow a perforation to break the edge of the media because the media may split and jam the printer Note Try to avoid preprint that may interfere with the detection of the black mark However if your are running Fingerprint you can use the command LBLCOND to temporarily disable the sensor for a specified amount of media feed to avoid unintentional detection For ...

Page 136: ...that came with your RFID kit Accessories for the Printer You can use these accessories sold and ordered separately with the printer To order accessories contact your local sales representative Liner Batch Takeup This factory installed option separates labels from the liner and winds up the spent liner inside the printer s media compartment For more information on using the liner batch takeup see L...

Page 137: ...ic sensor that enables the printer s firmware to detect if the last printed label ticket tag etc has been removed before printing another copy The LTS cannot be used with a paper cutter If you are running Fingerprint or Direct Protocol you can enable or disable the LTS using the commands LTS ON and LTS OFF For help see the Fingerprint Com mand Reference Manual Real Time Clock The Real Time Clock R...

Page 138: ...126 PX4i and PX6i High Performance Printer User Guide Serial Industrial Interface Board RFID Serial Interface Board ...

Page 139: ...nction and reflect the organization of the IPL and Fingerprint setup menus For detailed information on most of the commands see the Fingerprint Command Reference Manual or the IPL Command Reference Man ual Fingerprint Default Configuration Ser Com uart1 Parameters Parameter Default Value Baud rate 9600 Character length 8 Parity None Stop bits 1 Flow control RTS CTS ENQ ACK XON XOFF data to host XO...

Page 140: ...ter Default Value IP selection DHCP BOOTP IP address N A Netmask N A Default router N A IPv6 selection Auto IPv6 address N A Nameserver N A Nameserver6 N A DHCP response Broadcast MAC address N A Network type Ethernet if no 802 11 radio is installed Wireless 802 11 if an 802 11 radio is installed Parameter Default Value Mode Enable Tagadjust 0 Retries 1 Voidtext N A Fieldstrength 100 Parameter Def...

Page 141: ...dpi 1200 dots 1800 dots Media type Label with gaps Paper type Thermal transfer Ribbon constant 90 Ribbon factor 25 Label offset 0 Ribbon sensor 14 Low diameter ribbon 0 dots Label constant 85 Label factor 40 Contrast 0 Paper sensor 10 Low diameter paper 0 dots Testfeed N A Testfeed mode Fast Len slow mode 0 Parameter Default Value Head resistance N A Testprint N A Print speed 100 mm sec LSS test N...

Page 142: ...Parameter Default Value USB keyboard US Parameter Default Value IP selection DHCP BOOTP IP address N A Netmask N A Default router N A IPv6 selection Auto IPv6 address N A Nameserver N A Nameserver6 N A DHCP response Broadcast MAC address N A Network type Ethernet if no 802 11 radio is installed Wireless 802 11 if an 802 11 radio is installed Parameter Default Value Mode Enable Tagread N A Tagadjus...

Page 143: ... A Data dump No Memory reset All LSS test N A Cmd language N A Parameter Default Value Media type Gap Paper type DT Direct Thermal LBL length dots 1200 dots Testfeed mode Fast Sensitivity 420 Darkness 0 LBL rest point 0 Form adj dots X 0 Form adj dots Y 0 Ribbon low 0 Paper low 0 Parameter Default Value Emulation mode None Print speed 4 in sec Cutter Not installed LTS calibration Not installed ...

Page 144: ...132 PX4i and PX6i High Performance Printer User Guide ...

Page 145: ...RK SETUP RFID SETUP FEEDADJ SETUP MEDIA SETUP PRINT DEFS XON XOFF DATA FROM HOST PARITY SPACE BAUDRATE 38400 FLOWCONTROL XON XOFF FLOWCONTROL ENQ ACK BAUDRATE 19200 BAUDRATE 9600 BAUDRATE 4800 BAUDRATE 2400 BAUDRATE 1200 BAUDRATE 600 BAUDRATE 300 PARITY MARK PARITY ODD PARITY EVEN CHAR LENGTH 7 STOP BITS 2 SETUP SER COM UART1 SER COM UART1 BAUDRATE SER COM UART1 CHAR LENGTH SER COM UART1 PARITY SE...

Page 146: ...RK IP ADDRESS NETWORK NETMASK NETWORK DEFAULT ROUTER NETWORK IPV6 SELECTION PARITY MANUAL IP SELECTION DHCP BOOTP IP ADDRESS 0 0 0 0 NETMASK 0 0 0 0 DEFAULT ROUTER 0 0 0 0 IPV6 SELECTION AUTO NETWORK IPV6 ADDRESS IPV6 ADDRESS 0000 000 0000 0 NETWORK NAMESERVER NETWORK NAMESERVER6 NETWORK DHCP RESPONSE NETWORK MAC ADDRESS NETWORK NETWORK TYPE NAMESERVER 0 0 0 0 NAMESERVER6 00 0 DHCP RESPONSE BROADC...

Page 147: ...APER PAPER LOW DIAMETER PAPER PAPER SENSOR LOW DIAMETER 0 PAPER SENSOR 10 Only displayed if a paper sensor is installed 0 2 4 6 8 10 10 8 6 4 2 0 LEN SLOW MODE 0 Press E to perform a testfeed Values are read only CMD LANGUAGE DSim CMD LANGUAGE ZSim CMD LANGUAGE IPL CLIP DEFAULT OFF TESTPRINT NETWORK INFO TESTPRINT RFID TEST LABEL TESTPRINT HARDWARE INFO TESTPRINT SETUP INFO TESTPRINT BAR CODES 2 T...

Page 148: ... DATA BITS 8 PARITY NONE STOP BITS 1 PROTOCOL XON XOFF USB KEYBOARD USER DEFINED USB KEYBOARD GERMAN USB KEYBOARD FRENCH USB KEYBOARD SWEDISH SETUP COM COM USB KEYBOARD USB KEYBOARD US NETWORK TYPE Wireless 802 11 DHCP RESPONSE UNICAST IPV6 SELECTION MANUAL IPV6 SELECTION DHCP IPV6 SELECTION AUTO DHCP PARITY BOOTP PARITY DHCP PARITY MANUAL SETUP NETWORK NETWORK IP SELECTION NETWORK IP ADDRESS NETW...

Page 149: ...DSim CMD LANGUAGE ZSim CMD LANGUAGE IPL LTS LTS ADJUST LTS LTS TEST LTS LTS VALUE LTS VALUE 10 REMOVE LABEL ENTER TO STOP REMOVE LABEL AND PRESS ENTER PRINT DEFS LTS Only displayed if a paper sensor is installed MEDIA TYPE CONTINUOUS MEDIA TYPE MARK SETUP MEDIA MEDIA MEDIA TYPE MEDIA TYPE GAP MEDIA PAPER TYPE PAPER TYPE TTR PAPER TYPE DT MEDIA LBL LENGTH DOTS LBL LENGTH DOTS 1200 MEDIA LBL REST PO...

Page 150: ... PRINT SPEED 5 IN SEC CONFIGURATION CUTTER PWRUP EMULATION EMULATION MODE EMULATION MODE 86XX 10MIL EMULATION MODE 5MIL EMULATION MODE NONE EMULATION MODE 86XX 15MIL PRINT SPPED 4 IN SEC PRINT SPPED 3 IN SEC PRINT SPPED 2 IN SEC PRINT SPPED 8 IN SEC PRINT SPPED 7 IN SEC PRINT SPPED 6 IN SEC SETUP CONFIGURATION CONFIGURATION LTS CALIBRATION LTS CALIBRATION PRESS ENTER REMOVE LABEL AND PRESS ENTER C...

Page 151: ...inter File System Fingerprint As you access the printer for communications you encounter different parts of the printer file system The following sections contain a device tree structure and brief descriptions of the different devices and directories of the file system Device Tree Structure This illustration shows the device tree structure of the printer root c ADMIN boot tmp rom pffs dev card1 se...

Page 152: ...ppercase letters you are restricted from accessing devices and directories with lowercase names For more information on using Fingerprint see the Fingerprint Command Reference Manual root The root node is write protected to preserve the device and file structure of the printer c or c c is the user file system You can create directories here to store files such as pro grams fonts and images c ADMIN...

Page 153: ...e Printer Home Page The easiest way to modify the appearance of the printer web page is to create an HTML file called INDEX HTM on the device c with custom designed logo and colors From this file you can easily link to the printer configuration pages The web server generates these web pages with dynamic information on the fly This pro cess makes the real time generated pages of the printer appear ...

Page 154: ...contain optional variables All variables have to be lowercase followed by a sign and a consistent value There is no specific order of the variables Required Environment Variables Use the reference table below to understand all of the required environment vari ables Optional Environment Variables The optional environment variables are used to specify extra parameters for instance these variables pe...

Page 155: ... Style Guide files are designed to be placed on the printer s pffs as mentioned Due to the memory limits of the pffs the environment variables have very short name 4 bytes which may make them less user friendly to use but this allows more space to be used for the value of the variable Variable Description Comments alco Active link color ALINK attribute of BODY tag BGLI Background image link BACKGR...

Page 156: ...le Guide File The name has to be lowercase The first file has to have extension 0 The following files have to have sequential extension number if one number is missing in the sequence the parser will stop reading the files The split point between one web style guide and the other cannot be in the middle of a line The last line of the file has to be consistent in the syntax and the first line of th...

Page 157: ......

Page 158: ... Honeywell 9680 Old Bailes Road Fort Mill SC 29707 www honeywellaidc com 935 024 004 REV A 05 18 ...

Reviews: