


RP-2002 Series Manual —
P/N 53039:E6 1/26/2017
69
Master Programming Level
Programming
Daylight Savings Time
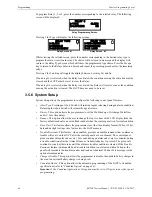
Pressing
1
while viewing Time-Date Screen #2 will cause the following screens to be displayed:
Pressing
1
while viewing Daylight Savings Screen #1 will cause the display to toggle between
Enabled Yes
and
Enabled No
. The control panel will automatically update the time for daylight
savings time when
Enabled Yes
is selected.
Pressing
2
while viewing Daylight Savings Screen #1 will display another screen which allows the
programmer to select the month that daylight savings time will begin. In this sub-screen, pressing
1
will select March,
2
will select April and
3
will select May.
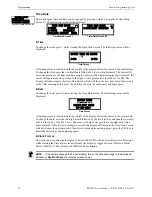
Pressing
3
while viewing Daylight Savings Screen #1 will display two sub-screens which allow the
programmer to select the week of the month that daylight savings time will begin. In the first sub-
screen, pressing
1
will select the first week,
2
will select the second week and
3
will select the third
week, while in the second sub-screen, pressing
1
will select the fourth week and
2
will select the
last week of the selected month.
Pressing
1
while viewing Daylight Savings Screen #2 will display another screen which allows the
programmer to select the month that daylight savings time will end. In this sub-screen, pressing
1
will select September,
2
will select October and
3
will select November.
Pressing
2
while viewing Daylight Savings Screen #2 will display two sub-screens which allow the
programmer to select the week of the month that daylight savings time will end. In the first sub-
screen, pressing
1
will select the first week,
2
will select the second week and
3
will select the third
week, while in the second sub-screen, pressing
4
will select the fourth week and
5
will select the
last week of the selected month.
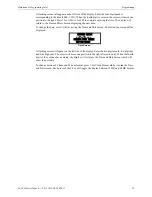
Trouble Reminder
The Trouble Reminder features causes the control panel piezo to sound a reminder ‘beep’ for
alarms and troubles, after the panel has been silenced. Refer to “System Setup” on page 64, for a
detailed description of this feature. Pressing
2
while viewing System Setup Screen #2 will cause the
display to toggle to
Trouble Remind Yes
, which enables this feature. Each press of the
2
key will
cause the display to toggle between
Trouble Remind Yes
and
Trouble Remind No
.
Note that if the Trouble Reminder feature is not enabled, a trouble existing on the panel for more
than 24 hours will cause the FACP to resound the trouble sounder.
Charger Disable
Pressing
3
while viewing System Setup Screen #2 will allow the programmer to enable or disable
the onboard battery charger. If an external battery charger is being used, the onboard battery
charger must be disabled. Each press of the
3
key will toggle between
Chargr Disable No
and
Chargr Disable Yes
.
Canadian Option
Pressing
1
while viewing System Setup Screen #3 will configure the FACP to comply with
Canadian requirements. The display will change to
Canadian Opt. On
. Each press of the
2
key will
cause the display to toggle between
Canadian Opt. On
and
Canadian Opt. Off
. The factory default
setting is
Canadian Opt. Off
.
The Canadian Options configures the FACP with the following as required by Canada:
•
The following zone type codes are not available:
non-latching supervisory
non-latching drill
TIME AND DATE
1=DAYLIGHT SAVINGS
Time & Date Screen #2
DAYLIGHT SAVINGS
1=ENABLED YES
2=START MONTH MAR
3=START WEEK WK 2
Daylight Savings Screen #1
Daylight Savings Screen #2
DAYLIGHT SAVINGS
1=END MONTH NOV
2=END WEEK WK 1
SYSTEM SETUP
1=TIME-DATE
2=TROUBLE REMIND
3=CHARGR DISABLE
System Setup Screen #2
SYSTEM SETUP
1=CANADIAN OPTION
2=SEC ANN ENABLE
System Setup Screen #3
Summary of Contents for NOTIFIER RP-2002C
Page 158: ...Cut along dotted line ...