background image


22 

Cable Installation (Interface Specific)  

RS232  

The following steps describe how to properly install the cables for an RS232 application.  The scanner 

must


then be configured to match the host’s RS232 parameters.  Cable installation alone 

does not

 guarantee that 

the scanner will communicate properly with the host system. 

Note:   Configuration bar codes are located in the MetroSelect Configuration Guide (PN 00-02407x) and the 

MS2xxx Stratos Series Configuration Addendum (PN 00-02034x). 

1.  Turn off the host system. 

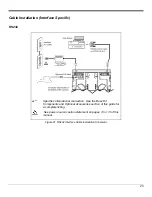
2.  Plug the 10-pin RJ45 end of the RS232 interface cable (PN 57-57210x-N-3) into the 10-pin socket labeled 

‘Scanner Host RS232’ on the bottom of the scanner.  Refer to the figure on page 23. 

3.  Connect the other end of the RS232 cable to the proper communication port on the host device. 

 Stop: 


Before continuing, verify that the RS232 interface cable is connected to the appropriate 
interface socket on the scanner.  An incorrect cable connection can cause communication 
problems or potential damage to the scanner and/or terminal. 


4.  Plug the external power supply (PN 46-002xx) into the 3-pin Molex socket labeled ‘DC Power In’ on the 

bottom of the scanner. 


Note:   Check the AC input requirements of the power supply to make sure the voltage matches the AC 

outlet.  The outlet should be located near the equipment and be easily accessible. 


Using a switched AC outlet is recommended.  The switch should be located on the operator’s 
side of the checkout counter in close proximity to the scanner to facilitate calibration and service 
of the unit. 

5.  Connect AC power to the transformer.  If the AC outlet is equipped with an on/off switch, turn the power on. 

6.  Turn on the host system. 

7.  Scan the Recall Defaults bar code.   


Note:   The Recall Defaults bar code is located in the MetroSelect Configuration Guide  

(PN 00-02407x), under Need to Start Over. 

8.  Configure the scanner to match the host system’s RS232 parameters. 


Note:   Refer to the MetroSelect Configuration Guide (PN 00-02407x) under Section G: RS232 for 

enabling RS232 Mode (scan the recall defaults bar code first). 


Summary of Contents for MS2421

Page 1: ...MS2421 MS2422 MS2431 Bar Code Scanner Installation and User s Guide ...

Page 2: ...reserved No part of this document may be photocopied reproduced or translated into another language without the prior written consent of HII 2009 Honeywell International Inc All rights reserved Web Address www honeywellaidc com Trademarks Metrologic MetroSelect MetroSet2 StratosSCAN StratosSPHERE StratosSYNC StratosSCOPE StratosSWAP and StratosSCHOOL are trademarks or registered trademarks of Metr...

Page 3: ... 12 MS2422 Connector Panel 12 MS2422 Caution and Serial Number Labels 13 Installation Quick Installation Outline 15 Site Requirements 15 Vertical Clearance 15 Ventilation and Spacing 15 Service Access 15 Power Installation 16 Checkout Counter Layout Consideration 16 Unpacking the Unit 17 Installing the Unit in the Counter 18 MS2421 Mounting Diagram 18 MS2422 Mounting Diagram 19 MS2431 Mounting Dia...

Page 4: ...per Tone and Volume Control 42 The Multi Function Button 42 Startup 43 Power Up Test Mode 43 Configuration Mode 43 Maintenance Horizontal Scan Window Replacement 45 Daily Maintenance 46 Troubleshooting Troubleshooting Symptom Solution Chart 47 Scanner and Cable Terminations Scanner Pinout Connections 51 Cable Connector Configurations 53 Regulatory Compliance Safety 55 EMC 56 Limited Warranty 59 Pa...

Page 5: ...2422 and MS2431 scanners are equipped with a multitude of standard features including StratosSCAN 5 sided 360 scanning that minimizes product orientation StratosSPHERE Decoding software that reads poor quality and damaged bar codes StratosSYNC Horizontal and vertical scanning zones operate independently from one another GS1 DataBar Decoding Decodes GS1 DataBar GS1 DataBar Limited and GS1 DataBar E...

Page 6: ...fic protocol being used To order additional items contact the dealer distributor or call the customer service department Optional Accessories Part Description 57 57210x N 3 RS232 Interface Cable Straight Cord with Short Strain Relief 57 57212x N 3 RS485 Port 9 Cable Straight Cord 57 57201x N 3 USB Full Speed Communication Cable Straight Cord Type A Non Locking Connector 57 57227x N 3 USB Full Spee...

Page 7: ... are not interchangeable due to laser safety and or scanner performance differences To change window type the scanner must be returned to the manufacturer for reconfiguration 46 00233 Diamonex Platter Compact 46 00296 Diamonex Platter Compact with Platter Lift Handle 46 00234 Diamonex Platter Sub Compact Size 46 00235 Sapphire Platter Compact 46 00297 Sapphire Platter Compact with Platter Lift Han...

Page 8: ...ame Figure 2 Platter Removal No hardware or tools are required to remove the platter see Figure 3 Refer to the Maintenance section of this manual for additional information on platter replacement Note See caution statement on page 3 Figure 3 Finger Recesses There are two finger recess areas provided to assist when lifting the scanner Rest both thumbs against the vertical window frame for added sta...

Page 9: ... Codes System Interfaces RS232 Aux RS232 RS485 and USB Print Contrast 35 Minimum Reflectance Difference No Characters Read Up to 80 data characters Maximum number will vary based on symbology and density Beeper Operation 7 Tones or No Beep 3 Volume Settings Blue Laser ON Ready to Scan Indicators LED Blue Flash Good Read Decoding Mechanical Length Width Tower Height MS2421 L x W x H 399 mm 15 7 292...

Page 10: ...A DC Transformers Class I 5 2VDC 2 5A 12VDC 0 8A For Regulatory Compliance Information refer to pages 55 57 Environmental Operating Temperature 0 C to 40 C 32 F to 104 F IP Rating IP 55 Light Levels 4842 Lux 450 footcandles Storage Temperature 40 C to 60 C 40 F to 140 F Humidity 5 to 95 Relative Humidity Non Condensing Contaminants Sealed to resist airborne particulate contaminants Ventilation Non...

Page 11: ...amonex or Sapphire Horizontal Window Laser Aperture 7 Flow Direction Indicators 8 Platter Support Bumpers see page 45 9 Optional Product Weight Flip Up Bar Platter Lift Handle Option provided with scale ready MS2421 105x or MS2431 105x models only 10 Diagnostic Indicator Display see page 38 for Error Codes 11 DC Power Scale and EAS Connectors see page 9 12 System Interface Connection Area see page...

Page 12: ...MS2421 Scanner Dimensions Figure 6 MS2421 Dimensions MS2431 Scanner Dimensions Figure 7 MS2431 Dimensions 8 ...

Page 13: ...mmunication cabling The use of these connections is dependent on the specific manufacturer of the scale being integrated Please refer to the custom Scale Installation Guide for detailed instructions on the appropriate cable hookups and calibration procedures for local Weights and Measures authorities Specifications are subject to change without notice 9 ...

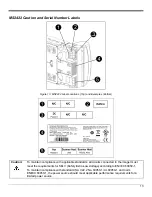
Page 14: ...e with applicable standards all circuits connected to the imager must meet the requirements for SELV Safety Extra Low Voltage according to EN IEC 60950 1 10 To maintain compliance with standard CSA C22 2 No 60950 1 UL 60950 1 and norm EN IEC 60950 1 the power source should meet applicable performance requirements for a limited power source ...

Page 15: ...latter 5 High Impact Window Frame Vertical Window Laser Aperture 6 Replaceable Stainless Steel Platter with Diamonex or Sapphire Horizontal Window Laser Aperture 7 Flow Direction Indicator 8 Platter Support Bumpers see page 45 9 Diagnostic Indicator Display see page 38 10 DC Power Scale and EAS Connectors see page 12 11 System Interface Connection Area see page 12 Note Scanner label information ca...

Page 16: ...MS2422 Dimensions Figure 11 MS2422 Dimensions MS2422 Connector Panel Figure 12 MS2422 Connectors Specifications are subject to change without notice 12 ...

Page 17: ...applicable standards all circuits connected to the imager must meet the requirements for SELV Safety Extra Low Voltage according to EN IEC 60950 1 13 To maintain compliance with standard CSA C22 2 No 60950 1 UL 60950 1 and norm EN IEC 60950 1 the power source should meet applicable performance requirements for a limited power source ...

Page 18: ...14 ...

Page 19: ... following items Vertical Clearance A minimum clearance height of 5 25 from the checkout counter surface is needed for the vertical hood on all of the scanner models Ventilation and Spacing The MS2421 MS2422 MS2431 models have a die cast housing to dissipate heat allowing the unit to operate without a ventilation fan The temperature surrounding the unit is recommended not to exceed 40 C 104 F Ther...

Page 20: ...r in a checkout counter the following factors should be considered Items should flow at a distance to the operator that maximizes comfort The operator should not need to stretch or strain to reach for and scan packages The MS2421 MS2422 MS2431 can scan a bar code on five sides of a package The packages should flow into the scan area that provides the maximum reading performance No lifting or orien...

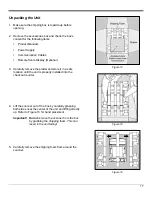
Page 21: ...ve the platter and store it in a safe location until the unit is properly installed into the checkout counter 4 Lift the scanner out of the box by carefully grasping both sides near the center of the unit and lifting directly up Refer to Figure 15 for hand placement Important Do not remove the scanner from the box by grabbing the shipping foam This can result in the unit falling Figure 15 5 Carefu...

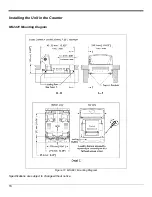
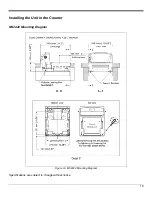
Page 22: ...Installing the Unit in the Counter MS2421 Mounting Diagram Figure 17 MS2421 Mounting Diagram Specifications are subject to change without notice 18 ...

Page 23: ...Installing the Unit in the Counter MS2422 Mounting Diagram Figure 18 MS2422 Mounting Diagram Specifications are subject to change without notice 19 ...

Page 24: ...Installing the Unit in the Counter MS2431 Mounting Diagram Two Point Support Figure 19 MS2431 Mounting Diagram Two Point Support Specifications are subject to change without notice 20 ...

Page 25: ...Installing the Unit in the Counter MS2431 Mounting Diagram Three Point Support Figure 20 MS2431 Mounting Diagram Three Point Support Specifications are subject to change without notice 21 ...

Page 26: ...rrect cable connection can cause communication problems or potential damage to the scanner and or terminal 4 Plug the external power supply PN 46 002xx into the 3 pin Molex socket labeled DC Power In on the bottom of the scanner Note Check the AC input requirements of the power supply to make sure the voltage matches the AC outlet The outlet should be located near the equipment and be easily acces...

Page 27: ...fies international connection See the Base Kit Components and Optional Accessories section of this guide for a complete listing See power source caution statement on pages 10 or 13 of this manual Figure 21 RS232 Interface Cable Installation Schematic 23 ...

Page 28: ...hat scanned information will appear at the host A software driver and correct configuration setting are also required for proper communication to occur 4 Plug the external power supply PN 46 002xx into the 3 pin Molex socket labeled DC Power In on the bottom of the scanner Note Check the AC input requirements of the power supply to make sure the voltage matches the AC outlet The outlet should be l...

Page 29: ...t Configuration Guide PN 00 02407x under Low Speed USB Any low speed USB warnings may be disregarded when utilizing these codes for a Full Speed USB scanner Note Step 7 must be completed before continuing to step 8 for these features to work properly xx Specifies international connection See the Base Kit Components and Optional Accessories section of this guide for a complete listing See power sou...

Page 30: ... scanner into the serial port of the host device does not guarantee that scanned information will appear at the host device A software driver and correct configuration settings are also required for proper communication to occur 4 Plug the external power supply PN 46 002xx into the 3 pin Molex socket labeled DC Power In on the bottom of the scanner Note Check the AC input requirements of the power...

Page 31: ...Specifies international connection See the Base Kit Components and Optional Accessories section of this guide for a complete listing See power source caution statement on pages 10 or 13 of this manual Figure 23 RS485 Cable Installation Schematic 27 ...

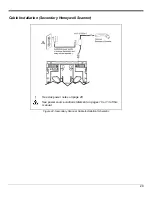
Page 32: ...e 29 3 Connect the angled end of the RS232 AUX cable PN 57 57099x 3 into the 10 pin socket labeled Aux RS232 In on the bottom of the MS2421 MS2422 MS2431 scanner Note The MS2421 MS2422 MS2431 series aux port requires the signals transmit receive RTS CTS from the secondary scanner MS2421 MS2422 MS2431 scanner auxiliary port will support 5VDC devices with a 150mA maximum current If the auxiliary dev...

Page 33: ...ble Installation Secondary Honeywell Scanner See Aux power notes on page 28 See power source caution statement on pages 10 or 13 of this manual Figure 24 Secondary Scanner Cable Installation Schematic 29 ...

Page 34: ... and 6 set to ON All MS2421 MS2422 MS2431 models have a connector labeled EAS In on the bottom of the unit An optional EAS cable PN 52 52511 or 52 52556 available for purchase for connection between the Checkpoint device and the MS2421 MS2422 MS2431 scanner Figure 25 EAS Cable Connection Bottom of MS2421 MS2422 MS2431 The following figure shows the location of the EAS deactivation area for the MS2...

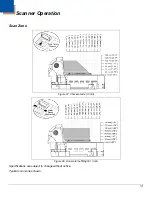
Page 35: ...Scanner Operation Scan Zone Figure 27 Checker Side 13 mil Figure 28 Horizontal Left Right 13 mil Specifications are subject to change without notice Typical scan zones shown 31 ...

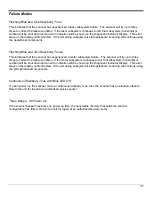
Page 36: ...Scan Zone Figure 29 Horizontal Direct 13 mil Figure 30 Vertical Direct 13 mil Specifications are subject to change without notice Typical Scan Zones shown 32 ...

Page 37: ...photocell in the activation area shown below in grey will cause the scanner to exit the power save mode The motor will restart automatically and the laser will turn back on preparing the scanner for bar code recognition decoding and transmission Figure 31 Wake Activation Area Perpendicular to Package Flow Default Range Photocell LED Output Refer to the MetroSelect Configuration Guide 00 02407 for ...

Page 38: ...ensitivity or far sensing for the wake up photo transistor This is the default setting Medium Photocell Sensitivity 2 2 1 2 1 0 This feature enables the MS24xx to be at a medium 1 sensitivity or medium sensing for the wake up photo transistor Low Photocell Sensitivity 2 2 1 2 2 0 This feature enables the MS24xx to be at a low sensitivity or low sensing for the wake up photo transistor Minimum Phot...

Page 39: ... to failure modes on page 36 Three Beeps during operation When placing the scanner in configuration mode the blue LED will flash while the scanner simultaneously beeps three times The blue LED will continue to flash until the unit exits configuration mode Upon exiting configuration mode the scanner will beep three times and the blue LED will stop flashing When configured three beeps can also indic...

Page 40: ...the blue LED does not flash or the scanner does not beep once then the bar code has not been successfully read Blue LED Off After a successful scan the scanner transmits the data to the host device Some communication modes require that the host inform the scanner when data is ready to be received If the host is not ready to accept the information the scanner s blue LED will remain off until the da...

Page 41: ...tem failure The scanner will try up to three times to correct the failure condition If the motor subsystem continues to fail that subsystem horizontal or vertical will be shut down and an error indication will be shown on the Diagnostic Indicator Display This error stays on the display until corrected If the remaining subsystem is still operational scanning will continue using the still operationa...

Page 42: ...by getting the proper hardware interface OR programming MS2421 MS2422 MS2431 configuration for the proper interface hardware attached 05 CONFIGURATION ERROR The non volatile configuration memory did not agree with the data last saved Default configuration data is then used and the scanner continues operating This error is also accompanied by three beeps This error will remain during operation as a...

Page 43: ... also in error the horizontal scanning subsystem will be shut down and this error code will remain on the Diagnostic Indicators 23 LASER 3 LEFT HORIZONTAL ERROR The left laser in the horizontal scanning subsystem denotes a failure The scanner will try three times to correct the laser operation If the laser error persists and the right horizontal laser 2 is also in error the horizontal scanning sub...

Page 44: ...ing subsystem denotes a failure The scanner will try three times to correct the motor operation If the motor error persists the vertical scanning subsystem will be shut down and this error code will remain on the Diagnostic Indicators 32 MOTOR 2 HORIZONTAL ERROR The motor in the horizontal scanning subsystem denotes a failure The scanner will try three times to correct the motor operation If the m...

Page 45: ...otor OFF after a configured period of non use Any movement detected by the photocell will wake the scanner from the power save mode see Figure 31 on page 33 This mode s wake time is slightly longer due to the motor s need to restart 4 Dual Action Power Save Mode 1 Blinks the laser OFF ON after a configured period of non use turns the laser and motor OFF at thirty minute intervals Example If the po...

Page 46: ... selectable 9 9 9 9 7 4 Next Volume The Multi Function Button Figure 34 The Multi Function Button Changing the Beeper Volume A short 3 second depression and the beeper volume will change The new volume will be heard The silent no beep volume is also selectable Figure 35 Changing the Beeper Volume Placing the Unit in Laser Motor Off Power Save Mode Long 3 seconds depression The Laser and Motor Off ...

Page 47: ...d at power up 1 Memory tests 2 Hardware setup tests 3 Motor tests 4 Laser tests 5 Configuration tests 6 Interface tests These tests are also performed on a periodic basis with the operator alerted to any failures Configuration Mode All MS2421 MS2422 MS2431 bar code scanners have been configured at the factory with a set of default communication protocols Since many host systems have unique formats...

Page 48: ...44 ...

Page 49: ...unction properly if the protective film is not removed Figure 38 Platter Horizontal Scan Window Replacement See replacement parts on page 3 For MS2431 use the same points as shown for the MS2421 to install the platter If the platter on the MS2421 MS2431 is not equipped with a product weight roll bar lift handle it can be removed using the same method as shown for the MS2422 45 ...

Page 50: ...monia When cleaning the window spray the cleaner onto a lint free non abrasive cleaning cloth then gently wipe the window clean If the unit s case requires cleaning use a mild cleaning agent that does not contain strong oxidizing chemicals Strong cleaning agents may discolor or damage the unit s exterior Routinely check and clean the base unit to ensure that no debris is interfering with the platt...

Page 51: ...s disabled Enable the beeper No volume is selected Select a volume The unit powers up but does not beep No tone is selected Select a tone The unit is trying to scan a particular symbology that is not enabled UPC EAN and Code 128 are enabled by default Verify that the type of bar code being read has been selected The unit powers up but does not scan and or beep The unit has been configured for a ch...

Page 52: ...y the configured criteria Verify that the bar code that is being scanned falls into the criteria Typical of Non UPC EAN codes The scanner defaults to a minimum of 4 character bar code The bar code may have been printed incorrectly Check if it is a check digit character or border problem The scanner is not configured correctly for this type of bar code Check if check digits are set properly The uni...

Page 53: ...dary scanner is not functioning Refer to the user s guide provided with the secondary scanner The secondary scanner cable may not be connected to the proper port on the scanner Ensure that the secondary scanner is connected to the MS242x com port marked Aux port The scanner must be configured to enable the auxiliary port The secondary scanner powers up but data is not relayed to the host The auxil...

Page 54: ...50 ...

Page 55: ...RS232 Receive 4 Reserved for RS232 Interface 4 RS232 RTS Output 5 Reserved for RS232 Interface 5 RS232 CTS Input 6 Reserved for RS232 Interface and EAS 6 RS232 DTR Input EAS GPIO IN 7 No Connect 7 No Connect 8 Reserved for RS232 Interface and EAS 8 DSR EAS GPIO OUT 9 IBM B 9 Reserved for RS485 Interface 10 IBM A 10 Reserved for RS485 Interface Scanner to Host USB Auxiliary RS232 In Pin Function Pi...

Page 56: ...e MS2421 MS2431 do not exceed the following current restrictions 12V 0 7A max 5V 0 2A max Figure 40 Scale Ready Connector Layout Scale Display Data In Scale Data to Display from the Load Cell Interface Scale Data In RS232 from the Load Cell Interface Scale RS232 to Host Scale Data Dual Cable Applications Scale to Display Pin Function Pin Function Pin Function Pin Function 1 SIG1 1 12V 1 Ground 1 S...

Page 57: ...x N 3 Pin Function 1 No Connect 2 RS232 TX Output 3 RS232 RX Input 4 DTR Input 5 Power Signal Ground 6 DSR Output 7 CTS Input 8 RTS Output 9 No Connect 9 Pin D Type Connector Full Speed USB Cable PN 57 57201x N 3 or PN 57 57227x N 3 Pin Function 1 PC 5V USB 2 Data 3 Data 4 Ground Locking Type A 57 57227x N 3 Non Locking Type A 57 57201x N 3 RS485 Cable PN 57 57212x N 3 Pin Function 1 Signal Ground...

Page 58: ...Aux Secondary Scanner 3 RS232 to Aux Secondary Scanner 4 RTS from Aux Secondary Scanner 5 CTS to Aux Secondary Scanner 6 No Connect 7 No Connect 8 No Connect 9 5VDC Transformer Direct 10 Shield Ground 10 Position Angled Modular Plug This configuration cable was designed to be used with the MS2421 MS2422 MS2431 auxiliary connector only All signals are referenced from the MS2421 MS2422 MS2431 scanne...

Page 59: ... ou procédés autres que ceux décrits ici peut entraîner de graves irradiations Le client ne doit en aucun cas essayer d entretenir lui même le scanner ou le laser Ne regardez jamais directement le rayon laser même si vous croyez que le scanner est inactif N ouvrez jamais le scanner pour regarder dans l appareil Ce faisant vous vous exposez à une rayonnement laser qú êst hazardous L emploi d appare...

Page 60: ...in accordance with the instruction manual may cause harmful interference to radio communications Operation of this equipment in a residential area is likely to cause harmful interference in which case the user will be required to correct the interference at their own expense Any unauthorized changes or modifications to this equipment could void the user s authority to operate this device This devi...

Page 61: ...received including interference that may cause undesired operation This equipment has been tested and found to comply with the limits for a Class B digital device pursuant to Part 15 of the FCC rules These limits are designed to provide reasonable protection against harmful interference in a residential installation This equipment generates uses and can radiate radio frequency energy and if not in...

Page 62: ...58 ...

Page 63: ... AS MAY BE OTHERWISE PROVIDED BY APPLICABLE LAW THE FOREGOING WARRANTY IS IN LIEU OF ALL OTHER COVENANTS OR WARRANTIES EITHER EXPRESSED OR IMPLIED ORAL OR WRITTEN INCLUDING WITHOUT LIMITATION ANY IMPLIED WARRANTIES OF MERCHANTABILITY OR FITNESS FOR A PARTICULAR PURPOSE OR NON INFRINGEMENT HII S RESPONSIBILITY AND PURCHASER S EXCLUSIVE REMEDY UNDER THIS WARRANTY IS LIMITED TO THE REPAIR OR REPLACEM...

Page 64: ...60 ...

Page 65: ...0 118 No license right or sublicense is granted either expressly or by implication estoppel or otherwise under any Metrologic Honeywell or third party intellectual property rights whether or not such third party rights are licensed to Metrologic and or Honeywell including any third party patent listed above except for an implied license only for the normal intended use of the specific equipment ci...

Page 66: ...62 ...

Page 67: ...ons 8 12 15 display 7 11 38 40 52 E EAS 7 11 30 51 electrical 59 error codes 38 39 40 F failure error codes 38 40 indicator 35 modes 35 37 finger recess 4 7 11 flow 7 11 frame 11 function 47 51 54 G ground 51 54 H host 35 36 43 47 50 I indicators 5 audible 35 42 43 47 50 diagnostic 38 40 error codes 38 40 failure 37 38 40 visual 7 11 35 36 43 47 48 interface 5 10 13 RS232 22 23 51 53 RS485 26 27 5...

Page 68: ...n pattern 5 scan speed 5 scan zone 31 32 scanner pinouts 51 54 secondary scanner 28 29 SELV 22 27 service 59 specifications 4 6 storage 5 switch 30 T test 43 tone 7 11 35 42 transformer see power troubleshooting 47 50 V ventilation 5 15 voltage 2 5 22 27 52 volume 7 11 42 W warranty 47 59 weight 5 window 3 4 7 15 ...

Page 69: ... com Mexico Telephone 803 835 8000 E mail latechsupport honeywell com Europe Middle East and Africa Telephone 31 0 40 7999 393 Fax 31 0 40 2425 672 E mail hsmeurosupport honeywell com Hong Kong Telephone 852 29536436 Fax 851 2511 3557 E mail aptechsupport honeywell com Singapore Telephone 65 6842 7155 Fax 65 6842 7166 E mail aptechsupport honeywell com China Telephone 86 800 828 2803 Fax 86 512 67...

Page 70: ...9100 Fax 55 21 3535 9105 E mail brservice honeywell com Mexico Telephone 52 55 5203 2100 Fax 52 55 5531 3672 E mail mxservice honeywell com Europe Middle East and Africa Telephone 31 0 40 2901 633 Fax 31 0 40 2901 631 E mail euroservice honeywell com Hong Kong Telephone 852 29536436 Fax 851 2511 3557 E mail apservice honeywell com Singapore Telephone 65 6842 7155 Fax 65 6842 7166 E mail apservice ...

Page 71: ......

Page 72: ...Honeywell Scanning Mobility 90 Coles Road Blackwood NJ 08012 00 05311 Rev B August 2009 ...

Reviews: