


11 - 2
1.
Prepare the cradle for use. See
Preparing the Desktop Cradle for Use
2.
Connect the external power cable to a dependable power supply.
3.
Connect the cradle end of the power cable to the power port on the back of the cradle.
4.
The B1 and B2 LEDs flash yellow-red-green then go out. The empty powered cradle is ready for use.
5.
Prepare the HX3 for docking by removing it from the arm band, hip-flip or audio case, if used.
6.
Insert the HX3 in the Docking Bay.
7.
Insert the tethered battery in one of the battery charging bays at the back of the cradle. The battery can remain tethered as
the power connection between the battery and the HX3 is broken as soon as the HX3 connects to the power source via the
cradle-power connector.
8.
Dock the Ring Scanner, if attached, in the Ring Scanner bay (located between the battery charging bays).
9.
Insert a spare battery in the remaining battery charging bay at the back of the cradle, if desired.
10. The B1 and B2 LEDs illuminate as soon as a battery is inserted in a charging bay.
11. Connect USB cables at the front of the cradle, if desired.
12. Press the Power button on the HX3. The cradle PWR LED illuminates. The fully loaded cradle is ready for use.
Extreme ambient temperatures may have unexpected / undesired effects on the HX3, ring scanner, cradle and batteries in the
charging bays. Refer to
(page 13-1) for recommended temperature ranges for daily operation, battery
charging and storage.
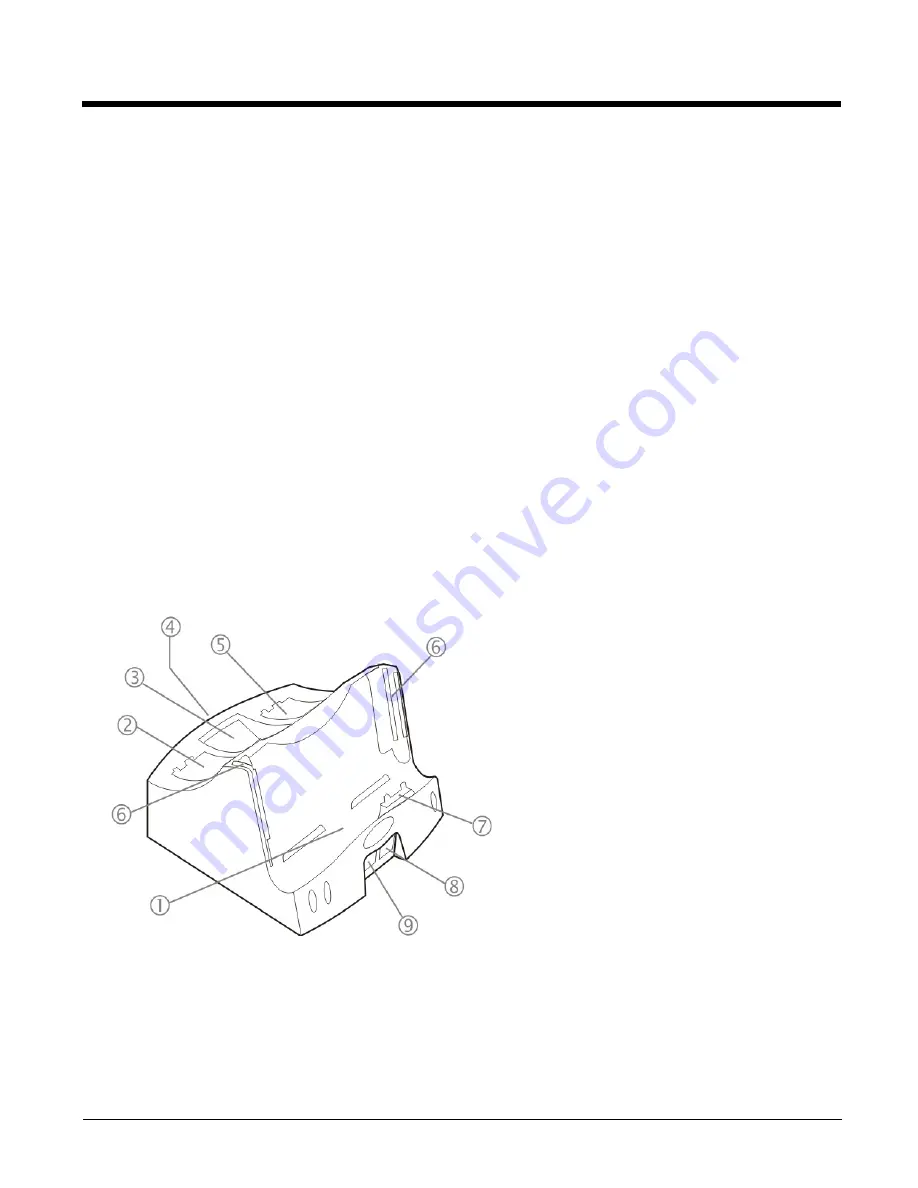
Components
Front View
Note: 1Either battery charging bay can charge stand-alone or tethered Standard and Extended batteries.
1.
HX3 Docking Bay
2.
Left Battery Charging Bay
3.
Tethered Ring Scanner Storage
4.
Back Connectors - AC Power Port
and RS232 Serial Port
5.
Right Battery Charging Bay
6.
Cradle Side Rails
7.
HX2 Cradle Connector (power and I/O)
8.
USB Port (USB-B Client)
9.
USB Port (USB-A Host)
Summary of Contents for HX3
Page 1: ...HX3 Wearable Computer User s Guide ...
Page 36: ...3 4 ...
Page 40: ...4 4 ...
Page 87: ...5 47 ...
Page 110: ...6 18 ...
Page 126: ...7 16 Hat Encoding ...
Page 127: ...7 17 ...
Page 128: ...7 18 ...
Page 189: ...9 37 9 Click the Request a certificate link 10 Click on the advanced certificate request link ...
Page 190: ...9 38 11 Click on the Create and submit a request to this CA link ...
Page 198: ...10 2 ...
Page 220: ...12 12 ...
Page 229: ......