Honeywell CL401PE User Manual Download Page 8

7

USE & OPERATION (CONTINUED)

EN

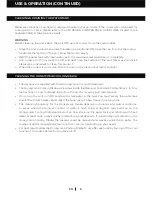
Remove the screws from the Rear Grill of the Air Cooler.
Carefully pull out the Rear Grill from the Air Cooler.
The Honeycomb Cooling Pad is secured on the Rear Grill by two Horizontal Bars that are fixed in 
place by two screws on the Left and Right Sides of these Horizontal Bars. Remove these screws 
to release the Horizontal Bars.
Pull out the Honeycomb Cooling Pad by sliding it out from the Rear Grill. Replace with the new 
Honeycomb Cooling Pad by sliding into the grooves of the Rear Grill until it fits comfortably and 
securely in place on the grill. Replace the Horizontal Bars back onto the Rear Grill by replacing the 
Left and Right Side screws and tightening them in place. This secures the Honeycomb Cooling 
Pad in place on the Rear Grill.
Repeat steps 1 to 4 to remove the Honeycomb Cooling Pad on the Left and Right Side Grills.

1. 
2.
3. 
 

4.

5.

Removing the Honeycomb Cooling Media:
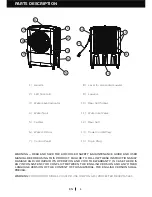
WARNING:

 DO NOT operate the Air Cooler when any or all of the Rear or Side Grills are removed 

from the Air Cooler, or if there is a loose-fitting Rear or Side Grill. Doing so can cause serious injury or 
dangerous electrical shock.

Step 2:

Rear Grill

Step 1:

Rear Grill

Rear Grill 

Screws

Step 3:

Rear 

Honeycomb Pad

Screws

Horizontal

Bars

Step 4:

Rear 

Honeycomb Pad

Rear Grill

CLEANING THE HONEYCOMB COOLING MEDIA (CONTINUED)

Summary of Contents for CL401PE

Page 1: ...Portable Evaporative Air Cooler User Manual Read and save these instructions before use www honeywellaircoolers com E mail info honeywellaircoolers com Model CL401PE CO401PE ...

Page 2: ...FOR OUTDOOR MODEL CO401PE USE ONLY ON GFCI PROTECTED RECEPTACLES WARNING READ AND SAVE THE AIR COOLER SAFETY MAINTENANCE GUIDE AND USER MANUAL BEFORE USING THIS PRODUCT FAILURE TO FOLLOW THESE INSTRUCTIONS MAY DAMAGE AND OR IMPAIR ITS OPERATION AND VOID THE WARRANTY IN CASE THERE IS ANY INCONSISTENCY OR CONFLICT BETWEEN THE ENGLISH VERSION AND ANY OTHER LANGUAGE VERSION OF THE CONTENT OF THIS MATE...

Page 3: ...e duration setting is selected When the set time has passed the unit will automatically turn off unit remains in Standby mode until power cord is unplugged from electrical socket The TIMER function allows you to program the unit for up to 7 5 hours of use SWING Press the SWING button until the SWING indicator light is illuminated on the control panel The louvers will begin to move left to right au...

Page 4: ...he back of the remote control and insert the batteries inside Care must be taken to insert the batteries according to the correct polarity markings shown inside the battery compartment Always point the remote control signal transmitter towards the unit when operating Make sure that the signal path is not obstructed Remove the batteries if the unit is not going to be used for an extended period of ...

Page 5: ... run the unit for long periods of time without refilling the tank This also helps prevent pump failure in case the cooler is running with inadequate water in the tank CAUTION Unplug the unit from the electrical power outlet before filling or emptying the water tank Continuous Water Supply Connection For a continuous water supply you will need a garden hose that is connected to a main water supply ...

Page 6: ... level you will hear a beeping sound and the indicator light will flash continuously The unit will automatically pause evaporative cooling Refill the water tank to deactivate the alarm in cooling mode First switch OFF the unit and unplug from the power outlet Fill the water tank with water above the minimum water level mark Plug in and switch ON again To deactivate the alarm and continue using the...

Page 7: ...liance is supplied with three Honeycomb Cooling Media pads The Honeycomb Cooling Media are located inside the Rear and Side Grills Follow Steps 1 to 5 for instructions on how to remove them from the unit for cleaning and maintenance Do not run the unit in COOL mode with stale water in the tank You must empty the water tank and refill with fresh water especially if the tank has not been cleaned in ...

Page 8: ...n place on the grill Replace the Horizontal Bars back onto the Rear Grill by replacing the Left and Right Side screws and tightening them in place This secures the Honeycomb Cooling Pad in place on the Rear Grill Repeat steps 1 to 4 to remove the Honeycomb Cooling Pad on the Left and Right Side Grills 1 2 3 4 5 Removing the Honeycomb Cooling Media WARNING DO NOT operate the Air Cooler when any or ...

Page 9: ...tek com Made in China 2017 JMATEK Limited All rights reserved The Honeywell Trademark is used under license from Honeywell International Inc Honeywell International Inc makes no representations or warranties with respect to this product This product is manufactured by Airtek Int l Corp Ltd subsidiary of JMATEK Ltd ...

Reviews: