


2
SPEED
SWING
POWER
MODE
TIMER
COOL
SLEEP
H
M
L
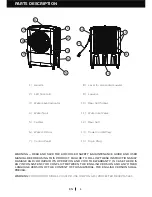
USE & OPERATION
EN
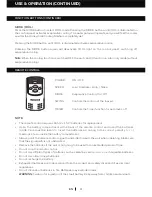
CONTROL PANEL
FUNCTION BUTTONS
POWER
Press the POWER button to turn the unit on. The cooler will start automatically at medium speed. After
a few seconds the speed will switch to low. To turn the unit off, press the button again.
SPEED
Press the SPEED button repeatedly to change the speed between High - Mid - Low - Sleep.
The indicator light will show the selected speed:
TIMER
Press the TIMER button until the desired time duration setting is selected. When the set time
has passed, the unit will automatically turn off (unit remains in Standby mode until power cord is
unplugged from electrical socket). The TIMER function allows you to program the unit for up to 7.5
hours of use.
SWING
Press the SWING button until the SWING indicator light is illuminated on the
control panel. The louvers will begin to move left to right automatically.
Vertical Air Flow - You can manually adjust the louvers to change vertical air flow.
When the Sleep mode is selected, the fan will randomly change between High, Medium, Low and off (5
seconds each) to mimic a natural breeze.
Medium (M)
High(H)
Low(L)
Sleep(SLEEP)
LOUVER
MOVEMENT