4
G
B
INSTRUCTIONS
FOR
USE
:
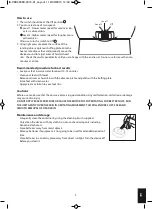
A – Main body
B – Dust trap
C – Abrasive plate
D – Protection shield
E – Protective cover
F – Buffing plate
G – Cleaning brush
H – 6 extra buffing pads
How to assemble the device
Using the Abrasive Plate
1. Align
th
e
two
protruding
pl
a
stic
p
a
rts
insid
e
th
e a
br
a
siv
e
pl
a
t
e
to
th
e
groov
e
s
on
th
e
rim
of
th
e
dust
tr
a
p
an
d
th
en
rot
a
t
e
clockwis
e
until
it
clicks
into
pl
a
c
e.
2.
Align
th
e
c
en
tr
e
hol
e
of
th
e
dust
tr
a
p
to
th
e a
xis
on
th
e
m
a
in
body
an
d
th
en
push
until
it
clips
into
pl
a
c
e.
3.
Align
th
e
Protruding
pl
a
stic
p
a
rts
on
th
e
rim
of
th
e
prot
e
ction
shi
e
ld
with
th
e
slots
on
th
e
rim
of
th
e
m
a
in
body,ins
e
rt
an
d
rot
a
t
e an
ti-clockwis
e
to
fix
in
pl
a
c
e (
to
d
e
t
a
ch
rot
a
t
e
clockwis
e).
4.
Aft
e
r
us
e,
put
th
e
cov
e
r
on
th
e
m
a
in
body.
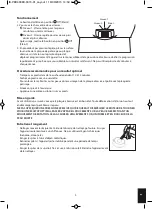
Using the Buffing Plate
1. R
e
mov
e
th
e a
br
a
siv
e
pl
a
t
e
if
a
tt
a
ch
e
d
by
r
e
v
e
rsing
th
e a
bov
e
st
e
ps.
2. Align
th
e
c
en
tr
e
hol
e
of
th
e
buffing
pl
a
t
e
to
th
e a
xis
of
th
e
m
a
in
body
an
d
th
en
fix
th
e
buffing
pl
a
t
e
on
th
e
m
a
in
body.
(
S
ee
th
e
Figur
e
on
th
e
right
sid
e.)
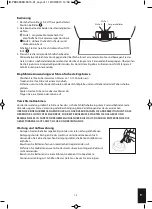
Insert the batteries
1. R
e
mov
e
th
e
upp
e
r
p
a
rt
of
th
e
m
a
in
body
from
th
e
m
a
in
body
by
unscr
e
wing
it
an
ticlockwis
e.
2. Push
th
e
two
clips
of
th
e
b
a
tt
e
ry
c
a
s
e
cov
e
r
downw
a
rds
3. Th
e
b
a
tt
e
ry
c
a
s
e
is
op
ene
d.
Th
en,
ins
e
rt
4
x
1.5
V
Typ
e
AA
b
a
tt
e
ri
e
s
by
following
th
e
pol
a
rity
signs
4. R
ea
ss
e
mbl
e
b
e
for
e
us
e
A
E
F
G
H
B
C
D
1.
2.
3.
1.
2.
3.
4.
IB-PED600EU-0315-01_Layout 1 18/03/2015 14:50 Page 4


