background image

1

HB2/OM/050221

© 2021 HOMEBIOGAS

VERSION 050221

HBG 2.0 HOUSEHOLD BIOGAS SYSTEM

OWNER’S MANUAL

Summary of Contents for HBG 2.0

Page 1: ...1 HB2 OM 050221 2021 HOMEBIOGAS VERSION 050221 HBG 2 0 HOUSEHOLD BIOGAS SYSTEM OWNER S MANUAL ...

Page 2: ...2 3 5 6 32 34 38 40 44 45 46 Introduction Safety System Assembly Activating the System Daily Operation System Care Troubleshooting Tech Specs Homebiogas Fertilizer Warranty ...

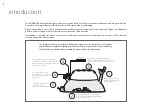
Page 3: ...3 4 6 introduction The HOMEBIOGAS household biogas system turns organic waste like food scraps and animal manure into biogas which can be used for cooking and natural liquid fertilizer which can be used for gardening Biogas is generated in the system by the anaerobic without oxygen fermentation of organic matter Biogas is a flammable gas that is lighter than air composed mainly of methane and carb...

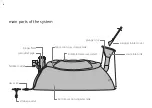
Page 4: ...ottom section digester tank gas valve fertilizer outlet waste inlet sink plunger inlet cover drainage valve gas outlet pipe biogas filter integrated pressure system top section gas storage tank main parts of the system ...

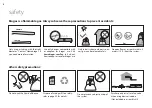
Page 5: ...ese precautions to prevent accidents Only use gas tubing with the right diameter Contact Homebiogas if you need more information Do not drink the liquid effluence Use only devices compatible with or adapted for biogas use Visit homebiogas com faq to find out how to adapt a stove for biogas use Dispose of used gas filters safely refer to page 39 for details Only install system outdoors so ex cess g...

Page 6: ...y to Usage Equipment Needed screwdriver flat OR socket wrench 6 7 8 boiling water water 1200 liters dry sand 50 liters Assembly with 2 persons recommended 5 you can continue feeding the system manure as per activation instructions page 32 you may start trying to light the gas as soon as the gas tank has visibly started to fill 6 for manure only systems there is no initial feeding period and you sho...

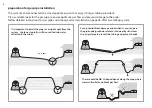
Page 7: ...tem before installation to ensure optimum performance and avoid potential damage to the system Failure to set up the system according to the following instructions could void the HomeBiogas warranty make sure the chosen location has a level surface usage on sloping or non level ground will damage system CAUTION Ensure that the following conditions are met when choosing a location The system weighs...

Page 8: ...de 0 7m front clearance for maintenance daily usage prepare a firm flat surface clear of obstructions do not place on soft or unstable ground e g flat dry ground tile concrete do not place system on shipping pallets or other weak raised surfaces place system within reach of a water supply 2m 3 3m 0 5m 0 5m 0 5m 0 7m ...

Page 9: ...drainage valve installation on page 26 after assembling system up to 10m There should be NO U shaped bends along the pipe where water will collect and block gas flow For protection from damage and accidents you can pass the pipe underground or elevate it on nearby structures Use a rigid pipe to protect the tubing and prevent bends It is important to install the pipes at a slight angle from the sys...

Page 10: ...y plunger 10mmø indoor gas tubing 3m 20mm connector attached gas filter combined fertilizer gas outlet gas outlet connecting pipe parts shown in this page are not to scale 20mmø outdoor gas tubing 7m A B system parts Box B combined gas tank digester Box A ...

Page 11: ...BRICANT 1 x4 drainage kit 3 gas tubing T joint 20mmø ball valve 20mmø 20mmø gas tube screw connector fitting 10cm gas pipe parts bag 2 bands for 20mmø gas tubing band for 10mmø gas tubing 20mmø gas tube screw connector fitting 20mmø gas tube straight L connectors 20mm gas tube clamps stakes x7 x2 x3 2 ...

Page 12: ...12 back front gas fertilizer out input sink waste in i ii HomeBiogas logo is located at the FRONT end of the system A ...

Page 13: ...13 i ii iii x4 parts bag 1 i i ii iii LUBRICANT LUBRICANT ...

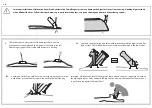
Page 14: ...ontact Homebiogas support if this cardboard protector is missing i ii Lubricate the pipes align and insert each pipe firmly with the digester on a flat hard surface The cardboard protectors will prevent damage to the inner liner iii Combined Outlet Pipe Hold onto the rim of the pipe connector with both hands use the thumbs to push the outlet pipe in all the way LUBRICANT Inlet pipe Hold onto the fol...

Page 15: ...15 1 parts bag LUBRICANT LUBRICANT ...

Page 16: ...16 x2 Inlet sink orientation short cord plunger slot towards back long cord towards front ...

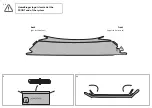
Page 17: ...another person s help stretch out digester inner lining with the 4 corner strings Before filling the digester make sure it is in a suitable location chosen according to the site selection criteria in page 7 8 The digester must be placed on a flattened level surface i ii ...

Page 18: ...18 pipes must point inwards when filling rest hose on digester enter inlet pipe from opposite side ...

Page 19: ...19 check filled digester for leaks contact HomeBiogas if any leaks are seen ...

Page 20: ...20 ii i LUBRICANT x2 ...

Page 21: ...21 i ii iii v iv 90 ...

Page 22: ...22 x40 i ii iii use dry sand only sand bags ...

Page 23: ...23 2 top x16 left right x16 back front x8 1 2 3 x2 x8 x8 x2 x2 x2 x2 x2 x2 x2 x2 x2 x2 x2 ...

Page 24: ...24 iii ii GAS FILTER i remove 2 protective stickers from cover base of gas filter ...

Page 25: ...25 x2 i 1 0 0 C 2cm 10s soften gas pipe in hot water for easy insertion of connectors 1 3 2 marking on gas tank outlet pipe must be facing upwards 2 parts bag ...

Page 26: ... bends along the pipe where water will collect and block gas flow Pass the pipe underground or elevate it onto nearby structures to protect it from damage and accidents It is important to install the pipes at a slight angle from the system the lowest point s will be used to drain water collected in the tubes water drainage outlet installation on page 28 up to 10m Use a rigid pipe to protect the tu...

Page 27: ...n additional safety valve purchase separately with 2x 10mm metal bands 10mmø gas tube into house 20 to 10 mm reducer fitting 2 parts bag purchase 10mm 100 C 2cm 10s x2 1 2 closed i ii iii for all gas pipe fittings soften pipe tip in hot water for easy insertion ...

Page 28: ...st point along 20mm gas tubing prepare suitable bucket container create holes in side bottom closed condensed water vapor may collect in the gas pipe over time as the stove is used and must be emptied with the Drainage Outlet so that gas flow will not be blocked 3 ...

Page 29: ...29 ...

Page 30: ...t Cap G is inserted properly and locking clips are fastened 4 Sandbags inserted in correct locations page 21 7 Gas valve closed until activation complete gas valve on ground level 2 Waste inlet Combined outlet inserted completely 5 Sink anchoring cords correctly attached 8 Water Drainage Outlet valve closed 3 Pipes in O G I assemblies inserted fully 6 Steel bands on 20mm gas tube securely tightene...

Page 31: ...ster filled until water flows from fertilizer outlet 13 Marking on Gas Tank Outlet pipe is facing upwards 11 Digester is placed on strong flat level surface refer page 7 8 14 Combined outlet is aligned 90 vertically and not leaning in any direction 12 Digester is placed in sunny location near kitchen away from windows sitting areas refer page 7 8 ...

Page 32: ... generated in the system some liquid will pour out from the fertilizer outlet and the gas tank will begin to fill up and expand Raise the plunger rest it on the sink s plunger slot and start gradually filling the sink with slurry An equal amount of liquid will pour out from the fertilizer outlet You may collect and reuse this water to mix more slurry to feed into the system Mix the 100 liters of ani...

Page 33: ...ced at first may contain a high level of CO2 and will not ignite easily If the flame is not steady or the gas does not ignite empty the gas tank by unscrewing the Gas Valve Connector until the gas tank has completely deflated Initially the storage tank may need to be emptied once or twice Close the Gas Valve s screw on connector and wait for the tank to fill up again then try to light the stove Onc...

Page 34: ...sink and container with water Push the plunger all the way down the inlet pipe then make sure to turn plunger 180 to lock it in place and properly seal sink Turn the plunger 180 then lift and rest the plunger on the plunger slot on the back of the sink Mix manure well with twice the amount of water to create a slurry 1 2 ratio of manure to water Fillacontainerwithkitchenwaste Kitchen Waste Animal ...

Page 35: ...wigs tree branches wood shavings earth sand metal plastic glass paper any non organic liquids garden waste like non organic objects household waste like Animal waste as clean as possible from stones straw and earth Dog or cat waste free from sand can be fed All types of animal waste should be mixed well with twice the volume of water 1 2 ratio of waste water Animal Manure up to 15 liters per day 1...

Page 36: ...en the average temperature drops below 15 C 59 F If temperatures will drop below freezing you may drain at least 200 liters of liquid from the system and reactivate it page 32 when warmer weather comes Visit homebiogas com faq for more information on heating instructions and solutions or contact HomeBiogas if you have additional enquiries The fertilizer produced by the HomeBiogas system may be saf...

Page 37: ...37 ...

Page 38: ...es Biogas contains water vapor that may condense during cooler nights and accumulate in the gas pipes blocking gas flow If your stove s flame is sputtering you should empty the water from the gas pipes Refer troubleshooting section on p40 for more details When the tank is filled liquid should pour from the fertilizer outlet when the system is fed ...

Page 39: ...d to the filter s cover 4 Properly dispose of the spent filter media by burying it underground as a soil improver or add it to compost Take care not to breathe in vapors from the filter media Rinse and recycle the empty container 1 Return the Gas Filter into its slot in the gas outlet make sure to push the filter down completely 2 Replace the Gas Outlet Cover pushing it down securely and press the...

Page 40: ... Fix the leak or replace the leaky element 6 pH level in the system is abnormally low 5 0 causing gas production to stop see page 39 for details on pH checking Contact HomeBiogas for assistance The most likely cause is accumulation of water condensation in the gas pipe blocking the free flow of gas to the stove Ensure there are no bends dips in the pipe from stove to system that water can collect ...

Page 41: ...as tank through the Drainage Connector Close the connector once the tank is empty ii Stop feeding the system for a week On the 3rd day try to light a flame If the gas does not burn empty the gas tank again and close the Drainage Connector iii After a week try to light a flame again If the flame still does not burn you may need to increase the system s pH 1 Measure the system s pH level with a meas...

Page 42: ... need to weigh it down with a rock other heavy object 2 Bad smell when gas is used Remove the gas outlet G cap pull out the Gas Filter and check that the filter s rubber seal is in place fitted into the filter s lip Replace the filter with a light downward push for a good seal If the rubber seal is fine your filter should be replaced Contact Homebiogas or your local distributor for a replacement 3...

Page 43: ...43 ...

Page 44: ... Daily animal manure input up to 15 ℓ 45 ℓ slurry Daily fertilizer output up to 45 ℓ equal to input volume Operating temperature 20 C 68 F The system accepts a maximum feeding volume of 45 liters daily a combination of up to 6 liters kitchen waste and up to 45 liters animal manure slurry 1 part manure 2 parts water Example 6 liters of kitchen waste and up to 39 liters of manure slurry 13 liters ma...

Page 45: ...tial variation however when using the liquid fertilizer attention should be paid to the appearance and health of the fertilized plants Reduce feeding volumes or stop applying fertilizer if the plant s health is negatively affected HomeBiogas fertilizer can be applied to plants via two methods root drench or foliar spray The fertilizer should be diluted with water at a 5 1 ratio of water to fertili...

Page 46: ...ailure to continually provide a suitable operating environment or from any other cause beyond HomeBiogas reasonable control including Force Majeure events as described in the General Conditions iii have been used in a manner not in accordance with the instructions supplied by HomeBiogas and or the General Conditions iv have been subject to the opening of any sealed components without HomeBiogas pr...

Page 47: ...47 ...

Page 48: ...48 HB2 OM 050221 2021 HOMEBIOGAS ...

Reviews:

Related manuals for HBG 2.0