HOMCOM A91-179 Assembly & Instruction Manual Download Page 21

FOUR TYPES OF STRENGTH WORKOUTS
Note: A “repetition” is one complete cycle of an exercise, such as one sit-up. A “set” is a series of repetitions.

Muscle Building - 

Work your muscles near their maximum capacity and progressively increase the intensity 

of your exercise. Adjust the intensity level of an individual exercise as follows: 
• Change the amount of resistance used.
• Change the number of repetitions or sets performed.
Use your own judgment to determine the amount of resistance that is right for you. Begin with 3 sets of 8 
repetitions for each exercise you perform. Rest for 3 minutes after each set. When you can complete 3 sets 
of 12 repetitions without difficulty, increase the amount of resistance.

Toning - 

Tone your muscles by working them to a moderate percentage of their capacity. Select a moderate 

amount of resistance and increase t he number of repetitions in each set. Complete as many sets of 15 to 20 
repetitions as possible without discomfort. Rest for 1 minute after each set. Work your muscles by complet-
ing more sets rather than by using high amounts of resistance.

Weight Loss - 

 To lose weight, use a low amount of resistance and increase the number of repetitions in 

each set. Exercise for 20 to 30 minutes, resting for a maximum of 30 seconds between sets.

Cross Training - 

Combine strength training and aerobic exercise by following this type of program:

• Strength training workouts on Monday, Wednesday, and Friday. 
• 20 to 30 minutes of aerobic exercise on Tuesday and Thursday. 
• One full day of rest each week to give your body time to regenerate.

WORKOUT GUIDELINES
Familiarize yourself with the equipment and learn the proper form for each exercise. Use your own judgment 
to determine the appropriate length of time for each workout, and the numbers of repetitions and sets to 
complete. Progress at your own pace and be sensitive to your body’s signals. Follow each workout with at 
least one day of rest.

Warming Up - 

Start with 5 to 10 minutes of stretching and light exercise. A warmup increases your body 

temperature, heart rate, and circulation in preparation for exercise. 

Working Out - 

Include 6 to 10 different exercises in each workout. Select exercises for every major muscle 

group, emphasizing areas that you want to develop. To give balance and variety to your workouts, vary the 
exercises from workout to workout. 

Cooling Down - 

Finish with 5 to 10 minutes of stretching. Stretching increases the flexibility of your muscles 

and helps to prevent post-exercise problems.

EXERCISE FORM
Move through the full range of motion for each exercise and move only the appropriate parts of the body. 
Perform the repetitions in each set smoothly and without pausing. The exertion stage of each repetition 
should last about half as long as the return stage. Exhale during the exertion stage of each repetition and 
inhale during the return stroke. Never hold your breath.
Rest for a short period of time after each set: 
• Muscle Building - Rest for three minutes after each set.
• Toning - Rest for one minute after each set. 
• Weight Loss - Rest for 30 seconds after each set.

STAYING MOTIVATED
For motivation, keep a record of each workout. Write the date, the exercises performed, the resistance used, 
and the numbers of sets and repetitions completed. Record your weight and key body measurements once a 
month. To achieve good results, make exercise a regular and enjoyable part of your life.

EXERCISE GUIDELINES

21

Summary of Contents for A91-179

Page 1: ...ASSEMBLY INSTRUCTION MANUAL INamc004_DE_EN A91 179 IMPORTANT RETAIN FOR FUTURE REFERENCE READ CAREFULLY...

Page 2: ...ber an der gezeigten Stelle an Hinweis Der die Aufkleber wird werden m glicherweise nicht in der tats chlichen Gr e angezeigt WARNUNG WARNUNG Ein Missbrauch dieses Ger ts kann zu schweren Verletzungen...

Page 3: ...r den Heimgebrauch bestimmt Verwenden Sie die Hantelbank nicht in kommerziellen vermietenden oder institutionellen Umgebungen Bewahren Sie die Hantelbank in Innenr umen auf und halten Sie sie von Feu...

Page 4: ...die Hantelbank wird Ihnen helfen die spezifischen Ergebnisse zu erzielen die Sie w nschen Lesen Sie zu Ihrem Nutzen dieses Handbuch sorgf ltig durch bevor Sie die Hantelbank benutzen Wenn Sie nach dem...

Page 5: ...er des Teils aus der TEILELISTE am Ende dieses Handbuchs Hinweis Wenn ein Teil nicht im Teilesatz enthalten ist pr fen Sie ob es vormontiert ist M glicherweise sind zus tzliche Teile enthalten M12 x 1...

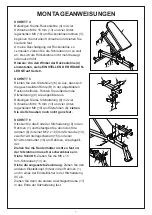
Page 6: ...15 mm 13 und vier Unter legscheiben M8 18 am R ckenlehnenrahmen 3 ziehen Sie die Schrauben noch nicht vollst n dig an SCHRITT 1 Richten Sie das Untergestell 2 und den Rahmen 1 wie abgebildet aus Befes...

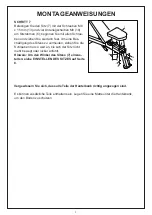
Page 7: ...Sitzhalterung 8 mit vier Schrauben M8 x 15 mm 13 und vier Unter legscheiben M8 18 am Sitzrahmen 6 ziehen Sie die Schrauben noch nicht ganz fest SCHRITT 6 Stecken Sie das Ende der Sitzhalterung 8 in de...

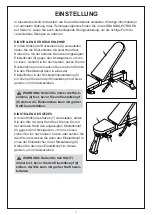
Page 8: ...eiden ziehen Sie die Schrauben nur so weit an bis sich der Sitz nicht mehr bewegt oder locker anf hlt Hinweis Um den Winkel des Sitzes 7 einzus tellen siehe EINSTELLEN DES SITZES auf Seite 8 Vergewiss...

Page 9: ...Einstelll cher in der R ckenlehnenhalterung 5 ein Drehen Sie dann den Einstellknopf im Uhrzei gersinn um ihn festzuziehen 4 9 5 7 9 8 WARNUNG Halten Sie immer die R ck enlehne 4 fest bevor Sie am Ein...

Page 10: ...ten vertraut und lernen Sie die richtige Form f r jede bung Bestimmen Sie nach eigenem Ermessen die angemessene Zeitdauer f r jedes Training und die Anzahl der Wiederholungen und Einheiten die Sie aus...

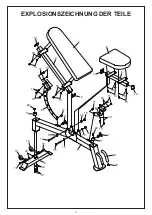
Page 11: ...1 3 4 6 8 10 10 12 12 12 12 5 2 7 9 9 11 11 14 14 16 16 17 18 18 18 19 19 13 13 13 15 15 15 15 17 20 21 22 22 18 18 18 13 13 18 13 18 13 18 13 24 23 EXPLOSIONSZEICHNUNG DER TEILE 11...

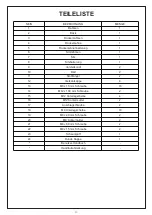
Page 12: ...ad 2 11 Sto f nger 2 12 Vierkantkappe 4 13 M8 x 15 mm Schraube 16 14 M12 x 100 mm Schraube 2 15 M12 Unterlegscheibe 4 16 M12 Kontermutter 2 17 Anschlagschraube 2 18 M8 Unterlegscheibe 18 19 M8 x 40 mm...

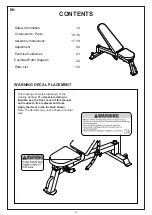
Page 13: ...st 17 19 20 21 22 23 14 15 16 WARNING DECAL PLACEMENT This drawing shows the location s of the warning decal s If a decal is missing or illegible see the front cover of this manual and request a free...

Page 14: ...is manual The weight bench is intended for home use only Do not use the weight bench in any commercial rental or institutional setting Keep the weight bench indoors away from moisture and dust Do not...

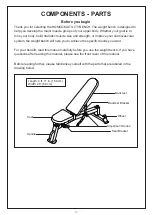
Page 15: ...he weight bench will help you to achieve the specific results you want For your benefit read this manual carefully before you use the weight bench If you have questions after reading this manual pleas...

Page 16: ...umber of the part from the PART LIST near the end of this manual Note If a part is not in the hardware kit check to see whether it has been preassem bled Extra hardware may be included M12 x 100mm Bol...

Page 17: ...st Frame 3 with four M8 x 15mm Screws 13 and four M8 Washers 18 do not fully tighten the Screws yet STEP 1 Orient the Base 2 and the Frame 1 as shown Attach the Base 2 to the Frame 1 with two M8 x 60m...

Page 18: ...Frame 6 with four M8 x 15mm Screws 13 and four M8 Washers 18 do not fully tighten the Screws yet STEP 6 Insert the end of the Seat Bracket 8 into the Frame 1 and then attach the Seat Frame 6 to the F...

Page 19: ...aging the Seat tighten the Screws only until the Seat does not move or feel loose Note To adjust the angle of the Seat 7 see ADJUSTING THE SEAT on page 8 Make sure that all parts of the weight bench a...

Page 20: ...ustment Knob into one of the adjustment holes in the Backrest Bracket 5 Then turn the Adjustment Knob clock wise to tighten it 4 9 5 7 9 8 WARNING Always hold the Backrest 4 before pulling the Adjustm...

Page 21: ...with the equipment and learn the proper form for each exercise Use your own judgment to determine the appropriate length of time for each workout and the numbers of repetitions and sets to complete Pr...

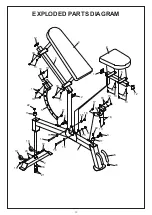
Page 22: ...1 3 4 6 8 10 10 12 12 12 12 5 2 7 9 9 11 11 14 14 16 16 17 18 18 18 19 19 13 13 13 15 15 15 15 17 20 21 22 22 18 18 18 13 13 18 13 18 13 18 13 24 23 EXPLODED PARTS DIAGRAM 22...

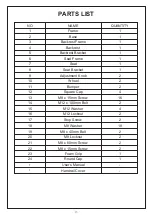
Page 23: ...stment Knob 10 2 Wheel 11 2 Bumper 12 4 Square Cap 13 16 M8 x 15mm Screw 14 2 M12 x 100mm Bolt 15 4 M12 Washer 16 2 M12 Locknut 17 2 Stop Screw 18 18 M8 Washer 19 2 M8 x 40mm Bolt 20 2 M8 Locknut 21 2...

Page 24: ......

Reviews: