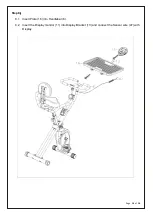
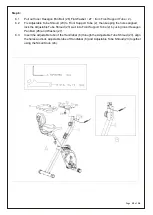
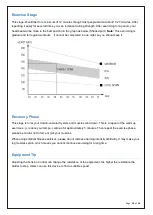
HOMCOM A90-245 Assembly Instruction Manual Download Page 15


Page 

15

  of 

16


The Warm Up Phase 

This stage helps get the blood flowing around the body and the muscles working properly. It will also 

reduce the risk of cramp and muscle injury. It is advisable to do a few stretching exercises as shown 

below. Each stretch should be held for approximately 30 seconds, do not force, or jerk your muscles into 

a stretch - if it hurts, STOP. 


1.Down Stretch 

Bend your knees slightly and body slowly, let 

your back and shoulders relax, and try to touch 

your toes. Hold for 10 - 15 seconds, repeat 3 

times. 

2. Hamstring Stretch. 

Sitting on a clean cushion, bend your left foot, 

and place it against the inner thigh of your right 

foot.    Try to touch your toes. Hold for 10 -15 

seconds, repeat 3 times on each foot. 

3. Calf and Foot Stretching 

Stand and place both hands on a wall or a tree, 

with one foot behind. Keep the back foot 

straight with the heel on the floor, then lean 

forward towards the wall or tree. Hold for 10 - 

15 seconds, repeat 3 times on each foot.   

4 Quadriceps Stretch.   

Place your left hands against a wall or a desk to 

aid your balance. Then grasp your left ankle 

with your left hand and pull your foot toward 

your buttocks. Hold for 10 - 15 seconds, repeat 

3 times on each foot. 

5. Groin Stretch. 


Sit with your knees flexed and soles of feet 

together. Hold your ankles and bend at your 

hips. Hold for 10 -15 seconds, repeat 3 times. 


Summary of Contents for A90-245

Page 1: ...ASSEMBLY INSTRUCTION INaob001_UK A90 245 IMPORTANT RETAIN FOR FUTURE REFERENCE READ CAREFULLY...

Page 2: ...nt Safety Precautions 3 Product Breakdown and Parts Catalogue 4 Parts List 1 5 Parts List 2 6 Assembly Instructions 7 1 Notice 7 2 Assembly instructions 7 The Warm Up Phase 15 Exercise Stage 16 Recove...

Page 3: ...ing when exercising DO NOT wear robes or other clothing that could become caught in the machine Running or aerobic shoes are also required when using the machine 7 Use the machine only for its intende...

Page 4: ...Page 4 of 16 Product Breakdown and Parts Catalogue EXPLODED DIAGRAM 1...

Page 5: ...2 18 Crossed Pan Self Tapping Screw ST4 2 9 8 54 Front Stabiliser End Cap 2 19 Round Inner Plug 22 1 5 2 55 Rear Stabilizer End Cap 2 20 Square Inner Plug 53 23 1 5 1 56 Inner Hexagon Pan Screw M8 40...

Page 6: ...l Axle 1 73 Flywheel 1 91 Bearing 6202Z 1 74 Waved Washer Ring D17 1 92 Spring Washer Ring of Axle D15 1 75 Nylon Bearing Support D shaped 2 93 Adjustable Chain Bolt 2 76 Crossed Pan Self Tapping Scre...

Page 7: ...has enough space around the machine before assembly B Please use the provided tools or right tools by yourself C Check the parts and the hardware first 2 Assembly instructions Step 1 1 1 Drag Bead Pi...

Page 8: ...Page 8 of 16 Step 2 2 1 Lock Rear Stabilizer 4 and Front Stabilizer 3 into Main Frame 1 using the Waved Washer 52 and Domed Nut 51...

Page 9: ...he Flat Washer 37 Nylon Nut 38 from Seat Cushion 36 3 2 lock Seat Cushion 36 into Seat Tube 5 by using the Flat Washer 37 and Nylon Nut 38 3 3 insert Seat Tube 5 into Main Frame 1 then align the hole...

Page 10: ...rame Tube 80 then lock the Back Cushion 65 into Back Rest Frame Tube 8 by using Inner Hexagon Pan Screw 29 and Spring Washer 66 4 2 Pull out Square Bolt 60 Flat Washer 40 and Nylon Nut 59 from Seat Br...

Page 11: ...agon Pan Screw 56 5 2 Lock Pedal 48L and Pedal 48R into Crank 50L and Crank 50R respectively 5 3 Lock Nylon Nut 49L and Nylon Nut 49R well Note The right pedal 48R should be turned clockwise when lock...

Page 12: ...2 then keeping the holes aligned lock the Adjustable Tube Shroud 23 well into Front Support Tube 2 by using Inner Hexagon Pan Bolt 26 and Washer 27 6 3 Insert the adjustable tube of the Handlebar 6 t...

Page 13: ...lip 17 into Plate 16 and lock them together by using Crossed Pan Self Tapping Screw 18 7 2 Align the holes on the Display Bracket 13 with the Plate Snap Clip 17 then lock them together by using Inner...

Page 14: ...Page 14 of 16 Step 8 8 1 Insert Plate 16 into Handlebar 6 8 2 Insert the Display monitor 11 into Display Bracket 13 and connect the Sensor wire 47 with Display...

Page 15: ...our left foot and place it against the inner thigh of your right foot Try to touch your toes Hold for 10 15 seconds repeat 3 times on each foot 3 Calf and Foot Stretching Stand and place both hands on...

Page 16: ...covery Phase This stage is to let your Cardio vascular System and muscles wind down This is a repeat of the warm up exercise e g reduce your tempo continue for approximately 5 minutes Then repeat the...

Page 17: ......

Reviews: