background image

17

X1   MD80-S

    Manual 1.0 en

X1 Modul 80-S

THE ELECTRONICS PACKAGE

 
The Electronics Package is fabricated of aluminum 
alloy and houses the main electronic components. It is 
both the brain and powerhouse of the Audio Module, 
integrating processor and amplification.

The Electronics Package connects to the Loudspeaker 
Cabinet through two 108-pin connectors, which carry the 
amplified loudspeaker signals, a digital bus, and power 
for the active electronic components in the front of the 
Audio Module.

The Electronics Package integrates:

•  5x 16-channel digital amplifier modules — providing 

individual amplification and DSP control to each of 
the 80 drivers in the first two matrix layers

•  2x AC to DC amplifier “Smart Rail” power supply 

modules

•  2x DC amplifier energy storage modules

•  the “Core” — integrating a processing module 

combining a high-performance Field Programmable 
Gate Array (FPGA) and a dual-core ARM® 
Cortex™-A9, with an independent AC to DC ancillary 
power supply

•  an optional “Dante Module” — providing Dante audio 

networking connectivity

•  8x temperature-controlled fans — actively cooling 

the Electronics Package

•  the “Display Panel” — providing information on the 

Audio Module’s ID and status

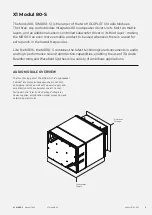
THE DISPLAY PANEL

 
The backside of the Electronics Package integrates 
the Display Panel, which displays Audio Module status 
and error messages, and provides basic information 
like IP addresses and firmware version. The resistive 
touch screen responds to pressure and therefore can be 
operated by a fingertip, even when wearing gloves, or by 
an appropriate stylus tip (pen).

“Reset” 

pin-hole switch

“Test”  

pin-hole switch

2x LEDs for contextual Audio 

Module status display 

•  the upper LED lights up 

blue when Audio Module 

is in factory mode 

•  the lower LED mirrors 

the behavior of the four 

RGB LEDs on the front of 

the Loudspeaker Cabinet

3.5” TFT color touch screen 

with a resolution of  320 x 240 

pixels screen: displays the serial 

number, firmware version, 

IP addresses, Audio Module 

state, and error messages in 

case a fault was detected

LED labeled “STATUS” for 

general Audio Module status 

indication, which lights up 

red if an error is detected 

and is off otherwise

LED labeled “POWER” for 

Audio Module power status 

indication, which lights up 

green as soon as the Audio 

Module is powered on

i

The touch screen utilizes a thin 
flexible sheet that may be damaged 
by sharp objects or heavy treatment.

Summary of Contents for MD80-S

Page 1: ...HOLOPLOT X1 Modul 80 S User Manual Version 1 0 en ...

Page 2: ...ould not be construed as a legal commitment HOLOPLOT reserves the right to change the content of this manual without prior notice We recommend that you regularly check the HOLOPLOT website for the latest version All third party trademarks mentioned herein are the property of their respective trademark holders Holoplot GmbH Ringbahnstr 12 10 14 A2 12099 Berlin Germany 49 0 30 4074 5812 info holoplo...

Page 3: ...ween Audio Modules Ground Stacking Heat Generation and Dissipation Cooling and Air Flow Requirements Clearance Required at the Back Power Setup and Requirements AC Power Distribution Requirements AC Power Connectors AC Power IN blue AC Power OUT gray AC Power Cable Requirements Voltage Requirements Power States and Current Power Draw Protection Circuitry Intelligent AC Power Supply Network Setup a...

Page 4: ...PLOTAudio System In particular pay close attention to material related to safety issues The first section of this document provides a summary of all important safety instructions in two languages English and French The following symbols indicate important safety related instructions or warnings provided in this manual or on the product itself As you read these instructions you will also encounter ...

Page 5: ...es ces instructions 2 Tenez compte de tous les avertissements 3 N utilisez pas cet appareil à proximité de l eau N installez pas l appareil dans des endroits humides ou mouillés N exposez pas cet appareil à la pluie ou à l humidité Ne laissez pas l eau ou tout autre objet étranger pénétrer dans l appareil Ne mettez pas d objets contenant du liquide sur l appareil ou à proximité de celui ci 4 Netto...

Page 6: ...upérieures à 208 V afin d éviter tout risque électrique 11 Si le voyant POWER ne devient pas vert coupez immédiatement l alimentation en courant alternatif et vérifiez que la tension est dans la plage requise Si le problème persiste contactez le support technique de HOLOPLOT 12 Avant d appliquer le courant alternatif à un Module Audio assurez vous que la différence de potentiel entre le neutre et ...

Page 7: ...s de montage de câble appropriés d Amphenol Tous les connecteurs doivent être au moins de 25 A Utilisez au moins des fils AWG 12 20 La fiche d alimentation située à l autre extrémité du câble d alimentation CA doit être choisie en fonction des exigences de la région dans laquelle vous utiliserez l appareil 21 Pour réduire le risque de choc électrique débranchez l appareil du secteur avant d instal...

Page 8: ...de pression acoustique voir la fiche technique à la fin de ce manuel pour connaître le niveau de pression acoustique maximal que cet appareil peut produire 29 Do not attempt to disassemble the device Do not remove the loudspeaker grille Opening the device will void the warranty 30 Exposure to high sound pressure levels can cause permanent hearing loss Use adequate protection such as ear plugs or p...

Page 9: ...amplified and controlled by its own Digital Signal Processor DSP enabling ultimate control over sound HOLOPLOTAudio Modules are capable of generating multiple sound fields simultaneously each with its own content equalization level shape and position either in a single Audio Module deployment or as part of a larger HOLOPLOT Matrix Array system Each Audio Module provides digital audio connectivity ...

Page 10: ...sers to easily locate Matrix Arrays within the venue control volume and equalization and monitor performance By displaying essential system data such as component health or network status HOLOPLOT Control aids technical staff in operating and maintaining the entire system CONTROLLER The HOLOPLOT Controller manages a HOLOPLOT Audio System through a standard IP network providing different functional...

Page 11: ...m or HOLOPLOT affiliated service teams to access a HOLOPLOT installation for remote monitoring and remote failure analysis enabling efficient and targeted technical support as well as prediction of maintenance service intervals Furthermore Connected Services provide HOLOPLOT Audio Systems with software updates and upgrades for improved performance and security as well as new features making the sy...

Page 12: ...ound wave propagation by adjusting the vertical and horizontal steering angle and the vertical and horizontal opening angles The sound field of a HOLOPLOT Matrix Array can be configured individually to adapt to an installation s requirements even when facing complex shaped environments or challenging room acoustics A sound field based on HOLOPLOT 3D Audio Beamforming technology is usually deployed...

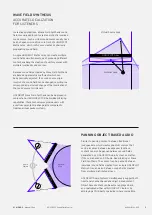
Page 13: ...1 2 Audio Object A r r a y Virtual Source Area WAVE FIELD SYNTHESIS ACCURATE LOCALIZATION FOR LISTENERS In creative applications a Wave Field Synthesis sound field is usually deployed to create a distinctly localized sound source Such a virtual sound source usually has a point shaped origin behind or in front of a HOLOPLOT Matrix Array which in this case creates a spherically propagating sound fie...

Page 14: ...urthermore an increased array size allows for higher SPL broadband values improves coverage homogeneity in high frequencies and reduces sound spill outside the targeted area HOLOPLOT Sound Field Control Sound fields created with HOLOPLOT Matrix Arrays are controllable independently horizontally and vertically The upper control frequency is dependent on the beam configuration The respective amount ...

Page 15: ... the MD80 S combines the latest technological advancements in audio and high performance sound reproduction capabilities enabling the use of 3D Audio Beamforming and Wavefield Synthesis in a variety of ambitious applications AUDIO MODULE OVERVIEW The front facing part of the MD80 S the Loudspeaker Cabinet integrates loudspeaker drivers sensors and rigging points as well as the power supply and amp...

Page 16: ...ture sensors each monitoring a low frequency loudspeaker drivers magnet assembly 2x temperature sensors each monitoring a high frequency loudspeaker drivers magnet assembly 2x orientation sensors detecting Audio Module s orientation 1 1 1 1 2 2 2 2 3 3 3 3 The MD80 S integrates the following active electronic components in its glass fiber polycarbonate enclosure X1 Modul 80 S An 18 inch sensor con...

Page 17: ... the Electronics Package the Display Panel providing information on the Audio Module s ID and status THE DISPLAY PANEL The backside of the Electronics Package integrates the Display Panel which displays Audio Module status and error messages and provides basic information like IP addresses and firmware version The resistive touch screen responds to pressure and therefore can be operated by a finge...

Page 18: ...nnectors carry HOLOPLOT proprietary audio networking protocols used for special purposes SubLink Two SubLink etherCON RJ45 networking connections which can be utilized to provide audio signal to the subwoofer amplifier module integrated into the Loudspeaker Cabinet of the MD80 S and to standalone Subwoofer Modules offered by HOLOPLOT in the future SubLink connectors carry HOLOPLOT proprietary audi...

Page 19: ...capacity to prevent them falling or tipping Audio Modules shall not be lifted by any other means than the rigging points identified Audio Modules shall only be stood on the bottom top or sides They shall not be stood on the Electronics Package rear of Audio Module or front grille Standing in any other way can damage the Audio Module The Modul 80 S is a heavy device and should not be carried by ope...

Page 20: ...ate torque not exceeding 65 Nm IMPORTANT SAFETY AND LEGAL NOTE A rigging system must be designed and used in accordance with local state federal and industry regulations It is the user s responsibility to evaluate the reliability of any rigging method for their application Rigging should only be designed and carried out by experienced professionals Any rigging design must be verified and approved ...

Page 21: ... an array The eight M10 rigging points as well as the two additional M10 safety points are threaded to a depth of 19 mm The threads are recessed by ca 4 mm from the outer surface Hence ensure the M10 fasteners used are long enough to engage sufficiently with the threads but do not exceed 18 mm depth into the Audio Module from the outer surface FRONT 370 75 75 15 6 0 x2 x 4 370 TOP BOTTOM 47 LEFT R...

Page 22: ...ormance of Matrix Arrays requires a consistent spacing between loudspeaker drivers across multiple Audio Modules Hence when designing a rigging system for an array of X1 Audio Modules reduce the distance between individual Audio Modules to a minimum The distance should not exceed 50 mm in any of the axes horizontal and vertical If Audio Modules lack appropriate fixation to the floor or to a secure...

Page 23: ... is required to have access to cool air and may not be sealed by surrounding infrastructure CLEARANCE REQUIRED AT THE BACK For connectors and cable dress there must be at least 100 mm clearance on the back of an Audio Module To prevent overheating ensure sufficient airflow around the back and sides of the Electronics Package Do not block the intake fans at the bottom nor the exhaust cooling vents ...

Page 24: ... safety guidelines Power Setup and Requirements Improper grounding of connections between Audio Modules and other equipment may produce noise hum or cause serious damage to the devices electronic components When powering the Electronics Package and the subwoofer amplifier module from two different power sources wall sockets make sure that both power sources provide the same ground potential Before...

Page 25: ... I L B U S N I Do not connect under load T U O AC Output 240V 9 5A 208V 9A AC Input Range 115 240V 50 60Hz AC Input 115V 6 5A 240V 12 8A AC Input Range 115 240 V 50 60 Hz AC Input 115 V 1 1 A 240 V 0 9 A Do not connect under load Only power from Electronics Package at Power IN 208 V SUBLINK IN Do not connect or disconnect the Amphenol HP Series 25 connectors under load AC POWER IN BLUE The two blu...

Page 26: ...nol HP 3 FJ interconnecting cable is available from HOLOPLOT as an accessory P N H42 120 50 B1 Only use the AC Power OUT at AC input voltages equal to or higher than 208 V to prevent electrical hazards K R O W T E N Secondary Uplink Secondary Downlink Primary Downlink Primary Uplink K N I L O L O H A B 1 2 K N I L B U S N I Do not connect under load T U O AC Output 240V 9 5A 208V 9A AC Input Range...

Page 27: ...dio discontinuity when the AC voltage stays within a nominal range of 115 240 V at 50 or 60 Hz Make sure that your AC main connections are capable of satisfying the power rating FJ side FJ front Mains voltages exceeding the specified nominal range can damage the Audio Module or shorten component life For all AC power cables use the correct cable mount connectors from Amphenol All connectors must b...

Page 28: ...ronics Package and the current draw of the subwoofer amplifier module are not in phase Therefore current draw when powering both from a single power source is different than the sum of the values for powering each individually ELECTRONICS PACKAGE Current draw and input power of the Modul 80 S Electronics Package in different power states SLEEP MODE IDLE CONTINUOUS MAX POWER 120 V AC 0 4 A rms 1 7 ...

Page 29: ...urrents do not exceed the Maximum Input Peak Current MIPC limit A power supply capacity based limiter regulates the peak level of the audio signal preventing amplifiers from shutting down if the amplifier power supplies are depleted amplifier brown out protection Various current and voltage limiters protect drivers from excessive excursion and excessive voice coil temperature Athermal limiter prot...

Page 30: ...ary Switch with DHCP Server Network Secondary optional Switch with DHCP Server HOLOPLOT Controller Primary Audio Modules HOLOPLOT Controller Secondary optional 3rd party Dante Audio source Audio Modules i All HOLOPLOTAudio Modules are stateless i e without a control network connection to the HOLOPLOT Controller the Audio Module is not functional The Audinate Dante protocol does not support daisy c...

Page 31: ...ry switch connects to the Secondary Uplink port i The maximum CAT6 cable length supported for control and Dante audio networking is 100 meters NETWORKING REQUIREMENTS Networking appliances A DHCP server needs to be present to provide all Audio Modules and HOLOPLOT Controller s with IP addresses The HOLOPLOT System does not work with static IP addresses To achieve full network redundancy the networ...

Page 32: ...ovide audio and control signal to this subwoofer amplifier module connect the SubLink 1 connection on the connector panel of the Electronics Package to the SubLink IN port on the connector panel of the Loudspeaker Cabinet The SubLink port may also be used to provide audio and control signal to standalone Subwoofer Modules offered by HOLOPLOT in the future i To connect the SubLink 1 port on the Ele...

Page 33: ...ement service PC or Mac running HOLOPLOT Plan PC Mac or tablet running HOLOPLOT Control Third party audio source with Dante audio networking connectivity Networking appliances Ethernet switch and DHCP server HOLOPLOT Control Remote Interface HOLOPLOT Controller Primary 3rd party Audio source HOLOPLOT Plan HOLOPLOT Cloud HOLOPLOT Audio Modules HOLOPLOT Audio Modules HOLOPLOT Audio Modules Network P...

Page 34: ...V 6 5A 240V 12 8A AC Input Range 115 240 V 50 60 Hz AC Input 115 V 1 1 A 240 V 0 9 A Do not connect under load Only power from Electronics Package at Power IN 208 V SUBLINK IN K R O W T E N Secondary Uplink Secondary Downlink Primary Downlink Primary Uplink K N I L O L O H A B 1 2 K N I L B U S N I Do not connect under load T U O AC Output 240V 9 5A 208V 9A AC Input Range 115 240V 50 60Hz AC Input...

Page 35: ...e Display Panel will indicate if an error is detected in the MD80 S by turning red The error description appears on the Display i For more information on redundancy please refer to the Network Design section K R O W T E N Secondary Uplink Secondary Downlink Primary Downlink Primary Uplink K N I L O L O H A B 1 2 K N I L B U S N I Do not connect under load T U O AC Output 240V 9 5A 208V 9A AC Input...

Page 36: ...ollowing steps need to be carried out in order to play audio through the Modul 80 S STEP 1 CONFIGURE THE MD80 S VIA HOLOPLOT PLAN a Connect your PC Mac to the local area network serving the HOLOPLOTAudio System b In HOLOPLOT Plan establish a connection to the HOLOPLOTAudio System c Load your prepared project settings including configurations for the MD80 S onto the connected HOLOPLOTAudio System O...

Page 37: ... the external audio source to set the level We recommend you start at a relatively low level and increase slowly MONITORING AND CONTROLLING THE MD80 S DURING OPERATION HOLOPLOT Control a browser based interface is used to manage update and monitor a HOLOPLOT Audio System installation You can access and use HOLOPLOT Control from a tablet device using the internet browser The number of unicast flows...

Page 38: ... options to access HOLOPLOT Control Enter https holoplot local in the address bar of your web browser In HOLOPLOT Plan once a connection to the HOLOPLOT Audio System has been established follow File Open Controller Interface This will open the Web Interface in your default web browser Both options require an active connection to the local control network UPDATING Software Updates for a HOLOPLOTAud...

Page 39: ...le parts inside the Audio Module In case of any damage contact HOLOPLOT Customer Support Refer servicing only to qualified service personnel authorized by HOLOPLOT In particular if objects or liquids have entered the device the device does not operate normally the device was dropped or the housing is damaged Due to the cooling concept no dust filters are required As a result filter exchange or cle...

Page 40: ...OT 3D AUDIO BEAMFORMING TECHNOLOGY Steering angle and Up to 12 beams in parallel per X1 Matrix Array 8 fully user configurable parametric beams and virtual sources 4 beams providing optimized coverage over a predefined audience area Steering angle and opening angle user adjustable 0 1 steps defined by HOLOPLOT algorithms Steering angle and opening angle user adjustable 0 1 steps defined by HOLOPLO...

Page 41: ...istributed audio operating system 80 1 7600 parametric EQ bands and more than 1100 Finite Impulse Response FIR filters with over 430000 filter taps Sleep Mode Idle Continuous Max Power POWER CONSUMPTION 140 W 400 W 1 040 W 1 710 W Control Audio Power CONNECTORS ON LOUDSPEAKER CABINET FOR SUBWOOFER MODULE 1x etherCON Cat 6A RJ45 for SubLink 1x Amphenol HP 3 MDQ for AC Power IN 115 240 V AC 50 60 Hz...

Page 42: ...flame retardant textured black finish RAL 9005 Premium multi ply Finnish Birch Plywood Polyurea finish textured black RAL 9005 Aluminum alloy powder coated black RAL 9005 Hexagon perforated steel with hydrophobic damp and dust repellent acoustic cloth black RAL 9005 Device Condition Packaged in shipping box Operating ENVIRONMENTAL CONDITIONS Temperature 20 C to 60 C 10 C to 45 C Humidity to 90 at ...

Page 43: ...e FCC Rules These limits are designed to provide reasonable protection against harmful interference when the equipment is operated in a commercial environment This equipment generates uses and can radiate radio frequency energy and if not installed and used in accordance with the instruction manual may cause harmful interference to radio communications Operation of this equipment in a residential ...

Page 44: ...44 X1 MD80 S Manual 1 0 en Holoplot GmbH Ringbahnstr 12 10 14 A2 12099 Berlin Germany 49 0 30 4074 5812 info holoplot com holoplot com ...

Page 45: ......

Reviews: