background image

Affirm User Guide 

Chapter 2: General Information 


Page 10 

MAN-03209 Revision 005 


2.4 

Biopsy Control Module Components 

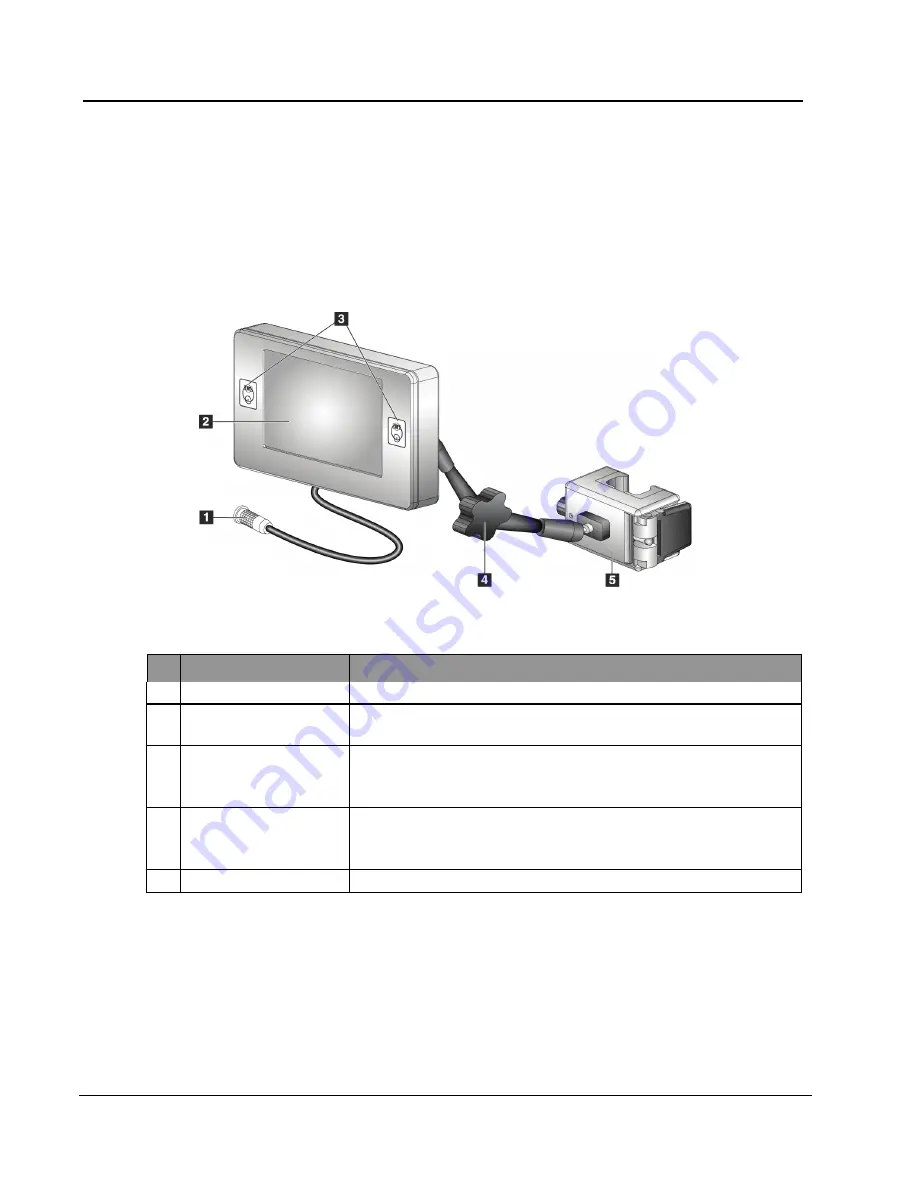
The Biopsy Control Module attaches to either the left or right handle on the Biopsy 
Guidance Module with a bracket (item 5). The display screen (item 2) is a touch screen for 
the user to perform the desired tasks. Motor Enable buttons (item 3) on either side of this 
module (and at the rear) activate motorized movement of the biopsy device. 


Figure 5:


Biopsy Control Module 


Table 2:


Components of the Biopsy Control Module 

Name 

Description 

Cable 

Connects to Biopsy Guidance Module. 

Display Screen 

Shows targets, system status, name of the biopsy device, and safety 
margins. Touch buttons allow option selection. 

Motor Enable Buttons  Front and back button pairs on either side of the display. Press the 

front and back buttons of either side at the same time to activate a 
motor movement. 

Articulating Arm Lock 
and Release 

Rotate to release the lock and adjust the module. Rotate in the 
opposite direction to lock the arm and hold the module in the new 
position. 

Attachment Bracket 

Attaches to either handle of the Biopsy Guidance Module. 


Summary of Contents for Affirm

Page 1: ......

Page 2: ......

Page 3: ...User Guide For Software Version 1 7 Part Number MAN 03209 Revision 005 January 2015...

Page 4: ......

Page 5: ...bols 4 1 11 Warnings Cautions and Notes 5 2 General Information___________________________________________________________7 2 1 System Description 7 2 2 How to Handle the Biopsy Guidance Module 8 2 3...

Page 6: ...eaning 46 5 3 1 How to Clean the Biopsy Control Module Screen 46 5 3 2 To Prevent Possible Injury or Equipment Damage 47 5 4 Geometry Calibration 47 5 4 1 Geometry Calibration Procedure 47 6 Troublesh...

Page 7: ...sy Control Module 23 Figure 12 Admin Screen 24 Figure 13 Device Field in the Biopsy Tab 24 Figure 14 The Home Screen 26 Figure 15 Target Guidance Screen 27 Figure 16 Green Differential Cells 28 Figure...

Page 8: ......

Page 9: ...Module 9 Table 2 Components of the Biopsy Control Module 10 Table 3 How to Use the Sound Button 29 Table 4 The C Arm Stereo Mode Button 36 Table 5 How to Select the C Arm Stereo Mode 37 Table 6 Radiol...

Page 10: ......

Page 11: ...r Guide for instructions on using the system 1 3 Product Complaints Report any complaints or problem in the quality reliability safety or performance of this product to Hologic If the device has cause...

Page 12: ...ht with two hands necessary for upright stereotactic systems Understands sterile procedures 1 7 2 Radiologists Surgeons Meets all requirements that apply to the location in which the Physician operate...

Page 13: ...e The user control device for the Affirm breast biopsy guidance system Biopsy Guidance Module Holds and operates the biopsy device Responds to commands from the Biopsy Control Module to move the devic...

Page 14: ...ion X axis The lateral axis from left to right across the biopsy window Y axis The longitudinal axis from front to back above the biopsy window Z axis The vertical axis through the biopsy window 1 10...

Page 15: ...ual WARNING The procedures that you must follow accurately to prevent possible dangerous or fatal injury Warning The procedures that you must follow accurately to prevent injury Caution The procedures...

Page 16: ......

Page 17: ...main components Biopsy Guidance Module Biopsy Control Module The Tube Arm on the Selenia Dimensions moves separately from the Compression Arm to allow the acquisition of stereotactic images for the p...

Page 18: ...ge be careful when you move the Biopsy Guidance Module Caution The Affirm Biopsy Guidance Module weighs 15 pounds When you move it be sure to have a secure grip on the handles Only lift the Biopsy Gui...

Page 19: ...antry 2 Handles One on each side Hold both handles to lift the Biopsy Guidance Module 3 Z axis Control Knobs Rotate either knob to move the biopsy device along the Z axis 4 Z axis Slide Rail Holds the...

Page 20: ...l Module Table 2 Components of the Biopsy Control Module Name Description 1 Cable Connects to Biopsy Guidance Module 2 Display Screen Shows targets system status name of the biopsy device and safety m...

Page 21: ...rays Do not connect this equipment to any system or component not described in this manual A combination of components must have the data to validate the safety of the patient personnel and the enviro...

Page 22: ...e patient unattended during the exam Warning Keep the hands of the patient away from all buttons and switches at all times Caution To prevent damage or misalignment be careful when you move the Affirm...

Page 23: ...turer is responsible for the effects of safety reliability and performance of this equipment with the following provisions The equipment is used in accordance with the User Guide Assembly operations e...

Page 24: ......

Page 25: ...ave a secure grip on the handles Figure 7 Installation of the Biopsy Guidance Module 1 Move the Compression Device down 2 Hold the Biopsy Guidance Module by both handles 3 Slide the top hooks item 2 o...

Page 26: ...the Attachment Bracket item 4 until the side with the Lock item 5 is on the front side of the handle 3 Attach the Lock side of the Attachment Bracket around the lower end of the handle 4 Slide the op...

Page 27: ...item 5 2 Slide the bracket to the required height 3 Put the Attachment Bracket Lock item 5 into the locked position How to adjust the Biopsy Control Module position 1 Release the Lock Knob item 1 for...

Page 28: ...efer to the Selenia Dimensions User Guide for instructions on installation and removal of the paddles 3 2 2 Biopsy Device Holder To install a biopsy device holder 1 Align the holes top and bottom in t...

Page 29: ...de of the Needle Guide fits between the two lobes of the Needle Guide Mount 2 Slide the open area of the U shape in the Needle Guide around the pin in the Needle Guide Mount 3 Push the Needle Guide in...

Page 30: ...dle guide to the highest upper position as shown in A 2 Disconnect the Affirm cable from the Gantry 3 Remove the Affirm Guidance Module along with the Control Module if present Caution To prevent dama...

Page 31: ...psy Guidance Module from the Selenia Dimensions 1 Disconnect the Biopsy Guidance Module Cable from the Selenia Dimensions 2 Hold a handle of the Biopsy Guidance Module with one hand while you release...

Page 32: ......

Page 33: ...he Home screen shows on the Biopsy Control Module Figure 11 Home Screen on the Biopsy Control Module 4 1 2 The QAS Test Each day that you plan to use the system do this test one time to confirm the sy...

Page 34: ...he Admin button on the Selenia Dimensions then select the QAS button from the Admin screen Figure 12 Admin Screen 2 When the QAS screen shows on the Selenia Dimensions Acquisition Workstation select t...

Page 35: ...Needle use 25 kV 10 mAs For QAS Tomo Phantom use 25 kV 30 mAs 10 Acquire and Accept the first view in the procedure The Auto Accept feature is not enabled during the QAS procedure and targeting on th...

Page 36: ...elected target coordinates and the Cartesian difference between the two positions The buttons in the Target Guidance screen allow the user to go to the Previous screen item 3 go to the screen for targ...

Page 37: ...between C Arm Mode or Stereo Mode when the system is set for Manual C Arm Stereo Mode 6 This button is gray and disabled 7 Mute or Enable Sound An icon displays on this button and an alarm sounds whe...

Page 38: ...re 16 Green Differential Cells Yellow and Red Cells Figure 17 Yellow and Red Cells Yellow indicates that the biopsy device is in the correct position for that axis but you must move the device to the...

Page 39: ...beep sound To stop the sound press the Sound button All system beep sounds are muted and the icon on the button changes When you correct the safety margin violation the icon on the button disappears...

Page 40: ...em 5 and cancel item 7 an audible signal that sounds when there is a problem with a safety margin The display area item 4 of the Jog Mode screen shows the difference between the current position of th...

Page 41: ...negative direction 3 Change Y axis Jog value in positive direction 4 Target Information 5 Go to the Previous screen 6 Change X axis Jog value in positive direction 7 Mute or Enable Sound An icon displ...

Page 42: ...The name of the biopsy device that was selected also displays item 5 To move the biopsy device to one of the targets shown in this screen 1 Press one of the target coordinates icons or the home button...

Page 43: ...tomosynthesis image acquisition is acquired to determine the 3D X Y Z Cartesian coordinates of the region of interest How to Add a Biopsy View 1 From the Procedure screen select the Add View button Fi...

Page 44: ...t view to an image Figure 23 Edit Biopsy View Screen To edit a view 1 Select an exposed thumbnail image view in the Procedure screen 2 Select the Edit View button 3 Select the view from the screen and...

Page 45: ...configure the lockout force from 22 Newtons 5 pounds to 45 Newtons 10 pounds In Auto C Arm Stereo Mode In the Auto C Arm Stereo Mode the Target Guidance screen does not show the C Arm Stereo Mode but...

Page 46: ...ains in position Select Stereo Mode to acquire stereo images when the system is set for Manual C Arm Stereo Mode Figure 25 C Arm Mode The C arm and Tube Arm rotate together Select C Arm Mode to rotate...

Page 47: ...quisition Table 5 How to Select the C Arm Stereo Mode 1 Select the System Status icon Figure 26 System Status Icon 2 Select System Defaults from the System Status menu Figure 27 System Status Menu 3 S...

Page 48: ...send selected targets to the Biopsy Control Module See Biopsy Staging on page 39 for information about the buttons and data fields on the Biopsy tab screen Slice Indicator The Slice Indicator shows o...

Page 49: ...sy Control Module is unplugged after the targets are transmitted the Biopsy Control Module deletes the targets Resend the targets 2 Reject Target removes the selected target from the list that display...

Page 50: ...ordinates When multiple targets are created on an image a target set is created All targets in the current target set show with an arrow before the coordinates When you send the target set to the Biop...

Page 51: ...t button to save the target The active target set automatically transmits to the Biopsy Control Module with the creation of each new target 5 Repeat this procedure to create multiple targets a maximum...

Page 52: ...dicator beside the selected slice The X Y and Z values for the target are established automatically at the area of the click 4 Select the Create Target button to save the target The active target set...

Page 53: ...to show the pre fire targets on the post fire Tomographic Target scout 4 3 6 Post Biopsy 1 Put in a marker if desired 2 Rotate the Z axis Control Knob to move the biopsy device away from the breast 3...

Page 54: ......

Page 55: ...he Breast Platform with a disinfectant after use x Inspect the Biopsy Paddle for damage before use x Inspect the calibration Phantom for damage x Inspect all cables for wear and damage before use x Ma...

Page 56: ...e not diluted 3 maximum concentration of hydrogen peroxide solution After you apply any of the above solutions use a pad and apply a diluted dishwashing liquid to clean any parts which touch the patie...

Page 57: ...ipment decrease imaging performance or increase the risk of electric shock Always follow instructions from the manufacturer of the product you use for cleaning The instructions include the directions...

Page 58: ......

Page 59: ...Audible Alerts Activity Frequency Duration Repeats At Power Up 3 250 ms No Any Needle position within the safety margin limit 1 50 ms Yes BGM calibrate or configuration operation Move or Jog If the o...

Page 60: ...equired Contact Technical Support Motion Fault 1 Select the system status icon in the taskbar of the Selenia Dimensions 2 Select the Clear All Faults options Another message that is related to the cau...

Page 61: ...mm Y axis 72 8 mm Z axis 161 mm Speed of Motorized Movements Continuous No faster than 5 mm per second Incremental 0 5 mm steps Power System Input from Selenia Dimensions 15Vdc 10 and 5Vdc 10 Output 1...

Page 62: ......

Page 63: ...Affirm User Guide Appendix B Forms MAN 03209 Revision 005 Page 53 Appendix B Forms B 1 QAS Test Checklist Date Tech X Diff Y Diff Z Diff Pass Fail Appendix B...

Page 64: ......

Page 65: ...al XX6xxxxx Detector Serial XX8xxxxx 2 0 cm 0 91 0 91 0 91 4 0 cm 1 00 1 00 1 00 6 0 cm 1 27 1 27 1 32 8 0 cm 1 76 1 76 1 88 C 2 CNR Correction for Biopsy Under Tomosynthesis Option Note System defaul...

Page 66: ......

Page 67: ...on 35 manual 35 37 selection 37 complaints 1 component controls biopsy control module 10 component removal biopsy control module 21 biopsy guidance module 21 control module position adjustment 17 cont...

Page 68: ...ator 38 skills needed 2 slice indicator 38 specifications 51 stereo biopsy mode auto 35 37 C arm rotation 35 manual 35 37 selection 37 stereo views 33 stereotactic lesion targeting 41 system descripti...

Page 69: ......

Page 70: ......

Reviews: