


FM-ONE
HOKUTO DENSHI
CO;LTD;
株式会社
11
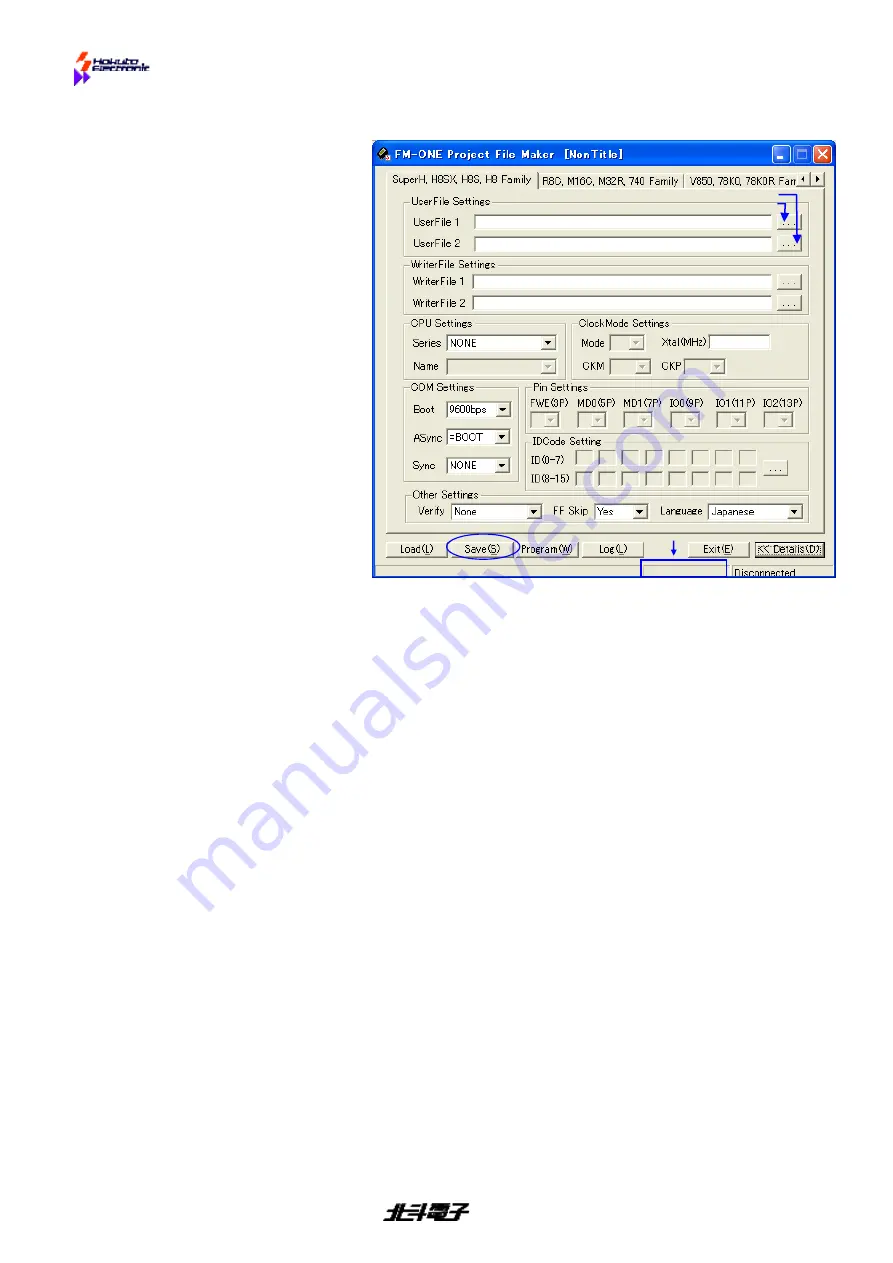
A1: Save/Load
Select a file as well as a parameter as a project file to be
SAVED
.
As mentioned on the previous page, first of all, start
FM-ONE Project File Maker
to display a detailed setup screen.
①
Selection of User Program
Select the prepared MOT/HEX file.
Click on the screen display button of file selection
and then select from among files displayed on
Windows.
▼
For User File 1, select a file for regular ROM areas,
and for User File 2, select a file for secondary (in a
specific MCU such as stacked modules or User
boot mats.)
▼
Those selected files are converted into one project
file and saved in a single HDP file.
▼
If selected files include an write-in address to an
area other than on-chip ROM area good for the
boot mode, a warning will appear.
②
Selection of MCU type name
Select the target MCU from among type names.
Make selection through two stages: from the group
selection list to type name list.
▼
MCU on the list is a type name which can be
available at the moment. New MCU is now under
preparation. For further information, contact us.
▼
When necessary, the boxes of the right Clock
Mode Setting turn into an active mode (white
background) urging ENTER.
Mode
…Clock Mode (Select from the pull-down list)
Xtal
…Target Clock All MCU is indispensable.
(
When saved in HDP, the frequency is
rounded off to one decimal
place.
)
CKM
…Main Clock multiplication factor
CKP
…
Sub Clock multiplication factor
※
Select from among the pull-down list.
Cautions!
Up to 10 projects can be displayed in the CF on the LCD.
When more than 10
projects are in the CF, a display order cannot be designated. It is recommend that unused
files be saved in a particular folder.
④
Selection of Transmission Rate
Select a transmission rate between FM
-
ONE and Target MCU from among the pull-down list.
Boot
…This rate is to be used by combining the target MCU at the time of Start writing. Select
an appropriate rate corresponding to the target clock within a range specified by the
target MCU.
▼
Setting value:
1200bps
2400bps
4800bps
9600bps
19200bps
Async
…This is a rate of an asynchronous communication method when user program data
are transmitted. Select a rate with a smaller serial communications error rate by
Target Clock.
▼
Setting value:1200bps
2400bps
4800bps
9600bps
19200bps
38400bps
76800bps
*Setting values are displayed, larger than by the Boot selection.
Sync…This is a rate of a clock synchronized communication method, which is used when the
user program data are transmitted.
To use this rate, SCK signal must be connected to the
Target Interface #19.
▼
Setting value: NONE (No need when unnecessary) 10K, 25K, 50k, 100K, 500K, 1M, 2M
③
Pin setup
While
writing,
the
connected
MCU
pin
is
automatically controlled according to the intended
set-up, High or Low. Writing in the target board in
an operation mode is readily done.
▼
Various pins are merely output but not monitored
and so writing is possible even when this function
is not used. Compare the operation mode with
the boot mode and connect them in the minimum
frequency.
▼
Unconnected lines can be used selecting Hi-Z.
⑤
Options setting
Select from two options, verify and FF Skip.
▼
Verify
…Apart from the one at the time of normal writing, after writing all the programs, the written in contents must be retrieved without ending the
boot mode to verify. You can choose from Csum (comparison in terms of checksum values) and Byte (Comparison in terms of bytes).
▼
FF Skip…When all the sizes of a serial write are FF data, skip writing and optional verifying in terms of bytes.
*
It is recommended to do Verify to enhance the reliability of the programming.
⑥
Click on SAVE key
Now that all items to be selected are completed, click on
SAVE
key, and save the project names on the specified
destination.
▼
Right project name…Save the project name in English one byte characters.
★
1
On the specified destination, HDP (Hokuto Denshi Project) is
saved in an extension form, and the same time, files are produced necessary for writing, which are stored and saved at the same place where HDP
is. After it is saved and if it is to be written in the offline with the USB removed, be sure to match the folder name with the file name. Otherwise, a
file name cannot be found on the LCD screen of the FM
-
ONE body.
▼
Destination to be saved…In Offline operations, be sure to save in the CF. It is only when 'Program' button is clicked that a new folder is made
automaticaly. The new folder for the project files is not made automaticaly when they are saved with 'Save' button.
The project file is saved, which can be confirmed by loading the project file.
Click on Load key, and a screen display of file selection will be displayed.
Click on the saved file from the screen in a file selection mode.
It is possible to modify the loaded project
if needed, to save again, as well as resume writing in the previous setup.
★
1 The file name must be less than 8 characters.
The hierarchy of the directory has to be with in one.
①
File selection
②
MCU
selection
④
Rate selection
③
Pin
setting
File selection screen
display button
⑤
Option
⑥
Save
When saving is in progress,
“
Save
”
is displayed here.
When loading is in progress,
“
Load
”
is displayed
.
*
Note: Save key is valid only when MCU is selected.
Please do Unplug or Eject Hardware when take off a USB cable and writing in offline mode.
Clock setting as needed