8
2.4 Air Installation
WARNING!
THE AIR INSTALLATION MUST BE MADE ONLY BY
LICENSED PERSONNEL.
WARNING!
EXCESSIVE AIR PRESSURE CAN SERIOUSLY INJURE
PERSONNEL AND DAMAGE THE MACHINE.
Ensure that the line pressure is within the limits required
by the machine. If the air pressure exceeds 170 psi it is
mandatory to install a pressure regulator before the air
inlet of the machine.
After ensuring all the above proceed as follows:
WARNING!
BEFORE CONNECTING THE MACHINE TO THE AIR
SUPPLY BE SURE ALL PERSONNEL ARE CLEAR OF
THE MACHINE AND THAT NOTHING IS LEFT ON THE
TURNTABLE AREA (TOOLS).
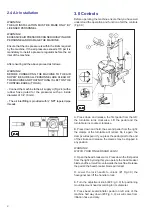
- Connect the machine to the air supply o:(Fig.2.4) with a
rubber hose (rated for the pressure) with an inside
diameter of 1/4” (6 mm).
- The air inlet fitting is provided with ¼” NPT tapered pipe
threads.
3.0 Controls
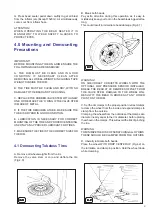
Before operating the machine ensure that you have well
understood the operation and function of all the controls
(Fig.3.0).
A. Press down and release, the first pedal from the left:
the turntable turns clockwise. Lift the pedal and the
turntable turns counter-clockwise.
B. Press down and hold, the second pedal from the right:
the clamps of the turntable will retract. Do it again: the
clamps will expand. If you press the pedal prior to the end
of the stroke and release, the clamps may be stopped in
any position.
WARNING!
WATCH YOUR FINGERS AND LEGS!
C. Open the bead breaker arm. Press down the first pedal
from the right: by doing this you operate the bead breaker
blade and the arm will move towards the machine. Release
the pedal: the bead breaker blade will retract.
D. Lower the lock handle to unlock (#1 Fig.3.0) the
hexagonal bar, lift the handle to lock.
E. Turn the adjustment knob (#2 Fig. 3.0) for positioning
mount/demount head according to rim diameter.
F. Press bead seater/inflator pedal on left side of the
machine half way down (#3 Fig. 3.0): air will come from
inflation hose end only.
1033a
3.0
3.0
3.0
3.0
3.0
NC
2.4
2.4
2.4
2.4
2.4


