background image

Option when using Easy Config Mode 5 or 6: You can add up to 6 additional Bolt Serial
Clients to the serial bridge.

To add additional Clients:

1.

Connect the Client to a serial device.

2.

Automatic configuration of the Client starts.
The Client will be assigned the next free IP address in the current Ethernet subnet.

3.

To add more Clients, repeat step 1 and 2.

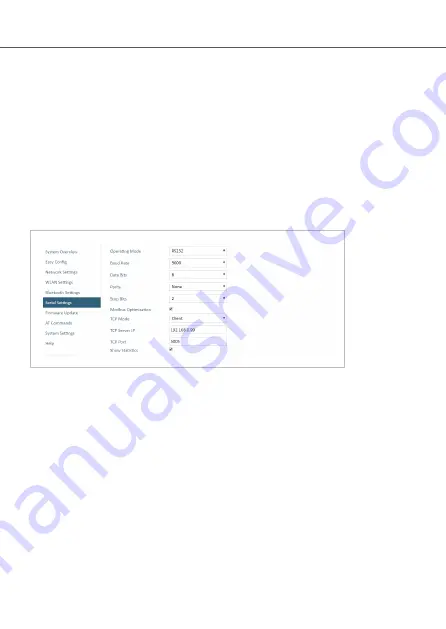
Serial Configuration

Figure 8. Serial port settings example

1.

From the PC connected to Access Point 2, navigate to the built-in web interface of
each Bolt Serial Client.

2.

Select the Serial Settings tab.

3.

Configure the serial port settings. For more information refer to the Bolt Serial User
Manual.

Anybus

®

 Wireless Bolt Serial

Set Up Wireless Infrastructure

Page 20 of 28

SP2554 2.0

Summary of Contents for Anybus Wireless Bolt SP2554 Series

Page 1: ...Anybus Wireless Bolt Serial STARTUP GUIDE SP2554 Version 2 0 Publication date 2022 04 07 ENGLISH...

Page 2: ...and because of the many variables and requirements associated with any particular implementation HMS Networks cannot assume responsibility or liability for actual use based on the data examples or il...

Page 3: ...n which if not avoided will result in death or serious injury WARNING Instructions that must be followed to avoid a potential hazardous situation that if not avoided could result in death or serious i...

Page 4: ...or operation TIP Helpful advice and suggestions 1 3 Trademarks Anybus is a registered trademark and Wireless Bolt Serial is a trademark of HMS Networks AB All other trademarks are the property of the...

Page 5: ...o avoid damage CAUTION Minimum temperature rating of the cable to be connected to the field wiring terminals 90 C CAUTION Use copper wire only for field wiring terminals CAUTION This equipment is reco...

Page 6: ...teway The equipment receives and transmits data on various physical levels and connection types If this equipment is used in a manner not specified by the manufacturer the protection provided by the e...

Page 7: ...t Antenna Considerations The characteristics of the internal antenna should be considered when choosing the placement and orientation of the unit Required Distance Between Devices For optimal receptio...

Page 8: ...32 ms Wireless link with Access Point and up to 4 wireless clients stations Bluetooth or Wi Fi 64 ms 3 6 Digital Input The digital input can be used to control roaming between Bluetooth access points...

Page 9: ...t be flat with a finish equivalent to Ra 3 2 or finer and cleaned and free from oils and greases Installation IMPORTANT Make sure that the sealing ring is correctly placed in the circular groove in th...

Page 10: ...All measurements are in mm Figure 1 Installation drawing Anybus Wireless Bolt Serial Mechanical Installation Page 8 of 28 SP2554 2 0...

Page 11: ...o the Bolt Serial Pin 1 will be the pin closest to the RESET button NOTE The Ethernet interface is intended for configuration purposes only Bolt Serial is not designed for permanent Ethernet communica...

Page 12: ...less Bolt Serial 15 ISO_5V Isolated 5 V for serial interface 16 RS232_GND RS485_GND Isolated Ground for Serial interface 17 CAN_L CAN Low Not used for Wireless Bolt Serial 18 CAN_H CAN High Not used f...

Page 13: ...Procedure Create connector cable for Bolt Serial 1 Cut off one of the connectors on a standard Cat5e or Cat6 Ethernet cable 2 Strip off about 40 mm 1 inch of the cable jacket and untwist the orange or...

Page 14: ...connector in the same way as the Ethernet wiring 6 Connect the wires from the power supply to the connector in the same way as the Ethernet wiring NOTE Ensure that polarity is not reversed Anybus Wire...

Page 15: ...s 192 168 0 99 Option 1 Set a Static IP Address on Your PC On the PC accessing the Bolt Serial built in web interface set a static IP address within the same IP address range as the Bolt Serial IP add...

Page 16: ...dress in your web browser and search to access the built in web interface login page 5 2 Bolt Serial Built In Web Interface The Bolt Serial built in web interface is used to configure maintain and tro...

Page 17: ...via a PC connected to the Wireless Bolt or Bridge Access Point After factory reset Wireless Bolt will by default start in Easy Config Mode 4 if there is no Ethernet connection When connection is estab...

Page 18: ...a Bluetooth PANU Client sends a connection configuration to the detected unit and restarts The detected unit restarts and attempt to connect to the first unit as a PANU Client 2 N A Reset configuratio...

Page 19: ...can be used to read out parameters in text format and for batch configuration using command scripts For a complete list of supported AT commands click Help in the built in web interface See also the A...

Page 20: ...al device See also Connect to LAN Serial and Power 2 Connect Access Point 2 to the Master device 3 Connect Access Point 2 to your PC with an Ethernet cable 4 Connect Access Point 2 to power Activate E...

Page 21: ...d configure Client 1 as a Client and configure itself as an Access Point Client 1 will be assigned the first free IP address in the same Ethernet subnet as Access Point 2 The default address to Client...

Page 22: ...ee IP address in the current Ethernet subnet 3 To add more Clients repeat step 1 and 2 Serial Configuration Figure 8 Serial port settings example 1 From the PC connected to Access Point 2 navigate to...

Page 23: ...er a factory reset the Bolt Serial starts in the default Easy Config Mode 4 Any one of these actions will restore the unit to factory default settings Reset Using the RESET Button Press and hold RESET...

Page 24: ...an Easy Config Mode in the Built In Web Interface Reset Using AT Command To reset Bolt Serial to factory default issue the AT command AT F and then restart the unit See Configuration with AT Commands...

Page 25: ...rough the built in web interface Procedure To enter Recovery Mode 1 Press and hold MODE button during startup Figure 9 RESET button 2 Bolt Serial enters Recovery Mode To Reinstall the Firmware 1 To re...

Page 26: ...IP67 and UL NEMA 4X for top outside the host IP21 for bottom inside the host Dimensions Diameter 68 mm Height 75 mm 95 mm including connector Outside height 41 mm Mounting M50 screw and nut 50 5 mm h...

Page 27: ...5 GHz Access Point 36 48 U NII 1 5 GHz Client 100 116 132 140 and 120 128 depending on regulatory domain scan U NII 1 U NII 2 U NII 2e RF output power 13 75 dBm Max number of slaves for Access Point 7...

Page 28: ...This page is intentionally left blank...

Page 29: ...This page is intentionally left blank...

Page 30: ...This page is intentionally left blank...

Reviews: