background image

TRAINING INSTRUCTION 


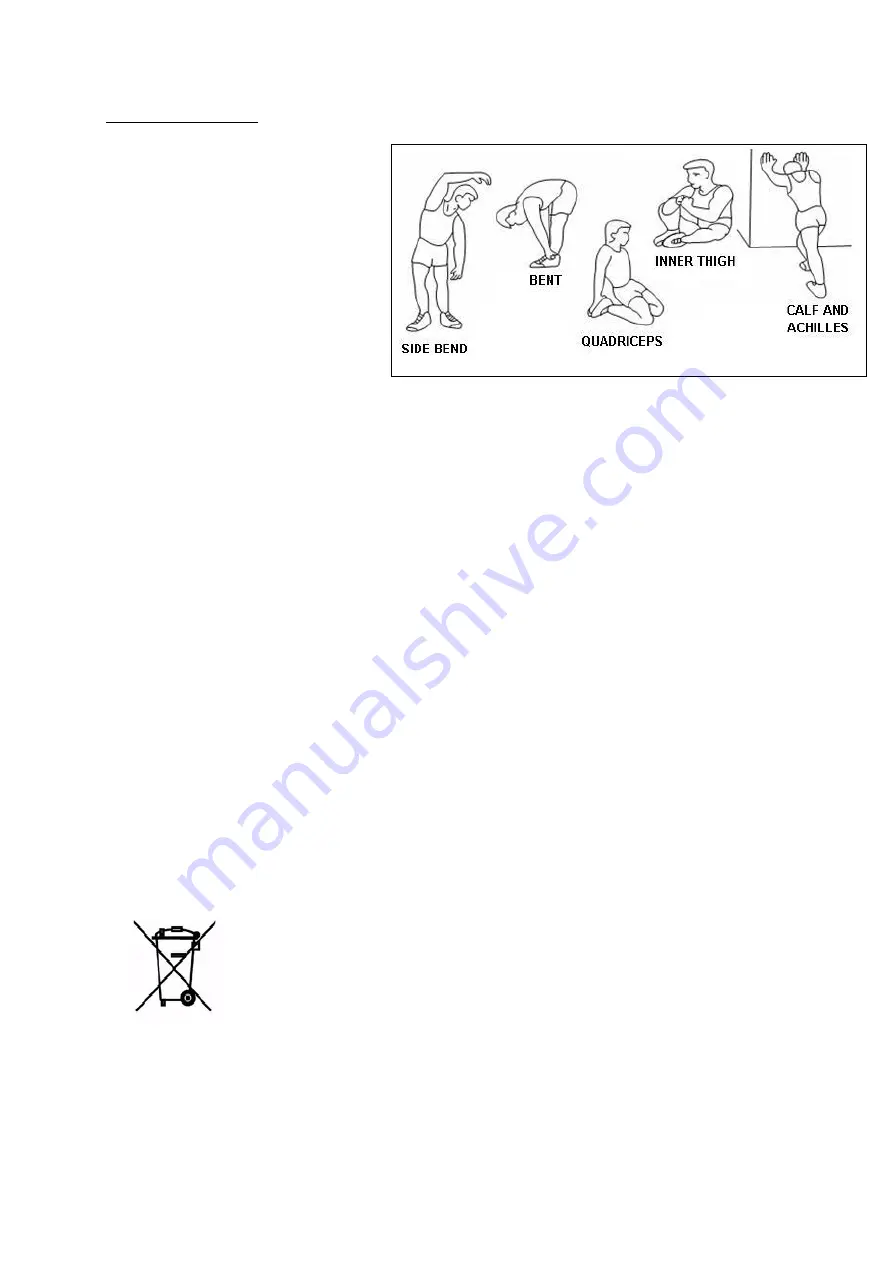
1. Warm-Up 

To 

prevent 

injury 

and 

maximize 

performance  we  recommend  that  each 
workout  period  starts  with  a  warm-up.  We 
suggest you do the following exercise as the 
sketch map. Each exercise at least about 30 
seconds. 


2. Position 

Seat down at the saddle, put feet’s in t

o pedals, hands put on the handlebar. Keep your back straight.  

3. 

Training Organization 

Warm-up:


Before every training you should warm-up for 5-10 minutes. Here you can do some stretching and training with 
low resistance.


Training session:


During the actual training a rate of 70% -85% of the maximum pulse rate should be chosen. The time-length of 
your training session can be calculated with the following rule of thumb:


daily training session:     approx. 10 min. per unit


2-3 x per week:           approx. 30 min. per unit


1-2 x per week:           approx. 60 min. per unit 


Cool down:


To  introduce  an  effective  cool-down  of  the  muscles  and  the  metabolism  the  intensity  should  be  drastically 
decreased during the last 5 – 10 minutes. Stretching is also helpful for the prevention of muscle aches.


Success


Even after a short period of regular exercises you will notice that you constantly have to increase the resistance 
to reach your optimum pulse rate. The units will be continuously easier and you will feel a lot fitter during your 
normal day. For this achievement you should motivate yourself to exercise regularly. Choose fixed hours for your 
training  session  and  do  not  start  training  too  aggressively.  An  old  quote  amongst  sportsmen  says:  “The  most 
difficult thing about training is to start it.”


The  equipment  label  depicting  a  crossed-out  wheeled  bin  symbol  informs  that  it  is 
forbidden to dispose of waste electrical and electronic equipment  together with other 
types of waste. In accordance with the WEE directive on waste electrical and electronic 
equipment,  separate  waste  management  processes  should  be  applied  for  this  type  of 
equipment. The user who intends to dispose of such a product is obliged to return it to an 
electronic equipment collection point thanks to which they can contribute to its re-use, 

recycling, and recovery and, in this way, protect the environment. To do this, contact the sales point where 
the equipment was purchased or a representative of the local authorities. Hazardous substances included 
in electronic equipment can have negative long-term influence on the natural environment and they can 
also have negative effect on human health. 


Summary of Contents for R6019i

Page 1: ...ROWER MAGNETYCZNY POZIOMY RECUMBENT MAGNETIC BIKE HORIZONT LN ROTOPED R6019i INSTRUKCJA U YTKOWANIA...

Page 2: ...kowicie sprawne 8 Urz dzenie powinno by regularnie sprawdzane pod wzgl dem zu ycia i uszkodze tylko wtedy b dzie ono spe nia o warunki bezpiecze stwa Szczeg ln uwag nale y zwr ci na peda y regulator o...

Page 3: ...kownika Zalecane s nastepuj ce kroki U ywaj mi kkiej ciereczki do usuwania zabrudze i kurzu oraz wycieraj do sucha po ka dym u yciu Regularnie sprawdzaj czy ta my urz dzenia nie s zu yte i w odpowiedn...

Page 4: ...y Instrukcja monta u Krok 1 A Przykr przedni i tylny stabilizator do ramy g wnej upewniaj c si czy otwory na obu cz ciach s na tej samej wysoko ci B U yj do tego celu rub M10 i dokr je do czonym do ze...

Page 5: ...spr ystych M6 oraz podk adek p askich M8 do po czenia element w Nast pnie dokr ca o u ywaj c klucza S4 Krok 3 A Po cz ram siedziska do podstawy siedziska upewniaj c si czy otwory na obu cz ciach s na...

Page 6: ...m upewniaj c si czy otwory na obu cz ciach s na tej samej wysoko ci B U yj rub M6 2 do przykr cenia element w i dokr ca o kluczem S5 Krok 6 A Po cz oparcie siedziska z ram podstawy siedziska upewniaj...

Page 7: ...to pokazane na Rys 1 B Przesu os on kolumny komputera na d kolumny C U yj rub 2 do przykr cenia element w oraz dokr ca o kluczem S5 Krok 9 Ustaw uchwyt na g rnej cz ci kolumny komputera i u yj rub M8...

Page 8: ...Komputer...

Page 9: ......

Page 10: ...ietla pr dko RPM czas TIME dystans DIST kalorie CAL WATT puls PULSE poziom LEVEL w tym samym czasie 6 Komputer automatycznie si wy czy je li urz dzenie nie jest u ywane sygna pr dko ci i pulsu wy czy...

Page 11: ...cisk aby wybra program powy ej Gdy odpowiednie okno si za wieci naci nij przycisk DOWN w celu zmniejszenia wybranej warto ci W trybie START na monitorze poka e si START naci nij ten przycisk aby zmnie...

Page 12: ...warto Zatwierd zmiany naciskaj c ENTER F Na monitorze wy wietli si warto WATT naciskaj c UP DOWN ustaw po dan warto Zatwierd zmiany naciskaj c ENTER Zobacz fig 30 G Naci nij START STOP aby rozpocz tre...

Page 13: ...ra odpowiedni warto Naci nij ENTER aby zapisa zmiany Zobacz fig 33 G Naci nij START STOP aby rozpocz trening UWAGA Podczas treningu warto rytmu serca zale y od poziomu trudno ci i pr dko ci Ten progra...

Page 14: ...ny Zobacz fig 36 E Gdy okno wieku zamiga naci nij UP DOWN aby wybra sw j wiek Naci nij ENTER aby zapisa zmiany Zobacz fig 37 F Gdy okno p ci zamiga naci nij UP DOWN aby wybra swoj p e Naci nij ENTER a...

Page 15: ...VERY aby przej do pomiaru komputer przejdzie w status STOP Zobacz fig 41 3 Zmierz puls 4 Komputer odliczy czas od 60 do 0 sekund 5 Kiedy komputer odliczy do 0 wynik poka e si na monitorze F1 F6 F1 wie...

Page 16: ...program si zako czy i wyda sygna d wi kowy PULSE Zakres 30 240BPM beat per minute LEVEL poziom trudno ci Zakres 1 24 WATT MONITOR KOMUNIKATY 1 ERROR1 sprawd silnik i jego pod czenie 2 ERROR2 sprawd cz...

Page 17: ...sza op r aby utrzyma optymalny poziom pulsu Treningi b d coraz atwiejsze i b dziesz si czu sprawniejszy w ci gu normalnego dnia Jednak nale y si zmotywowa do regularnych wicze Wybierz okre lon godzin...

Page 18: ...ance bends 8 Before using the equipment check if the nuts bolts and other bends are securely tightened 9 Always use the equipment as indicated If you find any defective components whilst assembling or...

Page 19: ...n you want stop the item Elliptical bike R6019 i does not acquire breaking system or emergency break TENSION ADJUSTMENT To reduce or increase tension press DOWN UP buttons on the computer Assembly har...

Page 20: ...embly instruction Assembly step 1 A Attach the rear and front stabilizer to the main frame Make sure the holes are aligned B Use the M10 inner hex screw to lock them up Tighten them with S6 Allen Wren...

Page 21: ...ew M6 split washer M8 flat washer to lock them up Then tighten them with the S4 Allen Wrench Assembly step 3 A Attach the backrest frame onto the seat carrier Make sure the holes are aligned B Insert...

Page 22: ...ch Assembly step 5 A Attach the seat to the hand grip Make sure the holes on both parts are aligned B Use the M6 2 inner hex screw to lock them up Then tighten them with S5 Allen Wrench Assembly step...

Page 23: ...ssembly step 8 Special note Please move the computer post cover up and keep it on the upper area of the computer post in first place A Connect the cables out of the main frame with the cables out of t...

Page 24: ...And tighten them up with S5 Allen Wrench Assembly step 10 Attention Connect the cables out of the computer with the cables from the computer post first See Pic 2 Remove the screws from the back of th...

Page 25: ...Computer...

Page 26: ......

Page 27: ......

Page 28: ......

Page 29: ......

Page 30: ......

Page 31: ......

Page 32: ......

Page 33: ......

Page 34: ......

Page 35: ...tice that you constantly have to increase the resistance to reach your optimum pulse rate The units will be continuously easier and you will feel a lot fitter during your normal day For this achieveme...

Page 36: ...m tr ninku zjist te upevn n jednotliv ch st a roub kter je spojuj Tr nink je mo n zapo t pouze v p pad e je za zen dn sestaveno 9 Za zen by m lo b t pravideln kontrolov no z hlediska opot eben a po ko...

Page 37: ...prost edky K odstra ov n p ny a prachu pou vejte m kk vlhk had k Za zen p echov vejte na such ch m stech tak aby bylo chr n no p ed vlhkost a koroz ZP SOB BR D N Za elem zastaven za zen se p esta te...

Page 38: ...bou stech jsou ve stejn v ce B K tomu pou ijte rouby M10 a ut hn te je p ilo en m kl em S6 Zadn stabiliz tor Op radlo P ka pro nastaven seda ky Sedadlo Madlo P edn stabiliz tor Ped l Kryt sloupku Slou...

Page 39: ...seda kou k z kladu seda ky a ujist te se zda otvory na obou stech jsou ve stejn v ce B Vlo te rouby M8 1 a M8 2 do otvor a v e ut hn te kl em S5 Krok 4 A Spojte dr ky se z kladem r mu seda ky zohled...

Page 40: ...ce B Pou ijte rouby M6 2 pro uta en prvk a v e ut hn te kl em S5 Krok 6 A Spojte op radlo seda ky s r mem z kladu seda ky a ujist te se zda otvory na obou stech jsou ve stejn v ce B Vlo te rouby M6 2...

Page 41: ...e it P ed mont po ta e posu te kryt sloupce po ta e nahoru A Spojte veden z hlavn ho r mu s veden mi ze sloupce po ta e tak jak je to zn zorn no na obr 1 B Posu te kryt sloupku po ta e na spodn st slo...

Page 42: ...elku Krok 10 UPOZORN N Spojte kabel ze sloupce po ta e s kabelem z hlavn ho r mu jak je zn zorn no na obr zku 2 Odstra te rouby ze zadn sti po ta e nastavte po ta v p slu n poloze na horn sti sloupku...

Page 43: ...Po ta 1 Program 21 program A 1 Manu ln program viz obr 1 B 10 p ednastaven profil programu viz obr 2 obr 11 Sloupek Po ta rouby um st n na zadn stran po ta e...

Page 44: ...C 1 WATT program viz obr 12 D 4 HRC program viz obr 13 obr 15...

Page 45: ...22 4 Simul tor pr ce srdce viz obr 23 5 Monitor zobrazuje rychlost RPM as TIME vzd lenost DIST kalorie CAL WATT puls PULSE rove LEVEL sou asn 6 Pokud se za zen nepou v po ta se automaticky vypne sign...

Page 46: ...pnut stiskn te tla tko UP a vyberte program M ete vyu t tla tko pro zm nu velikosti zadan hodnoty V re imu START na monitoru se zobraz START stiskn te toto tla tk pro zv en odporu 4 DOWN V re imu STOP...

Page 47: ...itoru se zobraz okno nastaven programu WATT J Zobraz se hodnota asu stisknut m UP DOWN nastavte po adovanou hodnotu Zm ny potvr te stisknut m ENTER K Na monitoru se zobraz vzd lenost DIST stisknut m U...

Page 48: ...slu nou rychlost Stisknut m tla tka ENTER ulo te zm ny E Kdy blik okno kalori stisknut m tla tka UP DOWN vyberte p slu nou hodnotu kalori Stisknut m tla tka ENTER ulo te zm ny F Kdy blik okno rytmu s...

Page 49: ...e zm ny viz obr 36 E Kdy blik okno v ku stiskn te UP DOWN a vyberte sv j v k Stisknut m ENTER ulo te zm ny viz obr 37 F Kdy blik okno pohlav stiskn te UP DOWN a vyberte sv pohlav Stisknut m tla tka EN...

Page 50: ...nut m RECOVERY nazp sob opakovn vstup do programu B hem testu stiskn te RECOVERY pro v stup a n vrat do klidov ho re imu 4 M en pulsu Ob dlan polo te na senzory tak aby po ta zobrazil srde n frekvenci...

Page 51: ...udby b hem cvi en N vod k tr ninku 1 Rozcvi ka P ed zapo et m tr ninku doporu ujeme prov st zah vac cviky dle obr zku Ka d cvik je pot eba vykon vat po dobu min 30 sekund Rozcvi ka sni uje riziko razu...

Page 52: ...p li agresivn P esto e d l me v e pro to abychom zajistili maxim ln kvalitu na ich v robk mohou se objevit jednotliv vady nebo chyby Pokud si v imnete z vady nebo toho e n kter z st chyb kontaktujte n...

Page 53: ...d sauberen Oberfl che gestellt werden Aus Sicherheitsgr nden sollte der Abstand zu anderen Gegenst nden mindestens 0 6 m betragen 8 Es sollten entsprechende Sportkleidung und schuhe verwendet werden Z...

Page 54: ...utzen Sie ein weiches Tuch zur Schmutz und Staubbeseitigung Danach reiben Sie das Ger t trocken Achten Sie immer darauf dass die B nder sicher sind und keine Verschlei erscheinungen aufweisen Achten S...

Page 55: ...1 A Befestigen Sie den vorderen und den hinteren Standfu am Hauptrahmen Dabei ist es wichtig dass die Lochbilder der beiden Teile richtig ausgerichtet sind B Benutzen Sie daf r die Schrauben M10 und z...

Page 56: ...die Schrauben M6 die Federringe M6 und die flachen Unterlegscheiben M8 Danach ziehen Sie alles mit dem Innensechskant S4 an Schritt 3 A Befestigen Sie den R ckkenlehnenrahmen am Sitzrahmengestell Dab...

Page 57: ...m Handgriff Dabei ist es wichtig dass die Lochbilder der beiden Teile richtig ausgerichtet sind B Benutzen Sie daf r die Schrauben M6 2 um alle Elemente anzuziehen und schrauben Sie das Ganze mit dem...

Page 58: ...Abdeckung des Computerst tzrohres nach oben bevor Sie mit der Montage des Computers beginnen A Stecken Sie die Enden der Kabelstr nge vom Computerst tzrohr und Hauptrahmen zusammen was auf der untere...

Page 59: ...HTUNG Stecken Sie die Enden der Kabelstr nge vom Computerst tzrohr und Hauptrahmen zusammen was auf der unteren Zeichnung Nr 2 dargestellt wurde Entfernen Sie die Schrauben von hinterer Seite des Comp...

Page 60: ...Computer...

Page 61: ......

Page 62: ...jetzt benutzt wird siehe sig 22 4 Herzfrequenzsimulator siehe fig 23 5 Werte auf der Computerkonsole Umdrehungen pro Minute RPM Zeit TIME Distanz DIST Kalorienverbrauch CAL WATT Puls PULSE LEVEL Dies...

Page 63: ...um ein n chstes Programm auszuw hlen Sie k nnen diese Taste auch zur nderung des Vorgabewertes nutzen Dr cken Sie im START Modus auf der Anzeige START diese Taste um den Widerstand zu erh hen 4 DOWN D...

Page 64: ...ann ENTER um die nderungen zu speichern siehe fig 28 R Dr cken Sie START STOP um Ihr Training zu beginnen siehe fig 29 WATT Control Programm O Dr cken Sie UP DOWN um das Watt Control Programm zu w hle...

Page 65: ...nnt dr cken Sie UP DOWN um den gew nschten Kalorienwert zu w hlen Dr cken Sie ENTER um die nderungen zu speichern F Wenn dieses Programm zu blinken beginnt dr cken Sie UP DOWN um das Alter an einen Nu...

Page 66: ...enn die Geschwindigkeitsangabe zu blinken beginnt dr cken Sie UP DOWN um den gew nschten Geschwindigkeitswert zu w hlen Dr cken Sie ENTER um die nderungen zu speichern E Wenn die Kalorienangabe zu bli...

Page 67: ...s Index K rperform SHAPE FAT Gesamtk rperfettanteil gemessen in BMR Basal Metabolic Rate Stoffwechsel zeigt den niedrigsten t glichen Kalorienbedarf an Dieser Kalorienbedarf erm glicht es die Vitalfun...

Page 68: ...kunden die Herzfrequenz BPM Herzschl ge pro Minute erscheint W hrend der Pulsmessung blinkt das Herzsymbol um die EKG Messung zu simulieren W hrend der Pulsmessung kann der Wert zun chst nicht stabil...

Page 69: ...ER abh ngig vom Modell Schlie en Sie den Audio Stecker an den Musikplayer an damit Sie w hrend des Trainings Musik h ren k nnen 5 Aufw rm bungen Vor dem eigentlichen Training empfehlen wir Ihnen die u...

Page 70: ...merken dass Sie stufenweise den Widerstand erh hen m ssen um den optimalen Pulswert zu halten Ihre Trainings werden leichter und Sie werden sich besser im Alltag f hlen Sie sollten jedoch st ndig moti...

Page 71: ...k linki paski elementy gumowe peda y uchwyty z g bki k ka o yska itp 6 Gwarancja traci wa no w przypadku Up ywu terminu wa no ci samodzielnych napraw nieprzestrzegania zasad prawid owej eksploatacji 7...

Page 72: ...ts purpose incorrect assembly and maintenance damages and consumption of such elements as cables straps rubber parts pedals sponge grips wheels bearings etc 6 The guarantee expires in the event of exp...

Page 73: ...ozen a opot eben sou st kter podl haj zk ze jako jsou kabely p sy pry ov prvky ped ly dr ky na houby kola lo iska atd 6 Z ruka zanik pokud vypr jej platnost bylo do produktu neodborn zasa eno nebyla d...

Page 74: ...Garantie erlischt nach Ablauf der Haltbarkeit bei freiwilligen Reparaturen Nichteinhaltung der Regeln f r den ordnungsgem en Betrieb 12 Duplikate der Garantiekarte werden nicht ausgestellt 13 Das zu...

Page 75: ...IMPORTER ABISAL SP Z O O ul wi tej El biety 6 41 905 Bytom Service Pyskowicka 14 41 807 Zabrze abisal abisal pl www abisal pl...

Reviews: