


8
EN
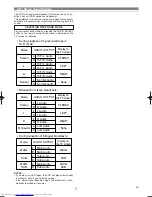
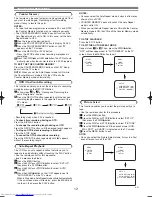
Video Channel Setting
MENU
TIMER
SET UP
INITIAL
RF OUT CH 35
INITIAL
CH TUNING
CLOCK
RF OUT
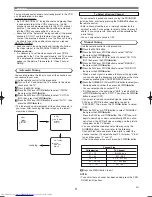
Setting the Clock
MENU
TIMER
SET UP
INITIAL
INITIAL
CH TUNING
CLOCK
RF OUT
CLOCK
YEAR
2 0 0 4
MONTH
0 1
DAY
0 7 WE
HOUR
_ _
MINUTE
_ _
This VCR incorporates a 24-hour clock. The clock must be set
for the Timer Recording function to operate correctly.
• Use the remote control for this procedure.
Press the MENU button.
Press the PLAY/
o
or STOP/
L
button to select “INITIAL”,
then press the F.FWD/
B
button.
Press the PLAY/
o
or STOP/
L
button to select “CLOCK”,
then press the F.FWD/
B
button.
Press the PLAY/
o
or STOP/
L
button to select “MANUAL” or
“AUTO”, then press the F.FWD/
B
button.
• If you select “MANUAL”, continue with step
.
• If you select “AUTO”, Auto Clock Setting becomes “ON”.
The clock time will appear automatically when you next
turn the VCR off and on.
Press the PLAY/
o
or STOP/
L
button until the relevant year
appears, then press the F.FWD/
B
button.
Press the PLAY/
o
or STOP/
L
button until the relevant
month appears, then press the F.FWD/
B
button.
Press the PLAY/
o
or STOP/
L
button until the relevant day
appears, then press the F.FWD/
B
button.
Press the PLAY/
o
or STOP/
L
button until the relevant hour
appears, then press the F.FWD/
B
button.
Press the PLAY/
o
or STOP/
L
button until the relevant minute
appears.
Press the MENU button to start the clock.
NOTES:
• Press the REW/
s
button to go one step back from the cur-
rent step during steps
to
.
• Although seconds are not displayed, they begin counting
from 00 when you exit by pressing the MENU button. Use
this feature to synchronise the clock with the correct time.
• When unplugging the power-cord or if there is a power
failure for more than one minute, you may have to reset
the clock.
AUTO CLOCK
• Channel Presetting must be set before the Auto Clock is set.
• The VCR refers to the channel which was memorised into
position 01.
The PDC channel must therefore be set to position 01.
• The clock cannot be set automatically if you are not
receiving a channel that carries a time signal in your area.
In this case, set the clock manually.
• Once the auto clock setting is performed, the VCR will
correct the current time by receiving PDC broadcasts
whenever you turn off the VCR.
• The VCR will correct the current time automatically at 8:00, if
the VCR’s power is turned off.
• Between 23:00~1:00, the AUTO CLOCK function does not
work even if the VCR’s power is turned off.
9
5
10
9
8
7
6
5
5
4
3
2
1
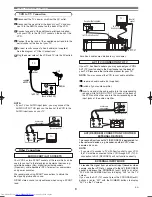
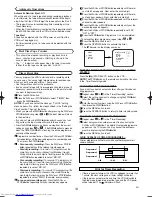
INITIAL SETUP
• Use the remote control for this procedure.
Insert a pre-recorded tape into the VCR which has a film
or programme which you will recognise when it plays.
The VCR will turn on. Press the PLAY button to ensure
the tape is playing.
Turn your television to the preferred video channel (this
would normally be channel “0” for most makes of TV
incl. Hitachi - If in doubt consult your television instruc-
tion book for details). Follow your television tuning
instructions (as detailed in your TV instruction book) until
you can see the film or program playing on the VCR.
• When you can see the playback clearly, follow your tele-
vision instructions to store the setting as the VCR play-
back channel and go to step
.
• If you do not get a clear picture on playback and have
interference lines on the screen this can be caused by
the VCR broadcast frequency being too close to a televi-
sion station frequency in your area. STEP
will
explain how to change the RF output frequency.
Press the MENU button.
Press the PLAY/
o
or STOP/
L
button repeatedly to
select “INITIAL” from the on screen menu. Then press
the F.FWD/
B
button.
Press the PLAY/
o
or STOP/
L
button repeatedly to
select “RF OUT” from the on screen menu. Then, press
the F.FWD/
B
button.
• The RF OUT CH menu will appear on your TV screen.
Press the PLAY/
o
or STOP/
L
button to select a
frequency which is not used for television broadcasts in
your area. You can select between RF CH 22 ~ RF CH
69, e.g. 51 or 53. (Your local dealer should be able to
advise you which channels to use if you are not sure)
Press the F.FWD/
B
button to store then the MENU but-
ton to exit.
Follow the instructions in step
above to tune your TV
to the new VCR frequency.
Press the STOP button to stop the tape.
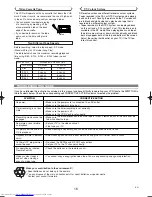
NOTES:
• You may also access the RF OUT CH menu by pressing
and holding the MENU button on the remote control for 3
seconds whilst the VCR is in STANDBY. (STANDBY = VCR
plugged in but switched off on the machine)
• If your VCR and TV are connected using a SCART cable
the RF converter may be switched off to avoid any possibili-
ty of interference. To switch off the RF converter;
Follow step
to step
above and adjust the “RF OUT
CH” until it is 22 in step
.
Press the STOP/
L
button so that “- -” appears, instead of a
number, next to “RF CH OUT”.
Press the F.FWD/
B
button, then the MENU button to finish.
6
6
3
9
2
8
7
6
5
4
3
3
9
2
1
HG467BD.qx4 04.10.25 9:53 AM Page 8
Summary of Contents for VT-FX540E
Page 17: ...17 EN ...