


10
EN
MENU
TIMER
SET UP
INITIAL
INITIAL
CH TUNING
CLOCK
RF OUT
CH TUNING
AUTO
MANUAL
MOVE
MANUAL
POSITION
CHANNEL
DECODER
SKIP
P08
008
[OFF]
[OFF]
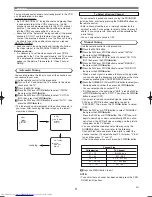
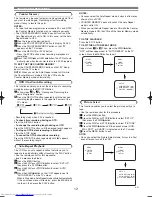
To Skip a Preset Channel
The channels you can no longer receive or seldom watch
can be set to be skipped when you access channels with
the PROGRAM (
o
/
p
) buttons.
• Use the remote control for this procedure.
Press the MENU button.
Press the PLAY/
o
or STOP/
L
button to select “INITIAL”,
then press the F.FWD/
B
button.
Press the PLAY/
o
or STOP/
L
button to select “CH TUN-
ING”, then press the F.FWD/
B
button.
Press the PLAY/
o
or STOP/
L
button to select “MANUAL”,
then press the F.FWD/
B
button.
Press the PLAY/
o
or STOP/
L
button to select “POSITION”,
then press the F.FWD/
B
button.
Press number buttons, the PLAY/
o
or STOP/
L
button to select
relevant position number, then press the F.FWD/
B
button.
Press the PLAY/
o
or STOP/
L
button to select “SKIP”, then
press the F.FWD/
B
button to select [ON].
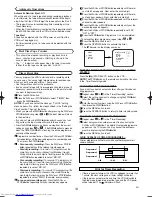
• To memorise the channel again, press the F.FWD/
B
button.
“ON” will change to “OFF”.
Press the MENU button to exit.
NOTE
:
• To confirm that a channel has been deleted, press the
PROGRAM (
o
/
p
) buttons.
8
7
6
5
4
3
2
1
MENU
TIMER
SET UP
INITIAL
INITIAL
CH TUNING
CLOCK
RF OUT
CH TUNING
AUTO
MANUAL
MOVE
MANUAL
POSITION
CHANNEL
DECODER
SKIP
P08
008
[OFF]
[ON]
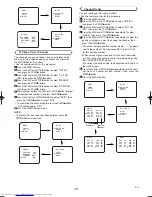
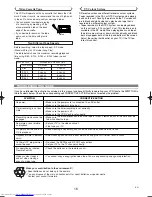
Channel Order
You can rearrange the order as follows.
• Use the remote control for this procedure.
Press the MENU button.
Press the PLAY/
o
or STOP/
L
button to select “INITIAL”,
then press the F.FWD/
B
button.
Press the PLAY/
o
or STOP/
L
button to select “CH TUN-
ING”, then press the F.FWD/
B
button.
Press the PLAY/
o
or STOP/
L
button repeatedly to select
“MOVE”, then press the F.FWD/
B
button.
Press the PLAY/
o
or STOP/
L
button repeatedly to select the
position number you want to change the channel, then
press the F.FWD/
B
button.
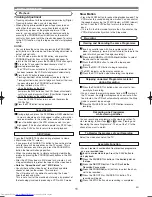
• You cannot select a position number where “- - - ” appears
next to the number. This is because SKIP is set to [ON]
for this position number.
• When a weak signal is received in Channel Order mode,
you can change the background to static blue by pressing
the COUNTER RESET button.
If you press the button again, the background will return to
the static screen.
Press thePLAY/
o
or STOP/
L
button repeatedly until the chan-
nel move to another position number, then press the
F.FWD/
B
button.
Press the MENU button.
7
6
5
4
3
2
1
MENU
TIMER
SET UP
INITIAL
INITIAL
CH TUNING
CLOCK
RF OUT
CH TUNING
AUTO
MANUAL
MOVE
MOVE
P01:
P02:
P03:
P04:
P05:
01
02
10
04
05
P06:
P07:
P08:
P09:
P10:
06
07
08
09
03
[ ]
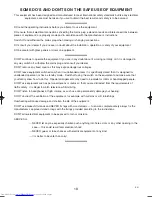
MOVE
P01:
P02:
P03:
P04:
P05:
01
02
03
04
05
P06:
P07:
P08:
P09:
P10:
06
07
08
09
10
Position
Number
Channel
Number
[ ]
MOVE
P01:
P02:
P03:
P04:
P05:
01
02
10
04
05
P06:
P07:
P08:
P09:
P10:
06
07
08
09
03
HG467BD.qx4 04.10.25 9:53 AM Page 10
Summary of Contents for VT-FX540E
Page 17: ...17 EN ...