Getting Started (Initial Setup)
27
Press GUIDE and 6, then press 4 to bring up the DST SETTING screen. Specify
another option, then set the time again.
To set the clock manually
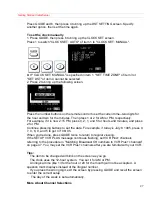
1. Press GUIDE, then press 6 to bring up the CLOCK SET screen.
Press 1 to switch "CLOCK SET: AUTO" of item 1 to "CLOCK SET: MANUAL".
If "CLOCK SET: MANUAL" is specified in item 1, "SET TIME ZONE" of item 3 or
"SET DST" of item 4 cannot be selected.
2. Press 2 to bring up the following screen.
Press the number buttons on the remote control to set the current time--two digits for
the hour and two for the minutes. Then press 1 or 2 for AM or PM, respectively.
For example, if it is now 2:15 PM, press 0, 2, 1, and 5 for hours and minutes, and press
2 for PM.
Continue pressing buttons to set the date. For example, if today is July 8, 1995, press 0,
7, 0, 8, 9, and 5 to get 07/ 08/ 95.
When you're done, press GUIDE twice to return to regular viewing.
If the SETUP VCR PLUS message continues flashing, set VCR Plus+ channels
referring to the procedure in "Matching Broadcast CH numbers to VCR Plus+ channels"
on page 47. You may set the VCR Plus+ channels after you are familiar with your VCR.
Tips:
The item to be changed will blink on the screen as you go.
The clock uses the 12-hour system. You set it for AM or PM.
An illogical time (like 13 for the hour or 20 for the month) will not be accepted. A
question mark displays instead of the illogical number.
If you press the wrong digit, exit the screen by pressing GUIDE and recall the screen
to enter the correct setup.
The day of the week is set automatically.
More About Channel Selections

