background image

TECHNICAL SPECIFICATIONS 


84

TECHNICAL SPECIFICATIONS   

Technical specifications 

Format:    D-VHS/VHS 
Video Signal System: 


D-VHS: D-VHS system standard CTP 

STD MODE2 
    VHS: 

NTSC 

color 

EIA 

standard 

Record/Playback System:  D-VHS: Digital: 2 Head record/playback 
system 
    VHS: 

Video: 

head 

     Audio: 

VHS 

Hi-Fi 

stereo 

record/playback 

system 
Tape Speed:  


D-VHS: 16.67 mm/sec (STD) 


VHS: 33.35 mm/sec (SP), 16.67 mm/sec (LP) 

(playback only), 
    11.12 

mm/sec 

(EP) 

RF Input: 


UHF/VHF 75 ohm 

Tuner:  


USA: 181 channel tuning ability* (125 cable 

channels) 


Canada: 178 channel tuning ability* (122 cable 

channels) 
Type: 

   Auto 

programming 

frequency 

synthesis 

Power Input:   


AC 120V 60 Hz 

Power Consumption: 


26W nominal 

Cabinet Size:  


17-1/8" (W) x 3-7/8" (H) x 11-1/8" (D) 


43.5 cm (W) x 9.9 cm (H) x 28.2 cm (D) 

Weight:    9.2 

lbs. 

(4.2 

kg) 

Storage Temperature: 


-4°F to 131°F 

Operating Temperature: 

41°F to 104°F 

Accessories:  


1 coaxial cable (Part No. E5861682) 


1 remote control unit (Part No. HL10702), 


1 digital A/V cable (Part No. EW11381) 


1 D-VHS video tape (Part No. GU10141) 

    2 

AA 

batteries 

*Check your cable company's compatibility requirements. 
For information about how to obtain these and other HITACHI 
accessories, please call HiTRON, Inc. TOLL FREE at 1-800-995-4500 (in 
the continental United States). For ALASKA and HAWAII, please contact 
the nearest Hitachi Regional Office. 

Design and specifications subject to change without notice. 

Hitachi Service Hotline 

Authorized Hitachi service facilities are available throughout the US and 
Canada. For the location nearest to you, call the Hitachi Service Hotline at 
one of these numbers: 

Summary of Contents for VT-DX815A

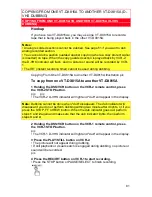
Page 1: ...ith digital interface function DSS is a registered trademark of DIRECTV Inc a unit of GM Hughes Electronics Auto head cleaning system minimizes the need for accessory cleaners and professional head cleaning Auto tracking system automatically adjusts the tracking so the picture is optimized Frequency synthesized tuner provides easy preset tuning of up to 68 broadcast TV channels and 125 cable chann...

Page 2: ...OOKUP B 18 WITH THIS HOOKUP 18 DSS BOX WITH DIGITAL INTERFACE HOOKUP RF HOOKUP C 19 WITH THIS HOOKUP 19 DSS BOX WITHOUT DIGITAL INTERFACE HOOKUP AV HOOKUP D 21 WITH THIS HOOKUP 21 DSS BOX WITHOUT DIGITAL INTERFACE HOOKUP RF HOOKUP E 22 WITH THIS HOOKUP 22 BASIC ANTENNA HOOKUP F 23 WITH THIS HOOKUP 23 ADVANCED ANTENNA HOOKUP AV HOOKUP G 24 WITH THIS HOOKUP 24 BASIC CABLE HOOKUP H 25 WITH THIS HOOKU...

Page 3: ...Y 50 Switching between the clock time counter and time of remaining tape 50 INDEX WITH THE TIME COUNTER 51 To find specific sections on a tape 51 VHS RECORDING STEP 52 Before you record 52 Basic recording steps 52 To watch a DSS program while recording a program other than DSS 54 D VHS RECORDING SETUP 55 Setup Procedure Hookups A B or C 55 D VHS RECORDING STEP 57 Basic recording steps 57 RECORDING...

Page 4: ...7 Hookup 77 To copy from a camcorder 77 COPYING FROM ONE VCR TO ANOTHER VCR DUBBING 79 Hookup 79 To copy from one VCR to another VCR 79 COPYING FROM ONE VT DX815A TO ANOTHER VT DX815A D VHS DUBBING 81 Hookup 81 To copy from one VT DX815A to another VT DX815A 81 PROBLEM GUIDE 82 Problem guide 82 MAINTENANCE 83 Maintenance 83 TECHNICAL SPECIFICATIONS 84 Technical specifications 84 HITACHI HOME ELECT...

Page 5: ...0 Steve Reynolds Blvd 3219 Koapaka Street Honolulu Norcross GA 30093 HI 96819 Tel 770 279 5600 Tel 808 836 3621 HITACHI HSC CANADA INC 6740 Campobello Road Mississauga Ontario L5N 2L8 CANADA Tel 905 821 4545 QR17951 Hitachi Ltd 1997 Printed in Japan ...

Page 6: ...OCK DO NOT REMOVE COVER OR BACK NO USER SERVICEABLE PARTS INSIDE REFER SERVICING TO QUALIFIED SERVICE PERSONNEL WARNING Many television programs and films are copyrighted In certain circumstances copyright law may apply to private in home videotaping of copyrighted materials WARNING TO PREVENT FIRE OR ELECTRIC SHOCK DO NOT EXPOSE THIS APPLIANCE TO RAIN OR MOISTURE CAUTION TO PREVENT ELECTRIC SHOCK...

Page 7: ...uipped with a polarized alternating current line plug a plug having one blade wider than the other This plug will fit into the power outlet only one way This is a safety feature If you are unable to insert the plug fully into the outlet try reversing the plug If the plug should still fail to fit contact your electrician to replace your obsolete outlet To prevent electric shock do not use this pola...

Page 8: ...r ventilation is provided or the video product manufacturer s instructions have been followed 9 Attachments Do not use attachments unless recommended by the video product manufacturer as they may cause hazards Caution Maintain electrical safety Powerline operated equipment or accessories connected to this unit should bear the UL listing mark or CSA certification mark on the accessory itself and sh...

Page 9: ...de antenna system should not be located in the vicinity of overhead power lines or other electric light or power circuits or where it can fall into such power lines or circuits When installing an outside antenna system extreme care should be taken to keep from touching or approaching such power lines or circuits as contact with them might be fatal Installing an outdoor antenna can be hazardous and...

Page 10: ...ions Adjust only those controls that are covered by the operating instructions Improper adjustment of other controls may result in damage and will often require extensive work by a qualified technician to restore the video product to its normal operation e If the video product has been dropped or the cabinet has been damaged f When the video product exhibits a distinct change in performance this i...

Page 11: ...L R jacks 50 13 VIDEO IN jack 50 14 ANT OUT select button 10 VCR Display pic 15 AM PM indicators 22 16 Time Tape counter Tape remaining or VCR mode indicator PLAY playback SRCH double speed play and visual search appears during reverse direction viewing SLOW slow play REW rewind FF fast forward STILL play pause and frame advance 22 33 33 27 27 29 27 29 17 REM tape remaining time indicator 33 18 VC...

Page 12: ... R jacks 49 27 VIDEO IN jack 28 IN FROM ANT signal input 10 29 OUT TO TV signal out to TV 10 30 VIDEO OUT jack 11 31 AUDIO OUT L R jacks 11 Remote Control Customer Controls Remote Control Keys pic Item No Function Page 1 Transmission window 8 2 POWER button 24 3 GUIDE to recall OSD menu 24 4 PROGRAM programming button 44 5 CLEAR EXIT clears time counter 34 6 DISP INFO to recall on screen display 3...

Page 13: ... button illuminates key function buttons for a few seconds 8 18 DSS MENU button 48 19 STOP button stops play record function 27 20 F F button fast forward or search 29 21 CH channel up down button 39 22 LAST CH button switches to the TV channel you watched previously during the current viewing session 47 23 VCR TV mode select button 40 24 DSS TV mode select button 48 25 AVX button select L1 or L2 ...

Page 14: ...c 3 Slide the cover in the direction of the arrow to close it pic Operating in the remote control Operating the VCR 1 Make sure there is no obstacle between the remote control and VCR s infrared receiver pic Note You cannot operate the VCR if there is an obstacle for example coffee table sofa etc between the VCR and remote control 2 Point the remote control at the VCR s infrared receiver and press...

Page 15: ...min D VHS DF300 300 min Note The recording speed is automatically set to STD during D VHS recording You cannot select SP or EP speed This VCR does not record at the LP speed but it can play cassettes that were recorded at the LP speed Safety tabs prevent erasure To avoid erasing a recording Break off the safety tab using a screwdriver or similar tool To re record on a cassette which has its safety...

Page 16: ... VCR automatically turns on and the Tape In indicator turns on when the cassette is in place pic Removal Press the EJECT button on the VCR The cassette will come partially out of the compartment so you can pull it out The Tape In indicator turns off The cassette can be ejected with the power on or off ...

Page 17: ...ble cord to the IN FROM ANT jack of the VCR not to the RF IN OUT jacks of the DSS box TABLE A FUNCTION CHANNEL SELECTION VCR indicator Press the VCR TV mode select button to turn the VCR indicator on or off TV VCR DSS BOX Select and Watch Channels using TV Select Channel to Watch OFF TV mode Select and Watch Channels using VCR AUX or VIDEO Select Channel to Watch Record and Watch the Same Channel ...

Page 18: ...ox Connect the antenna or cable cord to the IN FROM ANT jack of the VCR not to the RF IN OUT jacks of the DSS box TABLE B FUNCTION CHANNEL SELECTION VCR indicator Press the VCR TV mode select button to turn the VCR indicator on or off TV VCR DSS BOX Select and Watch Channels using TV Select Channel to Watch OFF TV mode Select and Watch Channels using VCR AUX or VIDEO Select Channel to Watch Record...

Page 19: ...CR indicator Press the VCR TV mode select button to turn the VCR indicator on or off TV VCR DSS BOX Select and Watch Channels using TV Select Channel to Watch OFF TV mode Select and Watch Channels using VCR 3 or 4 Select Channel to Watch ON VCR mode Record and Watch the Same Channel 3 or 4 Select Channel to Record ON VCR mode Record One Channel Watch Another Select Channel to Watch Select Channel ...

Page 20: ...FACE HOOKUP RF HOOKUP C 20 button on front of the VCR Pressing the button alternates between RFCH 03 channel 3 and RFCH 04 channel 4 in the VCR s display Display the channel which is not used by a commercial channel in your area ...

Page 21: ...f the DSS box TABLE D FUNCTION CHANNEL SELECTION VCR indicator Press the VCR TV mode select button to turn the VCR indicator on or off TV VCR DSS BOX Select and Watch Channels using TV Select Channel to Watch OFF TV mode Select and Watch Channels using VCR AUX or VIDEO Select Channel to Watch Record and Watch the Same Channel AUX or VIDEO Select Channel to Record Record One Channel Watch Another S...

Page 22: ...elect and Watch Channels using VCR 3 or 4 Select Channel to Watch ON VCR mode Record and Watch the Same Channel 3 or 4 Select Channel to Record ON VCR mode Record One Channel Watch Another Select Channel to Watch Select Channel to Record OFF TV mode Record and Watch the Same DSS Channel 3 or 4 Select L1 Select Channel to Watch Record ON VCR mode Watch a Channel other than DSS and Record a DSS Chan...

Page 23: ...to Watch ON VCR mode Record and Watch the Same Channel 3 or 4 Select Channel to Record ON VCR mode Record One Channel Watch Another Select Channel to Watch Select Channel to Record OFF TV mode Watch Playback of a Tape 3 or 4 ON VCR mode Switch the RF Channel When the VCR is on its video signal can come into your TV on either channel 3 or channel 4 You need to select the appropriate channel Turn on...

Page 24: ... SELECTION VCR indicator Press the VCR TV mode select button to turn the VCR indicator on or off TV VCR Select and Watch Channels using TV Select Channel to Watch OFF TV mode Select and Watch Channels using VCR AUX or VIDEO Select Channel to Watch Record and Watch the Same Channel AUX or VIDEO Select Channel to Record Record One Channel Watch Another Select Channel to Watch Select Channel to Recor...

Page 25: ...annel to Watch ON VCR mode Record and Watch the Same Channel 3 or 4 Select Channel to Record ON VCR mode Record One Channel Watch Another Select Channel to Watch Select Channel to Record OFF TV mode Watch Playback of a Tape 3 or 4 ON VCR mode Switch the RF Channel When the VCR is on its video signal can come into your TV on either channel 3 or channel 4 You need to select the appropriate channel T...

Page 26: ...ION VCR indicator Press the VCR TV mode select button to turn the VCR indicator on or off TV VCR Select and Watch Cable Channels using TV Select Channel to Watch OFF TV mode Select and Watch Cable Channels using VCR AUX or VIDEO Select Channel to Watch Record and Watch the Same Channel AUX or VIDEO Select Channel to Record Record One Channel Watch Another Select Channel to Watch Select Channel to ...

Page 27: ...elect Channel to Watch OFF TV mode Select and Watch Cable Channels using VCR 3 or 4 Select Cable Box Output Channel Select Channel to Watch ON VCR mode Record and Watch the Same Channel 3 or 4 Select Cable Box Output Channel Select Channel to Watch ON VCR mode Record One Channel Watch Another OFF TV mode Watch Playback of a Tape 3 or 4 ON VCR mode Switch the RF Channel When the VCR is on its video...

Page 28: ... K Illustration pic TABLE K FUNCTION CHANNEL SELECTION VCR indicator Press the VCR TV mode select button to turn the VCR indicator on or off TV VCR CABLE BOX Watch Cable Channels on TV Select Cable Box Output Channel Select Channel to Watch OFF TV mode Select and Watch Cable Channels using VCR AUX or VIDEO Select Cable Box Output Channel Select Channel to Watch Record and Watch the Same Channel AU...

Page 29: ...llustration pic TABLE L FUNCTION CHANNEL SELECTION VCR indicator Press the VCR TV mode select button to turn the VCR indicator on or off TV VCR CABLE BOX Watch Cable Channels on TV Select Channel to Watch OFF TV mode Select and Watch Cable Channels using VCR AUX or VIDEO Select Cable Box Output Channel Select Channel to Watch Record and Watch the Same Channel AUX or VIDEO Select Cable Box Output C...

Page 30: ...e time differences between various time zones and sets the time during Daylight Saving Time D S T The auto clock set function operates each time the VCR is turned off When the VCR is connected to a DSS box via a digital A V cable the time can only be set by the auto clock function You cannot set the clock manually When the clock is set automatically the displayed time may drift from the current ti...

Page 31: ...If the clock has automatically been set the CLOCK SET menu will not appear 3 Press the number buttons to fill the hour and minutes For times with only one number 1 9 press the 0 button first then the hour or minute For example if it is now 10 20AM press 1 0 2 0 AM and PM will now appear on the screen Example CLOCK SET TIME 10 20 AM 1 PM 2 MONTH DAY YEAR END GUIDE SETTING THE CLOCK cont pg 2 ...

Page 32: ...AY YEAR END GUIDE 5 Press the number buttons to fill in the number of the month then the day then the year For dates with only one number 1 9 press the 0 button first then the date For example if today is July 8 1998 press 0 7 0 8 9 8 The correct day of the week will appear by itself CLOCK SET TIME 10 20 AM MONTH DAY YEAR 07 08 98 WED END GUIDE ...

Page 33: ...rrect time of day on the VCR s display Notes The clock uses the 12 hour system You set it for AM or PM An illogical time like 13 for the hour or 20 for the month will not be accepted If you press the wrong digit exit the screen by pressing GUIDE and recall the screen to enter the correct setup ...

Page 34: ...1 Press the POWER button to turn on the VCR pic 2 Turn on the TV and select the video channel 3 or 4 Or if you are hooked up with an audio video cable set the TV to AUX or VIDEO 3 Press the GUIDE button The main on screen menu will appear on the TV screen MENU 1 DVHS 2 VCR 3 SETUP SETUP CHANNEL 4 5 REVIEW CLOCK END GUIDE 4 Press the 3 button to select the CHANNEL PRESET operation CHANNEL PRESET 1 ...

Page 35: ...enna CATV1 Ordinary cable CATV2 Alternate cable If CATV1 doesn t give you the channels you expect 6 Press the 2 button CHANNEL PRESET 1 CHANNEL ANT 2 AUTO CHANNEL SET 3 ADD ERASE CHANNEL END GUIDE The VCR will automatically store channels received in your area It takes about 2 3 minutes After the channels are stored in memory the channel with the lowest number appears in the VCR s display 7 Press ...

Page 36: ...mbered buttons to check the channels you can receive or Selects Channel 7 Note If no channels have been set or a clear picture does not appear check the antenna or cable connection To add or erase channels The auto channel set procedure may memorize channels that are blank have snowy pictures or interference You may skip these channels by erasing them Very weak stations might not be memorized at a...

Page 37: ...ESET 1 CHANNEL CATV1 2 AUTO CHANNEL SET 3 ADD ERASE CHANNEL END GUIDE 3 Press the 3 button to select ADD ERASE CHANNEL ADD ERASE CHANNEL CHANNEL 02 SELECT CHANNEL ERASE STOP ADD PLAY END GUIDE 4 Use the number buttons to select the number of the channel you want to add or erase Example Selects channel 7 ADD ERASE CHANNEL ...

Page 38: ...HANNEL CHANNEL 07 ERASED SELECT CHANNEL ERASE STOP ADD PLAY END GUIDE 6 Press the GUIDE button to return to regular viewing PRE TUNING THE VCR TUNER cont pg 2 Auto blue setting 1 Turn on the TV and select the video channel 3 or 4 Or if you are hooked up with an audio video cable set the TV to AUX or VIDEO pic 2 Press the GUIDE button The main on screen menu will appear on the TV screen ...

Page 39: ...CR SETUP AUTO 1 BLUE ON SAP 4 HIFI 5 STEREO 6 OFF AUDIO SETUP END GUIDE 4 Press the 1 button to select AUTO BLUE ON or OFF VCR SETUP AUTO 1 BLUE ON SAP 4 HIFI 5 STEREO 6 OFF AUDIO SETUP END GUIDE ON The screen becomes blue and mutes sound when a channel without a broadcast signal on the VCR or a channel on which broadcasting has finished ...

Page 40: ...UNER 40 If the signal is too strong this function may not operate even if you specify ON During playback this function does not operate OFF The AUTO BLUE feature is switched off 5 Press the GUIDE button to end the setting ...

Page 41: ...IDEO 2 Insert a recorded tape The power comes on automatically and the tape indicator lights on the display When a cassette without its safety tab is inserted playback starts automatically pic pic 3 Press the PLAY button to start playing the tape When you connect the VCR and DSS box via a digital A V cable and play back a D VHS tape the D VHS indicator will light and the VCR will automatically ent...

Page 42: ... the tape pic PLAYBACK cont pg 2 Rewinding the tape Movie Return If your videocassette has the safety tab removed the VCR will stop and automatically rewind the videocassette eject it and turn off the power when it reaches the end of the tape or a blank section of tape which lasts for more than 30 seconds Note This function works only in PLAYBACK mode not in RECORDING mode To remove noise from the...

Page 43: ...wing a cassette Press either the or buttons until picture is clear pic pic During playback the tracking level meter with a number will appear in the VCR s display Press the or button to adjust the playback level so the number is the largest Note When manual tracking has been activated auto tracking will not operate until you press the PLAY button on the remote control during playback or remove the...

Page 44: ...n the PAUSE mode the VCR automatically switches to STOP mode to protect the tape If noise bars appear on the TV screen during the PAUSE mode first set the VCR to the SLOW mode by using the shuttle ring and then press the CH or button on the remote control to minimize the noise bars see page 28 If the screen jitters during PAUSE press the CH or button to minimize the jitter Visual Search This funct...

Page 45: ...ing D VHS playback SPECIAL PLAYBACK EFFECTS cont pg 3 Choosing a mode for audio playback The VCR records the same audio on both the Hi Fi and linear tracks on the tape The Hi Fi sound is recorded on separate left and right stereo channels Monaural sound is recorded on the linear track To enjoy Hi Fi sound connect your VCR to a stereo television or amplifier receiver using the audio video jacks see...

Page 46: ...or normal use The L and R indicators will light in the VCR s display panel Select LINEAR to play back the sound recorded on the linear monaural track Also if the audio sounds distorted or unusual or there is no audio select LINEAR VCR SETUP AUTO 1 BLUE ON SAP 4 LINEAR 5 STEREO 6 OFF AUDIO SETUP END GUIDE 4 Press the GUIDE button to end the setting ...

Page 47: ...re backward and forward through your next video pic B Turn the ring while in the stop mode to fast forward or rewind the tape The tape continues to be wound even after you release the dial pic Notes If noise bars appear on the TV screen during the SLOW STILL modes turn and hold the shuttle ring in the SLOW position then press the CH or button on the remote control to minimize the noise bars The no...

Page 48: ...ng Your VCR will automatically create an invisible INDEX mark when you start recording or when you press the PAUSE button during recording change the channel and press the PAUSE again to restart recording pic 1 Press the DISP INFO button in the stop mode The index screen appears on TV pic STOP CH 02 5 SP EP 7 INDEX 9 INDEX 07 08 97 TUE 10 20AM EP 2 Press the 7 button for rewind or the 9 button for...

Page 49: ...t begins at that spot 3 If this is the program you were looking for press the PLAY button for normal playback To stop the index search before an index mark is reached press the STOP button pic Note If there are no index marks on the tape the VCR will just rewind to the beginning or fast forward to the end ...

Page 50: ...0 00 00 when the tape is ejected Press the DISP INFO button a third time to see the tape remaining time Note Immediately after the tape is inserted will appear 2 minutes after playback or recording is started the tape remaining time is displayed Press the CLEAR EXIT button repeatedly to switch the type of the tape used The correct remaining time will appear AUTO T 120 or shorter tape T 160 T 140 o...

Page 51: ...cording or playing back a tape pic 3 At the point that you want to go back to press the CLEAR EXIT button This resets the counter to 0 00 00 pic 4 Press the STOP button when you are done recording or playing back the tape pic 5 Press the REW button to rewind the tape pic It will automatically stop at the spot where you cleared the counter in step 3 Press the PLAY button to watch the tape from the ...

Page 52: ... copyright law may apply to private in home taping of copyrighted materials In most cases it is okay to record for personal use as long as you do not sell the material You must act responsibly in this area check into the matter if you are unsure Basic recording steps Note You may use a blank tape or you may record over a previously recorded erasable tape 1 Turn on the TV and select the video chann...

Page 53: ...r the best picture quality or EP extended play for the longest recording time on a single tape STOP CH 02 5 SP EP 7 INDEX 9 INDEX 07 08 97 TUE 11 08AM SP An indicator on the VCR s display shows which speed is selected VHS RECORDING STEP cont pg 3 5 Press the CH button or the number buttons to select the channel you want to record Example Select channel 8 100 ENT and 2 and 4 for channel 124 pic ...

Page 54: ...VCR to the recording pause mode Press the button again to re start recording If you stay in PAUSE mode for more than 5 minutes the VCR automatically switches to STOP mode to protect the tape 7 Press the STOP button to finish recording pic pic To watch a DSS program while recording a program other than DSS pic 1 Press the DSS VCR button on the remote control so that a DSS program appears on the TV ...

Page 55: ...l 3 or 4 Or if you are hooked up with an audio video cable set the TV to AUX or VIDEO 2 Press the GUIDE button The main on screen menu will appear on the TV screen MENU 1 DVHS 2 VCR 3 SETUP SETUP CHANNEL 4 5 REVIEW CLOCK END GUIDE 3 Press the 1 button to select the D VHS SETUP operation DVHS SETUP 1 DVHS AUTO MODE ON END GUIDE 4 Press the 1 button to select D VHS AUTO MODE ON or OFF ...

Page 56: ... inserted DSS programs will be recorded in the VHS format Any section guarded against copying where a copy protect signal is inserted will be recorded in the VHS format If the digital A V cable is not connected DSS programs will be recorded in the VHS format OFF When VHS or D VHS tape is inserted DSS programs will be recorded in the VHS format 5 Press GUIDE to end the setting ...

Page 57: ...seconds and then start recording 1 Turn on the TV and select the video channel 3 or 4 Or if you are hooked up with an audio video cable set the TV to AUX or VIDEO pic 2 Insert a blank or erasable tape with the mark pic The power comes on automatically and the tape indicator lights on the display If a cassette without its safety tab is inserted playback starts automatically and you cannot complete ...

Page 58: ...een removed the VCR will eject the tape Press the PAUSE SELECT button to set the VCR to the recording pause mode Press the button again to re start recording If you stay in PAUSE mode for more than 5 minutes the VCR automatically switches to STOP mode to protect the tape If the digital A V cable comes unplugged during D VHS recording recording will stop Any section guarded against copying where a ...

Page 59: ... TV again This will switch you back to viewing through the VCR and you ll see the program you are recording If you re hooked up with an audio video cable Switch the TV from AUX or VIDEO mode back to the TV mode then select the channels you want to watch as described in Step 2 Switch TV back to AUX or VIDEO to monitor your recording To change the channel being recorded pic 1 Press the PAUSE SELECT ...

Page 60: ...pe that has several recordings on it by searching for the INDEX mark See Page 32 Jump to an Index Mark with INDEX RECORDING A PROGRAM RECORDING TIPS cont pg 4 To record a Second Audio Program SAP Some stations transmit a Second Audio Program such as in a second language If a station broadcasts in SAP the SA indicator will display on your TV screen You can set the VCR to record a second audio progr...

Page 61: ... 5 Press the GUIDE button twice to end the setting 6 Follow the Step 1 through 5 on VHS Recording Step on pages 35 and 36 Stereo vs mono sound When you select the STEREO option in the initial setup operation your VCR records in stereo any station that broadcasts stereo sounds When a TV channel broadcasts in stereo you ll see a stereo indicator on the TV screen Set to MONO if the stereo signal is w...

Page 62: ...RECORDING A PROGRAM RECORDING TIPS 62 1 BLUE ON SAP 4 HIFI 5 STEREO 6 OFF AUDIO SETUP END GUIDE Note When you select MONO sound is recorded as mono even when a channel broadcasts in stereo ...

Page 63: ...he REC IRT button twice to indicate the recording time on the display REC IRT Settings Illustration pic You may increase the recording time by 30 minutes each time you press the REC IRT button While you are recording the remaining recording time is shown on the VCR display At the end of your recording the display will read 0 00 recording will stop automatically and the VCR will turn itself off To ...

Page 64: ...t once Before you begin Assemble the information you need for timed recording Be sure that the clock is set to the correct time Date and day of the program Starting time Ending time Channel to be recorded Blank or erasable videocassette safety tab intact Method for programming a DSS program for delayed D VHS recording Insert a D VHS tape into the VCR Connect the VCR and DSS box via a digital A V c...

Page 65: ... the TV and select the video channel 3 or 4 Or if you are hooked up with an audio video cable set the TV to AUX or VIDEO DELAYED RECORDING cont pg 4 EXAMPLE Set the VCR to record one time in the analog format a program on Channel 8 that starts at 6 00 PM and ends at 6 30 PM on 7 10 98 at the EP recording speed pic 3 Press the PROGRAM button The screen will appear pic RECORDING ONE TIME 1 DAILY 2 W...

Page 66: ...the 1 button to bring up the screen for One Time Recording ONE TIME RECORDING CH START END DATE TAPE SPEED SP END PROGRAM 5 Press the 0 and 8 buttons to select channel 8 ONE TIME RECORDING CH START END 0 8 DATE TAPE SPEED SP CORRECT CLEAR END PROGRAM Note Remember to press 0 before single digit channel numbers times and dates If you want to record from an external equipment press the AVX button to...

Page 67: ...correct digit then reenter the correct digit 6 Enter the start time by pressing 0 6 0 and 0 for 6 00 ONE TIME RECORDING CH START END 0 8 06 00 AM 1 PM 2 DATE TAPE SPEED SP CORRECT CLEAR END PROGRAM 7 Press the 2 button for PM ONE TIME RECORDING CH START END 0 8 06 00PM DATE TAPE SPEED SP CORRECT CLEAR END PROGRAM 8 Enter the end time by pressing 0 6 3 and 0 for 6 30 The VCR automatically selects P...

Page 68: ...s date so no changes are needed on that line DELAYED RECORDING cont pg 4 pic 9 Enter the recording date by pressing 0 7 1 and 0 for 7 10 98 ONE TIME RECORDING CH START END 0 8 06 00PM 06 30PM DATE TAPE SPEED 07 10 98 FRI SP SP EP 5 CORRECT CLEAR END PROGRAM 10 Press the 5 button to select the recording speed EP ONE TIME RECORDING CH START END 0 8 06 00PM 06 30PM ...

Page 69: ...n the screen Then enter the correct number Illogical times and dates won t be accepted To stop recording while in the timed recording mode 1 Press POWER button 2 Press the STOP button within 10 seconds pic pic This can be done either on the VCR or with the remote control When you have set up all the timed recordings you want Don t forget to load a videocassette with the safety tab still attached t...

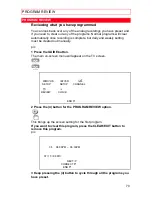
Page 70: ...e GUIDE button The main on screen menu will appear on the TV screen MENU 1 DVHS 2 VCR 3 SETUP SETUP CHANNEL 4 5 REVIEW CLOCK END GUIDE 2 Press the 4 button for the PROGRAM REVIEW option This brings up the screen setting for the first program If you want to clear this program press the CLEAR EXIT button to remove this program pic ONE TIME RECORDING CH START END 0 8 06 00PM 06 30PM DATE TAPE SPEED 0...

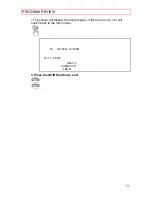
Page 71: ...ll display the next program if there are more or it will switch back to the main menu ONE TIME RECORDING CH START END 03 06 30PM 07 00PM DATE TAPE SPEED 07 17 98 FRI EP NEXT 4 CORRECT CLEAR END PROGRAM 4 Press the GUIDE button to end ...

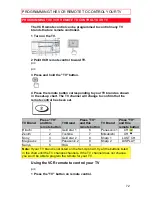
Page 72: ...he remote control has been set TV Brand Press TV and this remote button TV Brand Press TV and this remote button TV Brand Press TV and this remote button Hitachi 1 Gold star 1 6 Panasonic 1 CH Zenith 2 Toshiba 7 Mitsubishi CH Sony 3 Gold star 2 8 Sharp 1 LAST CH Magnavox 4 Panasonic 2 9 Sharp 2 DISPLAY Sanyo 5 RCA 0 Note If your TV brand is not listed on the Set Up Chart try all the buttons listed...

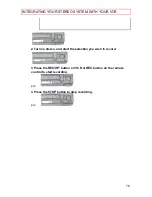
Page 73: ...PROGRAMMING THE VCR REMOTE TO CONTROL YOUR TV 73 2 Point VCR remote control toward TV 3 Press buttons corresponding to the functions available on your TV remote control ...

Page 74: ...hes DSS 1 2 DSS 2 1 Remote Control Customer Controls Remote Control Illustration pic Item No Name of the button Function 1 Transmission window 2 CLEAR EXIT to clear the main menu from the display and will return to the channel that was being viewed prior to entering the menus 3 DISP INFO to show the information about the program on the TV screen 4 DSS GUIDE to show the available program at a given...

Page 75: ...reo system Use the VCR as an extra audio tape deck for dubbing To record from stereo BEFORE YOU BEGIN Make sure the VCR is connected to your stereo system as shown above Make sure that STEREO audio is selected from the VCR Set Up Menu as shown on Page 41 of RECORDING OPERATION Section Stereo vs mono sound Select VCR recording speed SP or EP as shown on page 35 of RECORDING OPERATIONS Section VHS R...

Page 76: ...O SYSTEM WITH YOUR VCR 76 2 Turn on stereo and start the selection you wish to record 3 Press the REC IRT button on VCR or REC button on the remote control to start recording pic 4 Press the STOP button to stop recording pic ...

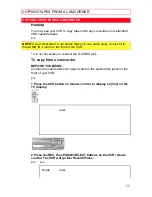
Page 77: ...to the AUDIO IN L input on the front of the VCR It is not necessary to connect the S VIDEO jack To copy from a camcorder BEFORE YOU BEGIN Connect the camcorder s AV output cable to the audio video jacks on the front of your VCR pic 1 Press the AVX button on remote control to display L2 line on the TV display LINE2 2 Press the REC then PAUSE SELECT buttons on the VCR remote control The VCR will go ...

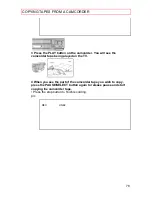
Page 78: ...corder You will see the camcorder tape being played on the TV 4 When you see the part of the camcorder tape you wish to copy press the PAUSE SELECT button again to release pause and start copying the camcorder tape Press the stop button to finish recording pic REC LINE2 ...

Page 79: ...he VCR D VHS recorded sections cannot be dubbed See page 52 for procedure if you want to dub D VHS recorded sections Copying From One VCR to Another Illustration pic To copy from one VCR to another VCR pic 1 Press the AVX button on the remote control of VCR 1 so that L2 line2 appears in the display LINE2 2 Press the REC then PAUSE SELECT buttons on VCR 1 The VCR will go into Record Pause pic pic 3...

Page 80: ...E VCR TO ANOTHER VCR DUBBING 80 4 When you see the part of the program you wish to record press the PAUSE SELECT button on VCR 1 again to release pause and start recording Press the STOP button to finish recording pic ...

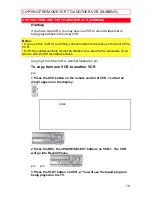
Page 81: ...r VT DX815A 1 Holding the DSS VCR button on the VCR 2 remote control press the VCR 2 STOP button pic pic The VCR 2 D VHS indicator will light and dub will appear in the display Note Dubbing cannot be done when dub disappears The dub indicator will disappear if you do not perform dubbing withing two minute after it lights or if you press the STOP FF or REW button When the dub indicator goes out per...

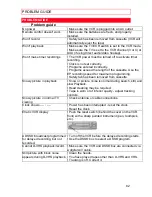
Page 82: ...as been removed from cassette Snowy picture in playback Snow or picture noise is normal during search still and slow Playback Head cleaning may be required Tape is worn or of inferior quality adjust tracking controls Snowy picture in normal TV viewing Check antenna or cable connections Clock shows Power has been interrupted reset the clock Reset the clock Erratic VCR display Push the reset switch ...

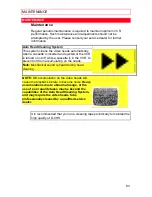
Page 83: ...R is turned on or off while a cassette is in the VCR to prevent dirt from accumulating on the heads Note Mechanical sound is heard during head cleaning NOTE Dirt accumulation on the video heads will cause the playback picture to become noisy Heavy accumulations due to abnormal usage or the use of poor quality tapes may be beyond the capabilities of the Auto Head Cleaning System and may require the...

Page 84: ... 17 1 8 W x 3 7 8 H x 11 1 8 D 43 5 cm W x 9 9 cm H x 28 2 cm D Weight 9 2 lbs 4 2 kg Storage Temperature 4 F to 131 F Operating Temperature 41 F to 104 F Accessories 1 coaxial cable Part No E5861682 1 remote control unit Part No HL10702 1 digital A V cable Part No EW11381 1 D VHS video tape Part No GU10141 2 AA batteries Check your cable company s compatibility requirements For information about ...

Page 85: ...ONS 85 In the continental U S A DIAL TOLL FREE 7 days a week 24 hours a day 1 800 HITACHI 1 800 448 2244 You must state your zip code when calling In Canada MONTREAL 514 956 9882 TORONTO 905 821 4545 VANCOUVER 604 214 0777 ...

Reviews: