background image

Getting Started 


19

Note: 

If you connect the VM-BPL30 battery with the remaining battery time of 5 minutes or less, the time will not 

be displayed. 

Note: 

If the correct remaining time does not appear, use up the battery attached to the camcorder, and then fully 

charge it. 

Note: 

If you repeat charging and discharging the battery before using it up, the correct remaining time may not be 

displayed. 

Note: 

If the battery is used at low temperatures, the actual operating time with battery will be substantially 

different from the displayed time, and the correct time may not appear. 

Note: 

If the battery which has been used at low temperature is subsequently used at normal temperature, display 

of remaining battery time will be incorrect. For display of correct remaining time, fully charge the battery. 

Note: 

The remaining battery time will not appear when you are recording an image of yourself, or the LCD 

monitor Is put back to camcorder with its screen facing to the side. 

Note: 

If you eject and reinsert cassette after the battery is discharged, power will shut off midway and the 

camcorder will stop. When the battery is discharged, immediately remove it from the camcorder and charge it 
again. 

Note: 

When the VM-BPL30 battery is used, the battery charge indicator "

"   may not match the remaining 

battery time display (in minutes). In this case, refer to the remaining time display when using the camcorder. 

To display the correct remaining battery time on camcorder 

•  Fully charge the battery before use. 
•  Turn the camcorder on and leave it pointing at a still subject for about 30 seconds. Do not move the camcorder 
during this time. 
•  If display does not change some time, open and close the LCD monitor while you are using the camcorder. 

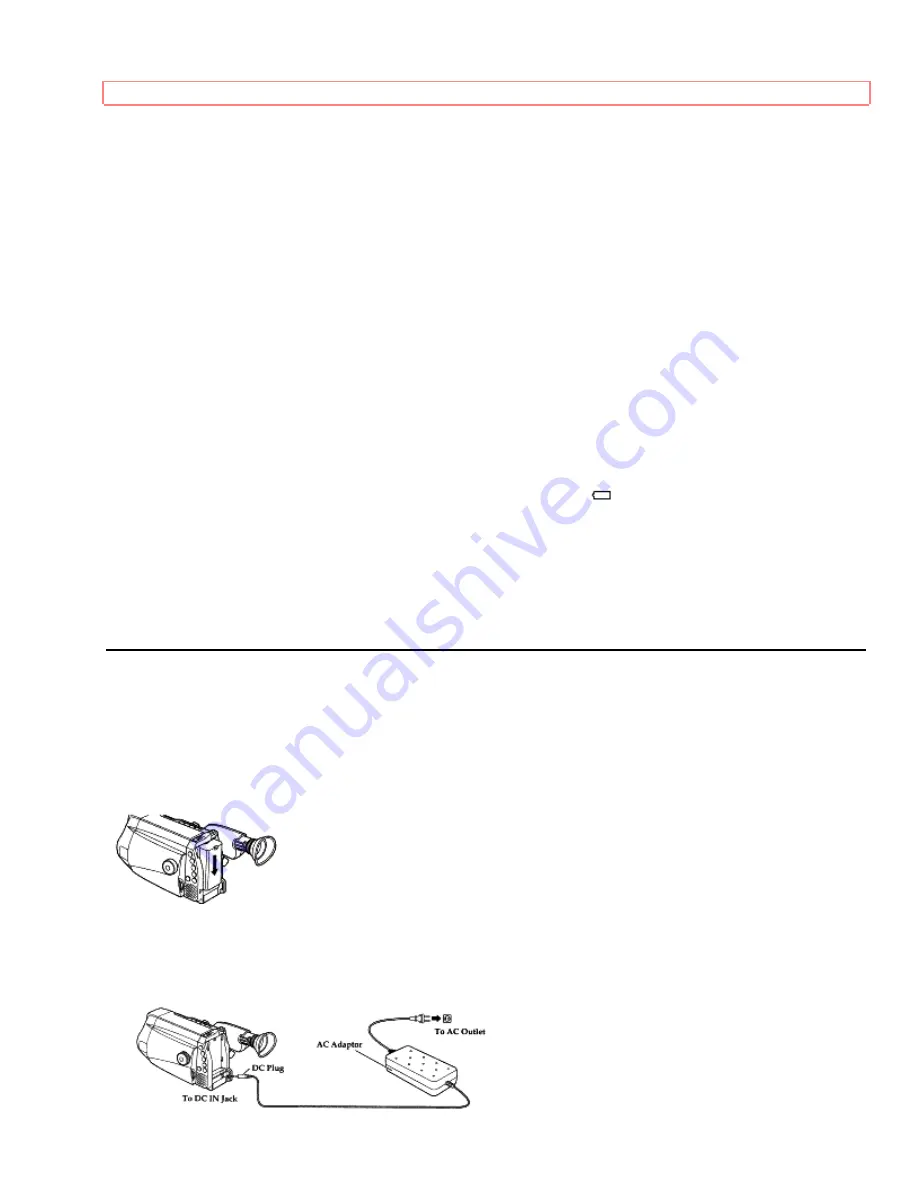
Camcorder Power Sources 

You can use the charged battery pack, AC adaptor (provided) or car battery cord (optional) to power the 
camcorder, After use, be sure to remove the power supply, 

Using Battery Pack 

1 Attach the charged battery pack to the camcorder. (See pages 16 and 17 for attachment and charging of battery 
pack.) 


Using the AC Adaptor 

Please ensure that the CAM/OFF/VIDEO switch is in the OFF position whenever attaching or detaching any 
power supply (le. battery, AC adaptor, etc.). 


Summary of Contents for VM-E455LA

Page 1: ...ISION 1855 Dornoch Court San Diego CA 92173 Tel 1 800 HATACHI 1 800 448 2244 HITACHI HSC CANADA INC 6740 Campobello Road Missisauga Ontario L5N 2L8 CANADA Tel 1 800 HATACHI 1 800 448 2244 Thank you for buying a Hitachi product Please take time to become familiar with the manual and how it is set up Keep it handy for feature reference QR30893 Hitachi Ltd 1999 Printed in Japan KK S N ...

Page 2: ...ng Tape 25 Using the Linear Time Counter 26 Display in Viewfinder or on LCD Monitor 26 Setting the Date and Time 27 Basic Techniques 28 Making a Basic Recording 28 Using Instant Review 30 Using Auto Focus 30 Using Manual Focus 31 Using the Power Zoom 31 Using the Digital Zoom 32 Using the INST ZOOM instant Zoom Button 32 Using Macro 33 Playback 33 Playing Back Your Recording on Your TV 35 Video Ef...

Page 3: ... adapter charger have the following caution marks Identifications of caution marks This symbol warms the user that uninsulated voltage within the unit may have sufficient magnitude to cause electrical shock Therefore it is dangerous to make any kind of contact with any inside part of this unit This symbol alerts the user that important literature concerning the operation and maintenance of this un...

Page 4: ...utlet on a circuit different from that to which the receiver is connected Consult the dealer or an experienced radio TV technician for help Caution to the user Changes or modifications not expressly approved by the manufacture could void the user s authority to operate the equipment Note to CATV system installer This reminder is provided to call the CATV system installer s attention to Article 820...

Page 5: ...om battery power or other sources refer to the operating instructions 6 Overloading Do not overload wall outlets and extension cords as this can result in a risk of fire or electric shock Overloaded AC outlets and extension cords are dangerous and so are frayed power cords damaged or cracked wire insulation and broken plugs They may result in a shock or fire hazard Periodically examine the cord an...

Page 6: ...utside antenna or cable system is connected to the video product be sure the antenna or cable system is grounded so as to provide some protection against voltage surges and built up static charges Section 810 of the National Electrical Code ANSI NFPA No 70 provides information with respect to proper grounding of the mast and supporting structure grounding of the lead in wire to an antenna discharg...

Page 7: ...maged f When the video product exhibits a distinct change in performance this indicates a need for service 19 Replacement Parts When replacement parts are required have the service technician verify that the replacements he uses have the same safety characteristics as the original parts Use of replacements specified by the video product manufacturer can prevent fire electric shock or other hazards...

Page 8: ...655LA Advanced Techniques to help you with some of the exciting sophisticated features of the Hitachi VM E455LA VM H655LA We hope you will take the time to learn about these functions since they have been designed for you You can use the video camcorder without reading this section A General Maintenance section to help keep your purchase in good repair We want this manual to be as helpful as possi...

Page 9: ...getting to know all about your Hitachi 8mm camcorder The more comfortable and familiar you are with the machine and its features the more you can make it do for you Let s get started It is crucial that you read and understand all the safety instructions before you begin If you haven t read the safety instructions yet please take the time to do so now Components and Accessories Check that you have ...

Page 10: ...on Use this button to fast forward tapes or for visual search During visual search the camcorder fast forwards at approximately 9 times normal playback speed During fast forward press and hold this button to visually scan the tape forward at 19 times the normal playback speed Using Forward and Reverse Search p3l Also use this button to set date and time and create a title Creating and Recording a ...

Page 11: ...ich case you will need a DC cord optional 16 Shoulder Strap Slots Attach a shoulder strap here 17 OPEN Button Push this button to open the LCD monitor 18 Bright Control Buttons Use this to adjust the brightness of the LCD monitor screen 19 LCD Monitor You can view the pictures as they are being recorded and play them back immediately after recording on the LCD screen 20 Cassette Holder A power sou...

Page 12: ...F VIDEO switch is set to CAM this button can be used as the DATE or DISPLAY button set the date and time and select the date display you want to record Setting the Date and Time p24 and Date Recording p38 In the VIDEO mode the DATE DISP button is used as the DISPLAY button Display in Viewfinder or on LCD Monitor p22 Note Be sure to insert the clock battery before setting the date and time or creat...

Page 13: ...handles PAL60 mode signal and has vertical sync adjustment circuitry for 60Hz Notes Make sure PAL60 is not displayed when connecting the camcorder to an NTSC TV for playback or monitoring the playback picture on the camcorder s LCD monitor If PAL60 Is displayed in the above cases no color will appear in the picture The PAL60 button is effective during playback only See TV instruction manual for de...

Page 14: ...sumes normal playback 30 Hand Strap Refer to page 21 31 Clock Battery Compartment Pull the battery holder and install the clock battery provided See Loading Clock Battery on page 21 32 Power Zoom Control Use this to zoom automatically Using the Power Zoom p28 33 INST ZOOM instant Zoom Button Use this button to magnify the image being recorded 1 5 times 34 Tripod Mounting Threaded Socket Use this t...

Page 15: ...harge the battery on a flat surface this is free of vibration 1 Make sure the CAM OFF VCR switch is set to OFF position 2 Attach the battery pack to the camcorder Align the bottom of the battery with mark on the camcorder so that the battery fits into the grooves Then slide the battery downward as illustrated Note Always attach a battery only by the procedure described here Attaching a battery for...

Page 16: ...C plug from the camcorder 6 Disconnect the AC plug from the AC outlet 7 Detach the battery from the camcorder Note Always remove the battery from the camcorder after use Note Charging is not done when the CAM OFFLINE switch of the camcorder is set to CAM or VIDEO However if recording pause continues for more than 5 minutes in the CAM mode the camcorder will automatically turn off after which charg...

Page 17: ...m Continuous Recording EVF when using the viewfinder LCD when using the LCD monitor BatteryVM BPL13VM BPL27VM BPL30VM BPL60 EVF 160 min 330 min 370 min 760 min LCD 120 min 260 min 290 min 630 min Typical Recording EVF when using the viewfinder LCD when using the LCD monitor BatteryVM BPL13VM BPL27VM BPL30VM BPL60 EVF 90 min 190 min 200 min 420 min LCD 70 min 150 min 170 min 380 min Notes on the Ba...

Page 18: ...his flashing symbol indicates a battery nearly out of power Use an alternative power source or charge the battery before continuing to use the camcorder Knowing Remaining Battery Power Time If you use the VM BPL30 lithium ion battery optional to power the camcorder you can finding out how much camcorder operating time remains with the battery The VM BPL30 measures the battery consumption calculate...

Page 19: ...cassette after the battery is discharged power will shut off midway and the camcorder will stop When the battery is discharged immediately remove it from the camcorder and charge it again Note When the VM BPL30 battery is used the battery charge indicator may not match the remaining battery time display in minutes In this case refer to the remaining time display when using the camcorder To display...

Page 20: ... etc 1 Plug the car battery cord into the car s cigarette lighter socket 2 Connect one end of the DC cord optional to the DC IN jack of the camcorder Connect the other end of the DC cord to the DC OUTPUT of the car battery cord Note You need the optional VM CC80A KIT Note Only use the car battery cord with cars having 12 24 volts negative ground system Note You cannot use the car battery cord to c...

Page 21: ...tte and check that the tape Is not damaged is not slack or no dust adheres to it etc After making sure that there is no abnormality reinsert the cassette If TAPE reappears see Troubleshooting on page 57 Note If the tape is near the winding end it may take longer to load it Removing a Cassette Press the EJECT button EJECT will appear on the LCD monitor and the cassette door will open automatically ...

Page 22: ...n the LCD monitor is adjusted the recorded video will not change 1 Load the battery Camcorder Power Sources P17 2 Press the red button on the CAM OFF VIDEO switch as you slide it to CAM or VIDEO 3 Use the brightness control buttons to adjust the brightness of the LCD screen When either button is pressed the brightness control display will appear on the LCD monitor for about 5 seconds Press to incr...

Page 23: ...it could cause a malfunction The LCD monitor cannot be closed if it is tilted Close the LCD monitor after making sure it is parallel with the camcorder If you were to close the monitor while it faces the same direction as the lens or it is diagonal it could damage the LCD monitor Do not disassemble the LCD monitor as this might cause a malfunction When opening the LCD monitor be careful that no wa...

Page 24: ...tory in present condition only adjustment of the diopter control is necessary Note Be sure to pull out the eye cup all the way so that you can see the subject in the viewfinder clearly Note Hold the knobs on both sides of the eye cup stem to pull out the eye cup Note The eye cup stem can be retracted when the camcorder is being carried Adjustment the Hand Strap Adjust the hand strap to best fit yo...

Page 25: ... EMERGENCY TREATMENT Note Replace the battery with 3V micro lithium cells such as Maxell CR2025 or its equivalent Note Dispose of battery safely in accordance with local laws Do not dispose of in fire Note Do not short circuit the battery Note Do not take apart the battery Note Do not hold the battery with the metallic tweezers Note Do not recharge the battery Note Keep the battery In a dark cool ...

Page 26: ...g you ve been filming or time you have left to film before running out of tape Turn the camcorder on to display the linear time counter The linear time counter keeps track from when you load a cassette into the camcorder and clears to 0 00 00 when the cassette is ejected Display in Viewfinder or on LCD Monitor When you are using the camcorder the selected functions and time counter will appear in ...

Page 27: ...reappear again Setting the Date and Time Take the time to set the date and time now The date and time can be recorded on your tapes to act as a handy reference when viewing them later Use the following procedure to set up the display for the current dote and time Note Be sure to insert the clock battery before setting the date and time Although the date and time can be set without the clock batter...

Page 28: ... the month 2 Move to where you need to make the correction with the STOP button and use the F FWD and REW REVIEW to correct 3 Press the DATE DISP button to set the corrected date and time Basic Techniques The batteries are in place and charged the date and time are set and you are familiar with the controls its time to make a recording Basic recording is easy and simple Hooking up the camcorder to...

Page 29: ...F VIDEO switch to OFF position to turn off the camcorder Note If the LCD monitor is opened or closed the monitor picture is switched between the viewfinder and LCD monitor during recording the on screen display will disappear for about one second It is recommended that you do not switch the picture during recording as the date or title superimposed in the picture being recorded will disappear for ...

Page 30: ...t Stop button to resume recording Using Auto Focus The camcorder focuses the subject in the center of the viewfinder or LCD monitor automatically unless the manual focus is engaged If FOCUS appears in the viewfinder or on the LCD monitor manual focus is engaged Press the FOCUS VOL control buttons simultaneously to return to auto focus The auto focus will not work under the following conditions and...

Page 31: ...ing Manual Focus 1 Press the FOCUS VOL control buttons simultaneously FOCUS displays in the viewfinder or on the LCD monitor You can adjust the focus manually 2 Use the power zoom T control to zoom up completely to your subject If you don t use the T control to zoom to the picture you want the picture may fall out of focus when actual recording starts 3 Press the FOCUS VOL control far or near butt...

Page 32: ... The digital zoom increases the magnification of the power zoom by 4 5 times You must place the subject you wish to magnify at the center of the viewfinder or LCD monitor Slide and hold the power zoom control to the T side until you find the picture you want You control the zoom with the power zoom T and W controls When ZOOM is not displayed in the viewfinder or on the LCD monitor normal zoom func...

Page 33: ...LCD monitor immediately after recording Note Make sure that PAL60 does not appear in the viewfinder or on the LCD monitor If it is displayed no color will appear In the played back picture 1 Open the LCD monitor and then adjust the angle of the monitor Opening the LCD Monitor p19 2 Hold down the red button on the CAM OFF VIDEO switch while sliding the switch to VIDEO 3 Press the REW REVIEW button ...

Page 34: ...ture on a TV without viewing it Note Only the playback sound is heard The sound being recorded is not heard Note No sound is heard when the LCD monitor is closed To Play Back a Tape with the Viewfinder Close the LCD monitor then press the PLAY button to play back the tape The picture appears in the viewfinder Note You cannot hear the playback sound when playing back your video with the viewfinder ...

Page 35: ...res with less noise on the LCD monitor during forward or reverse search Press the F FWD button during playback to play the tape forward at 6 times normal play speed Press the PLAY button to resume normal playback Press and hold the F FWD button during fast forward to visually scan the tape at 17 times the normal playback speed Releasing F FWD returns the camcorder to fast forward Press the REW REV...

Page 36: ...rded cassette into the camcorder 4 Turn on your VCR and place it in the camcorder input mode consult your VCR manual for details Operate the television as you normally do to see the signal coming from the VCR 5 Hold down the red button on the CAM OFF VIDEO switch while sliding the switch to VIDEO 6 Press the PLAY button to begin playback 7 Press the STOP button when finished Connecting to a Televi...

Page 37: ... Jacks 1 Disconnect the VHF antenna leads from the back of the television Leave the UHF antenna leads connected 2 Connect the VHF antenna lead to ANT IN of the RF output adapter If the cable on the VHF antenna lead is flat you need to purchase an antenna adapter 300 ohm to 75 ohm transformer Connect the antenna adapter to the VHF antenna lead and slide the adapter on to the ANT IN terminal 3 Conne...

Page 38: ... PAL60 output Video Effects in Playback Mode The digital signal processor DSP in this camcorder allows you to add special effects to playback Pictures Use this feature during tape dubbing etc to create a tape with a more artistic impression The video effect modes during playback include 16x9 Art and Sepia Each time the EFFECTS button is pressed in the playback or play pause mode the playback mode ...

Page 39: ... the TV on and select the TV video input Set the TV to the PAL60 mode 3 Set the CAM OFF VIDEO switch of the camcorder to VIDEO 4 Press the PAL60 button 5 Press the PLAY button of the camcorder If you press the DATE DISP button at this time PAL60 will appear in the viewfinder or on the LCD monitor 6 When playback is finished set the CAM OFF VIDEO switch to OFF position Note Connect the camcorder to...

Page 40: ...Advanced Techniques ...

Page 41: ...d time with the picture all the time 10 20 AM 11 5 2000 3 Press the Start Stop button Recording will start Note When AUTO and date display is selected the date disappears about 10 seconds after recording is started Note When TITLE and date display is selected the title and date disappear about 10 seconds after recording is started Creating and Recording a Title The titling function allows you to s...

Page 42: ... the battery providing power to the camcorder is removed 1 Connect the camcorder to a power source 2 Hold down the red button on the CAM OFF VIDEO switch and slide it to either CAM or VIDEO 3 Press the TITLE ON OFF button on the remote control A flashing cursor will appear in the viewfinder or on the LCD monitor and the camcorder will enter the title creating mode Creating a Title on next page 4 P...

Page 43: ...mo available English HAPPY BIRTHDAY MERRY CHRISTMAS CONGRATULATIONS THE SUPERSTAR VACATION FUN THANKSGIVING HAPPY EASTER ANNIVERSARY HAPPY NEW YEAR French BON ANNIVERSAIRE JOYEUX NOEL FELICITATIONS SUPERSTAR VACANCES THANKSGIVING JOYEUSES PAQUES ANNIVERSAIRE BONNE ANNEE Spanish FELIZ CUMPLEAÑOS FELICIDADES EL PROTAGONISTA FELIZ NAVIDAD VACACIONES ANIVERSARIO ...

Page 44: ...thout the clock battery inserted it will disappear when the battery providing power to the camcorder is removed 1 Connect the camcorder to a power source 2 Hold down the red button on the CAM OFF VIDEO switch and slide it to either CAM or VIDEO 3 Press the TITLE ON OFF button on the remote control and a flashing cursor appears in the viewfinder or on the LCD monitor Note If a stored title appears ...

Page 45: ...mplete your title press the TITLE ON OFF button on the remote control to store the title in memory and remove the title graphics from the viewfinder or on the LCD monitor Note As long as the correct current time can be displayed the title is held in memory Characters available for your title Correcting Errors 1 Set the CAM OFF VIDEO switch to CAM 2 Repeatedly press the DATE DISP button unil the ti...

Page 46: ...ng mode a negative image negative positive recording 300 times digital zoom feature with instant zoom a symmetric image obtained by placing a mirror at the center of the screen half mirror recording and an image in mosaic mosaic recording and an oil painting look art mode Note The half mirror recording and mosaic recording functions cannot be used with digital zoom instant zoom image stabilizer or...

Page 47: ... MIRROR Half Mirror Mode MOSAIC Mosaic Mode ART Art Mode Normal Mode Activating Digital Effects Recording 1 Place the camcorder in the record pause mode 2 Press the EFFECTS button to select the digital effects mode you want ...

Page 48: ...00 times when instant zoom is used at the same time MIRROR Half Mirror Mode The image in the viewfinder will change to a symmetric image on the left and right obtained by placing a mirror at the center of the screen Note This function cannot be used with digital zoom instant zoom image stabilizer or zoom fade function Note The subject image will be compressed in the horizontal direction and narrow...

Page 49: ... be released After setting the digital effect mode reset the fade function White fade Fades in from a white screen or fades out to a white screen appears in the upper left corner of the viewfinder Wipe fade The picture opens gradually from the center of a black screen or closes into the center to a black screen appears in the upper left corner of the viewfinder Mosaic fade Fades in from a picture ...

Page 50: ...ck and white screen or fades out to a black and white screen B W appears in the upper left corner of the viewfinder Fading In 1 Use the FADE button to select a fade option before recording 2 Press the Start Stop button to start recording fade begins automatically Fading Out 1 While recording with the camcorder use the FADE button to select a fade option 2 Press the Start Stop button to stop record...

Page 51: ...e with that cassette When a cassette is inserted and the recording is started the position is identified as the recording start position on that day Note If the clock battery is not inserted the date search function does not operate when the battery providing the power to the camcorder is removed Note When the cassette was recorded by another camcorder the date search function does not operate Not...

Page 52: ...cord pause mode hold down the F FWD REW REVIEW or PLAY button and visually search the tape Release the button and the camcorder stops the tape at the exact position you selected Note If the F FWD or REW REVIEW button Is pressed for quick edit noise will appear in the viewfinder on the LCD monitor or on the connected TV Attaching the Optional Wide or Tele Converter Lens Screw the lens into the thre...

Page 53: ... OFF VIDEO switch while you slide the switch to VIDEO 4 Insert the recorded tape in the camcorder and a blank tape into the VCR Set the VCR to record 5 Play the tape from the camcorder while recording on the VCR Note If the VCR is connected to a television and the VCR TV selector is set to VCR you can monitor the tape being dubbed Note Reduce the volume of the camcorder as low as possible during d...

Page 54: ...the VCR does not change with the above operation you need to switch the remote control code of your VCR Refer to the VCR s instruction manual If the channel still does not change after you have changed the VCR s remote control code the edit remote control cannot operate your VCR Note The remote control code is held in memory until it is changed or the batteries are replaced Note Use the remote con...

Page 55: ... remote control indoors When the infrared receivers of the VCR and camcorder are exposed to direct sunlight or strong artificial light the remote control may not operate correctly Note The remote control cannot be operated if there is an obstacle between the remote control and infrared receiver Especially be careful of this during dubbing Note When the edit remote control is connected to the camco...

Page 56: ...onitor PROG 1 0 00 02 IN OUT Note If your VCR is connected to a TV the program display will also appear on the TV screen 5 Press the button and use the or button to search for the starting point of the segment you want to copy Press and then to set the camcorder to the play pause mode The liner time counter counts when searching for the starting point Use the FORWARD and REVERSE buttons in the pla...

Page 57: ...it is finished the camcorder will enter the stop mode and the VCR will enter the record pause mode Note If you make a mistake during programming start again from the beginning or press the COUNTER RESET button to return to the previous steps one by one and enter the correct program data Note After the simple programmable edit Is finished the programmed data Is erased if you want to continue editin...

Page 58: ...al search 7 Pause Record Button In CAM mode press this button to start recording When pressed a second time the camcorder pauses During playback use this button to stop the tape temporarily Pressing a second time resumes normal playback 8 COUNTER RESET Button Use this button to reset the linear time counter to 0 00 00 This button can always reset the displayed time to 0 00 00 which is helpful when...

Page 59: ...he camcorder is ready to record 7 Press and hold the A V DUB button then press PLAY button This places the camcorder AN DUB pause mode disappears replaced by A V DUB 8 Press the button The audio video dubbing starts When the linear ear time counter reaches 0 00 00M the cam corder stops automatically recording only the portion of the tape that you selected Note If the camcorder is in AV DUB pause o...

Page 60: ...adheres to it 1 Pull out the eye cup to the position where a mark can be seen up to a half where it is pulled out all the way The side with the mark should be up 2 Turn the eye cup counterclockwise until it stops then pull it out to remove 3 Clean the picture tube face and lens To prevent scratching use a soft nonabrasive cloth swab or lens cleaning paper 4 Face the rib up as shown above and push ...

Page 61: ...d cassette in direction indicated by arrow on cassette Cassette window must be toward outside CAMERA RECORDING Symptom Check Point Correction Picture does not appear in the viewfinder or on the LCD monitor Slide the CAM OFF VIDEO switch to CAM The camcorder cannot go into the recording mode even when the start stop button is pressed Check the record protect tab on the cassette See page 18 for deta...

Page 62: ...e the CAM OFF VIDEO switch to VIDEO Insert the clock battery set the date and time then start recording Do not remove the clock battery after recording Do not eject the recorded cassette Leave it in the camcorder BATTERY CONDITION Symptom Check Point Correction The indication in the electronic viewfinder or on the LCD monitor flashes to indicate battery is discharged Try another battery or charge ...

Page 63: ... the camcorder functions will return to their default settings General Maintenance cont pg 58 Specifications General Specifications Power requirements 7 2V DC Power consumption 3 4W when recording LCD monitor OFF 4 3W when recording LCD monitor ON Dimensions 4 11 16 W x 4 1 16 H x 7 1 8 D 118 5 mm x 102 5 mm x 181 mm Weight VM E455LA 1 87 lbs approx 850g without battery pack and cassette VM H655LA...

Page 64: ...itachi Authorized Service Facility and service will be rendered in accordance with the terms of the limited warranty as stated on your warranty card or operating guide Should you have any questions regarding in warranty service operation or technical assistance please contact Hitachi Home Electronics America Inc 1855 Dornoch Court San Diego CA 92173 Tel 1 800 448 2244 Accessories Add Excitement We...

Page 65: ...General Maintenance 65 FOR AUTHORIZED HITACHI SERVICE FACILITY IN CANADA Please consult the following telephone numbers 1 800 HITACHI 1 800 995 4500 ...

Reviews: