background image


IMPORTANT: 

READ  AND  UNDERSTAND  THIS 

INSTRUCTION  MANUAL  BEFORE 

USING  THIS  AIR  CONDITIONER. 

KEEP  THIS  MANUAL  FOR  FUTURE 

REFERENCE.


INSTRUCTIONS MANUAL


Installation, Operation and Maintenance 
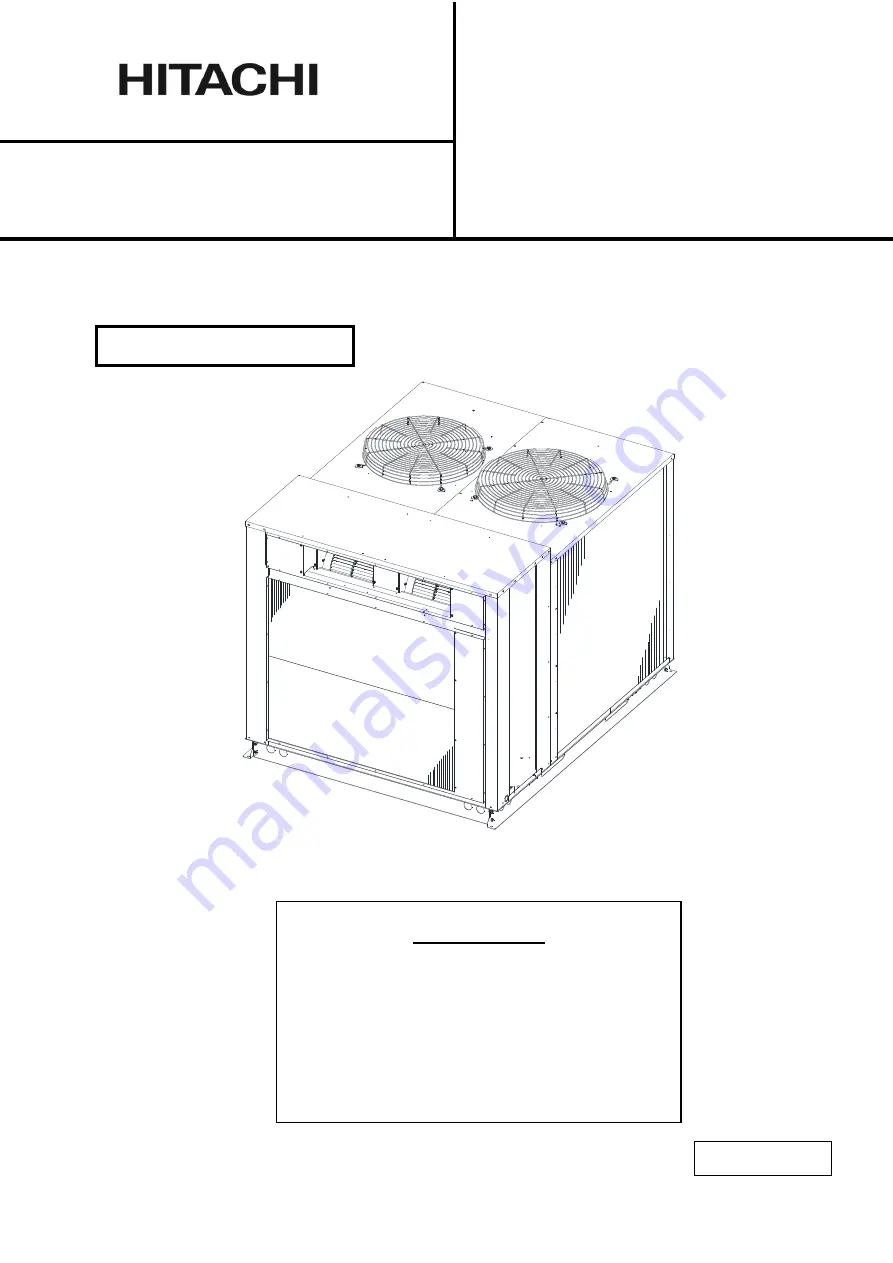
65MP3

208


REFRIGERANT:R410A 

Model

s:

AIR CONDITIONERS


RUA-NP30ATS

RUA-NP20ATS

SELF-CONTAINED


Summary of Contents for RUA-NP20ATS

Page 1: ...NSTRUCTION MANUAL BEFORE USING THIS AIR CONDITIONER KEEP THIS MANUAL FOR FUTURE REFERENCE INSTRUCTIONS MANUAL Installation Operation and Maintenance 65MP3208 REFRIGERANT R410A Models AIR CONDITIONERS RUA NP30ATS RUA NP20ATS SELF CONTAINED ...

Page 2: ...he following temperatures Operate the air conditioner within this range Condenser Air Inlet Temperature and Evaporator Air Inlet Temperature This manual should be considered as a permanent part of the air conditioning equipment and should remain with the air conditioning equipment Hitachi s air conditioners are designed and manufactured based on using the specified refrigerants The applicable refr...

Page 3: ...LECTRICAL WIRING 3 3 1 Main Power Wiring Procedures 3 4 FAN SPEED ADJUSTMENT 6 5 REMOVING SHIPPING WASHERS 6 6 TEST RUNNING 7 6 1 Final Installation Check 7 6 2 Preparation 7 6 5 Safety and Control Device Setting 9 7 MAINTENANCE 10 8 WINTER SHUTDOWN 11 9 REPLACEMENT OF PARTS 11 7 10 TROUBLESHOOTING 13 6 3 Test Running 6 4 Test Running Record 8 3 2 Control Wiring 4 3 3 Printed Circuit Board PCB Lay...

Page 4: ...at the thermostat is set at the desired position 3 Check the air filter for clogging 4 Are there any obstacles which hamper free air Please contact your service shop if the trouble is still not solved Maintenance 1 Clean or replace the filter 2 Clean the cabinet with cleaner 3 Clean the condensate drain pan and the drain piping 4 Clean the condenser It is recommended that a specialist be contacted...

Page 5: ...oftop or on the ground installation Additionally for on the ground installation provide a gravel or concrete space around the condenser air intake in order to avoid airflow obstruction due to grass or other vegetation Unit Check to ensure that the unit has been transported without damage File a damage claim with the transportation companies if mishandling due to transportation company negligence i...

Page 6: ...ituated to balance the unit refer to the center of gravity in Fig 4 Lifting by Forklift Insert the forks under the base frames from the indicated direction in Fig 4 Lift the unit exercising care to catch both of the outer frames Rigging Apply spreader bars to the top of the unit in order to prevent damage to the unit due to cable scratches Unpacking Follow the instructions marked on the packing NO...

Page 7: ...upplied main switch box at the properly selected location 2 Install conduit connectors in the hole for power wiring knockout holes 3 Lead the main power wires and the earthing wire through the connector to the screw terminals for main power and earthing in the magnetic switch box The neutral wire to 220V power supplies should also be led through the connector Firmly connect the wires with wire ter...

Page 8: ...recommended when the unit is started after installation of the unit 1 If the phase is wrong exchange two of the three wires connected from the main power source to the main terminals of the unit as indicated with dotted lines and then check the rotation direction of the phase sequence indicator once again Do not exchange the wires in the unit in order to protect the compressor against the reversal...

Page 9: ...t Refer to 3 2 Control Wiring 3 Times Trip Detected of Safety Device 1 Check the current for indoor fan motor 2 Check the current for outdoor fan motor 3 Check the pressure of discharge and suction line Refer to 16 Troubleshooting 4 Check the internal thermostat of compressor 4 Times Overcurrent of Compressor 1 Check the current for compressor motor 2 Check the pressure of discharge and suction li...

Page 10: ...ghtening the bolts on the adjusting bracket 3 Turn the movable pulley flange toward the fixed flange to increase the speed and turn it away from the fixed flange to decrease the speed Each turn of the movable flange will increase or decrease the fan speed by 32 rpm Fig 7 Adjustable Motor Pulley Table 1 Fan Speed Adjustment RPM Fan Speed RPM PD Pitch Diameter of Motor Pulley mm RPM Turn Fan Speed C...

Page 11: ...and General Tools Preparation Confirm that the system switch on the room thermostat is at the OFF position Pressure Gauges Equip high and low pressure compound gauges according to Fig 11 Thermostat Set the thermostat at a lower temperature than the room temperature 6 3 Test Running Test running should be performed as follows when the unit is wired according to the HITACHI standard wiring label 1 S...

Page 12: ...N ON ON ON OFF ON 2nd ON ON ON OFF OFF ON Electric Components Indoor Fan Motor MIF Outdoor Fan Motor 1 2 MOF1 2 After 3 min and After 3 min 30 sec After 4 min 4 Start Delay Time Safety Devices Close Close Close Close Close Close Close Close Open After 3 min and After 3 min 30 sec After 4 min 4 Compressor 1 2 MC1 2 Compressor 3 4 MC3 4 Start Delay Time RUA NP30ATS RUA NP20ATS Compressor 3 MC3 Compr...

Page 13: ...Reset Non Adjustable 230V 60Hz 380V 60Hz A A 40 41 21 Discharge Gas Thermostat Cut Out C 120 120 Cut In C 98 98 CCP Timer for Compressor Non Adjustable built in PCB No 1 min 3 3 No 2 min 3 5 3 5 No 3 min 4 4 For Evaporator Fan Motor 230V 60Hz 380V 60Hz A A 14 21 11 For Condenser Fan Motor Automatic Reset Non Adjustable Internal Thermostat Cut Out C 160 160 Cut In C 125 125 For Control Circuit Fuse...

Page 14: ...porator Fan Check for a loosened fan belt and abnormal sounds Lubrication Compressor The compressors are charged at the factory with the correct oil and the compressor nameplate It is not necessary to add oil if the cycle remains sealed Refrigerant Cycle Strainer Check for clogging after the time when the cycle is opened Refrigerant Re Charge When the cycle requires re charging due to leakage or r...

Page 15: ... and dry the unit especially the drain pan and the drain lines This unit shall be preferably covered during shutdown in order to protect it from dust and environmental conditions Spring Start Up After any extended shutdown period prepare the unit for operation as follows 1 Thoroughly inspect and clean the unit 2 Clean or replace the air filters 3 Clean the condensate drain lines 4 Remove any accum...

Page 16: ...ction line Temperature and superheat Suction line Temperature C Superheat C 8 Check Pressures Discharge Pressure kg cm2G Suction Pressure kg cm2G 9 Check Voltage Rated Voltage V Operation Voltage R S V S T V T R V Starting Voltage V Phase Imbalance 1 V Vm 10 Check Compressor input and running current Input kW Running Current A 11 Do the control devices function properly 12 Do the protective device...

Page 17: ...ce the Contactor Repair the Contacts Replace the Compressor Correct the Wiring No Voltage or Low Voltage Single Phase Shorted Components Loose Connections High Voltage or Low Voltage Single Phase or Phase Imbalance Faulty Fan Bearing Excessive Fan Belt Tension Excessive Fan Load Burned Coil Faulty Contact Defective Operation Switch High Voltage or Low Voltage Single Phase or Phase Imbalance Burned...

Page 18: ...ction Pressure Low Discharge Pressure Add Refrigerant See Unit Working Range Operating High Discharge Pressure or Low Suction Pressure Clogged Capillary of Pressure Switch High or Low Pressure Switch Tripped Overcurrent Relay for Compressor Compressor Cycling Insufficient Cooling High Discharge Pressure and High Suction Pressure Loose Connections High Suction Pressure High Discharge Pressure or Lo...

Page 19: ...ed Screws See the Installation Guide Clean the Flexible Ducts Evaporator Air Inlet Temperature High Suction Pressure High Excessive Fresh Air Intake Insufficient Duct Insulation Defective Compressor Valve Overcharged Refrigerant High Discharge Pressure Evaporator Air Flow Low Suction Pressure Restricted Clogged Air Filter Slipping Fan Belt Restricted Duct Low Fan Speed Faulty Fan Motor Short Cycli...

Page 20: ...65MP3208 Printed in the Philippines ...

Reviews: