--- 27 ---
Fit a flat-blade screwdriver or similar tool
into the gap between the Magazine
[80]
and
the Magazine Cover
[84]
, and push it
strongly to extract the Retaining Ring
(E-type) for D3 Shaft
[81]
. Then, extract the
Hinge Pin
[82]
to remove the Magazine
Cover
[84]
.
(b) Reassembly:
Reassembly can be accomplished by
following the disassembly procedures in
reverse. However, particular attention
should be given to the following points.
Assemble the Retaining Ring (E-type) for
D3 Shaft
[81]
while carefully aligning it with
the Hinge Pin
[82]
groove, and confirm that
it fits securely into the groove.
Be very careful not to lose the small
Retaining Ring (E-type) for D3 Shaft
[81]
.
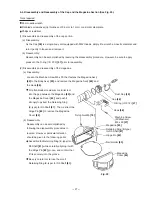
9-4. Disassembly and Reassembly of the Cap and the Magazine Section (See Fig. 20.)
Tools required
23 mm-wide wrench
Flat-blade screwdriver (tip thickness of 0.5 mm to 1 mm) or a similar steel plate.
Philips screwdriver
(1) Disassembly and reassembly of the cap portion:
(a) Disassembly:
As the Cap
[48]
is a single-body unit equipped with M42 theads, simply fit a wrench across its diameter and
turn it gently to loosen and remove it.
(b) Reassembly:
Reassembly can be accomplished by reversing the disassembly procedure. However, be sure to apply
grease to the O-ring (I.D 37.2)
[47]
prior to reassembly.
Fig. 20
Nylon Nut M5
[78]
Cap
[48]
Hinge Pin
[82]
O-Ring (I.D 37.2)
[47]
Hook
[56]
Machine Screw
(W/Washers)
M5 x 30
[57]
Magazine
[80]
Retaining Ring (E-type)
for D3 Shaft
[81]
Nail Holder
[83]
Magazine
Cover
[84]
(2) Disassembly and reassembly of the magazine
(a) Diassembly:
Loosen the Machine Screw M5 x 30 that fastens the Magazine Ass'y
[85]
to the Body Ass'y
[20]
, and remove the Magazine Ass'y
[85]
and
the Hook
[56]
.
Dust Cap
[49]
Summary of Contents for NV 50AG2
Page 39: ......


