--- 23 ---
Next, align the 4.5 mm dia. holes (2 places) of
Cylinder Washer (A)
[14]
with the matching 4 mm
dia. bosses (2 pcs.) of the Cylinder Packing
[13]
,
and assemble them while confirming that they fit
properly into the groove of the Cylinder
[16]
. Also,
position the assembled Cylinder
[16]
by positioning
the curved portion of Cylinder Washer (A)
[14]
between the ribs of the Body Ass'y
[20]
. (See Figs.
11 and 12.)
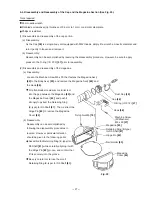
Mount Bumper (A)
[11]
to the Piston Ring
[9]
at the
driver blade side (lower) (Fig. 13).
Reassembly of Head Valve (A)
[8]
is easier if it is
pushed into the Exhaust Cover
[4]
together with the
Head Valve Spring
[6]
. Prior to reassembly,
liberally apply grease to the head valve sliding
portion
A
of the Exhaust Cover
[4]
and rib portions
B
and
C
of Head Valve (A)
[8]
, and insert grease
(approx. 0.5 g) into the grooved portion of the
Exhaust Cover
[4]
. (See Fig. 14.)
Piston
[12]
Piston Ring
[9]
Fig. 13
Driver blade
Exhasut cover
grooved portion
Bumper (A)
[11]
Fig. 14
Head Valve (A)
[8]
Top Cover
[1]
Exhaust Cover
[4]
During reassembly, apply oil (Shell Tonna S32 is recommended) to the inner portion of the Cylinder
[16]
.
When assembling Gasket (A)
[5]
, ensure that its hole is properly aligned with the air hole on the Body Ass'y
[20]
.
During reassembly, liberally apply grease to the seal surface and the O-ring (P-32)
[15]
.
Summary of Contents for NV 50AG2
Page 39: ......


