85
•
If you want to dub only the scenes with dubbed marks
, "Category" in HDD setting should be designated
(see page 114).
•
Marks
will appear for the thumbnails of the scenes which have been once
dubbed. If the marks make the thumbnails difficult to see, you can turn off the
marks (see page 88).
•
If a finalized disc or a heavily scratched or dirty disc is inserted into this DVD video
camera/recorder, a message will appear and dubbing will not be possible: Use
another disc.
•
A DVD-RW/DVD-R dubbed on this DVD video camera/recorder will not be finalized: To play it back on a DVD
recorder, be sure to finalize it on this DVD video camera/recorder.
•
The details of editing scenes on HDD (fade, skip, change of thumbnail, etc.) will not be reflected in the scenes
if they are dubbed on a DVD-RW (VF-mode)/DVD-R/+RW.
•
If you combine scenes with different recording dates on a play list, and dub the combined scene to a DVD-
RAM/DVD-RW (VR-mode), the scenes will be dubbed separately for each date. However, if a combined scene
is subsequently divided, the scenes may not be dubbed separately for each date.
•
If you dub scenes combined using the Disc Navigation function to a DVD-RW (VF-mode)/DVD-R/+RW, the two
scenes immediately before the combination (sometimes more than two scenes) will be dubbed.
•
If you divide a scene using the Disc Navigation function, and then dub both the divided scenes to a DVD-RW
(VF-mode)/DVD-R/+RW, the scene before the division will be dubbed.
• Please note in advance that Hitachi will not accept any responsibility for compensation or loss of data,
or direct or indirect damage when dubbing is not performed normally due to a fault in this DVD video
camera/recorder.
FIRST-TIME (“NEW”) DUBBING
This option allows you to dub scenes without dubbed marks, among those recorded on HDD, to a
DVD beginning with the first scene without dubbed mark.
If those scenes cannot be included on one DVD, the capacity of scenes will be calculated and the
scenes will be dubbed up to capacity. When the DVD is replaced following the instruction on
replacement of DVD during dubbing, dubbing will start from the scene following: Repeat this
operation until dubbing of all scenes on HDD without dubbed marks is finished.
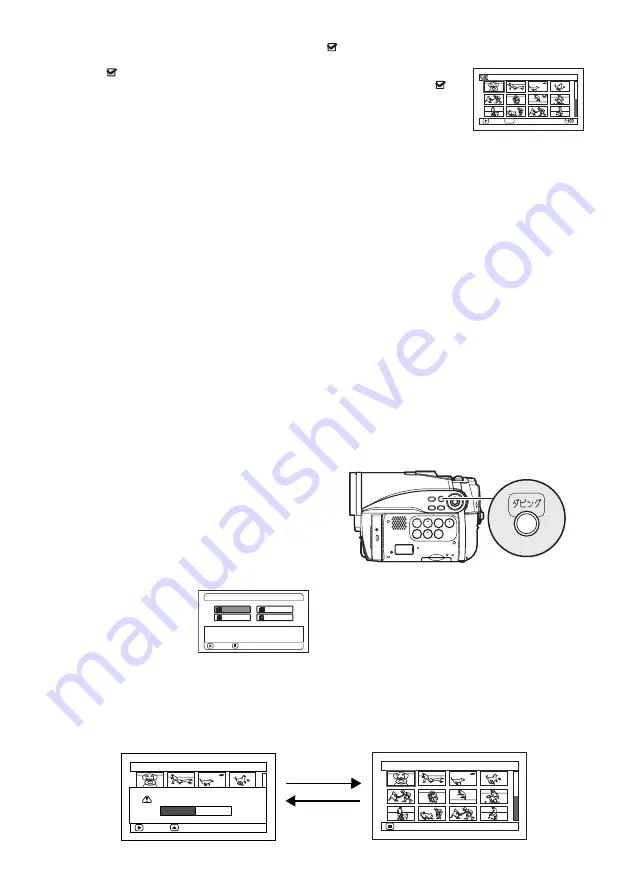
1
Press the DUBBING button.
The Dubbing Menu will appear.
You can also display the Dubbing Menu from
the Disc Navigation screen: Press the DISC
NAVIGATION button, press the MENU
button, choose “Scene”, “Dubbing”,
“Execute”, and then press the
A
button.
2
From the Dubbing
Menu screen, choose
“New” and press the
A
button.
If no DVD is loaded in
this DVD video camera/recorder, a message
will appear: Press the DISC EJECT button,
and then load a DVD.
3
The screen for verification will appear:
Choose “YES” and press the
A
button.
Pressing the
f
button at this time will allow
you to check the scenes to be dubbed to a
DVD that is loaded in the DVD video
camera/recorder: The scenes to be dubbed
will be encircled by a red cursor. To return to
the verification screen, press the
C
(stop/
cancel) button.
To stop dubbing, choose
“
NO
”
on the
verification screen, or press the
C
(stop/
cancel) button.
0 01 / 01 4
A l l P r o g r a ms
PLAY
SELECT
PHOTO
New
All
Select
Date
EXIT
Dubbing the scene which
isn't dubbed in HDD.
D u b b i n g M e n u
ENTER
D u b b i n g ( N e w )
RETURN
D u b b i n g ( N e w )
ENTER
CHECK SCENE
D u b b i n g s c e n e s t o DV D ?
YES
NO
Press
f
Press
C


